Hiking Chain Lakes Trail

The final trail in my little ‘Fall hiking in Washington’ series is the Chain Lakes Trail that leaves from the ski area at Mount Baker. Me, Lien, and Emily had visited the previous year in March to snowshoe Artist Point and were totally awed by the views, so we decided to come back in the fall for a different view. It was Thanksgiving Weekend in October 2019, just one week after me and Lien had hiked Yellow Aster Butte. This time we were joined by Emily and my friend Amy, who flits in and out of my life every now any then. We never really know when she’s going to appear and disappear again, but it’s fun to hike with her!

DSC00810

We had Thanksgiving dinner at my house on Sunday night and then made an early departure on Monday morning to cross the border. Traditionally, me and Brandon have always gone on a Thanksgiving Monday hike (3 years running), but this year he went on holiday and bailed on me, so I had to console myself with my other companions. I really liked both Yellow Aster Butte and Chain Lakes, but of the two, I would definitely have to give the edge to Chain Lakes. At 11.5km, it has half the elevation gain of Yellow Aster Butte, just 375m. The trail starts in the backcountry parking lot at the ski hill. Be sure to get and print out the parking pass online before you go because there’s no where to get it on the mountain. It’s only $5 and I’m told you can get it at the visitor center at the bottom before you drive up, but I’ve never once seen it open on the weekend.

DSC00839

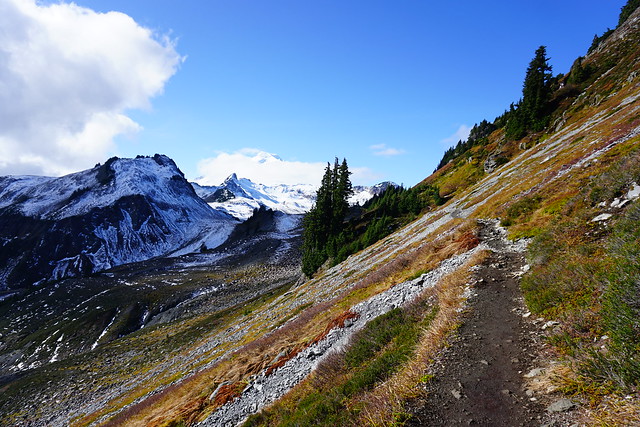
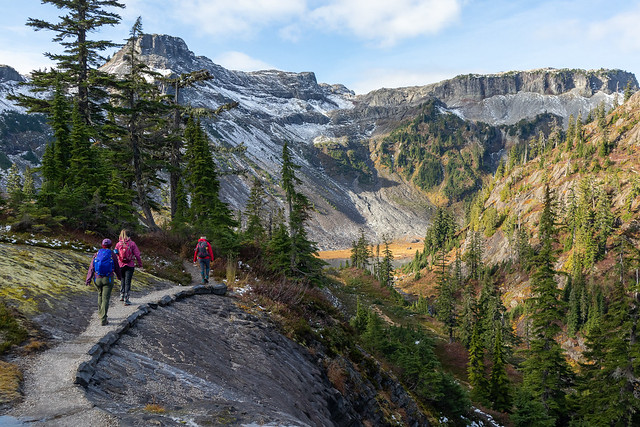
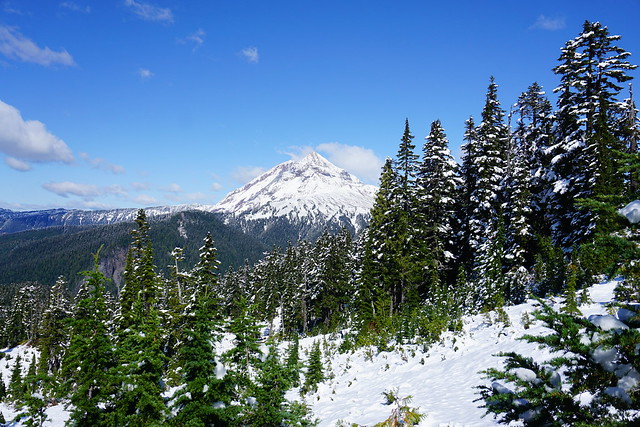
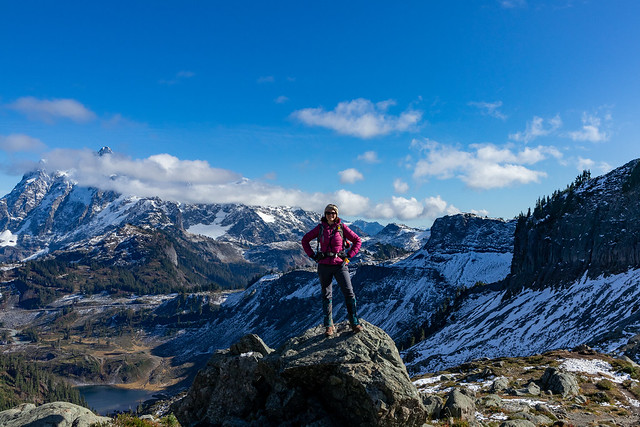
Chain Lakes is one of those rare trails that is scenic the ENTIRE trail. You’ve already driven up most of the elevation gain to get to the ski hill and from there, the trail continues up to the summer parking lot for Artist Point. In the summer, you can drive almost the whole way up to Artist Point, but at some point in September they close the road. Hiking up the road is the least scenic part of the trail, but still has really nice views looking down into the big bowl that’s popular among backcountry skiers. We decided to skip the Artist Point viewpoint since we’d already done it and instead continued down the other side of the parking lot into the backcountry. I think it’s a bit of an understated part of the trail, but it was one of my favourite parts. You hike right across the slope of Table Mountain, looking out towards Mount Baker.

DSC00840

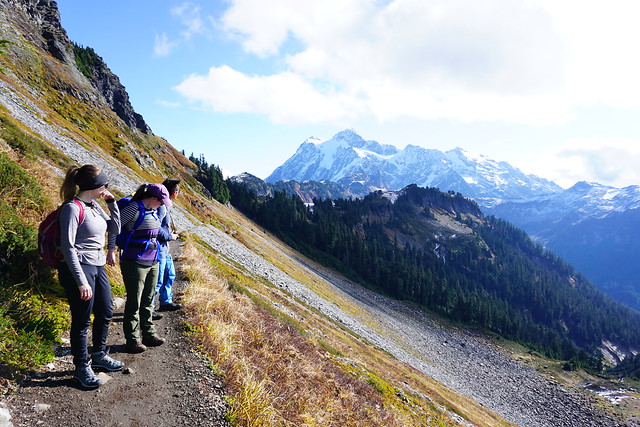
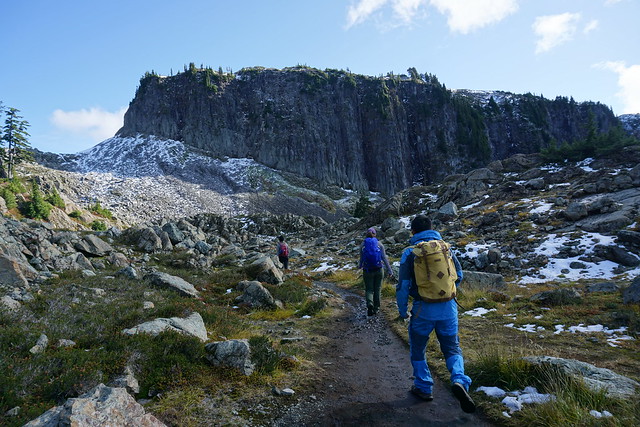
From the Skyline Divide Trail, I felt like I was so close to Mount Baker that if I continued hiking I would eventually reach it (you can reach the foothills, but then the trail ends). But from the Chain Lakes Trail, you really are on the trail that goes up to the top of Mount Baker (albeit this is only for experienced mountaineers). It looked like if we just crested a few more hills we’d pretty much be there, but of course, it’s further then it looks as the size of the mountain dwarfs everything surrounding it and can be a bit misleading. Once you get to the end of Table Mountain, the trail turns to continue around the mountain and over to the chain lakes part of the trail. You can also hike along the top of Table Mountain, which may have to be an adventure for another day.

DSC00909

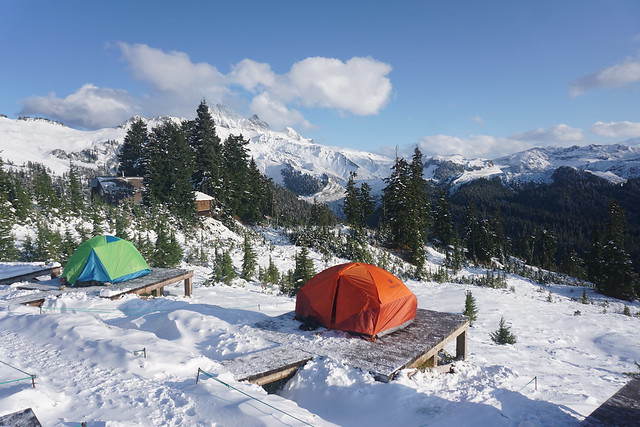
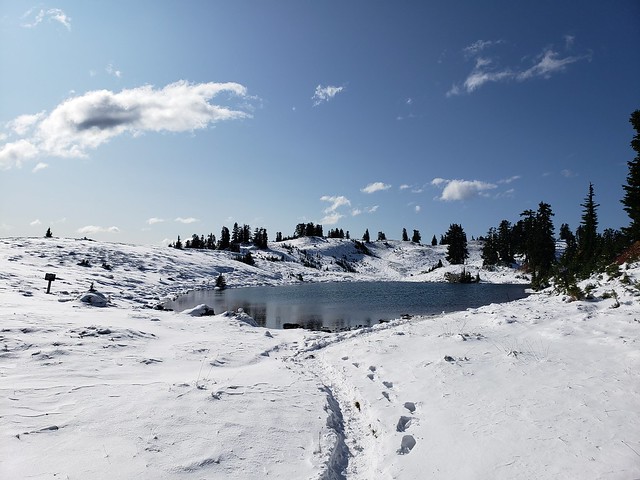
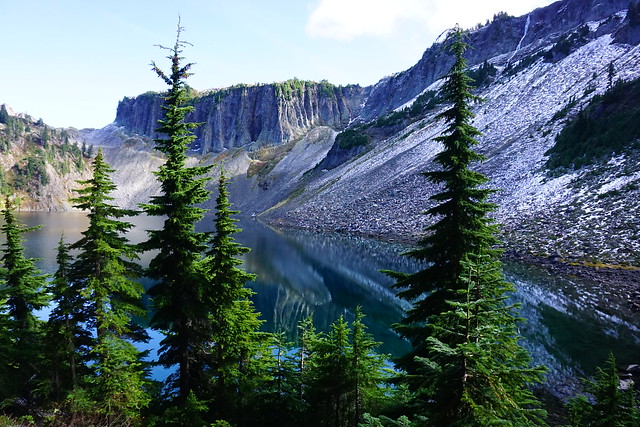
The first lake you come to is Mazama Lake. You can camp there, but it’s pretty small and not the most scenic, so if you’re overnighting, I’d recommend one of the other lakes instead. After Mazama, you come to Iceberg lake, which is the biggest and has staggering views looking up at the steep cliffs that surround the lake. This is where we decided to stop for lunch and enjoy the views before starting our climb back up the pass to the top of the trail.

DSC00879

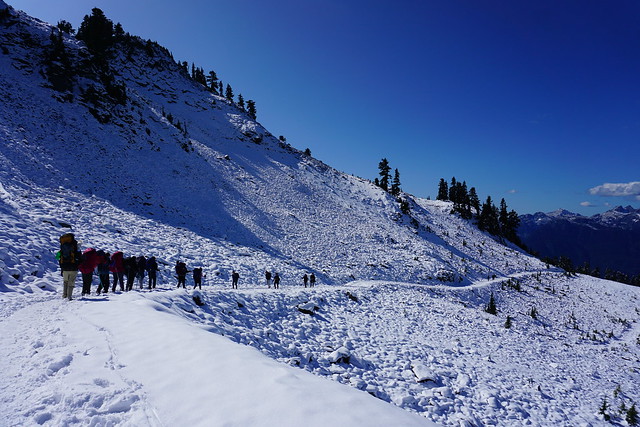
One of the awesome things about Chain Lakes, in addition to the fact that the entire hike is scenic, is that it’s a loop trail, so you don’t have to do any return on the trail. It starts to climb around Iceberg Lake until you reach Haynes Lake, which is where I’d recommend branching off to camp. From there it gets really steep. There’s some great views looking back down the trail at Iceberg lake and you continue climbing to the top of the pass before starting to descend back into the bowl we were looking at from the start of the trail. It seemed like most people were doing the trail in the opposite direction as us, starting with the steep climb up the bowl. I’d recommend going the same way as us though because then you get to finish the hike with what was, in my opinion, the best view.

DSC00922

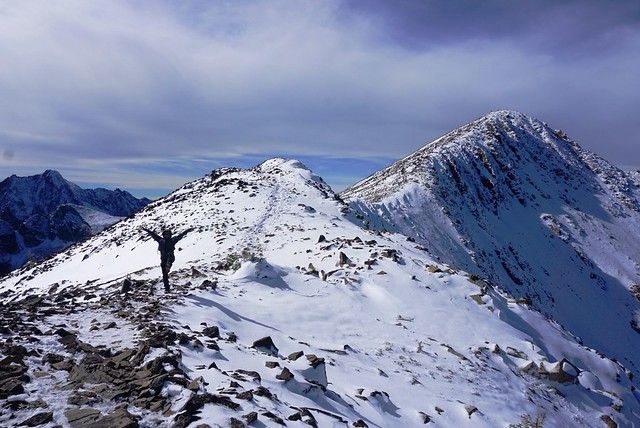
The view from the top of the pass is really unreal. The mountains stretch out around you in every direction and as you climb up the side of the Mazama dome, you really feel like you’re on top of the world. We’d already had lunch, but we decided to stop and have a break to make tea so that we could enjoy the view for a little bit longer! Even though we still had a few kilometers left to go, from the top we could pretty much see the trail down to the bottom almost the whole way there. We continued from the pass and started the long descent down the bowl to the parking lot. We were basically undoing all of the elevation from the rest of the hike in this stretch, which is why I recommend doing the hike from the other direction, that way the ascent is more gradual, with a few flat parts in between as you climb up. The descent down the bowl though is hard on the knees, so something to take into consideration as well.

IMG_4567

The trail switchbacks for a while until you finally reach the bottom. It weaves through the valley and you pass by a few more lakes and the most quaint little rock bridge. Seriously, there’s no part of this trail that is not scenic, and even a few minutes before the parking lot, we were still stopping to take pictures of things. Except for Emily, who was badly in need of a washroom and sprinted the last 15 minutes of the trail to get to the outhouse.

IMG_4564

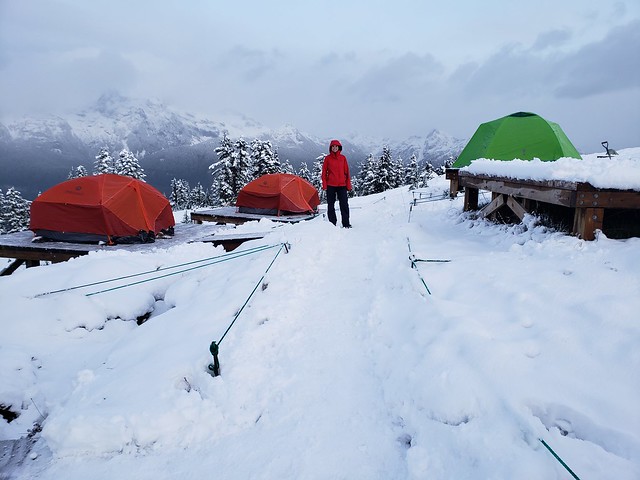
Sadly that was our last adventure in the North Cascades. I returned the following winter with Carolyn and Brandon to snow camp on Artist Point, but unfortunately with Covid, we haven’t been able to return. I was hoping to do a few hikes in the summer and fall again, but sadly I’ll just have to wait until next year (hopefully). Either way, if you’re from Washington, I’d definitely recommend hitting up the North Cascades, and if you’re Canadian, put in on your bucket list!

IMG_4406
IMG_4534

Hiking Frosty Mountain

Disclaimer: I wrote this blog a year ago and hiked the trail on September 27, 2020. I delayed posting out of respect for hiker Jordan Naterer, who went missing on this trail on October 10, 2020 and whose remains were not found until July 2021. Manning Park can get snow early in the Fall, which can make the trail difficult to follow and be exacerbated by freezing temperatures and limited daylight hours. It can be a beautiful trail, but it is also a strenuous hike and an unforgiving environment, so please don’t underestimate it in your zeal to photograph the larches. Don’t go unprepared; take the essentials and leave a trip plan. Check out my blog post on Personal Safety for more info.


The Heather Trail is the most trafficked trail in Manning Park in the summer, but by fall, everyone flocks to Frosty Mountain. It’s hard to see Mount Frosty in most of the park as it’s hidden behind other mountains and can’t be seen from the highway. But if you drive up Blackwell Road and stop at the first viewpoint, you can get a great view of it. I’d heard some talk about Frosty Mountain when I first started hiking and though I was intrigued by it, decided Frosty was probably a little too challenging for me.

In 2018, I decided I was finally ready to give it a try and I hiked the longer route up past Windy Joe Mountain, day hiking up to Frosty Peak from the PCT campsite. Even in summer, this is a challenging and strenuous trail, but boy is it rewarding. So earlier this Fall, Brandon and I decided to hike up the other (more trafficked) half of the trail from Lightning Lakes to try and catch a glimpse of the larches turning yellow.

DSC08005

There’s so many different ways to explore Frosty Mountain. It’s located near the midpoint of a loop trail with campsites located on either side. One side of the loop trail is shorter than the other, so you can either hike 21.5km up and back from Lightning Lakes (what we did this year), or hike 27km as a loop (exiting on the Windy Joe trail). Alternatively, you can camp at one or both of the campsites, either day hiking up to the top (what I did on my first visit) or if you’re determined, hiking your big pack up over the top.

Like I said, our key interest in hiking Frosty on this occasion was to explore the larch meadow below the peak and snap some pictures of the needles turning from green to yellow. We were a little too early in the season to get the really gold hues, but we still got some truly beautiful views of the trees changing colour and had great weather for it. Plus with the fresh dusting of snow the yellow larches really popped! There were a lot of people around, but we were still a bit early in the season, so it never felt that crowded. If you’re a novice but want to see the larches, consider just hiking to the meadow and skipping the peak.

DSC08022

It rained the day before and was still foggy when we set out early on Sunday morning to drive the 2 hours out to Manning Park. With the shorter daylight hours, it’s essential to give yourself lots of time for this hike in the Fall. Me and Brandon left my house around 6:45am and were on the trail by 9am. We had the privilege of watching the sun rise from the highway and watched as it started to burn off the fog. There were still lots of low clouds hanging around when we got to Manning, but the sun was shining through and we were optimistic they would lift off by the time we reached the top.

DSC08133

Our plan had been to do the entire loop trail starting from Lightning Lakes. It’s a big climb, 1150m from the bottom to the top, but it’s spread over 11km, so I didn’t find it too bad. It’s steeper for the first 6km, but it levels off before you reach Frosty Creek Campsite. When I visited before, I camped at the PCT campsite on the other side. Both are located in the trees and have really small creeks as water sources, so I’d recommend bringing a water filter with you for both, but overall I’d give the edge to the Frosty Creek Campsite. It’s a bit more spacious. There’s two viewpoints before you hit the campsite; the first looks down towards lightning lakes and out to Hozameen Mountain, while the other is the first glimpse of Frosty through the trees. At the time we passed it, it was super cloudy at the top and there was a fresh layer of snow sitting on the peak. It looked super foreboding, as if it was the middle of a storm, but fortunately it cleared up in no time.

We continued along the trail until we finally hit the larch trees! Like I said, they weren’t quite at their peak, some were full yellow, others lighter green changing to yellow, but still very gorgeous. The trail exits the woods into the meadow and has the most beautiful view of snowy Mount Frosty peaking out behind the yellow needles of the larch trees. I’d been getting targeted adds on facebook for a few weeks before with this gorgeous picture of the larch meadows, with the mountain covered in snow behind them. It’s a beautiful picture and a rare time when what I saw before me looked exactly like what had been advertised in the photo! Except of course more unreal because I was there to experience it with my own eyes.

DSC08127

The trail winds through the meadows and then you pop out on the ridge, with a steep climb ahead to the trail junction for the loop trail, and then a final ascent along the ridge to the summit of Frosty Mountain. It’s very steep, but not that long to the junction. The problem in this instance was the snow. There was only a couple of centimetres of snow on the trail, but it had become very packed down and icy. It was perfect conditions for microspikes and I was kicking myself for not having them. I carry my microspikes all winter and spring and rarely get the opportunity to use them, but of course, the one time I really would have benefitted from them, I didn’t have them with me. It was still September and I hadn’t really thought there would be snow yet. So we slowly trudged our way up the slope, taking care with each step, arriving without incident.

DSC08086

The first milestone is reaching the junction sign. It’s really not obvious with the snow, but there is a trail going down the other side. There seemed to be a few people using it that were coming from the camp on the other side, but overall, most people seemed to be going up and back from Lightning Lakes. The second and final milestone is reached only by continuing across the ridge and climbing up to the final peak. It’s only about a kilometre (maybe a bit less), but both times I’ve found it annoying being so close to the top and still having to push to the end. The final ascent isn’t as steep as the climb up to the junction though, so it was easier in the snow.

DSC08039

The parking lot was packed when we arrived, but given the length of the trail it felt pretty empty as we were hiking. We passed one or two groups right at the beginning and got passed by a group of trail runners about halfway up. So by the time we got to the top, the peak was looking a little crowded. Fortunately, the trail runners didn’t stay too long and after a few minutes it was just us and 2 other guys at the top. It was REALLY cold and windy up there, so I don’t think people were sticking around for too long. The cold is definitely another thing to be prepared for; Manning is always chilly – it was about 3 degrees when we started hiking and was only supposed to go up to 11 degrees (at the bottom).

DSC08048

We layered up and had only intended to stay at the very top for a short while, planning to eat our lunch a little further down where it was more sheltered, but the view is just so damn spectacular I couldn’t bring myself to leave! It was pretty overcast when we arrived, but the sun came out and cleared away a lot of the clouds while we were up there, resulting in me having to take all my pictures twice with the changing weather conditions. I ended up eating my lunch standing up and walking around because I didn’t want to climb down yet and it was too cold to sit still. We stayed up there for about a half an hour or more and when we’d had our fill, started to trek back down. It’s definitely worse going down without spikes, but it was manageable along the ridge.

PSFix_20200927_203732

I had to rethink our plan to do the whole loop trail though. I thought the whole thing was 22km, but we’d already done 11km and looking at the map in retrospect, it was clearly going to be longer going the other way down, 6km longer to be precise. I have bad knees and at 22km, this hike was already much longer than any other day hikes I’d done all year, so we decided to just head back the way we’d come. Fortunately I’d already done the other side, so I didn’t really feel like I was missing much.

Going down the steep section was definitely a lot harder than going up. I had brought gloves with me for the cold and they were invaluable climbing back down. I did a lot of the trail in a kind of crouching position so that I could reach down and grab the rocks to steady myself. But no question, microspikes would have made it a whole lot easier. Looking back now, I’m a little embarrassed to admit I did it without spikes; it’s really important to know your limits and turn back if you’re unprepared. It was probably a bad judgement call for me to keep going without spikes and I’m working on getting better at making these tough choices. In the past year I have passed on summiting several scrambles (Needle Peak and all the summits on the HSCT) out of abundance of caution, so I am getting better at it.

PSFix_20200928_221704

There were still a good number of people coming up when we were going down and the summit was starting to look pretty crowded again. The meadows were more or less empty as we made our way back through them and I had to take all my photos again, this time with blue sky in the background! Otherwise it was a pretty uneventful hike back. My knee was bothering me, so I wrapped it up about halfway down and we stopped at the campsite for a snack break. When we sat down at the campsite, 6 hours into our hike, I realized that was the first time I’d sat down all day. We hadn’t taken any breaks on the way up, other than to snap a few photos, and while we’d taken a hiking break at the top, it’d been too cold to sit down. So it felt good to take a little rest before knocking out the last 6km of the hike.

Overall the whole thing took us 8 hours, which I think is pretty impressive for a 22km hike with 1150m of elevation gain! It was cold, but I loved all the varying weather conditions we experienced on the trail and really think we couldn’t have picked a better day!

DSC08106

Elfin Lakes Girl Guide Trip

Since I just wrote about the bike trip I took with Girl Guides, I figured I’d continue the trend by writing about a backpacking trip I did in September 2019 to Elfin Lakes. I wrote this post almost right after the trip, but I never got around to posting it, so with the changing of the seasons (foreshadowing), I thought it was finally time! This was my most recent trip to Elfin Lakes, but I’ve been 3 other times, all of which were very different experiences. Read about my Fall day hike, summer tenting trip, and winter snow camping experience for my stories about the trail.

20190927_184739

I’ve been wanting to take my Pathfinder group into the wilderness, but you need previous experience on backcountry trips with girls before you can lead your own, so I jumped at the opportunity to join the North Vancouver Trex group on this trip. It was only my second trip into the backcountry with Girl Guides, but for some reason I always seem to encounter the craziest weather on guide trips, and this one was no exception!

We were a group of 12 and we planned to hike up to Elfin Lakes on Friday, tent for 2 nights – day hiking to Opal Cone on Saturday – and then hiking back down on Sunday. Needless to say, things did not go quite as planned. We do our best to be prepared as girl guides. The forecast was calling for rain on Friday and temps down to -8 degrees celsius overnight, so we packed lots of rain gear and warm clothes for sleeping. However, the temperature ended up dropping a lot faster than we expected and the rain started to turn to snow just before we reached Red Heather Hut, which is almost the halfway point up to the lakes.

DSC00558

The girls were thrilled about the snow, which was falling gently, and I have to admit, hiking in the snow is a lot nicer than hiking in the rain. We had hot noodle soup for lunch before continuing on to the lakes. It was still September at this point and it was obvious it was the first snowfall of the year. However, the snow started to accumulate pretty quickly and it started snowing heavier as we continued on from the hut. Fortunately, there was no wind, but visibility wasn’t great and we couldn’t see any of the views on the way up. I admit, the further we hiked, the more apprehensive I got.

I wasn’t really nervous about camping in the snow, because I have done that before and we had brought really warm gear, but we didn’t have snow boots or snow pants and it was increasingly obvious we weren’t going to be able to hike to Opal Cone the following day. Even though it was calling for sun and blue skies on Saturday and Sunday, there was too much snow to hike further without proper footwear. But we just focused on getting to the hut and the girls did really well managing the conditions. Fortunately no one got cold or wet feet on the way up!

DSC00553

We hit the hut around 4pm and everyone was thrilled to go inside. I think the girls were thinking we were going to abandon the tenting idea and just sleep in the hut, but as we had only booked tent pads and there were 12 of us, that wasn’t really an option (although obviously in an emergency we would have camped out on the floor if we had to.) We made them hot drinks to warm up and everyone hung their wet gear by the fire. I have to say, the girls had a great attitude when we told them we were still planning to camp. The snow did start to slack off and was almost stopped when we went back outside an hour later to scope out the tent pads. Fortunately the clouds had started to lift and you could just start to see the surrounding mountains (which are incredibly striking from the tent pads at Elfin Lakes), so the girls started to get excited again about tenting.

We shoveled off the tent pads and set up 4 tents. This proved to be a bit more of a challenge than we anticipated because it was pretty darn windy when we were setting them up. We had to weigh them down with rocks and then shove all our gear inside them to hold them down. Then we had the added difficultly that we couldn’t peg them because of the tent pad, but we eventually managed to get them set up and soon after that the wind died down and I didn’t give it much more thought.

DSC00526

By the time we finished it had really cleared off and we had fun getting some photos of the mountains and the tents. Time really got away from us with the weather though and it was 8pm before we finally had supper in the hut. We had pesto pasta and re-hydrated coleslaw for dinner, with 2 bite brownies and reese peanut butter cups for dessert. After that we pretty much hit the sack because we were all exhausted. Unfortunately we decided we couldn’t stay for a second night because it just wouldn’t be safe to hike to Opal Cone and the girls didn’t have the appropriate gear to play in the snow, so it made the most sense to just hike back out on Saturday. The girls took the news pretty well and were very understanding.

I stayed up to get some star photos and then nestled into my sleeping bag for the night. It was pretty calm when we went to bed, so I thought that was the end of it, but oh was I ever wrong. Around 3 or 4am a wind storm blew in that totally put our tents to the test. I grew up in Newfoundland, which is super windy, but I never really did much tenting there, and not in recent years, so sadly I’ve kind of gotten used to tenting without wind. As a result, I never guy line my tent and only ever peg it really to protect from the rain. So it never really occurred to me to guy line the tents. It had occurred to the other leader though, but she had forgotten her rope, so she never brought it up (not realizing I always bring extra rope with me).

20190928_105126

Anyways, I’m sure you see where this is going, but the wind was really strong. I’ve never tented in wind like that and it was totally billowing the tent in and out. It woke everyone up and the girls started freaking out a bit, but everyone’s tents looked fine, so we told them to go back to sleep. Then I was woken up again at 5:30am by one of the other Guiders when her tent collapsed on her and two girls. When we looked at the other two tents the girls were in, it really looked like they were going to collapse soon too. So we had to put the first tent back up and then I got my rope and we guylined them all to the tent pads. Somehow my tent was the only one that didn’t look close to collapsing, but we were in a slightly different area than the rest of the tents, so the wind may have been blowing slightly differently.

It was still super windy in the tent, but the guylines did the trick to prevent any more collapses and we were able to go back to sleep until 8am. The wind never really let up though and it battered us all morning when we tried to take the tents down as well. but it was a beautiful sunny day and the blue sky and fresh snow made for a really beautiful view. We had sunrise spuds for breakfast and then packed everything up again to head down.

DSC00587

I was worried it was going to be super slippery on the way down and was concerned about not having spikes (my friend once broke her arm in similar conditions), but the snow was still fresh enough that it hadn’t been compacted into ice yet, so it wasn’t too bad. We had a little photo shoot on the ridge looking down on the lake and then hiked back to the Red Heather hut for lunch again.

We had one more spot of adventure on the way down. One of the girls rolled her ankle about a kilometre from the end, but fortunately it seemed to be only sprained and she was able to slowly walk the last little bit out. We divvied up some of her gear and strapped the rest of the pack to my front to carry it out and we all made it down to the parking lot in one piece!

With the exception of the first photo, all pictures were taken on Day 2!

DSC00598