Skookumchuck Narrows is a short hike on the north side of the lower Sunshine Coast. I’ve been aware of its existence for years, but because it’s a short hike and quite far away, I’ve never had a good reason to visit. In 2023, I attended a wedding in Pender Harbour, which gave me a great excuse to finally make a trip out to the Narrows.
Skookumchuck Narrows is a natural phenomenon on the Sunshine Coast that requires a little bit of explanation of the area. The Sunshine Coast is actually connected to mainland BC, but can be confusing because it requires taking a ferry to get there. There’s no road to get there because it’s separated from the mainland by Howe Sound and the vast mountainous wilderness, so the easiest way to travel there is a 40 minute ferry from Horseshoe Bay to Langdale.
Once you arrive on the Sunshine Coast, you have to drive an hour and a half along the coast. Right before you reach the 2nd ferry at Earl’s Cove, you branch off the highway to drive out to Egmont. The interesting thing about this area is that, from Sechelt to Earl’s Cove, the Sunshine Coast is almost an island. The ocean flows down a large channel at Earl’s Cove and then Sechelt Inlet extends all the way back to Sechelt, with several arms branching off the main inlet. What this means is that every time the tide changes, there’s a significant amount of water flowing in and out of the inlet. The narrowest part of the inlet is the Skookumchuck Narrows, which is why, twice a day, you get this natural phenomenon happening in this area, known as the Sechelt Rapids.
If you’re an experienced paddler, you can paddle up to the narrows from Egmont, or if you’re less of a thrill seeker, like us, you can hike 4.5km from Egmont to the Skookumchuck Narrows Provincial Park. It’s a fairly easy trail. It’s partially on forestry road and then switches to nice forested trails. You can circle around Brown Lake and then you eventually come to 2 viewpoints of the rapids.
The first viewpoint is the more official viewpoint and gives you a great look at the inlet. It’s really beautiful, even without the attraction of the rapids. We enjoyed the view here for a while, and then continued on less maintained trail to the large flat rocks at Roland Point where you can watch the real thrill seekers attempt to whitewater kayak through the rapids. Because there’s so much water coming in and out of the inlet, in this area it creates these rapids where you can paddle almost stationary because of the conflicting currents. It’s a bit hard to describe, but a picture is worth a thousand words in this instance.
If you want to watch the paddlers, you do need to be cognizant of your timing. If I’m being honest, we didn’t really plan this visit at all and had no idea when was the best time to visit. There was no one paddling when we visited the first viewpoint, but our timing must have been perfect, because a bunch of paddlers showed up right when we got to the second viewpoint and we ended up sticking around for quite a while to watch them. It was very entertaining!
Once we had our fill, we started the hike back. The nice thing about this hike in the summer is that there’s a little cafe near the end of the trail, which is a great place to stop for treats. So we rewarded ourselves before returning to the car. I won’t end the blog here though, because we caught one more attraction before leaving Egmont. We started to drive back to the highway, but just out of Egmont, there’s a big lake called Waugh Lake that you can access directly from the road. There’s no beach and limited parking, so it’s more of a roadside stop, but I saw a dock and a few kids swimming there. Since it was so hot, I wanted to swim too, so we made a quick stop and me and Seth both went for a refreshing swim before starting our journey back to Gibsons.
So while I wouldn’t place this trail super high on the bucket list, it’s a great option for beginner hikers or if you just want to have a more relaxing, slower paced day. I had a really fun time and I’m glad I finally got the chance to visit this well known, but not super busy, area.
Last week, I shared a Beginner’s Guide to Backpacking for those looking to make the transition from hiking to backpacking. A large part of trip planning is selecting a good trail, especially as a beginner, so I’ve put together a list of trails near Vancouver that I think are appropriate for new backpackers.
There are literally hundreds of trails within a 3-hour drive of Vancouver and it can be difficult to know where to start. My biggest recommendation is to keep it simple by choosing easy trails and campsites with access to basic facilities. It can be an adjustment getting used to carrying a large backpack, so pick shorter trails with less elevation gain, and a first-time trip can be made a lot simpler with access to an outhouse, bear cache, and cooking shelter. See my Guide for more information on how to select and book campsites.
Here are some of my preferred hikes for beginners, in order of level of difficulty (easiest trips first):
Region: E.C. Manning Provincial Park Distance: 4km each way Elevation: 200m Reservation: yes ($10pp, per night) Amenities: outhouse, bear cache, tent pads, cooking shelter, picnic tables Season: July-September Drive time from Vancouver: 2.5 hours Trip Report: found here
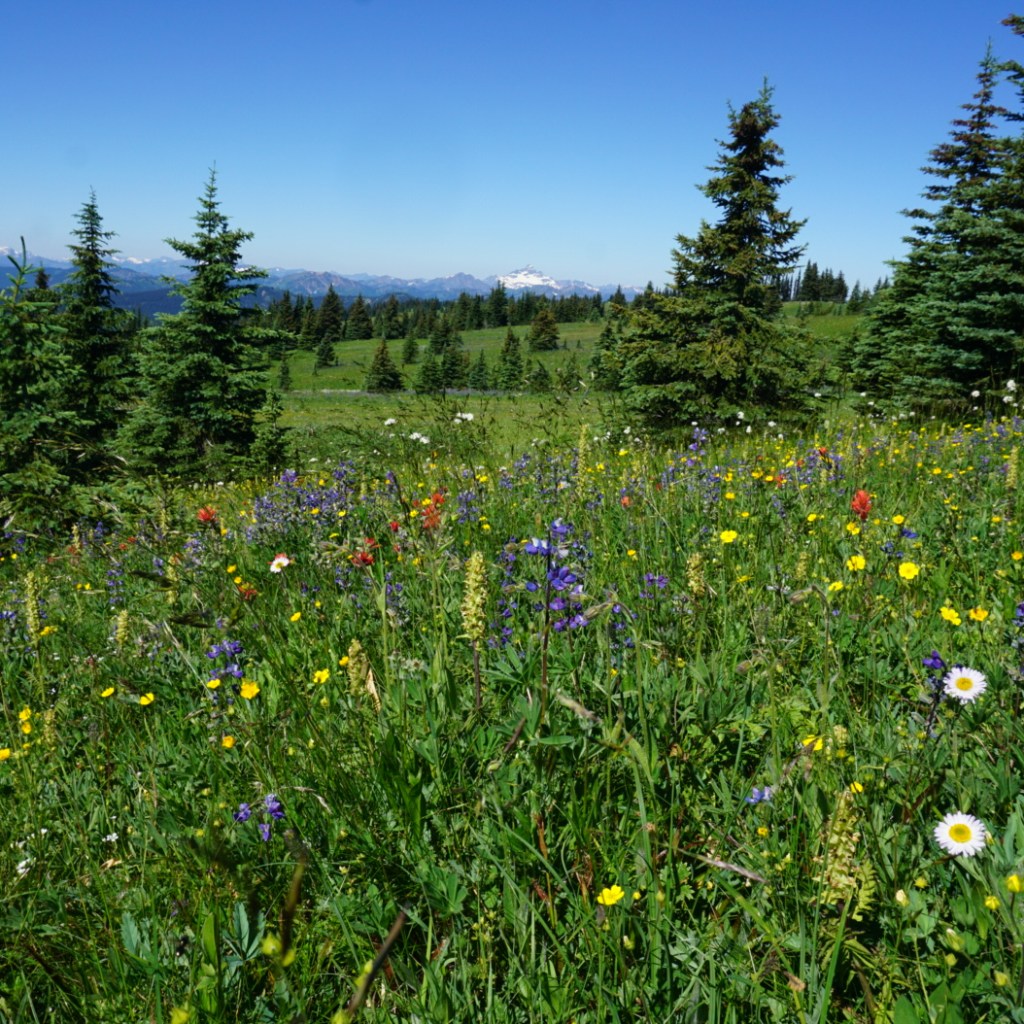
Buckhorn Campsite is my pick for best experience for beginners. Manning Park is my favourite park near Vancouver and I think this hike is ideal because it’s short, has a lot of amenities, and is absolutely beautiful. You have to drive up all the way up Blackwall Road to get to the trailhead, so most of the elevation gain is done in the car. You get to enjoy brand new tent pads and a gorgeous cooking shelter, surrounded by alpine wildflowers. The reservation system for this site is new in 2024. This campsite is ideal for 1 or 2 nights and is a great base if you want to day hike to 3 Brothers Mountain on your second day.
Region: Garibaldi Provincial Park Distance: 4-7km each way Elevation: 250m Reservation: yes ($10pp, per night) Amenities: outhouse, bear cache Season: June-October Drive time from Vancouver: 2 hours Trip Report: found here
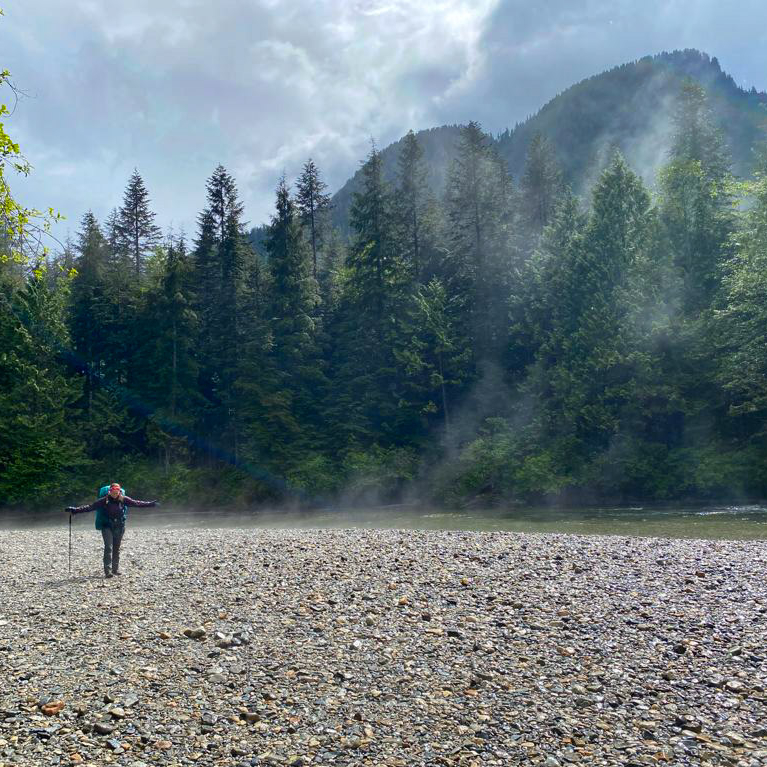
There are two options for Cheakamus Lake, the first campground is called Cheakamus Lake and is located 4km from the parking lot along mostly flat terrain. The second campground is called Singing Creek and is located 7km from the parking lot, and is still mostly flat terrain. Either campground is a great option for a 1 night hike. If you’d like to do 2 nights, camp at Cheakamus Lake and do a day hike to Singing Creek and back on your second day. Be diligent with bear safety on this hike as there is a history of bears in this area.
Region: Golden Ears Provincial Park Distance: 4.5km each way Elevation: 200m Reservation: no (permit is $5pp, per night) Amenities: outhouse, bear cache Season: May-October Drive time from Vancouver: 1 hour Trip Report: found here
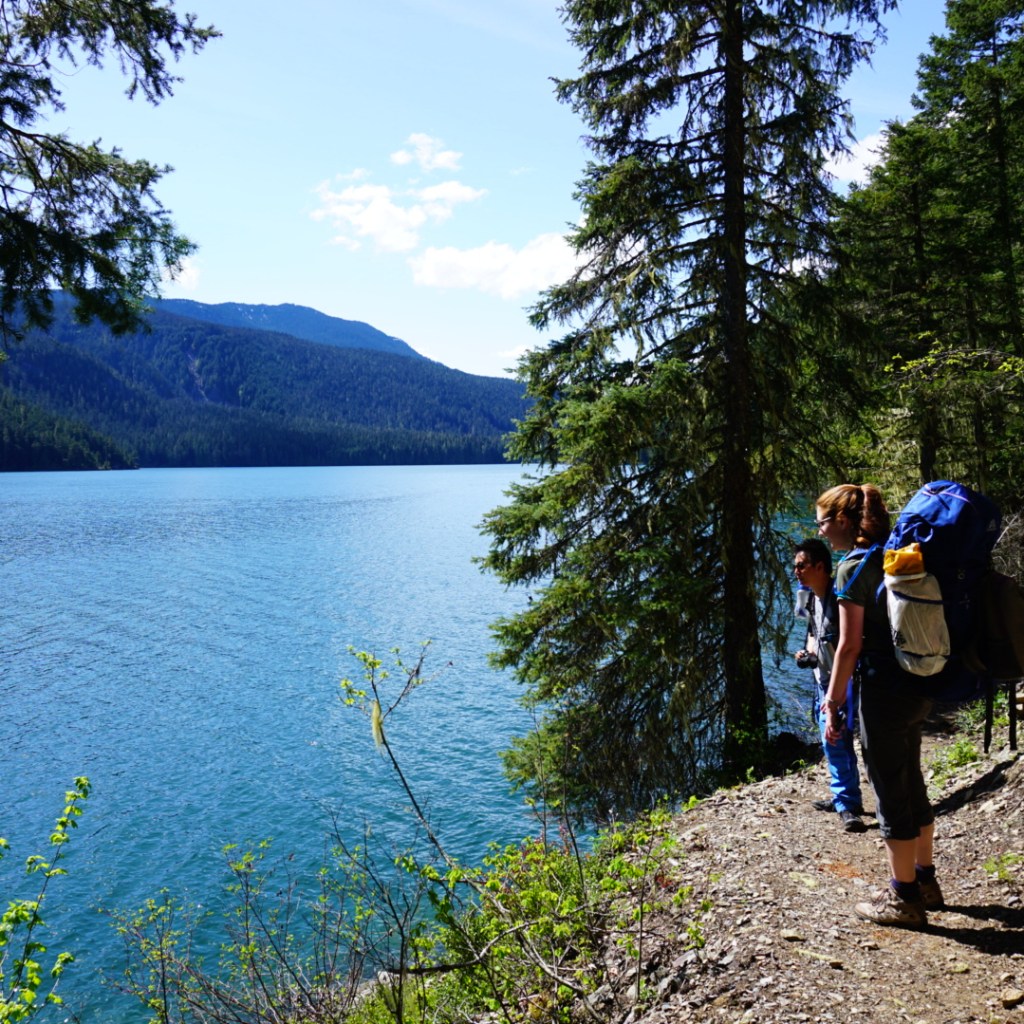
Viewpoint Beach was the first place I ever took my girl guides and it’s a great option for beginners. It’s a short and easy walk from the parking lot to the campground and there is an outhouse and a bear cache available. However, because there are no reservations, I recommend to leave earlier in the day to secure a campsite. You can camp on either side of the river, but don’t attempt to cross the river. The bear cache and outhouse are located at Viewpoint Beach. The other side of the river is called Hikers Beach and can be accessed by crossing the large wooden bridge 500m before Viewpoint Beach. You can extend this trip to 2 nights if you’d like to do a day hike up to Alder Flats.
Region: Tetrahedron Provincial Park Distance: 3-6km each way Elevation: 250m Reservation: yes ($15pp, per night, paid to the Tet Outdoor Club) Amenities: sleeping hut, outhouse Season: June-October Drive time from Vancouver: 1 hour + ferry Trip Report: found here
Tetrahedron Park is a really unique experience and is a great option if you don’t have a tent yet. Tenting is not allowed in this park and all users must stay in one of the huts. There are 4 huts, but I recommend either Bachelor Cabin or Edwards Cabin for beginners (though Bachelor Cabin is often used by families, so please be respectful of children). These sites are managed by the Tetrahedron Outdoor Club. First, join the Tetrahedron Outdoor group on facebook and do a search for your dates to see how many other people are already going then (the cabin sleeps ~12), then post your booking on facebook and pay on the website. This location is great for multi-day trips, as you can do a day hike up to Mount Steele from Edwards Cabin, but the mountain may have snow until July.
Region: Chilliwack Provincial Park Distance: 1.5km each way Elevation: 225m Reservation: no (permit is $5pp, per night) Amenities: outhouse, bear cache, tent pads Season: May-October Drive time from Vancouver: 2 hours Trip Report: found here
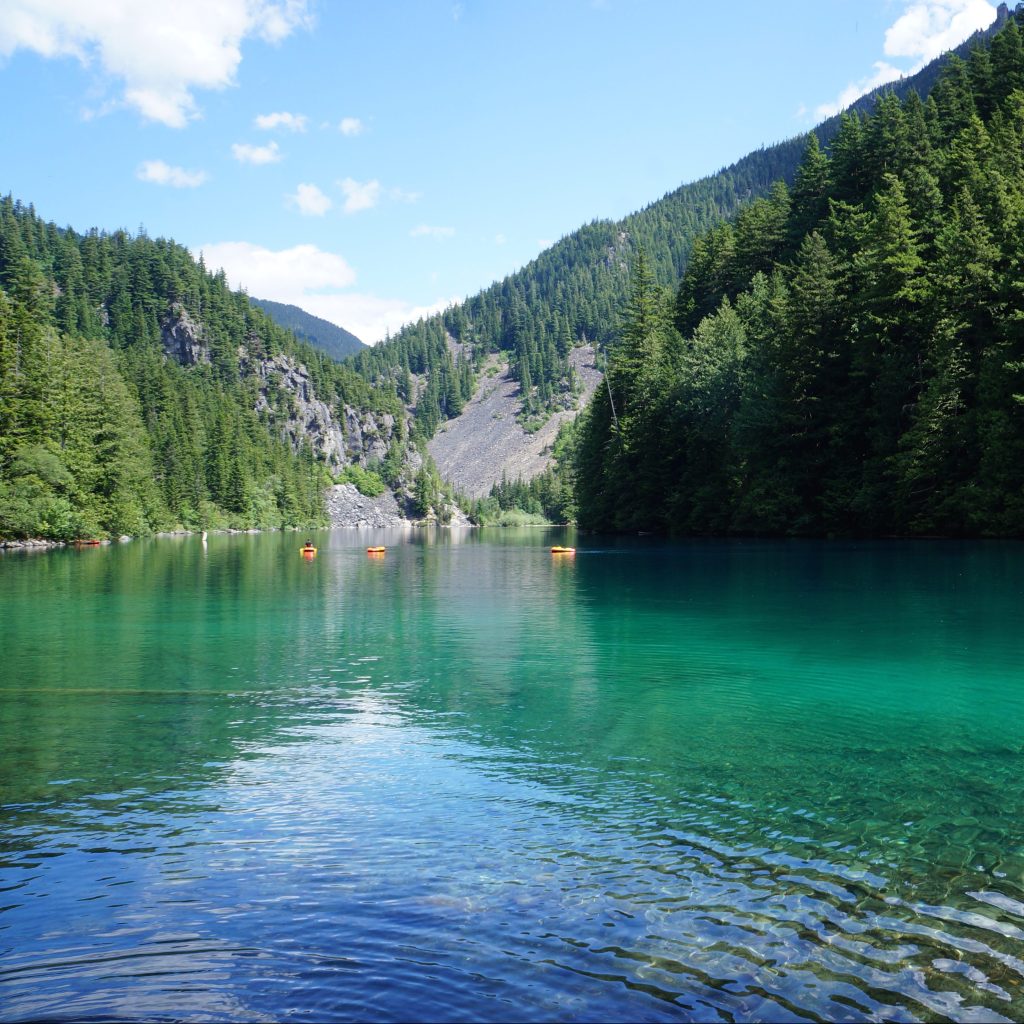
Lindeman Lake is a very popular trail, so if you opt to camp here, I recommend going very early or visiting on a week day. There are a small amount of tent pads and room for tents, but it can get very crowded. It’s an attractive hike because it is very short, but there is significant elevation gain over a short distance, so be prepared for a steep hike. Sites are not reservable, but you do need a backcountry permit, which can be obtained 2 weeks before your trip. This is a great option for a two night trip if you want to do a day hike up to Greendrop Lake, but you may encounter snow past Lindeman Lake until July.
In my opinion, the first 5 hikes on this list are the most ideal for true beginners planning their first ever overnight hike. They are shorter and have less elevation gain. The rest of the hikes on the list are starting to get more advanced in that they are longer and have more elevation gain, but are still good options for newer backpackers and second trips. I recommend these trips to people who are are already experienced hikers; those new to both hiking and backpacking should stick with the hikes listed above.
Region: Joffre Lakes Provincial Park Distance: 5.5km each way Elevation: 400m Reservation: yes ($10pp, per night) Amenities: outhouse, bear cache Season: July-September Drive time from Vancouver: 3 hours Trip Report: found here
Joffre Lakes is another insanely popular hike and you will have to be diligent in booking exactly 4 months ahead of your planned dates to secure a permit. However, it’s popular for a reason and is actually a relatively straightforward trip for the incredible views. Be prepared for a climb, but it’s not too steep, so it just requires a little bit more effort for a great reward.
Region: Upper Sunshine Coast Distance: 6-12km (customizable) Elevation: 250-400m Reservation: no (recommend a donation to qPAWS) Amenities: sleeping hut, outhouse, bear cache, picnic tables Season: May-October Drive time from Vancouver: 2 hours + 2 ferries Trip Report: found here
We’re definitely starting to get a little more technical with this trail. The Fairview/Rainy Day loop is located in Saltery Bay, directly after you get off the ferry. To save money, park at Earl’s Cove and walk on the ferry as you don’t need your car on the other side. This loop trail is part of the Sunshine Coast Trail and has two huts on it, Fairview Hut and Rainy Day Lake Hut. It’s 6km (250m gain) to Fairview hut (counterclockwise) and 4km (350m gain) to Rainy Day Lake hut along the road (road is recommended as it’s significantly longer and steeper to take the trail). You can do the trail as a loop to visit both huts (12km total), but this is a more challenging option as there’s 700m of climbing to do both huts. The huts can get very busy, so you should bring a tent in case they get full.
Region: Garibaldi Provincial Park Distance: 11km each way Elevation: 600m Reservation: yes ($10pp, per night) Amenities: sleeping hut, tent pads, outhouse, cooking shelter, bear cache, picnic tables Season: July-September Drive time from Vancouver: 1.5 hours Trip Report: found here
Elfin Lakes is the longest trail on the list, so you should be prepared for ~4 hours of hiking with your backpack. However, I include it because the elevation gain is spread out over the distance, so it’s never too steep and it’s a very wide and easy trail. This is another hike that books up fast, but you can stay either on a tent pad or in the hut, but they have separate bookings, so make sure you book the correct one. The views from the campsite are some of the best of any hike. Watch out for bears on this hike, especially in the Fall.
Region: Garibaldi Provincial Park Distance: 9km each way Elevation: 800m Reservation: yes ($10pp, per night) Amenities: outhouse, bear cache, cooking shelters, picnic tables Season: July-September Drive time from Vancouver: 2 hours Trip Report: found here
This is the final hike on the list. It has the most elevation gain and you should be prepared for 3 hours of hiking up switchbacks in the first 7km. The trail is not technical, but it is very boring until you reach the lake. However, if you like amenities, it’s a great option. You can camp at either Garibaldi Lake or Taylor Meadows, which have composting toilets, cooking shelters, and picnic tables. I recommend this trip only for those who are already experienced hikers.
There are 3 more trails I want to note because they are easy trails, but I didn’t include them in my main list because they don’t have outhouses or bear caches. There are enough other challenges to contend with on your first hike, so I don’t recommend these. But once you get comfortable with digging a cathole and making your own bear caches, these are good options. However, please note, these are all on crown land, so while there’s no permit required, the sites also don’t receive any maintenance, so please respect the natural environment, leave no trace and pack out everything, including your toilet paper!
Falls Lake – a 1.5km hike on the Coquihalla Summit Rec Area. It’s totally flat and is a great option for a beginner snow camp as well.
Levette/Hut Lake – you can drive up to Levette Lake (which can get very busy), and it’s only another 4km to Hut Lake, which doesn’t get many visitors.
Semaphore Lakes – a 2.5km hike, but this one is a bit steeper (300m gain). There are limited trees for a bear cache here, so a bear canister is recommended.
If you’re looking for more advanced trips, check out my posts on Thru Hikes and Loop Hikes.
The first half of our trip centered around Mount Steele (featured in Part I), so the second half of the trip was about McNair Lake. Like I said in my last post – there are 4 cabins in the park. Edwards Cabin is the most central and could be used as a home base for day hiking. Bachelor Cabin is located the closest to the parking lot and is really popular among both families and partiers because of the short hike for hauling in children or booze, depending on your desires, I guess. These two crowds probably don’t mesh very well, so my opinion is to leave this cabin for the families!
I think Mount Steele is the most popular hut because of it’s location for skiing, and I’d heard McNair Cabin is one of the least frequented in the park. It’s certainly the hardest to get to. You’d think that Mount Steele would be the most challenging because of the hike up the mountain, but it’s a longer hike to McNair Lake and while the terrain is flatter – it’s more technical. In the shoulder season, it can get very muddy on the trail to McNair and there are several detours around boggy areas.
It was another gorgeous day when we departed Mount Steele and we hiked our way back towards Edwards Cabin. Just before you get to the cabin, there’s a branch towards McNair Lake. We weren’t ready for lunch yet, so we skipped Edwards and immediately carried on towards McNair. It’s a nice forested trail at the beginning, but it does deteriorate as you continue on. It’s not really in bad condition, but there’s a collapsed bridge and a detour before Chapman Lake that were pretty muddy.
Eventually our hunger caught up with us, but it’s pretty swampy and we didn’t see many places to stop. We decided to aim for Chapman Lake for lunch and we did find a small dry spot right at the head of the lake to take a break, but overall there’s not many good places to stop at the lake either. We didn’t see anyone on the trail except for one father and son who were leaving the cabin. Apparently on this particular weekend McNair Cabin had been the party cabin and they told us they had a great time participating in “beer olympics” with a bunch of partiers the previous night. They were crowned champions at the end of the night as the only ones not blackout drunk.
The partiers must have gotten up early though, because we didn’t see them. There are some large meadows just before the cabin and a short climb to get up to the top of the hill. The Cabin is still a few hundred metres from the lake, so you can’t see it, but there is a really beautiful view looking down to the meadows. The father-son duo told us they had seen a bunch of elk down there the previous day, so we kept our eyes peeled for them. We saw lots of evidence of where they had been bedded down, but unfortunately we didn’t see them.
We were the only people at the Cabin when we arrived and it ended up staying that way all night. We loved meeting new people at Steele, but it was nice to have the cabin to ourselves at McNair. I don’t know how McNair got its reputation as the least popular cabin though, because we absolutely loved it! Don’t skip it if you’re visiting the park, it’s definitely worth the muddy trek out there! Someone has strung lights around the edge of the cabin that can be plugged into a power bank, so it has a really great atmosphere!
We made a trek down to check out the lake as the clouds moved in for the evening. It’s a pretty small lake and if you’re feeling adventurous, there is another day hike that can be done up to Panther Peak. Definitely do your research for this one though as there’s no marked trail and it wasn’t even shown on my GPS. Instead, we hung out at the cabin and ate supper and had a cribbage tournament. Girls vs. Boys and me and Adriana absolutely smoked the boys!
The hut is very similar to Mount Steele, but McNair has a little balcony on the front of the cabin, which is a nice spot to hang out. I didn’t sleep well though because I woke up in the middle of the night and was absolutely convinced I had forgotten my rain pants at Mount Steele when I’d been repacking my bag in the morning. I only recently bought rain pants after a very wet episode at Lake O’Hara and I was feeling dejected thinking that I wouldn’t have them for the following day.
Fortunately, I lost sleep over nothing and found them in the bottom of my bag the following morning. It wasn’t raining when we woke up, but it started while we were having breakfast. I wouldn’t say it was heavy rain, but it rained consistently throughout the entire day. We had a nice breakfast before packing up for the hike back to the car. We made for a colourful crew with our rain jackets and pack covers!
As muddy as the trail had been the previous day, it was much worse in the rain. In the very first meadow I went calf deep in the mud and got my shoe wet and Brandon took a tumble backwards into the mud. It continued to rain on us all morning and it was a slow hike back to Edwards. Adriana was very worried about crossing the broken bridge and she did take a little tumble off it right at the start, but was otherwise okay. Eventually we made it back to Edwards for lunch and were thrilled to find 3 other guys there who were getting ready to leave, but had a fire going.
I was pleased with my new rain pants, which were only $15 from value village, but kept me quite dry on the trail. We stripped off all our wet layers and enjoyed our lunch warming up by the remnants of the fire. Brandon literally had steam pouring off him as we dried out our gear as much as possible.
Given the rain, it would have been an easy choice for me to skip Bachelor Cabin on the way back. It’s a slight detour (~2km) to get there and we skipped in on the way in to secure spots at Mount Steele. But I’m glad Eddie was there because he was determined to check out Bachelor Cabin to come back in the future with his family. So he convinced us to detour and now I can say I’ve been to all 4 cabins! Bachelor Cabin is located in the woods, but not far from Bachelor Lake. We didn’t stop for too long and it was only a short hike back to the car after that.
It was pouring by the time we finally got to the car, which made for an interesting dynamic of 4 people trying to change into dry clothes! We had a ferry booking for 8pm, which was the only sailing with reservations left, but we were hoping to get on one of the earlier sailings. We checked the ferry status as soon as we got service, but even though it was only 3pm, the ferry was already ticketing for 8pm, so we just kept our reservation. Instead, we got to enjoy some time in Gibsons and had a delicious meal at Lunitas Mexican Eatery, followed by ice cream!
So overall, I think it was a very successful trip and had a great time backpacking with some different friends than I usually go with. My love for the Sunshine Coast stays alive and well and I hope to be back one day on skis!