Widgeon Creek has been on my bucket list for a long time! It’s a paddling route that leaves from Pitt Meadows, starting with a crossing of the Pitt River, and then meanders up Widgeon Creek through Widgeon Marsh and Pinecone Burke Provincial Park.
It’s only a half hour drive from my house, but the reason this sat on my bucket list for so long is because I was afraid of crossing the Pitt River. You have to cross the river at the entrance to Pitt Lake, which can get pretty windy, and the Pitt River is tidally influenced, meaning you can get some pretty fast currents coming in and out of the lake. Even though I know people cross the river all the time, in all manner of vessels (many of which are much less robust than my 16 foot sea kayak), I found the idea of crossing the Pitt River pretty intimidating.
But I finally decided to go for it on a gorgeous day in early April. I didn’t want to go during freshet, when the flows increase from snow melt, and I didn’t want to go during the summer when it’s highly trafficked, so the conditions seemed to align in April. Now that I’ve done it, I’m kind of wondering what I was so afraid of! I know my risk aversion keeps me safe, but it was much less intimidating than I imagined.
We got up early on a Saturday morning to beat the crowds. Fortunately, the creek wasn’t very busy at this time of year and we had no trouble crossing the Pitt River. There was definitely a current when we crossed and a headwind when we returned, but it was very manageable in our kayaks. I’d probably be too nervous to cross the river on a SUP, but there were some people doing it in the afternoon. Although I find it shocking the number of people who go out without a PFD!
The water was very calm when we crossed and the creek was almost completely still. I’ve heard the creek can run dry or very low in some sections during the hot summer, but we crossed near high tide and had no issues in either direction. It was such an enjoyable paddle on the way up the creek that me and Seth kept remarking that we had to spend more time exploring the area in the future (our go-to trip is generally paddling to Jug Island).
We didn’t see any other paddlers on our way up the creek since it was still pretty early in the morning. You paddle through Widgeon Marsh, which is a regional park, and eventually cross into Pinecone Burke Provincial Park. I think this is so cool because I love Pinecone Burke – it’s such a large and underrated park – and I’ve now explored it from 3 different entry points. The most common entry is from Harper Road in Coquitlam, but I’ve also entered the Park along the trail to Seed Peak (east of Squamish), and now via Widgeon Creek.
The final destination by kayak is the Widgeon Creek campsite. There were a few boaters here who had come in the previous day and were camping overnight. We hauled our kayaks up on the shore and then re-packed our bags for a little hike to Widgeon Falls. The paddle to the campsite takes about 75 minutes, and it’s a 6km round trip hike from the campsite, so it makes for a nice day trip with a variety of activities. You can hike to the Falls mostly along an old forestry road, which is faster, but we opted for the detour through the forest, which is much more scenic.
The Falls are really nice and we hung out for an hour enjoying our lunch. We were the only people there, although we passed some other hikers along the way. We took the road back to the campground and then paddled out from there. We encountered more paddlers on the way back and the wind definitely picked up in the early afternoon. The hardest part of the day was crossing the Pitt River because we had a headwind, but it was very manageable in our kayaks. I wouldn’t want to do it on a SUP, and I did wonder if the people crossing on SUP realized they would have a pretty substantial headwind on the way back.
But overall, I absolutely loved everything about this trip! I’m keen to go back and I don’t think I’ll be quite as hesitant in the future. Since it’s a short paddle, it’s easily doable on a Friday night, so maybe we’ll come back some day and stay at the campground. You can also continue the hike up to Widgeon Lake, though I’ve heard it’s a bit of a slog, as the trail is not well maintained and usually has snow on it until July.
Definitely play it safe if you’re planning on doing this trip and plan around the wind and current conditions, but it was a much less intimidating trip overall than I thought it would be. In the summer, you can rent kayaks from the parking lot, so it’s pretty accessible if you want to check it out! I think parking can get challenging though because this is also the parking lot for people recreating at Pitt Lake, so I recommend going early because then you can easily find parking and take advantage of the early morning calm on the water!
Last week, I shared a Beginner’s Guide to Backpacking for those looking to make the transition from hiking to backpacking. A large part of trip planning is selecting a good trail, especially as a beginner, so I’ve put together a list of trails near Vancouver that I think are appropriate for new backpackers.
There are literally hundreds of trails within a 3-hour drive of Vancouver and it can be difficult to know where to start. My biggest recommendation is to keep it simple by choosing easy trails and campsites with access to basic facilities. It can be an adjustment getting used to carrying a large backpack, so pick shorter trails with less elevation gain, and a first-time trip can be made a lot simpler with access to an outhouse, bear cache, and cooking shelter. See my Guide for more information on how to select and book campsites.
Here are some of my preferred hikes for beginners, in order of level of difficulty (easiest trips first):
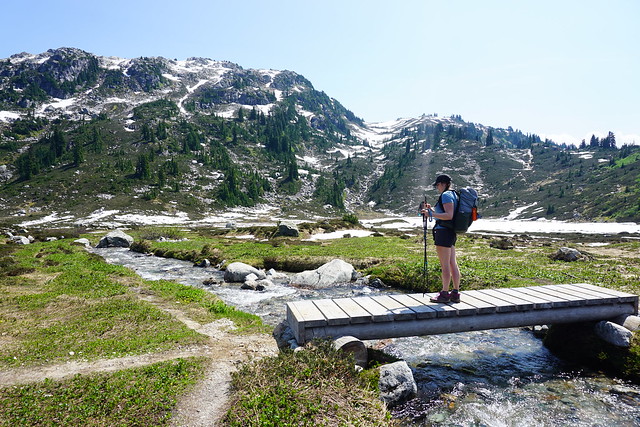
Region: E.C. Manning Provincial Park Distance: 4km each way Elevation: 200m Reservation: yes ($10pp, per night) Amenities: outhouse, bear cache, tent pads, cooking shelter, picnic tables Season: July-September Drive time from Vancouver: 2.5 hours Trip Report: found here
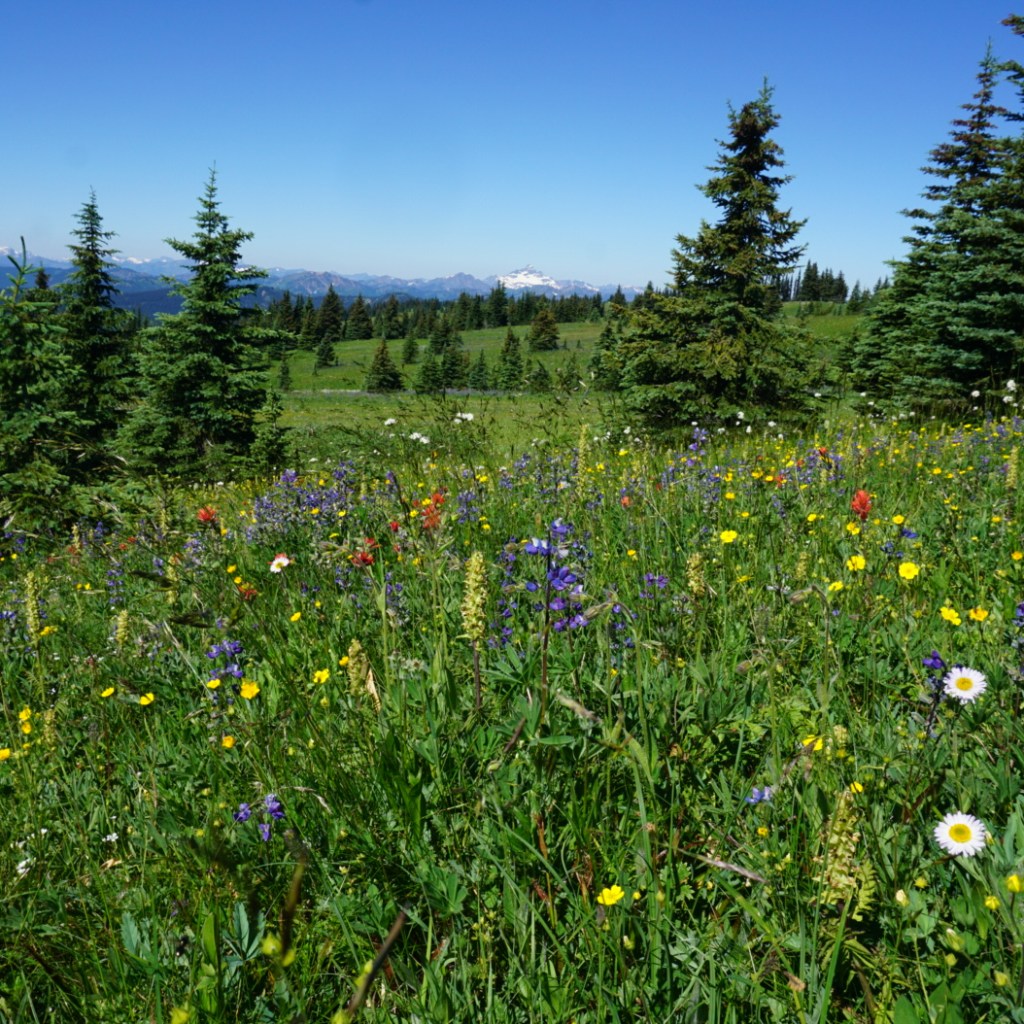
Buckhorn Campsite is my pick for best experience for beginners. Manning Park is my favourite park near Vancouver and I think this hike is ideal because it’s short, has a lot of amenities, and is absolutely beautiful. You have to drive up all the way up Blackwall Road to get to the trailhead, so most of the elevation gain is done in the car. You get to enjoy brand new tent pads and a gorgeous cooking shelter, surrounded by alpine wildflowers. The reservation system for this site is new in 2024. This campsite is ideal for 1 or 2 nights and is a great base if you want to day hike to 3 Brothers Mountain on your second day.
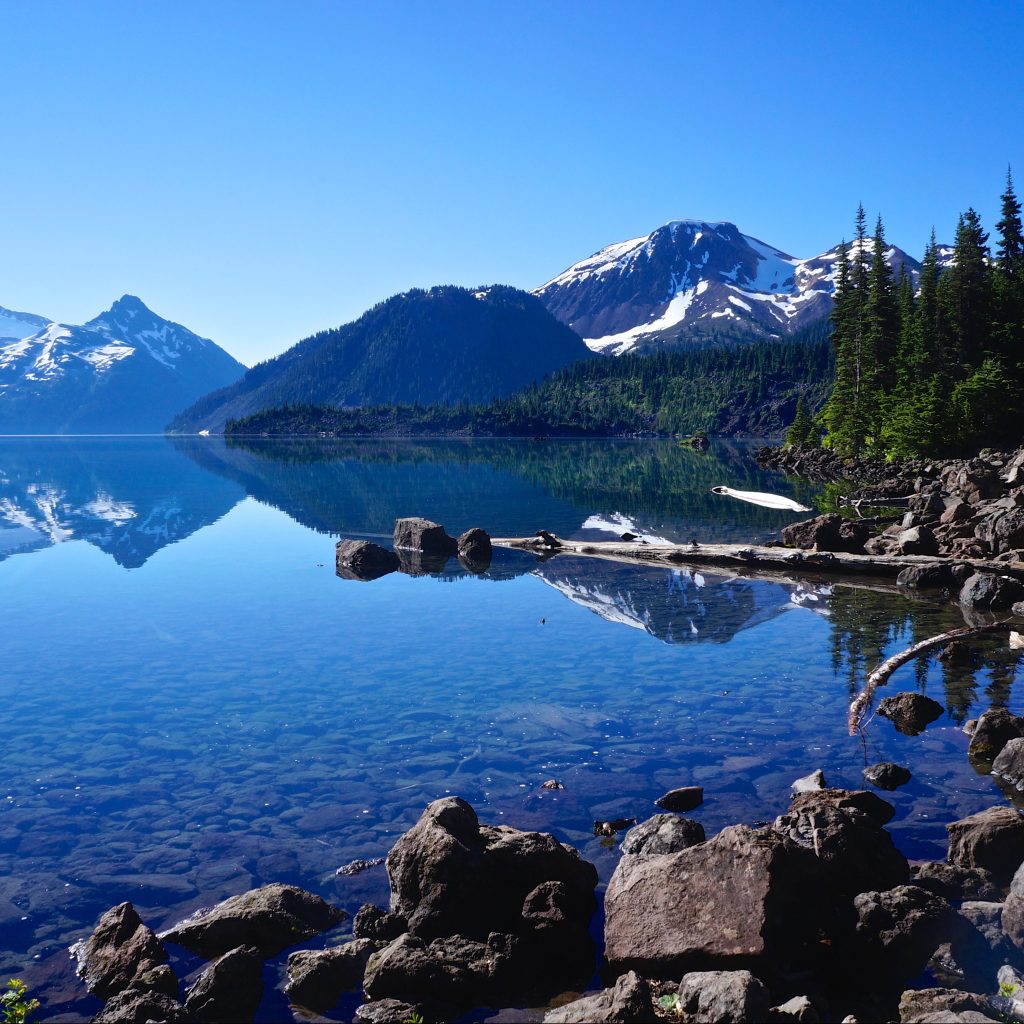
Region: Garibaldi Provincial Park Distance: 4-7km each way Elevation: 250m Reservation: yes ($10pp, per night) Amenities: outhouse, bear cache Season: June-October Drive time from Vancouver: 2 hours Trip Report: found here
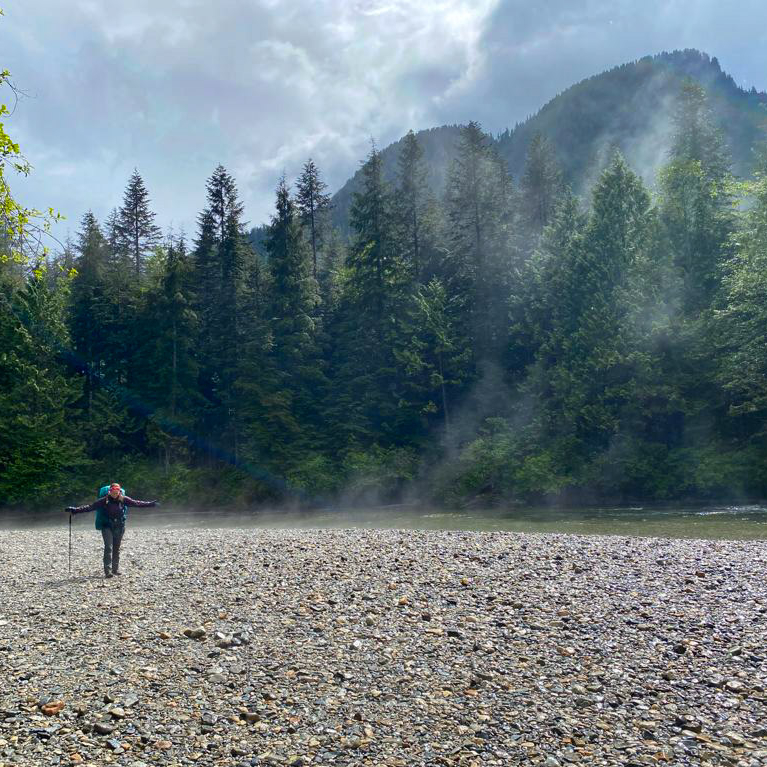
There are two options for Cheakamus Lake, the first campground is called Cheakamus Lake and is located 4km from the parking lot along mostly flat terrain. The second campground is called Singing Creek and is located 7km from the parking lot, and is still mostly flat terrain. Either campground is a great option for a 1 night hike. If you’d like to do 2 nights, camp at Cheakamus Lake and do a day hike to Singing Creek and back on your second day. Be diligent with bear safety on this hike as there is a history of bears in this area.
Region: Golden Ears Provincial Park Distance: 4.5km each way Elevation: 200m Reservation: no (permit is $5pp, per night) Amenities: outhouse, bear cache Season: May-October Drive time from Vancouver: 1 hour Trip Report: found here
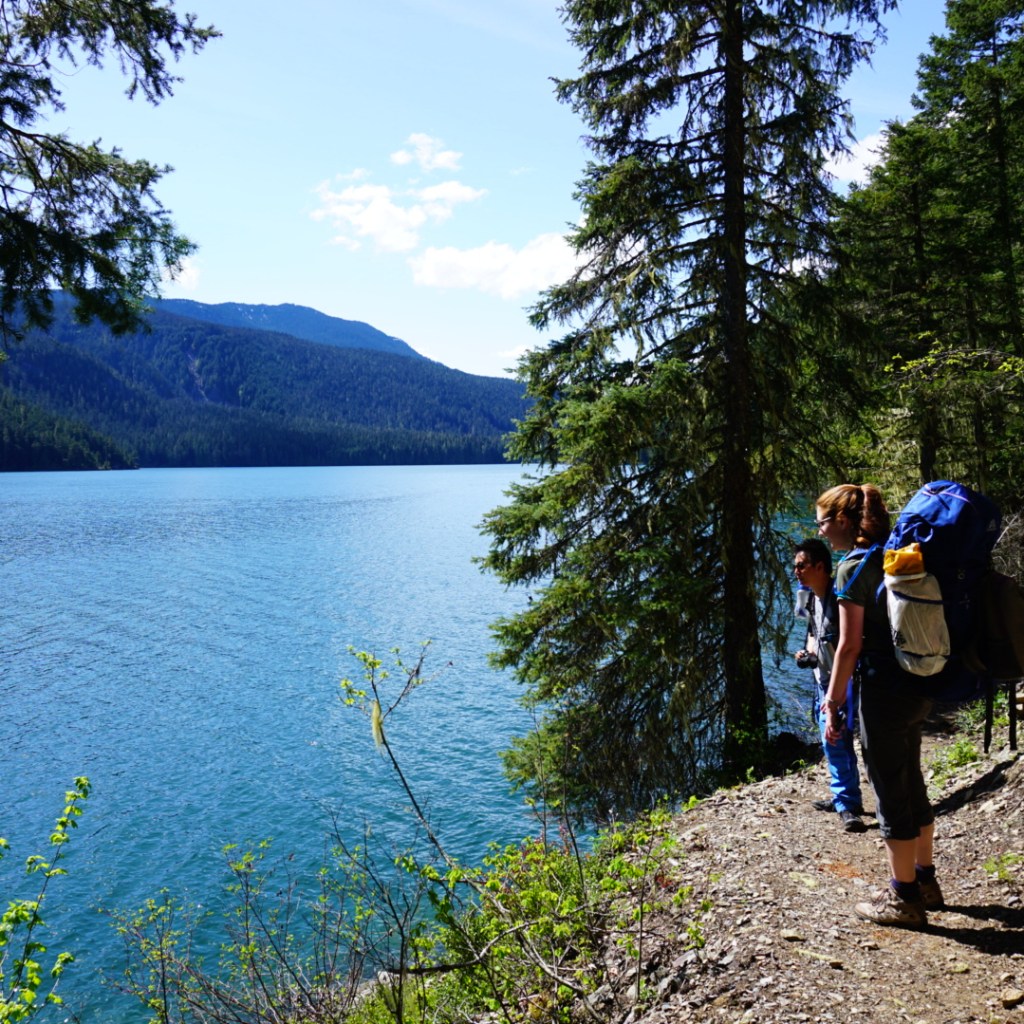
Viewpoint Beach was the first place I ever took my girl guides and it’s a great option for beginners. It’s a short and easy walk from the parking lot to the campground and there is an outhouse and a bear cache available. However, because there are no reservations, I recommend to leave earlier in the day to secure a campsite. You can camp on either side of the river, but don’t attempt to cross the river. The bear cache and outhouse are located at Viewpoint Beach. The other side of the river is called Hikers Beach and can be accessed by crossing the large wooden bridge 500m before Viewpoint Beach. You can extend this trip to 2 nights if you’d like to do a day hike up to Alder Flats.
Region: Tetrahedron Provincial Park Distance: 3-6km each way Elevation: 250m Reservation: yes ($15pp, per night, paid to the Tet Outdoor Club) Amenities: sleeping hut, outhouse Season: June-October Drive time from Vancouver: 1 hour + ferry Trip Report: found here
Tetrahedron Park is a really unique experience and is a great option if you don’t have a tent yet. Tenting is not allowed in this park and all users must stay in one of the huts. There are 4 huts, but I recommend either Bachelor Cabin or Edwards Cabin for beginners (though Bachelor Cabin is often used by families, so please be respectful of children). These sites are managed by the Tetrahedron Outdoor Club. First, join the Tetrahedron Outdoor group on facebook and do a search for your dates to see how many other people are already going then (the cabin sleeps ~12), then post your booking on facebook and pay on the website. This location is great for multi-day trips, as you can do a day hike up to Mount Steele from Edwards Cabin, but the mountain may have snow until July.
Region: Chilliwack Provincial Park Distance: 1.5km each way Elevation: 225m Reservation: no (permit is $5pp, per night) Amenities: outhouse, bear cache, tent pads Season: May-October Drive time from Vancouver: 2 hours Trip Report: found here
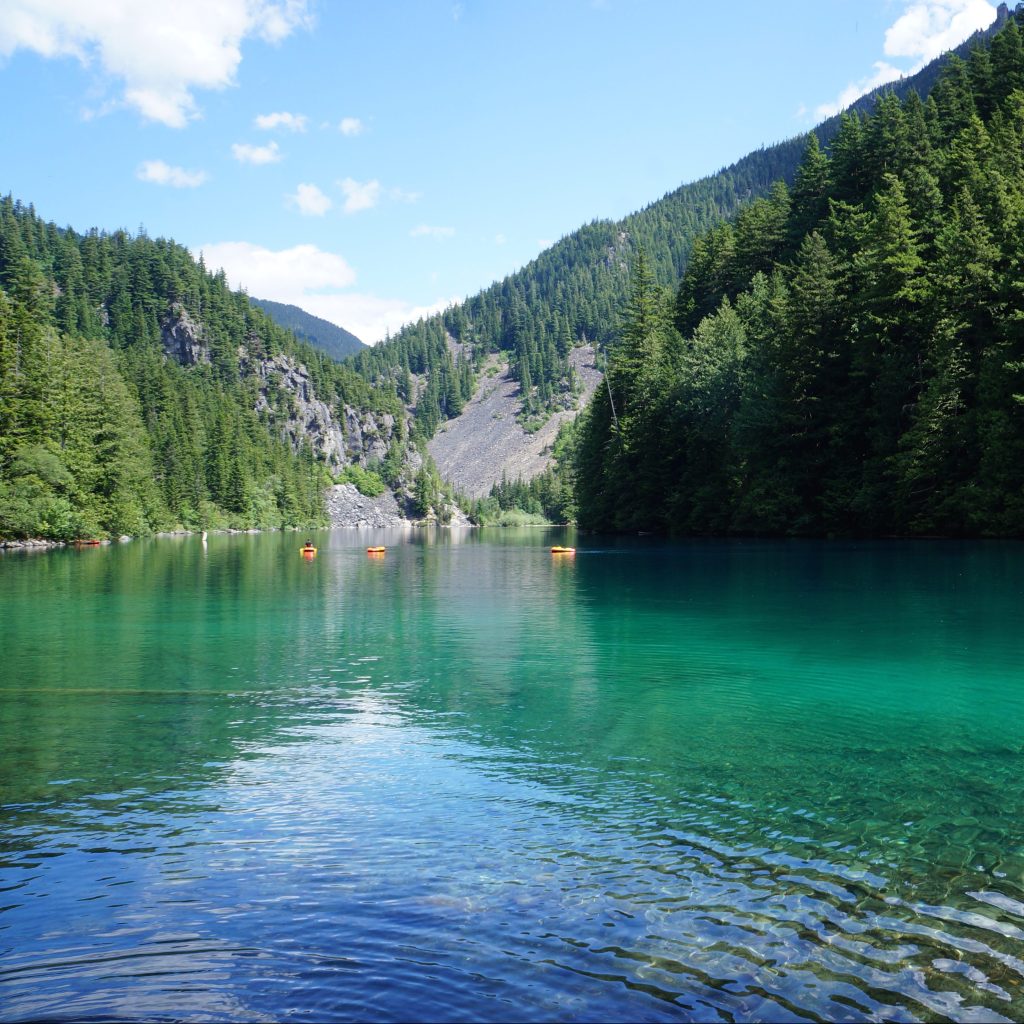
Lindeman Lake is a very popular trail, so if you opt to camp here, I recommend going very early or visiting on a week day. There are a small amount of tent pads and room for tents, but it can get very crowded. It’s an attractive hike because it is very short, but there is significant elevation gain over a short distance, so be prepared for a steep hike. Sites are not reservable, but you do need a backcountry permit, which can be obtained 2 weeks before your trip. This is a great option for a two night trip if you want to do a day hike up to Greendrop Lake, but you may encounter snow past Lindeman Lake until July.
In my opinion, the first 5 hikes on this list are the most ideal for true beginners planning their first ever overnight hike. They are shorter and have less elevation gain. The rest of the hikes on the list are starting to get more advanced in that they are longer and have more elevation gain, but are still good options for newer backpackers and second trips. I recommend these trips to people who are are already experienced hikers; those new to both hiking and backpacking should stick with the hikes listed above.
Region: Joffre Lakes Provincial Park Distance: 5.5km each way Elevation: 400m Reservation: yes ($10pp, per night) Amenities: outhouse, bear cache Season: July-September Drive time from Vancouver: 3 hours Trip Report: found here
Joffre Lakes is another insanely popular hike and you will have to be diligent in booking exactly 4 months ahead of your planned dates to secure a permit. However, it’s popular for a reason and is actually a relatively straightforward trip for the incredible views. Be prepared for a climb, but it’s not too steep, so it just requires a little bit more effort for a great reward.
Region: Upper Sunshine Coast Distance: 6-12km (customizable) Elevation: 250-400m Reservation: no (recommend a donation to qPAWS) Amenities: sleeping hut, outhouse, bear cache, picnic tables Season: May-October Drive time from Vancouver: 2 hours + 2 ferries Trip Report: found here
We’re definitely starting to get a little more technical with this trail. The Fairview/Rainy Day loop is located in Saltery Bay, directly after you get off the ferry. To save money, park at Earl’s Cove and walk on the ferry as you don’t need your car on the other side. This loop trail is part of the Sunshine Coast Trail and has two huts on it, Fairview Hut and Rainy Day Lake Hut. It’s 6km (250m gain) to Fairview hut (counterclockwise) and 4km (350m gain) to Rainy Day Lake hut along the road (road is recommended as it’s significantly longer and steeper to take the trail). You can do the trail as a loop to visit both huts (12km total), but this is a more challenging option as there’s 700m of climbing to do both huts. The huts can get very busy, so you should bring a tent in case they get full.
Region: Garibaldi Provincial Park Distance: 11km each way Elevation: 600m Reservation: yes ($10pp, per night) Amenities: sleeping hut, tent pads, outhouse, cooking shelter, bear cache, picnic tables Season: July-September Drive time from Vancouver: 1.5 hours Trip Report: found here
Elfin Lakes is the longest trail on the list, so you should be prepared for ~4 hours of hiking with your backpack. However, I include it because the elevation gain is spread out over the distance, so it’s never too steep and it’s a very wide and easy trail. This is another hike that books up fast, but you can stay either on a tent pad or in the hut, but they have separate bookings, so make sure you book the correct one. The views from the campsite are some of the best of any hike. Watch out for bears on this hike, especially in the Fall.
Region: Garibaldi Provincial Park Distance: 9km each way Elevation: 800m Reservation: yes ($10pp, per night) Amenities: outhouse, bear cache, cooking shelters, picnic tables Season: July-September Drive time from Vancouver: 2 hours Trip Report: found here
This is the final hike on the list. It has the most elevation gain and you should be prepared for 3 hours of hiking up switchbacks in the first 7km. The trail is not technical, but it is very boring until you reach the lake. However, if you like amenities, it’s a great option. You can camp at either Garibaldi Lake or Taylor Meadows, which have composting toilets, cooking shelters, and picnic tables. I recommend this trip only for those who are already experienced hikers.
There are 3 more trails I want to note because they are easy trails, but I didn’t include them in my main list because they don’t have outhouses or bear caches. There are enough other challenges to contend with on your first hike, so I don’t recommend these. But once you get comfortable with digging a cathole and making your own bear caches, these are good options. However, please note, these are all on crown land, so while there’s no permit required, the sites also don’t receive any maintenance, so please respect the natural environment, leave no trace and pack out everything, including your toilet paper!
Falls Lake – a 1.5km hike on the Coquihalla Summit Rec Area. It’s totally flat and is a great option for a beginner snow camp as well.
Levette/Hut Lake – you can drive up to Levette Lake (which can get very busy), and it’s only another 4km to Hut Lake, which doesn’t get many visitors.
Semaphore Lakes – a 2.5km hike, but this one is a bit steeper (300m gain). There are limited trees for a bear cache here, so a bear canister is recommended.
If you’re looking for more advanced trips, check out my posts on Thru Hikes and Loop Hikes.
Would you like to get into backpacking, but don’t know where to start? Whether you’re new to hiking or an avid hiker, it can be challenging to make the transition to backpacking. It can be hard to know where to go, what to bring, and how to stay safe. This Guide is meant to be a high level support to link you to other resources, help you assess your skills, and safely plan for your first overnight hike.
The backcountry can be a dangerous place. It can be easy to become lost, injured, or susceptible to adverse weather, and without the proper preparedness, sometimes one mistake can unfortunately prove to be fatal. I don’t think we need to be afraid of the backcountry, but I do advocate for smart planning to mitigate as many risks as possible up front.
I am not an expert on backpacking. I have done a lot of backpacking near the lower mainland and I am a Outdoor Adventure Trip Lead with Girl Guides Canada, so I focus a lot of risk management and preparedness in the backcountry.
Assessing Your Skills
Before heading into the backcountry, I think it’s important to understand what skills you have and what skills you may need to supplement. Are you an experienced hiker? Are you comfortable on more challenging terrain? Do you have any special training such as first aid or avalanche safety? Do you have access to all the essentials? Are you good at map and GPS reading? Do you know what to do if you run into trouble?
It’s important to have a good sense of awareness of your own body and to listen to it. It’s easy to get into trouble if you push your body too far or don’t recognize signs of stress. If you haven’t done much hiking, always start small to understand your limitations. Stop when you need a break, you are tired, the terrain looks dangerous, it’s too hot, etc. One of the most challenging decisions is accepting that you should turn around and not expose yourself to additional risk. Once you’ve started something, the inclination is always to push forward, because you’ve sunk time and energy into getting this far. But if the weather conditions are not right or your body is not feeling it, you should always feel empowered to stop for any reason.
Picking a Trail
Deciding where you want to go will help you plan appropriately for the rest of your trip. Once you’ve assessed your skills, you should have a better idea of what kind of trail you may want to do. Here’s some questions to ask yourself:
How far a distance do I want to hike?
Am I okay with hiking uphill, or do I prefer a flatter hike?
Do I want access to facilities like an outhouse, bear cache, tent pads, cooking shelter, etc?
How far am I willing to drive?
Can my vehicle safely access the trail?
For new backpackers, I recommend starting with shorter trails that aren’t too steep. AllTrails is a great resource to research hikes, so look for trails under ~6-10km and with elevation gain of no more than 200-400 metres. The shorter the hike and the greater the elevation gain, the steeper it will be. As a rule of thumb, keep the elevation gain under 10% grade (100m of gain over 1km). I also recommend selecting campgrounds that have outhouses and bear caches. Unless you already know how to dig a proper cathole, or you have a bear cannister, it’s much less stressful if you have access to these facilities. A cooking shelter can also be a great resource if the weather is not good because it will help you to stay dry without needing to set up a tarp. Do as much as possible to make your first trip easy because it can be overwhelming trying to learn too many new skills as once. Next week I’ll be posting some of my recommended hikes for beginners near Vancouver.
Packing the Essentials
Backpacking is a balancing act between making sure you have everything you need to survive and trying to keep your pack light for physical comfort. It’s likely you will have a pretty heavy pack on your first trip because lightweight gear is expensive and you won’t have a good sense of what you really need versus what you can manage without. First time backpackers often bring way too much clothes, make sure you have warm and waterproof layers, but leave the extras at home. Embrace being smelly and just wear the same clothes for multiple days.
While there’s some things you can do without, you can’t compromise on your 10 essentials. I have a whole other blog post on Personal Safety and the 10 essentials and you can get more information from North Shore Rescue. Make sure you have all the essentials with you.
Safety
One of the most important things to do before heading into the wilderness is to leave a trip plan and have a plan for how you will manage problems on the trail. Your trip plan should include details on where you are going and when you are expected to return, and should be left with someone you trust to call 911 if you do not return. AdventureSmart is a great resource for creating a trip plan. Some other things to consider for safety:
Assess your first aid knowledge. Are you carrying a first aid kit and do you know what to do if you become injured?
Assess your navigation skills. Are you confident reading maps and GPS? Are you carrying an extra battery for your phone/GPS? Will your GPS app work offline?
Assess the ease of communication. Do you know if you will have service on this hike? Do you have a satellite device in case of emergency? If not, are you traveling with other people who can help in an emergency, or on a crowded trail where you can seek help from others?
If you become lost or injured, always stop right away and call 911. Don’t call a friend, partner, or parent. 911 calls will go through on any network available and are traceable. If cell service is unreliable, don’t waste what might be your only call on someone who can’t trace you or meaningfully help you. I have written extensively about trip plans, navigation, and communication in my blog post on Personal Safety, as well as I have a blog post dedicated to First Aid and preparation.
Camping Permits and Reservations
Now that we’ve talked about the scary safety preparedness implications, let’s talk about some of the more practical preparation you can do. Camping permits and reservations can be really confusing, but are necessary for most campsites. There is a lot of camping you can do on crown land, but I recommend parks where possible because they have more infrastructure dedicated to visitors. It’s important to respect the natural landscape in which we’re recreating. Everyone makes mistakes starting out, so it’s easier to limit your impact when camping in parks with access to toilets, grey water disposal, bear caches, etc.
If you’re camping in a provincial park, you will need a permit or reservation. Both can be booked online at camping.bcparks.ca. Reservations are only required in popular parks where they are trying to manage overcrowding. A reservation guarantees you a campsite, but not a specific site. For example, Elfin Lakes has 50 tent pads, so they release 50 reservations and you can pick any available tent pad when you arrive. Reservations are available for Garibaldi Park, Joffre Lakes, Manning Park, Berg Lake, and Assiniboine. They release 4 months in advance of your desired date, so if you want to camp on Aug. 15, you must reserve your campsite at 7am on Apr. 15. These typically cost $10 per person, per night, with a $6 reservation fee.
All other parks require only a backcountry permit. Permits are available 2 weeks before your desired date, but there is no limit on the number of permits sold, so you can wait until the evening before your trip to purchase it. There is no guarantee of a site with a backcountry permit, it’s simply first-come-first-serve at the campground when selecting a site. These typically cost $5 per person, per night.
Camping Equipment
Your essentials likely will only account for a portion of what you actually want to bring in your pack. Equipment can be really overwhelming when you first start backpacking because gear is really expensive. On your first trip, borrow as much as you can and accept that you’re not going to have all the best gear and that you will likely have a heavy pack. I have a gear guide dedicated to talking about camping equipment. My piece of advice would be to start with investing in a quality sleeping bag, something both warm and lightweight, and then move on to other gear later. I have also shared a packing list from the 10-day trip I did on the Sunshine Coast Trail.
Food Planning
Food planning can be very stressful or very easy. If you want it to be easy on your first trip, just purchase backpacking meals at any outdoor store. They are expensive, but they are simple because they only require boiling water.
If you want to save money, I have written a 3-part series on cheap and easy meals to eat in the backcountry (no dehydration required):
If you want to get into the exciting world of dehydrating your own meals, of which I am a huge fan, I’ve written another 3-part series on easy dehydrated meals:
If you are recreating in the backcountry, you have a responsibility to leave it the same or better than you found it. This means, take all your garbage, including your toilet paper; stay on trails, even if it means walking through mud; filter your grey water to keep food waste out of the streams and lakes; don’t harm the natural environment scavenging for firewood or take anything natural back with you; respect wildlife and be considerate of other people. Check out Leave No Trace Canada for more information.
Other Considerations
A few other things to be aware of:
Practice bear safety. Cook away from your tent; keep everything that smells in a bear cache, including sunscreen and toiletries; pick up all crumbs; and make noise while hiking.
Protect your water sources. Filter or treat your drinking water and get water from moving sources, upstream of where people are swimming or washing dishes.
Always prepare for the weather. Mountain weather is unpredictable, always be prepared for rain and cold conditions. Turn back if necessary.