I recently did a post featuring some of the most epic thru hikes available in BC. Thru hikes are great if you have a bigger group or access to 2 vehicles, so I wanted to complement that post with a blog about some of the best loop backpacking trails! These are great if you only have access to one vehicle, or want to limit your driving/coordination time.
If you’re a beginner, check out my Guide to Backpacking and Overnight Trips for Beginners posts, as well as my safety resources instead.
East of Vancouver

This is the closest trail to Vancouver on the list (by a long shot) and the most beginner friendly. There are a ton of backcountry sites located along the Gold Creek Trail in Golden Ears Park, and it’s easy to do them as standalones or as a loop. Park at the north lot at Gold Creek and start your hike to Viewpoint Beach, taking either the East Canyon Trail (for the most direct route) or the Lower Falls Trail (for a more scenic route). Camp at Viewpoint Beach and consider doing a day hike up and back to Half Moon Beach.
Then you can head up to Alder Flats for a second night and loop back to the parking lot on the West Canyon Trail. There’s another option to day hike up to the Golden Ears Summit, but this is a steep hike and definitely not beginner friendly, so plan accordingly. You can customize the trip to whatever length you want, with lots of opportunities for side trails! Without side trips, it’s ~13km total to hike the loop to Viewpoint Beach and Alder Flats. A backcountry permit is needed for these campsites and can be obtained 2 weeks prior to your trip at camping.bcparks.ca.

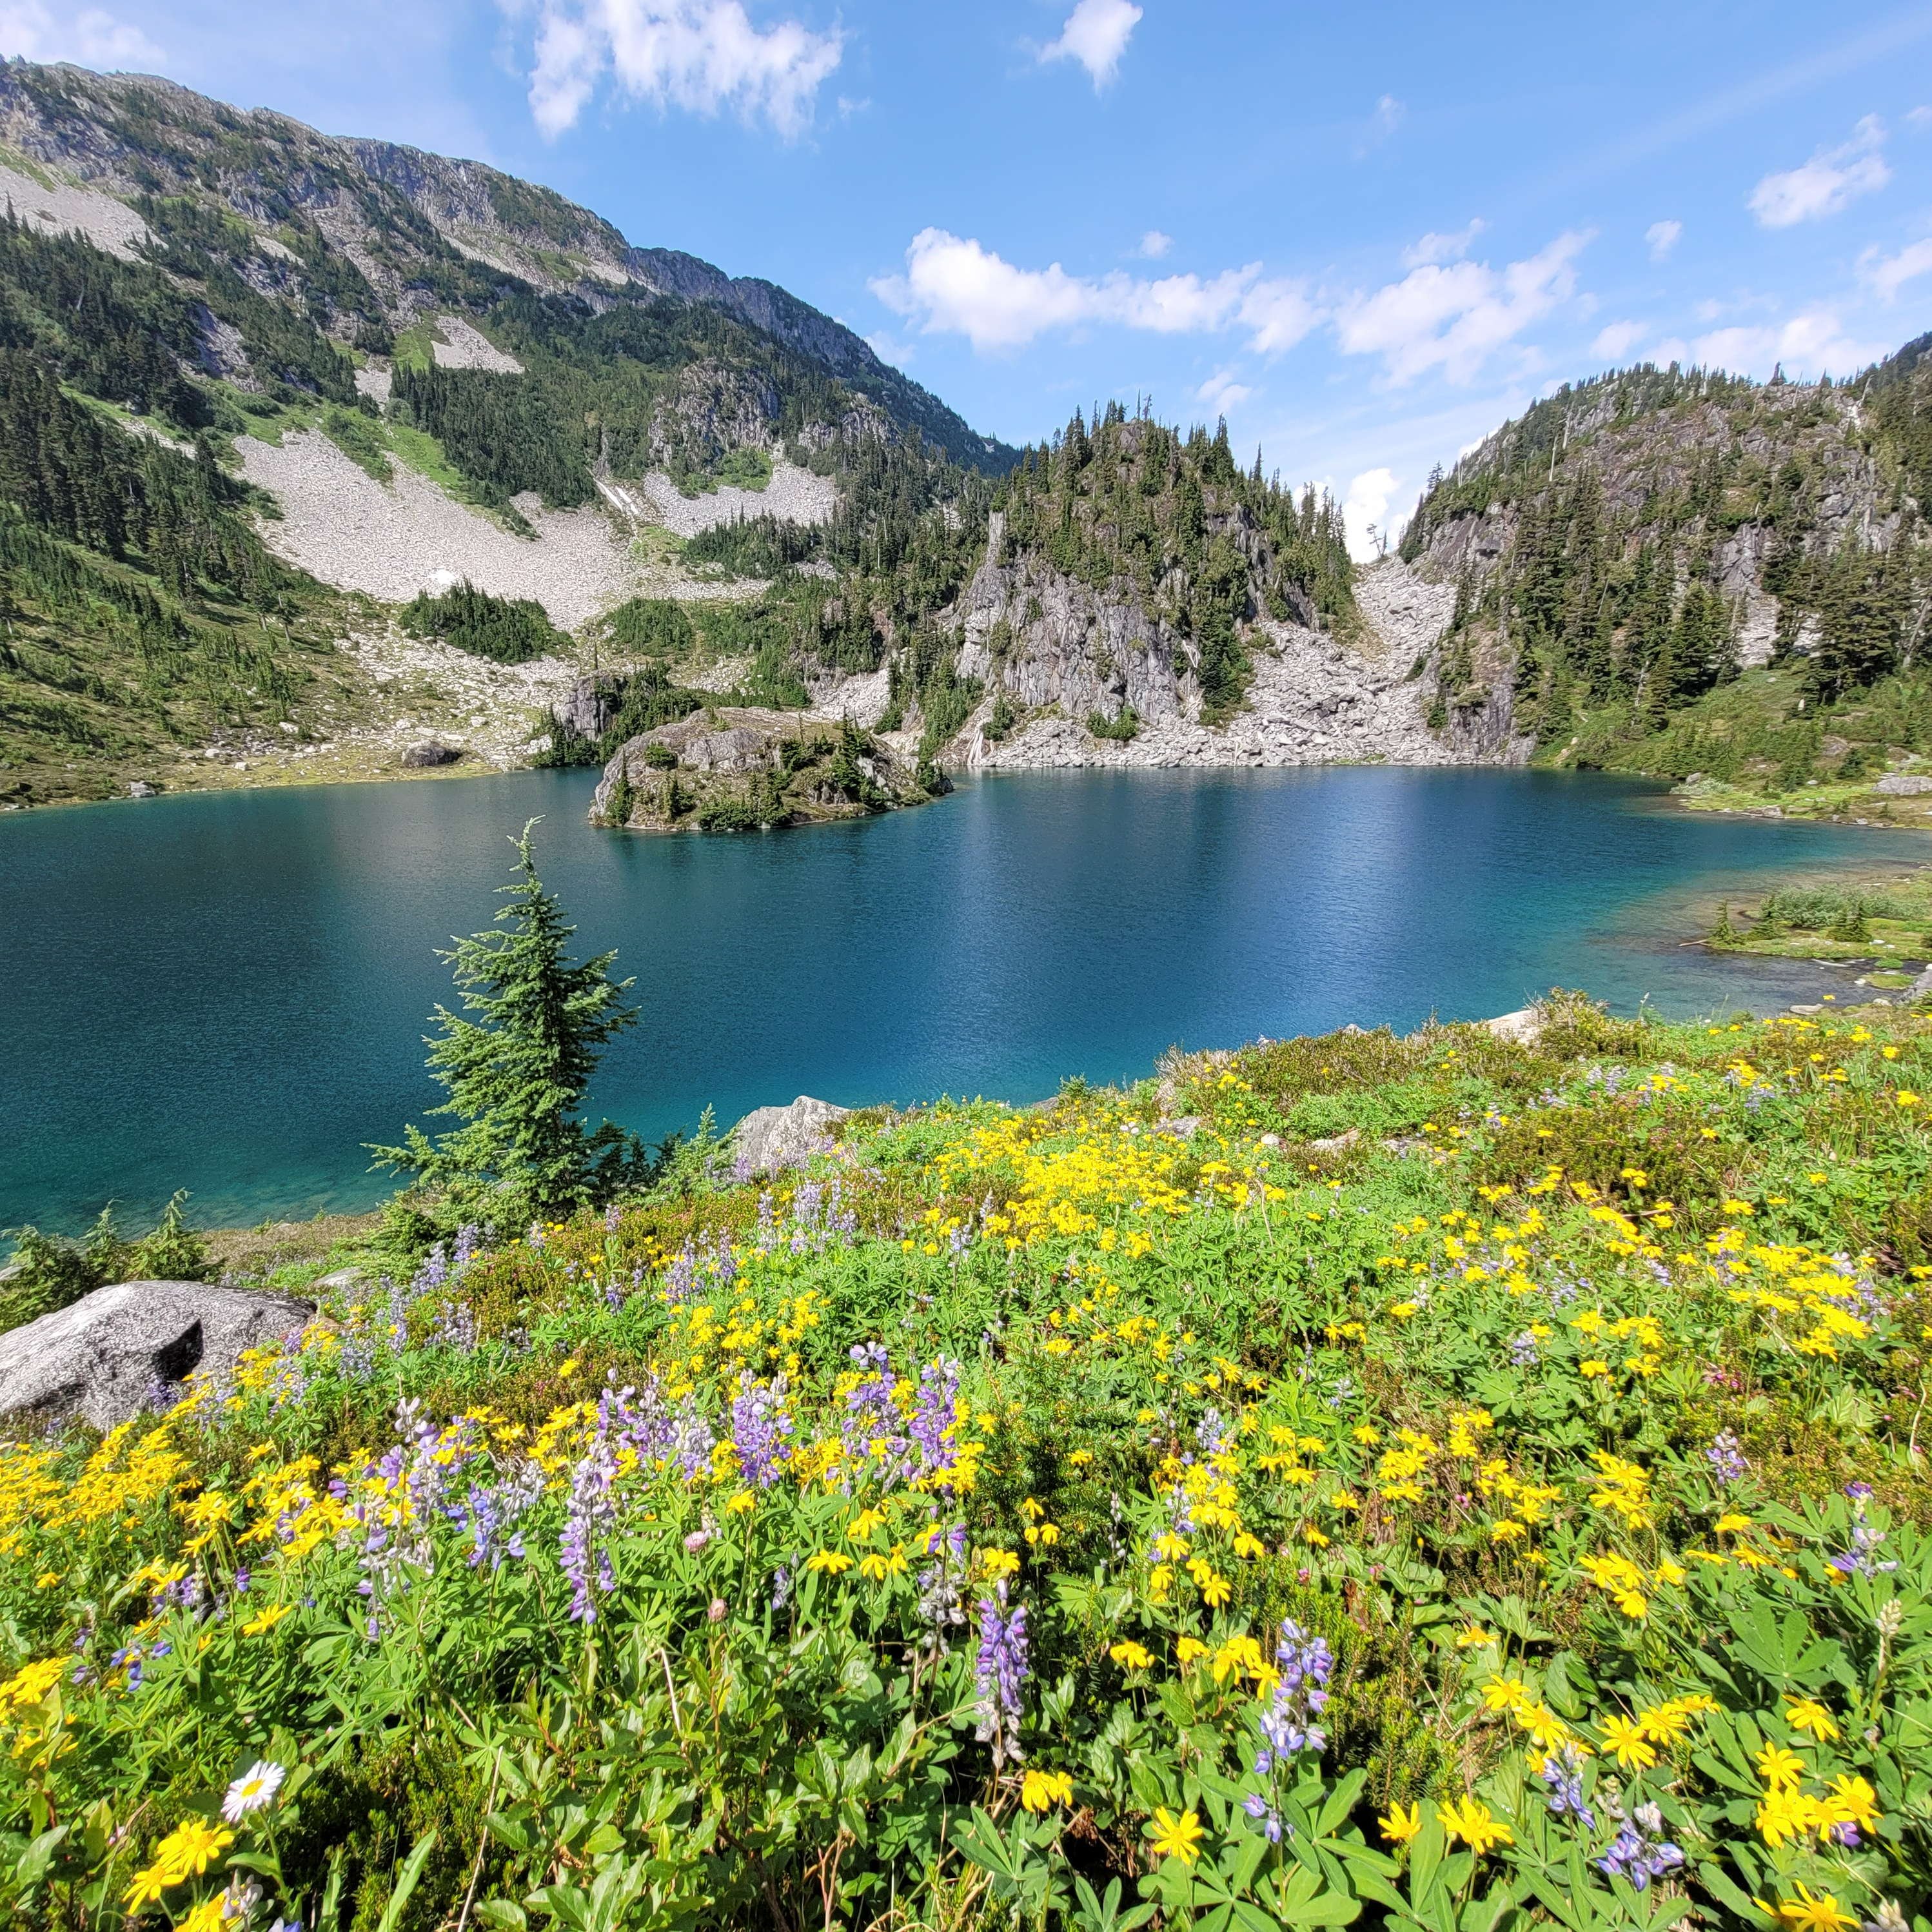
The Flora Lake Loop trail is a 20km trail in Chilliwack Lake Provincial Park that hits 3 alpine lakes and Flora Peak. I’ve never actually hiked the entire trail, but have done large sections of it in both directions. The trail climbs up to Lindeman Lake, which is a very popular trail, and then continues to the back of the lake and up to Greendrop Lake. From there, you continue climbing uphill until you reach Flora Lake. All 3 lakes have campgrounds, but Lindeman Lake is the most frequented.
From Flora, you continue up to the top of Flora Pass, where you have the option to do a side trail up to the Flora Lake Lookout. After the pass, it’s a giant downhill back to the trailhead. There’s 1000m of elevation gain along the hike, so you can either spread it out between campsites when circling the lakes, or reverse the trip and do it all in one go on the way up the Pass. With so many campsites, you can take anywhere from 1-3 nights to complete the trail. A backcountry permit is needed for these campsites and can be obtained 2 weeks prior to your trip at camping.bcparks.ca.

Frosty Mountain is one of the most popular Fall hikes near Vancouver, but it makes for a great backpacking trip any time of year. Most people go up and back on the same trail, but there’s actually a 27km loop option that goes around the back of the mountain. There’s a campsite on either side of the summit, so you can do it as a 1 or 2 night trip. There’s also the option to add on a side trip to the PCT monument, Windy Joe, or Lightning Lakes.
This hike has a lot of elevation gain, more than 1200m, so it’s good to do over multiple days. If you go in the Fall, it will be really busy when the larches turn yellow, but the view from the summit is great year-round. The only downside is having to carry a large backpack over the pass to the summit. A backcountry permit is needed for these campsites and can be obtained 2 weeks prior to your trip at camping.bcparks.ca.
North of Vancouver
Tricouni Meadows is a bit of a stretch for a loop hike, but it is a gorgeous trail! It’s located southwest of Squamish and requires driving up Squamish Valley Road, before merging onto Branch 200. 4×4 and high clearance are recommended to access this hike. The climb up Branch 200 is quite steep and there is a pretty big washout a few kilometres before the trailhead. I’ve heard the washout has gotten worse since I visited, so it might be necessary to add on a few extra kilometres walking on the road. The hike up to the meadows is only 4km from the trailhead, so it’s easy to add a few extra kms of road walking without overdoing it.
The loop part of this trail is because you can actually hike up to the meadows on either side of the river to Pendant Lake. The terrain isn’t that different, but it does make for a nice change of scenery. From Pendant Lake, there’s a bunch of camping available, but there are no facilities (bear cache or outhouse). You can do the trip in one night, but there are several lakes to explore and if you add a second night, you could use the extra time to climb up Tricouni Mountain!

Russet Lake seems to be one of the lesser frequented trails in Garibaldi Park, but it’s no less scenic than its neighbours. The challenge with Russet Lake is that most people take the Whistler gondola to the top, which costs $100. Fortunately, there are several options available for this hike. For a true loop hike, you can enter or exit from Whistler base by climbing up the Singing Pass Trail, which follows the valley between Whistler and Blackcomb Mountains (and saves you the cost of the gondola). The challenge with this option is that there is over 1200m of elevation gain spread over 15km. Alternatively, you can take the gondola up the mountain and follow either the High Note Trail (from Peak Chair), or the Musical Bumps Trail (from Roundhouse). This route is easier, but still has over 500m of elevation gain spread over 12km, as you summit several small peaks (but is much more scenic)
You only really need one night at Russet Lake, but if you stay a second night, you can explore some of the surrounding peaks. On the way back, you can take any of the 3 trails mentioned above. At the time of writing, Whistler doesn’t ticket on the way down, so even if you hiked up, you can still take the gondola back down at no charge. This hike does require camping reservations, which release 4 months in advance of your date from camping.bcparks.ca.

South Chilcotin Mountains Provincial Park is mostly frequented by mountain bikers, but even in peak season, the park is relatively empty. It’s a beautiful park with lots of options for loop trails. If you only have a few days, there’s a nice loop trail around Taylor Creek that is ~26km long and can be explored over 2 nights, with side trips to the High Trail or Camel Pass. If you have more time, there’s a 5-6 night loop in the core area of the park that can be accessed from Tyaughton Creek, which goes over Deer Pass and along the valley to Spruce Lake. It’s ~70km long, but can be extended with side trails up to Lorna Pass, Warner Lake, or Lizard Creek.
Many of the campsites in the core area are serviced by BC Parks and have bear caches and outhouses, but wild camping is also permitted and there are a few nice sites without facilities if you want to slow down your pace. There are grizzly bears in the park, but since there are so few visitors, they haven’t been known to bother hikers. It’s a remote part of BC that I really enjoyed getting to see.
Sunshine Coast

Tetrahedron Park is located north of Sechelt on the Lower Sunshine Coast and is another great trail for beginners. The park has 4 huts that are managed by the Tetrahedron Outdoor Club and they are the only option for camping in the park (tenting isn’t allowed, neither is swimming because it’s in the watershed).
With 4 huts, it’s easy to customize your trip to however many nights you’d like. The loop part of the trail comes from the trail from Edwards Cabin to Mayne Lake and back to Batchelor Cabin, but there are some great side trails to the Mount Steele and McNair Cabins. The hiking is pretty easy, though it can be muddy at certain times of year. The distance is customizable based on your route and could extend from 12-30km. Reservations are made through the Tetrahedron Outdoor Club facebook page and are $15 per person, per night.
Rocky Mountains
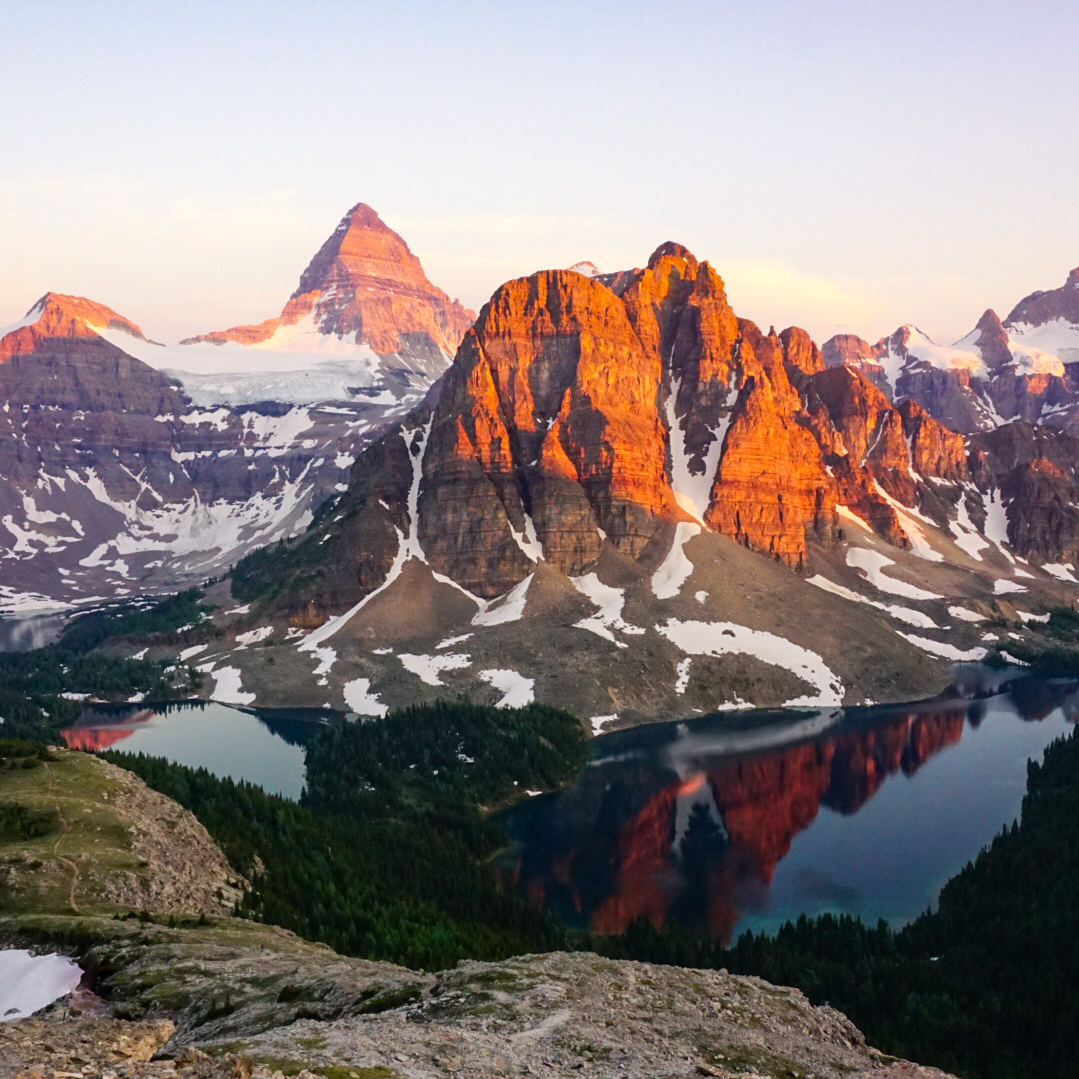
Assiniboine was also on my list of thru hikes, but it’s such a versatile hike, it can also be done as a loop trail! When you enter the park via the Mount Shark trailhead in Kananaskis, you can access Assiniboine through either Assiniboine Pass or Wonder Pass. They share a common trail to Marvel Lake, but then they branch. I’d recommend doing Assiniboine Pass on the way in and Wonder Pass on the way out because it is a steep trail to climb up. There are some restrictions on Assiniboine Pass at certain times of year, so make sure you check for any trail closures.
Once you get to the core area, you can spend a few days exploring the highlights of Assiniboine Park before you return. Not including side trails, the loop is ~52km, so I’d recommend 4-5 nights. It’s a long hike into the park and I personally prefer to do it over the span of 2 days, followed by 2-3 nights in the core area. Both of the entry trails are in Banff National Park and camping permits can be booked through Parks Canada, which release sometime in March for the entire season. Backcountry reservations for Assiniboine are available 4 months in advance at camping.bcparks.ca.

The Iceline Trail is an incredibly scenic trail in Yoho National Park. The loop trail is 22km and can be done as a big day hike, but it is also nice to enjoy over 2-3 days. The trail leaves from the valley at Takakkaw Falls and climbs up to the alpine for ~6km of exposed trail before going back down to the valley. There are tons of options for camping at Yoho Lake, Little Yoho, Laughing Falls, Takakkaw Falls, or if you’re an ACC member, Stanley Mitchell Hut.
There are also tons of options for side trails and day hikes, such as Twin Falls, Whaleback Mountain, and the Highline Trail. Reservations are made for the Yoho Backcountry on Parks Canada, and all of the reservations release for the season sometime in March. This is a great alternative trail for those not lucky enough to get permits for Lake O’Hara.

Lake O’Hara is one of the most popular hikes in the Canadian Rockies. It’s located in Yoho National Park and it is no small feat to secure permits for it. I’ve written an entire blog post on the challenge. You can visit as a backpacker, for which you need camping permits that include a bus ride along the 11km access road. Or you can visit as a day hiker, for which you either need a bus pass, or plan to hike an extra 11km each way. All permits are available from Parks Canada and release some time in March for the entire season.
Once you get to the base, the core trail is the Alpine Circuit, which is approximately 13km if you do the entire circuit. It sounds short, but it climbs through 3 key parts of the trail and shouldn’t be underestimated because of the considerable elevation gain. Fortunately, you can customize the trail to include either the Wiwaxy Gap, the Yukness Ledges, Opabin Prospect, and/or All Souls. The entire hike is in the alpine and one of the most scenic trails I’ve ever done. There’s also lots of options for side trails to Lake McArthur, Linda Lake, or Odaray Grandview.


