South Chilcotin Backpacking Trip – Lorna Pass

Following up from my first post, Brandon and I entered South Chilcotin Provincial Park with only a very loose hiking plan. We had enough food for 7 days and decided to just make up the itinerary on the fly. This was a good choice because Brandon was fighting a cold and it quickly became evident that shorter distances would be better. I wanted to do a side trip up Lorna Pass and considered camping at Lorna Lake, but we decided to make Day 2 a shorter day to do Lorna Pass as a day trip.

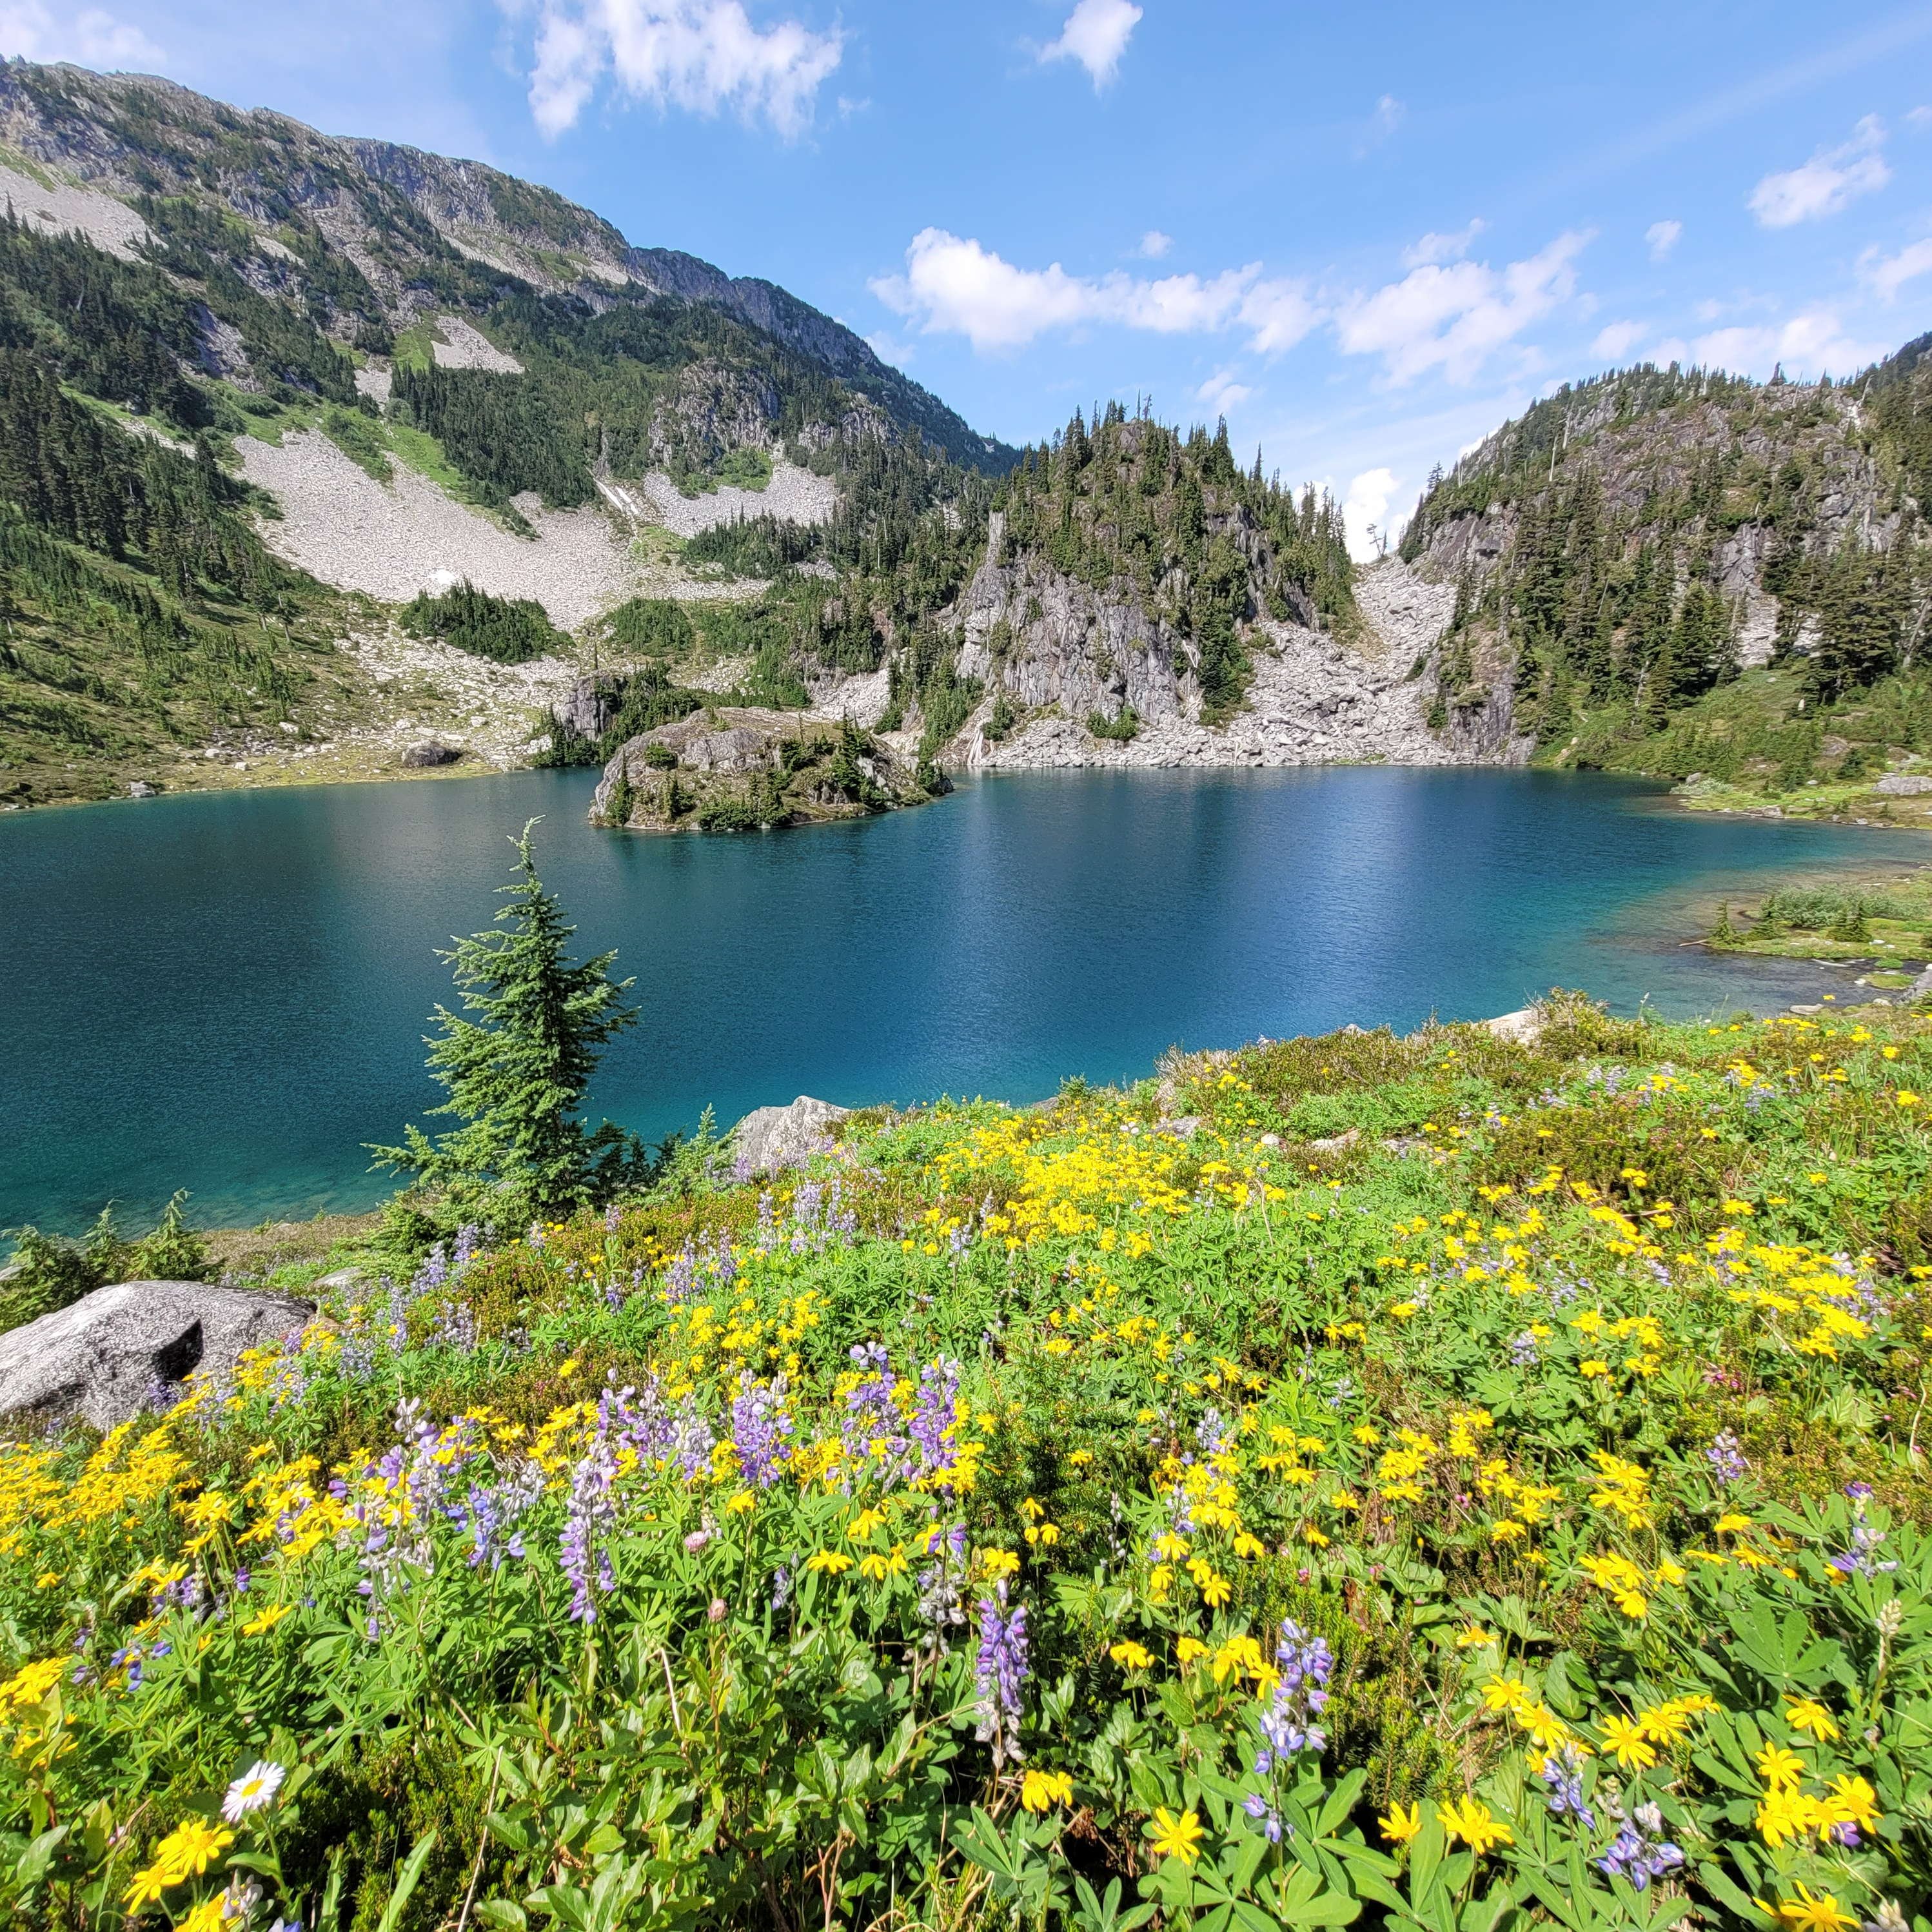
There’s a bit of a gap in formal campsites between WD Campsite, Lorna Lake, and Trigger Lake, but there is a wilderness campsite called Siwash Meadows at the Branch to Lorna Pass. I really think BC Parks should make this a formal campsite with an outhouse and bear cache, because it’s already a pretty established campsite. It ended up being my favourite campsite on the trail as it has incredible views of the surrounding mountains.

20240729_120638
PSX_20240816_075343

It’s only 10km between WD Camp and Siwash Meadows, so we figured the shorter distance would allow us to get ahead with our schedule. We were pretty late getting to camp the previous night, which means you’re slower to go to bed and subsequently slower to rise. We wanted to get on an earlier schedule to do more morning hiking.

It rained overnight and it was still drizzling in the morning, but it cooled down the temperature and overall, we thought the rain would benefit us. The trail to Siwash Meadows is pretty straightforward. It’s similar to the previous day in that the trail mostly goes through the forest, with frequent breaks through the meadows. It continued to rain for a few hours, but eventually stopped and didn’t rain anymore during the entire trip.

20240729_123115
20240729_150455

The only real challenge on this section of the trail is that there are 4 water crossings in a row. Like I said, South Chilcotin is very remote and there’s limited infrastructure in the park. The rivers were low enough to cross, but there were definitely some sketchy sections where we had to be intentional about picking our line. We wore our sandals across and at times the water was about midway between my knee and thigh. The water is really cold and by the 4th crossing, our feet were starting to go a bit numb.

We decided to stop for lunch after the last water crossing and encountered a group of 6 mountain bikers that were traveling from Spruce Lake to Bear Paw, which is the Tyax Camp located a few kilometres north of Siwash Meadows. They were the only people we saw for the next 3 days, but we did see them every day since we were on similar routes.

I’ve included a map of our route above so that you can visualize the route we took. On Day 1, the Tyaughton Creek Trail (red) took us into the park, and then our plan was to spend the rest of the trip doing a big loop in the central part of the park before exiting the same way. South Chilcotin is really only one part of this wilderness area and if you continue north, you’ll enter into Big Creek Provincial Park, where there’s a lot more wilderness to explore. I think I’d like to return in the future and get flown into Lorna Lake to explore Big Creek from there.

20240730_170909

Siwash Meadows is located right at the junction of the Tyaughton Creek Trail, Deer Pass, and the Lorna Pass Trail (as well as a little trail to Lizard Creek). Siwash Meadows is huge and the campsite is located at the west side of the meadow by the creek. There’s a few rustic benches and tall tables and pretty much infinite room for tents. We set up in the meadow and did a bear hang. Chilcotin is so remote and empty of people that it’s probably the most bear aware I’ve ever been. We would never leave our bags unattended anywhere, not even to run over in the trees to use the bathroom. If one of us was at the tent or away from the cooking area, the other person was always with the food. Fortunately, we didn’t see any bears, but we did have a few deer visitors!

20240730_085948
20240730_101558

We enjoyed a nice meal and then went to bed early with the plan of hiking up to Lorna Pass and back the following day (shown in purple). I would have liked to make it all the way to Lorna Lake, but we didn’t want to have to hike up and down the pass twice in one day, so we settled on the top of the Pass as our goal destination.

It was really cloudy on Day 2, so we were thrilled to wake up to clear weather on Day 3. It was still pretty cool in the park and we didn’t have to carry our heavy packs, so it was nice to see some sun. We set off around 8:30am to climb the 8km up to the top of Lorna Pass. It’s 2km of forest hiking to get to Bear Paw camp, which is pretty swanky. It’s $400 a night, which I thought was pretty reasonable given how remote it is and that it’s completely catered. We only passed through and then continued up the trail towards Lorna Pass.

PSX_20240803_215117
20240730_110622

The Lorna Pass Trail was probably my favourite part of the entire trip. You walk through the forests and meadows for a while and there were a lot more wildflowers. I’ve become really interested in wildflowers over the past two years, so I had my little wildflower identification brochure with me and tried to identify as many flowers as possible. Eventually the trail becomes very steep as you ascend through the forest.

We did ~300m of elevation gain in the forest before popping out in the alpine. Once you leave the trees, it’s just wide open meadow stretching across bare mountain and it is absolutely gorgeous! There’s another ~200m of gain through the alpine to the top of the pass, but you don’t feel it at all because it’s so scenic! We took a break in the shade at the edge of the alpine and we were both in really high spirits as we climbed up the pass.

PSX_20240815_080538
20240730_113914

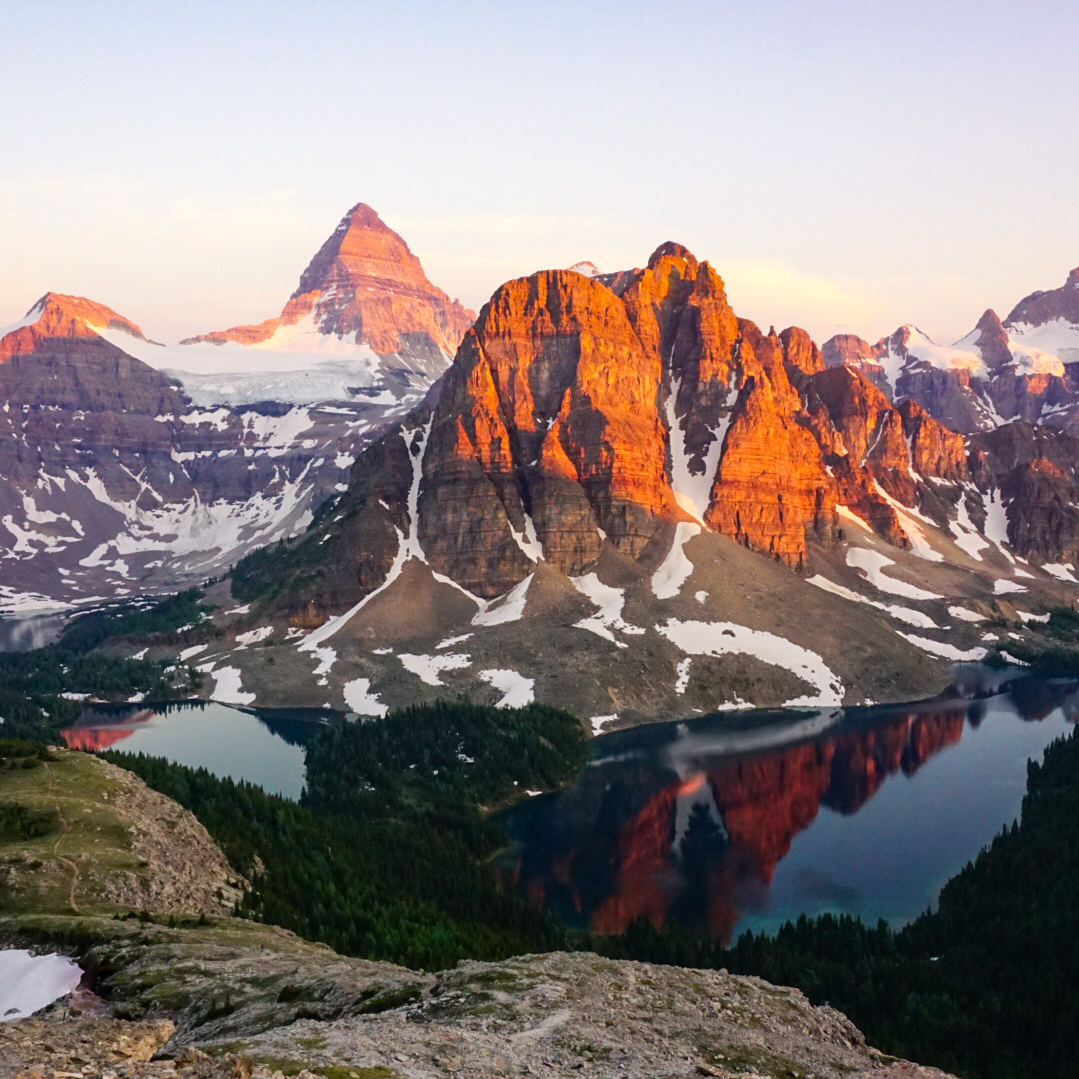
We planned to go as far as the Pass, but when I got there, I couldn’t stop myself from continuing to climb. There’s a nice view from the pass, but you can’t see around the edge of the surrounding peaks, so we impulsively did a scramble up to the top of the nearest peak. There’s an unnamed peak on either side of the pass, the one on the north side is much shorter and has a huge plateau on the top, so we climbed up that one. It adds another ~150m of gain, but it’s totally worth it! I’m not a frequent scrambler, but it’s not a steep peak and I felt very safe the whole time.

20240730_123308

It’s only from the top of the peak that you can get a view of Lorna Lake, plus the view of all the other mountains is stunning! I would have been happy to keep exploring further, but I didn’t want to kill poor Brandon. It was quite windy at the top, so we settled behind some rocks to enjoy our lunch and take a break. I don’t regret not going down to Lorna Lake as I think the view from the peak was more rewarding. I’ll save Lorna Lake for a future trip!

20240730_122250
PSX_20240820_184845

We had a nice hike back down through the alpine and went off trail for a bit to explore a tarn. We were hoping to go for a swim in it, but it was only about ankle deep and very mucky, so we decided to skip it and hiked back to the trail. It’s a steep trail on the way down and we took a break in some meadows along the way.

By the time we got back to the Siwash Meadows, we were pretty tired and sweaty, so we took turns bathing in the river. In total, we’d hiked 18 kilometres. To lighten our packs, we’d obviously left our tent and sleeping gear set up in the meadow, and we’d hung our food while we were away and everything was untouched when we returned. It was pretty cold overnight, but there was a completely clear and I snuck out of bed for a little while in the middle of the night to enjoy the stars. I have so many photos from this section of trail, so here’s a few more. Continue to Part III.

20240730_112311
DSC03447
20240730_112618
DSC03432
20240730_070703
DSC03429
20240730_141154

South Chilcotin Backpacking Trip – Tyaughton Creek

South Chilcotin Mountains Provincial Park has been on my bucket list for a long time. I’m not really sure why, because no one else really seems to know about it, but it’s been recommended to me several times by various Guiders and I’ve been trying to find the time to visit for years. I think the challenge with this park is that it’s not close enough to Vancouver to visit on a long weekend, and the trails are so remote that you need a longer time period for your trip. Other trips have always seemed to take priority.

I’m so glad I finally got the opportunity to visit, because I really loved this park! I wasn’t supposed to go this year at all, I had actually planned to do a 5-day hike in the Kootenays called the Earl Grey Trail (also very unknown). But as you might be able to guess, I had to cancel that trip because of the raging forest fires all over the province. The western trailhead caught fire before my trip and even though I could have done a modified trip, I was weary of the smoke and evacuation notices. Jasper burned down a few days before I was supposed to go, so I ended up canceling the whole trip the day before I was set to leave. 

The good thing about Chilcotin being on my bucket list for so long was that I already had several trip itineraries in mind. So after we cancelled the trip to the Kootenays, I was able to pivot pretty easily to this trip. The air quality was still relatively good near Vancouver and there weren’t many fires burning along the coast, so we committed to South Chilcotin and packed the car literally an hour later.

20240727_161924
20240727_180814

The trip ended up being just me and Brandon. We were supposed to meet another friend from Calgary, but understandably, she didn’t want to drive across BC. Instead, me and Brandon packed up his car and took off towards Squamish around noon. There’s a few ways to get to Chilcotin – you can go via Lillooet (either through Pemberton or Highway 1), or you can go directly on the Hurley Forest Service Road. It’s ~6 hours through Lillooet and there were several fires burning in that area, so we opted for the Hurley.

Since the Hurley is a forestry road rather than a highway, it has a bit of a reputation. It’s a joke/point of pride to be able to say “I survived the Hurley”. I would have been too nervous to do it in my Hyundai Tucson, but Brandon was thrilled to drive in his 4Runner, and it did save us an hour of driving. The Hurley is accessed by driving Pemberton Meadows Road across the river and then branching off. There’s a sign at the start of the road that indicates it’s a 4×4 road, but in reality, most cars can handle this road.

It’s a little rough as you climb up the mountainside, but you can travel on it in pretty much any car if you go slow enough. I definitely would have been fine in my Tucson and we even saw Tesla’s and sports cars up there. The Semaphore Lakes trailhead is located at the top of the mountain. It’s a really popular hike, so a lot of people use the road to access that trail. Once you get to the top, the road is pretty flat and maintained all the way to Gold Bridge. So it was a much less scary experience than I anticipated!

20240727_183721

Since this was a last minute trip, we didn’t have any bookings and planned to make use of one of the free BC Rec Sites for our first night. There’s a site right on Tyaughton Lake called Friburg Rec Site. It’s not very nice. It’s basically just a parking lot with room for a few tents, but it was fine for a night. I think it used to be nicer, but the nearby residents complained and they changed the campsite to day use only, leaving only the parking lot for camping now.

There’s a vibrant mountain biking and ski community in Chilcotin that I think is worth explaining in order to really understand the park. Like I said, the park is super remote and difficult to access. If you want to hike into it, you need quite a bit of time. However, hikers aren’t the primary park users and we encountered very few of them during our six days in the park (we only passed 2 solo female hikers and 1 couple). Mountain biking is the most popular sport in the park during the summer and a lot of them take advantage of an outdoor adventure company called Tyax to execute their trip.

20240728_154539
20240728_102723

Tyax runs a float plane operation out of Tyaughton Lake and flies to 3 different locations in the park (Spruce, Warner, and Lorna Lake). They have a huge lodge located at Tyaughton Lake, as well as 3 luxury wilderness campsites throughout the park. We still didn’t encounter many mountain bikers in the park, but most of the people we met were staying at the Tyax camps. It makes for a much easier trip because then you don’t have to carry a tent, sleeping bag, or pad. Plus, Tyax caters all of your meals, so you pretty much can just travel with a day pack!

In contrast, BC Parks has 7 formal campsites in the park, some of which have outhouses and bear caches, and some of which have nothing. Two of the sites are currently closed, but wilderness camping is allowed in the park. No permits are required to camp in the park and since we also stayed at free campsites, this was essentially a cost-free holiday, aside from the gas to drive there.

20240728_140840(0)

We decided to have dinner at Tyax Lodge instead of our campsite. It was a great choice. The lodge is located right on the lake and the restaurant has a huge patio. The food is fantastic, so we were happy to treat ourselves before 6 days of dehydrated food. It was a little hazy from smoke in the area, but there was some rain in the forecast, which we hoped would clear out all the smoke.

The following day we got up early to start our hike into the park. Hikers and mountain bikers can use the float planes to more easily access the core area of the park, but if you want to hike in, there are several entrances. You can enter through Gunn Creek, Taylor Creek, or Tyaughton Creek. Gunn Creek is currently closed from a forest fire a few years ago. Taylor Creek is accessible in any vehicle and Tyaughton Creek is advertised as 4×4 access, but similar to the Hurley, the road is in pretty good condition and I would do it in my Tucson.

PSX_20240812_214050
20240728_163840

We chose Tyaughton Creek because it’s a shorter distance to enter the park from there, but I think Taylor Creek is the more scenic route. There’s a shorter loop you can do from Taylor Creek, so I opted to save that for a future trip with Seth. Our goal on this trip was to get to the core area of the park as quickly as possible, so we chose Tyaughton.

It’s 16km from the Tyaughton Creek Trailhead to the first campsite (WD Camp). The hike starts with 200m of elevation gain, but after that, the net elevation gain is pretty minimal. We thought it would be a pretty easy hike to the campsite, but it’s actually a tiring trail. It’s not technical, but it climbs up and down from creek to creek over and over again, so we still ended up doing 650m of elevation gain over the entire day.

20240728_123549
20240728_165541

To make matters worse, Brandon seemed to be coming down with a cold and he struggled all day. Fortunately, I was feeling really good, so we pushed through. The trail is mostly in the forest, but it would frequently pop out into meadows where you could get a glimpse of the mountains. There were still some wildflowers in the meadows, but overall they were looking pretty dry.

We started the hike around 11am and got to the campsite shortly after 6pm. We only encountered one person on the trail, a hiker heading back to her car. The campsite was completely empty, but was a really nice site. It has a brand new outhouse and bear cache and a great water source. The site was pretty overgrown and you can tell it doesn’t get used much, but there’s room for several tents throughout the meadow. A family of 3 showed up on mountain bikes just before sunset. It was calling for rain overnight, so we got the tent set up and went to bed early. Continue to Part II.

20240728_114149
20240728_145755

10 Epic Loop Hikes in BC

I recently did a post featuring some of the most epic thru hikes available in BC. Thru hikes are great if you have a bigger group or access to 2 vehicles, so I wanted to complement that post with a blog about some of the best loop backpacking trails! These are great if you only have access to one vehicle, or want to limit your driving/coordination time. 

If you’re a beginner, check out my Guide to Backpacking and Overnight Trips for Beginners posts, as well as my safety resources instead.

Gold Creek Trail

Photo of two small backpackers on a rocky beach with a clear river flowing alongside them and a large green forest and mountain in the background, shrouded in fog. Taken from Viewpoint Beach in Golden Ears Provincial Park, on the Gold Creek Trail, in British Columbia, Canada.

This is the closest trail to Vancouver on the list (by a long shot) and the most beginner friendly. There are a ton of backcountry sites located along the Gold Creek Trail in Golden Ears Park, and it’s easy to do them as standalones or as a loop. Park at the north lot at Gold Creek and start your hike to Viewpoint Beach, taking either the East Canyon Trail (for the most direct route) or the Lower Falls Trail (for a more scenic route). Camp at Viewpoint Beach and consider doing a day hike up and back to Half Moon Beach

Then you can head up to Alder Flats for a second night and loop back to the parking lot on the West Canyon Trail. There’s another option to day hike up to the Golden Ears Summit, but this is a steep hike and definitely not beginner friendly, so plan accordingly. You can customize the trip to whatever length you want, with lots of opportunities for side trails! Without side trips, it’s ~13km total to hike the loop to Viewpoint Beach and Alder Flats. A backcountry permit is needed for these campsites and can be obtained 2 weeks prior to your trip at camping.bcparks.ca

Flora Lake Loop

The view of Chilliwack Lake from Flora Peak on a sunny cloudy day, with the snow capped mountains in the background in Chilliwack Lake Provincial Park on the Flora Lake Loop Trail in British Columbia, Canada.

The Flora Lake Loop trail is a 20km trail in Chilliwack Lake Provincial Park that hits 3 alpine lakes and Flora Peak. I’ve never actually hiked the entire trail, but have done large sections of it in both directions. The trail climbs up to Lindeman Lake, which is a very popular trail, and then continues to the back of the lake and up to Greendrop Lake. From there, you continue climbing uphill until you reach Flora Lake. All 3 lakes have campgrounds, but Lindeman Lake is the most frequented.

From Flora, you continue up to the top of Flora Pass, where you have the option to do a side trail up to the Flora Lake Lookout. After the pass, it’s a giant downhill back to the trailhead. There’s 1000m of elevation gain along the hike, so you can either spread it out between campsites when circling the lakes, or reverse the trip and do it all in one go on the way up the Pass. With so many campsites, you can take anywhere from 1-3 nights to complete the trail. A backcountry permit is needed for these campsites and can be obtained 2 weeks prior to your trip at camping.bcparks.ca

Frosty Mountain

A landscape photo of the larch trees turning yellow during Autumn, with a snow covered Frosty Mountain in the background on a cloudy day. Taken in E.C. Manning Park, British Columbia, Canada.

Frosty Mountain is one of the most popular Fall hikes near Vancouver, but it makes for a great backpacking trip any time of year. Most people go up and back on the same trail, but there’s actually a 27km loop option that goes around the back of the mountain. There’s a campsite on either side of the summit, so you can do it as a 1 or 2 night trip. There’s also the option to add on a side trip to the PCT monument, Windy Joe, or Lightning Lakes. 

This hike has a lot of elevation gain, more than 1200m, so it’s good to do over multiple days. If you go in the Fall, it will be really busy when the larches turn yellow, but the view from the summit is great year-round. The only downside is having to carry a large backpack over the pass to the summit. A backcountry permit is needed for these campsites and can be obtained 2 weeks prior to your trip at camping.bcparks.ca.   

Tricouni Meadows

A photo of Pendant Lake on the way to Tricouni Meadows, with yellow and purple wildflowers in the foreground and a blue alpine lake and mountains in the background on a sunny, blue sky day. West of Squamish in British Columbia, Canada.

Tricouni Meadows is a bit of a stretch for a loop hike, but it is a gorgeous trail! It’s located southwest of Squamish and requires driving up Squamish Valley Road, before merging onto Branch 200. 4×4 and high clearance are recommended to access this hike. The climb up Branch 200 is quite steep and there is a pretty big washout a few kilometres before the trailhead. I’ve heard the washout has gotten worse since I visited, so it might be necessary to add on a few extra kilometres walking on the road. The hike up to the meadows is only 4km from the trailhead, so it’s easy to add a few extra kms of road walking without overdoing it.

The loop part of this trail is because you can actually hike up to the meadows on either side of the river to Pendant Lake. The terrain isn’t that different, but it does make for a nice change of scenery. From Pendant Lake, there’s a bunch of camping available, but there are no facilities (bear cache or outhouse). You can do the trip in one night, but there are several lakes to explore and if you add a second night, you could use the extra time to climb up Tricouni Mountain!

Russet Lake

A photo of Russet Lake with the grassy meadows and the mountains in the background on a smoky summer day in Garibaldi Provincial Park near Whistler, British Columbia, Canada.

Russet Lake seems to be one of the lesser frequented trails in Garibaldi Park, but it’s no less scenic than its neighbours. The challenge with Russet Lake is that most people take the Whistler gondola to the top, which costs $100. Fortunately, there are several options available for this hike. For a true loop hike, you can enter or exit from Whistler base by climbing up the Singing Pass Trail, which follows the valley between Whistler and Blackcomb Mountains (and saves you the cost of the gondola). The challenge with this option is that there is over 1200m of elevation gain spread over 15km. Alternatively, you can take the gondola up the mountain and follow either the High Note Trail (from Peak Chair), or the Musical Bumps Trail (from Roundhouse). This route is easier, but still has over 500m of elevation gain spread over 12km, as you summit several small peaks (but is much more scenic)

You only really need one night at Russet Lake, but if you stay a second night, you can explore some of the surrounding peaks. On the way back, you can take any of the 3 trails mentioned above. At the time of writing, Whistler doesn’t ticket on the way down, so even if you hiked up, you can still take the gondola back down at no charge. This hike does require camping reservations, which release 4 months in advance of your date from camping.bcparks.ca.  

Chilcotin Loop

A photo of the hiking trail in South Chilcotin Provincial Park that runs to Lorna Pass. The trail is covered in yellow wildflowers in the middle of the forest, with the mountains peaking out in the background on a cloudy day in British Columbia.

South Chilcotin Mountains Provincial Park is mostly frequented by mountain bikers, but even in peak season, the park is relatively empty. It’s a beautiful park with lots of options for loop trails. If you only have a few days, there’s a nice loop trail around Taylor Creek that is ~26km long and can be explored over 2 nights, with side trips to the High Trail or Camel Pass. If you have more time, there’s a 5-6 night loop in the core area of the park that can be accessed from Tyaughton Creek, which goes over Deer Pass and along the valley to Spruce Lake. It’s ~70km long, but can be extended with side trails up to Lorna Pass, Warner Lake, or Lizard Creek. 

Many of the campsites in the core area are serviced by BC Parks and have bear caches and outhouses, but wild camping is also permitted and there are a few nice sites without facilities if you want to slow down your pace. There are grizzly bears in the park, but since there are so few visitors, they haven’t been known to bother hikers. It’s a remote part of BC that I really enjoyed getting to see.

Tetrahedron Park

A landscape photo of the trees, mountains, and ponds, from the top of Mount Steele in Tetrahedron Provincial Park on the Sunshine Coast of British Columbia, Canada.

Tetrahedron Park is located north of Sechelt on the Lower Sunshine Coast and is another great trail for beginners. The park has 4 huts that are managed by the Tetrahedron Outdoor Club and they are the only option for camping in the park (tenting isn’t allowed, neither is swimming because it’s in the watershed). 

With 4 huts, it’s easy to customize your trip to however many nights you’d like. The loop part of the trail comes from the trail from Edwards Cabin to Mayne Lake and back to Batchelor Cabin, but there are some great side trails to the Mount Steele and McNair Cabins. The hiking is pretty easy, though it can be muddy at certain times of year. The distance is customizable based on your route and could extend from 12-30km. Reservations are made through the Tetrahedron Outdoor Club facebook page and are $15 per person, per night.

Assiniboine

A photo of Mount Assiniboine and Sunburst Mountain and Cerulean Lake at sunset from the Nub in Assiniboine Provincial Park in British Columbia, Canada.

Assiniboine was also on my list of thru hikes, but it’s such a versatile hike, it can also be done as a loop trail! When you enter the park via the Mount Shark trailhead in Kananaskis, you can access Assiniboine through either Assiniboine Pass or Wonder Pass. They share a common trail to Marvel Lake, but then they branch. I’d recommend doing Assiniboine Pass on the way in and Wonder Pass on the way out because it is a steep trail to climb up. There are some restrictions on Assiniboine Pass at certain times of year, so make sure you check for any trail closures.

Once you get to the core area, you can spend a few days exploring the highlights of Assiniboine Park before you return. Not including side trails, the loop is ~52km, so I’d recommend 4-5 nights. It’s a long hike into the park and I personally prefer to do it over the span of 2 days, followed by 2-3 nights in the core area. Both of the entry trails are in Banff National Park and camping permits can be booked through Parks Canada, which release sometime in March for the entire season. Backcountry reservations for Assiniboine are available 4 months in advance at camping.bcparks.ca.

Iceline Trail

A female hiker walks with her hiking poles and hood up, facing away from the background view of large mountains and glaciers on the Iceline Trail in Yoho National Park in British Columbia, Canada.

The Iceline Trail is an incredibly scenic trail in Yoho National Park. The loop trail is 22km and can be done as a big day hike, but it is also nice to enjoy over 2-3 days. The trail leaves from the valley at Takakkaw Falls and climbs up to the alpine for ~6km of exposed trail before going back down to the valley. There are tons of options for camping at Yoho Lake, Little Yoho, Laughing Falls, Takakkaw Falls, or if you’re an ACC member, Stanley Mitchell Hut. 

There are also tons of options for side trails and day hikes, such as Twin Falls, Whaleback Mountain, and the Highline Trail. Reservations are made for the Yoho Backcountry on Parks Canada, and all of the reservations release for the season sometime in March. This is a great alternative trail for those not lucky enough to get permits for Lake O’Hara. 

Lake O’Hara

A photo of red canoes on the bright blue lake water of Lake O'Hara, with the mountains in the background on a cloudy day in Yoho National Park, in British Columbia, Canada.

Lake O’Hara is one of the most popular hikes in the Canadian Rockies. It’s located in Yoho National Park and it is no small feat to secure permits for it. I’ve written an entire blog post on the challenge. You can visit as a backpacker, for which you need camping permits that include a bus ride along the 11km access road. Or you can visit as a day hiker, for which you either need a bus pass, or plan to hike an extra 11km each way. All permits are available from Parks Canada and release some time in March for the entire season.

Once you get to the base, the core trail is the Alpine Circuit, which is approximately 13km if you do the entire circuit. It sounds short, but it climbs through 3 key parts of the trail and shouldn’t be underestimated because of the considerable elevation gain. Fortunately, you can customize the trail to include either the Wiwaxy Gap, the Yukness Ledges, Opabin Prospect, and/or All Souls. The entire hike is in the alpine and one of the most scenic trails I’ve ever done. There’s also lots of options for side trails to Lake McArthur, Linda Lake, or Odaray Grandview.