Hiking Brandywine Mountain – Camping no longer permitted

I first visited Brandywine Meadows with Seth and Brandon in 2015 when I was a very new hiker. We visited in October and the meadows were completely empty of people. It’s only a short hike to get to the back of the meadow, so on our visit, we continued hiking up through the boulder field at the back of the meadow to get a better view. I returned to this trail for the first time in 10 years in July 2025 to learn that since my last visit, the trail has become a lot more popular! 

There’s two access points to the trail. The lower lot is accessible for any vehicle, but involves an extra 400m of elevation gain in less than 2km, so it’s a very steep trail. If you’re lucky enough to have access to a 4×4, high clearance vehicle, you can cut out most of the elevation gain and park at the upper lot. This is what I’ve done both times I visited. From the upper lot, it’s only a 2km hike to the meadows, whereas it’s 4km (plus the elevation gain) from the lower lot. I think this easy access to the backcountry has really blown up the popularity of the trail. 

PSX_20250721_113533
PSX_20250721_113903

Brandywine Meadows is not on park land, but the trail to the meadows is managed by BC Recreation Sites and Trails. Until last summer, you could camp in the meadow, but from what I understand, people were not very respectful of the delicate alpine environment. There’s no outhouse or bear cache and overcrowding was damaging the meadows. So we were surprised, but not unhappy, to see a new “no camping” sign installed in the meadow when we arrived. 

While I do think this change is good for the area, it hasn’t been well communicated. It seems the sign was added this summer, but there’s been no online roll-out of the closure. We had hiked in with our backcountry gear with the intention of camping, but definitely did not want to camp in the meadows after seeing the sign. 

20250713_114442

After the trip, I reached out to BC Rec Sites and Trails for further clarification and they did get back to me. We assumed that camping was not permitted in order to protect the meadows, but actually it’s because this is in a designated Wildlife Habitat Area for grizzly bears. BC Rec Sites did not provide me with a map of the area, but indicated they would be posting one at the trailhead soon. To save you the trouble, I did some digging online and was able to find a shapefile of the area to upload to my GPS. The “no camping” area is shown in red, which represents the Wildlife Habitat Are. We were disappointed about the change, but it’s still a beautiful area for day hiking and that is how I will be using the area in the future. 

Brandywine boundary

Whether you want to hike the mountain or just visit the meadows, it is an incredibly beautiful area and I would be satisfied with either trip. I don’t think I would want to attempt a full mountain summit in a day from the lower parking lot, but it’s definitely achievable from the upper lot. If you’re hiking from the lower lot, hiking to the end of the meadows is still a very satisfying objective. Just make sure you stick to the trail so as not to further impact the sensitive wildflower habitat. 

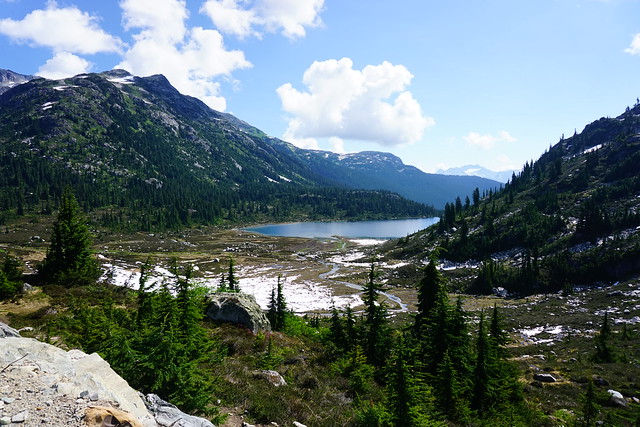
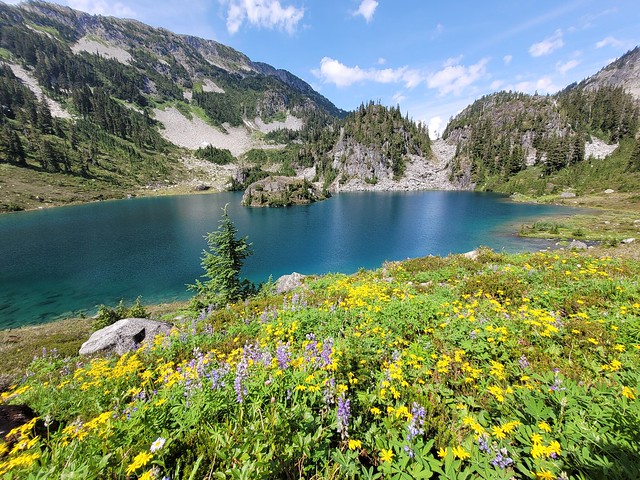
The real highlight of the meadows is the wildflowers. We visited in early to mid July, so there weren’t many wildflowers in bloom yet, primarily just pink mountain heather. But if you visit in late July and early August, you’ll likely see the meadows completely covered in beautiful wildflowers! There’s 50m of elevation gain from the upper parking lot to the meadows, and then another 50m of gain to the back of the meadows, so it feels more or less like a flat hike through the meadows. I recommend hiking to the back of the meadows, enjoying the views along the way.

20250712_190720

If you want to hike to Brandywine Mountain, prepare for some serious elevation gain. I like to challenge myself and explore lots of different hikes, but I wouldn’t consider myself a peak bagger. We didn’t end up actually summiting Brandywine Mountain, but we had a great time exploring the alpine nonetheless. If you want to head to the summit, I recommend an early start so that you have lots of daylight, but also so that you can avoid climbing uphill at the hottest part of the day. The climb up the mountain starts at the end of the meadow and there’s absolutely no shade anywhere. So if the summit is your objective, you might be better off visiting in the Fall when the days are cooler (although you give up some of your daylight hours).

20250713_114006
20250712_175713

It’s a steep climb out of the meadow. The trail turns to the left at the back of the meadow and after this point, you’re relying on your own way-finding skills. There is a small trail going up through the lower part of the mountain, so stick to that as much as possible to avoid further damage to the terrain. Early in the season, it will be muddy from snow run-off. Eventually (for us anyways), the trail disappears and it’s up to you to navigate the alpine. The next objective is getting to the top of the ridgeline. It’s obvious where you want to end up, but not necessarily obvious the best way to get there.

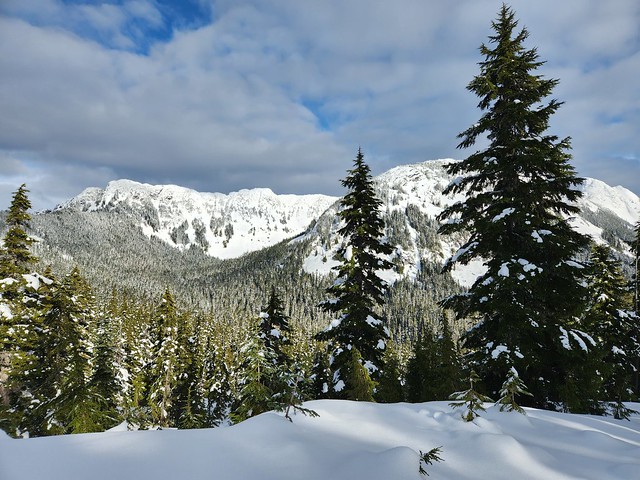
Because we visited in early July, there was still a lot of snow. The lower part of the mountain was bare, but most of the upper half still had a consistent layer of snow. Microspikes were definitely a requirement, and I would have felt more comfortable with an ice axe as well. The snow was pretty stable and we weren’t postholing at all (even with a late afternoon ascent). If you want to avoid the snow, I’d advise hiking later in the season.

20250712_184417
20250712_181910

However, I think I preferred the snow. It’s a very steep scree slope to get up to the ridge and I think the snow significantly increased our pace. We didn’t have to navigate any loose rock and could just go straight up the snow without worrying so much about footholds. I had to cross some scree at one point and it was quite scary because the rock is really loose and unstable. My friend Victoria had hiked it the previous summer when there was no snow, and she said it was much worse on the scree. That said, I was still nervous hiking up the snow. It gets steeper the closer you get to the ridge and I was feeling pretty uncomfortable near the top. I had to just look at my feet and push for the top rather than focus on the height. If you’re new to hiking or afraid of heights, I wouldn’t recommend this hike. 

Once you reach the ridge, you’re rewarded with the most incredible views of the surrounding backcountry! We hit the ridge later in the day, so we decided that was the extent of the hiking we would be doing and didn’t attempt to summit the mountain, but it was still a very rewarding experience. The rest of the trail seemed to be snow-free after that because it gets a lot more direct sunlight than the trail to the ridge. If you keep hiking up the ridge, you should be able to get views of the glacier, and then from there, you can continue to the summit of Brandywine Mountain, but I can’t comment on how challenging that summit is. I doubt I’ll ever summit, but I would return to see the glacier. 

PSX_20250714_204229

Of course, if you hike a lot, you know that if you have a challenging uphill, it’s going to be even worse on the return trip. I was pretty nervous about hiking back down the steep snowy slope and it was a little scary. This is where I wish I’d had an ice axe, so I relied heavily on my poles instead. A lot of people had been up and down the trail over the course of the day, so there were some “snow steps” along sections of the descent. We tried to stick to these as much as possible. Some people had clearly slid down on their butts, and we really avoided those tracks because they make the snow really slick. There’s a time and place for glissading, but this area was way too steep and long for me to attempt it. I wouldn’t recommend sliding down because you will pick up too much speed and it will be hard to control. Instead, we hiked sideways step-by-step back down the slope and all made it safely to the bottom.

Screenshot_20250722_121304_Gallery
20250712_191528

Normally, there’s a small pond off the trail mid-way up the mountain that makes for a nice place for a quick swim, but it was still completely frozen when we visited, so we didn’t get to avail. Otherwise, we enjoyed a very nice day hiking the mountain, except that I made one terrible mistake. I’m very fair skinned, so I always apply sunscreen, but I usually skip my legs since they don’t normally get a lot of sun. This was a mistake hiking up over the snow for 2 hours. There’s no trees to provide shade and the sun is stronger at high elevations, so it reflected off the snow onto my legs and I got a really bad sunburn. I didn’t notice until nighttime, but it was pretty painful after that. 

So overall, Brandywine Meadows and Mountain make for great objectives for a day hike and I want to do my part in getting the word out that camping is no longer permitted in the meadows, which is why I did my best to rush this post out.

PSX_20250714_204405

14 Free Backcountry Campsites in BC

Welcome back to the second part of my 2-part series to help you get camping with minimal advance planning, in any season! Part 1 focused on permitted campsites (that don’t require reservations) and Part 2 focuses on unpermitted (free) campsites! 

Camping is incredibly popular in BC, especially near Vancouver. The popular campsites require reservations that release 4 months out and being coordinated to plan so far in advance can be a real challenge for people. It might seem like all the good campsites are booked, but there are lots of great options that don’t require advance bookings!

HOP_4999

Why do some campsites require a permit and others are free?

The simple answer is that a lot of free campsites are located on crown land or in BC recreation sites (also considered crown land). The land doesn’t have park status, so it generally receives limited maintenance or it is maintained by users and volunteers. As a result, free campsites are often more rustic than traditional permitted campsites. There are lots of campsites located on crown land that are privately managed, either by for-profit or non-profit groups, and those campsites will usually have a campsite fee to go towards ongoing maintenance, though some non-profits will fundraise for the upkeep of facilities, like on the Sunshine Coast Trail.

That said, there are still some free campsites located in provincial parks, especially the further you get from the lower mainland. I don’t know the exact reason why some campsites have permits and others don’t, but I think it’s likely related to the popularity of a park and how much maintenance the park gets. For example, I visited South Chilcotin Provincial Park last year for 6 nights and didn’t pay any camping fees, but the park is very remote, has limited infrastructure, and several of the places we camped were considered wild camping (no outhouse or bear cache). When sites become more popular, permits will often be introduced.

If you are visiting a free campsite that does not have bear cache facilities or an outhouse, it is absolutely essential to practice bear safety and leave no trace practices. You must hang your food or bring a bear bin. In addition, you must be prepared to dig catholes or use a wag-bag, and pack out your toilet paper, pads, and tampons. It is not acceptable to poop in the woods without burying it, or to leave your toilet paper around the backcountry. We are so lucky to have access to incredible backcountry in Canada and we need to respect it.

Campsites Near Vancouver

Hanging Lake

DSC09695

Hanging Lake is located in Whistler, sharing a trailhead with the Rainbow Lake trail on Alta Lake Road. Rainbow Lake is Whistler’s water supply, and as such, it’s a protected watershed area, so you’re not allowed to camp there. But if you hike a few more kilometres over Rainbow Pass to Hanging Lake, you can enjoy a nice view from the pass and a relaxing night at the lake. It’s a 10km trail to the lake, but the real challenge comes from climbing 800m of elevation along the way. There’s a fair bit of space for tents at Hanging Lake and there is an outhouse and a bear cache. You can also access this trail from the Rainbow Madeley trailhead near Madeley Lake.

Tikwalus

20220528_140213

In my opinion, Tikwalus Heritage Trail is an underrated trail along the Fraser Canyon. To access it, you take Highway 1 past Hope until you pass Alexandria Bridge Provincial Park. The Tikwalus Heritage Trail has been used by indigenous peoples for generations, and in more recent history, it was used by fur traders. It’s only 6km along a semi-loop trail to the campsite, but you’ll climb almost 800m in elevation, so it’s steeper than Hanging Lake. Most of the trail is in the trees, but there are some beautiful mountain views from the campsite. There’s lots of space for tents, as well as an outhouse and a bear cache. There’s no water source directly at the campsite, so fill up at the creeks on the way up to save yourself having to backtrack.

Brunswick Lake / Deeks Lake

DSC07712

Deeks Lake and Brunswick Lake are both located on the Howe Sound Crest Trail, but are accessible from the northern trailhead at Porteau Cove if you’re not doing the 30km thru hike from Cypress Mountain. Both lakes are beautiful and offer an easier alternative to the strenuous Howe Sound Crest Trail. It’s 6.5km to Deeks Lake (which is the smaller site) and 10km to Brunswick Lake, however there’s almost 1200m of elevation gain along the way. Most of the elevation gain is in the first 6.5km to Deeks Lake, making this part of the trail the steepest on my list. Of the two lakes, Brunswick is the most scenic and has more room for camping. It’s also important to note there are no facilities at either site, so be prepared to hang your food and dig catholes.

Flatiron

DSC06682

Keeping in theme with the previous trails, the trail to Flatiron is just as steep, climbing over 800m in ~5.5km, with most of the elevation gain in the first 3.5km. It’s located in the Coquihalla Summit Recreation Area off Highway 5 and shares a trailhead with Needle Peak. The first section of the trail is a huge slog through the forest, but the views are incredibly rewarding. Once you pass the junction for Needle Peak, there’s a small lake where you can camp. You can also camp at the summit of Flatiron, but there’s no water source up there. There are no facilities at either site, so be prepared to hang your food and dig catholes.

Brew Lake

PSFix_20201005_141152

Brew Lake is less steep than some of the other trails on this list, but still a big hike, covering 900m of elevation gain over 8.5km. However, if you have access to a 4×4 vehicle, you can reduce some of that distance along forestry roads. We parked along Brew Creek FSR, at the entrance to Branch 50, and hiked the entire trail from there, including 3.5km along other FSRs. This isn’t a very popular site, so it’s a nice place to go to escape the crowds. There are no facilities, so be prepared to hang your food and dig catholes.

Fairview Bay / Manzanita Bluffs

20220804_200318

We have finally arrived at some options that are not super steep! Both of these sites are located on the Sunshine Coast Trail, which has lots of possibilities for backpacking trips. The whole trail is 180km long, but there are lots of sections that can be done over a day or two. The campsite at Manzanita Bluffs, located on the north end of the trail, is especially beautiful. I also really like the campsites at Fairview Bay and Rainy Day Lake, located on the south end of the trail. All campsites along the trail have outhouses and most of them have bear caches or huts. They do not all have water sources, so plan accordingly. While these sites are free, I do recommend a donation to qPAWS if you opt to stay in one of the huts.

Campsites Accessible by 4×4 Vehicle

Tricouni Meadows

20220820_132359

Tricouni Meadows is a popular campsite located northwest of Squamish. The trailhead is located on Branch 200, off of Squamish River FSR. If you can make it all the way to the trailhead, the hike to the campsite is just over 3km, with 250m of elevation. However, there was a large wash-out on Branch 200 when I did this hike in 2022. If you park at the wash-out, it adds 3km to the trail. In 2022, some vehicles could get through, but I’ve heard it’s gotten worse, so play it safe. There are 3 lakes near the meadows, with the campsite located at the middle lake: Spearhead Lake. It’s not a large campsite, so I recommend getting there early. There are no facilities, so be prepared to hang your food and dig catholes.

Blanca Lake

20240721_074347

Blanca Lake is another campsite located northwest of Squamish. In general, I would say this road is in better shape than the road to Tricouni, but it’s further away. The trailhead is located off E300 on the Elaho Mainline. The trail is 4.5km, with almost 500m of elevation gain. It starts off pretty steep, but then levels out along the middle. The view from Blanca Lake is incredible and there is tons of space for camping. Give yourself extra time to explore around the alpine once you get to the lake. There are no facilities, so be prepared to hang your food and dig catholes.

Conglomerate Flats / Manson Ridge

PSX_20230807_175855

Both of these campsites are located on the HBC Heritage Trail that runs 70km between Hope and Tulameen. Manson’s Campsite is located on the Hope end of the trail (off Peers Creek Road), so you don’t need 4×4 to access this site, but if you want to access Conglomerate Flats for a night, then you need 4×4 to get the trailhead at Jacobson Lake Rec Site (off Tulameen FSR). Both sites are beautiful, though Conglomerate Flats is the more stunning of the two. It’s 6.5km and 600m of elevation gain to Manson’s Camp from the southern trailhead, and 2.5km and 150m of elevation gain to Conglomerate Flats from Jacobson Lake. Both campsites have outhouses and bear caches.

Winter Campsites

Falls Lake / Zoa Subpeak

PSX_20210314_215122

Both of these sites are located in the Coquihalla Summit Rec Area off highway 5. Falls Lake is a great site for beginners because you only have to snowshoe 1km along the road (which isn’t plowed in the winter) and 1km to the lake. Zoa subpeak is a bit more challenging as it’s 550m of elevation gain over 4km. Both trails are located in simple terrain, but make sure to stop at Zoa Subpeak – if you try and snowshoe all the way to the true peak, you will be entering challenging avalanche terrain. I’ve never actually been to Falls Lake, but I believe there is an outhouse. There are no facilities at Zoa Subpeak.

Ottomite Peak

20230204_135419

Ottomite Peak is also located in the Coquihalla Summit Rec Area off highway 5. The trailhead is at the Zopkios Rest Area. It’s a 4.5km trail with 300m of elevation gain to get to the summit. It was completely empty when I camped there, but the general area is popular among ski tourers, so you may see people along the trails for the day. The trail is in simple terrain, but always exercise caution – in general, I always recommend taking an AST1 course. It’s not a challenging trail, but there are no facilities.

Water Access Campsites

Widgeon Creek

A photo of a line of canoes on the shore of Widgeon Creek at the Widgeon Campsite in Pinecone Burke Provincial Park, with the mountains and trees in the background on a cloudy day in BC.

Widgeon Creek is located near the lower mainland and is extremely popular on summer weekends. It’s a ~5 paddle across the Pitt River and up Widgeon Creek to get to the campsite. You can rent canoes or kayaks at Pitt Lake. There are lots of campsites and great facilities, including a large bear cache and 2 outhouses. But I recommend getting their early on a nice weekend to beat the crowds. From the campsite, you can do a day hike to Widgeon Falls.

Twin Islands / Granite Falls

20240810_114057

Twin Islands and Granite Falls are two campsites located in Indian Arm, so they are very accessible from the lower mainland. As a result, they are very popular on summer weekends, attracting paddle boats and motorized boats. You can rent kayaks from Deep Cove. It’s only 5km to paddle to Twin Islands, so this is the easier campsite to access. You’re only allowed to camp on the north island, but it has an outhouse (no bear cache since it’s an island). Granite Falls is at the far end of Indian Arm and is an 18km paddle from Deep Cove, so you should be an experienced paddler if you want to do this trip. It has 2 outhouses and a bear cache, but it’s severely undersized. Be prepared for northern afternoon winds.

Nine Mile Point / Kunechin Point

A photo from Kunechin Point in Sechelt Inlet on a kayaking trip, with the water and mountains in the background on the Sunshine Coast in BC.

Nine Mile Point Beach and Kunechin Point Campsite are both located in Sechelt Inlet on the Sunshine Coast. There’s a kayak rental place at the end of Sechelt Inlet Road, where you can launch from. It’s ~6km to paddle to Nine Mile Beach and ~10km to paddle to Kunechin Point, but the latter involves crossing the arm of the inlet, which can get windy. Both are beautiful sites and have outhouses, but no bear caches.

Bowron Circuit Kayak Trip: The Chute

If you’ve been following along, this is Part 3 of my Bowron Circuit series. Check out Part 1 and Part 2

We left off at the end of Day 3, camping at Camp #28 next to the most notorious feature on the Bowron Lake Circuit: The Chute. The Chute is a section of standing waves where the end of Isaac Lake meets the mouth of the Isaac River. The main characteristics of the Chute is that there is a circular eddy on either side of the chute and a sharp right bend in the river at the end of it. If I’m being honest, it’s not that challenging, the trick is not to exit the chute too early. You want to get as close to the end of the waves as possible because if you turn too early, you can get sucked into the eddy, which will turn your boat sideways and then the waves will quickly flip you over. 

I’m not sure how the water level contributes to the difficulty of the Chute. It was still Spring when we visited the park, so the water level was really high. One of the kayakers shared that he had done the Chute in the middle of summer when the water level was a lot lower. I imagine the waves are probably more pronounced in the Spring, but in the Summer, you have to worry about not hitting rocks, so it might actually be easier with the high flow.

20250520_180509

The biggest challenge we had was that it was very cold. We were lucky to wake up and find the sun shining, which definitely helped, but the temperature hovered pretty close to zero degrees most mornings (one morning we woke up with frost on the boats). The risk of a capsize was a lot scarier at this time of year because of the cold water and air temperatures. In the middle of summer, you’d generally only be worried about losing your gear to the river rather than being concerned about hypothermia from getting dunked in it. 

For this reason, more than half of the 5 Guys decided not to run the Chute. Three of them portaged around it, but two decided to paddle it, so Seth and I got to watch them before attempting it ourselves. They navigated the water without any issue, so we decided to follow close behind. I definitely think you have a bit of an advantage doing the Chute in a kayak because you’re not really worried about losing gear. Everything is enclosed in our hatches, so we only had to deal with the cold. The Canoe Bros also ran the Chute, but they spent more time to bungee all their gear to the canoe, so they went after us. 

PSX_20250603_193526
PSX_20250603_193607

The other advantage me and Seth had is that we were wearing wetsuits. Generally, a dry suit is much better, but they’re also very expensive, so we’ve managed just fine with our wetsuits for years. I still didn’t want to get dunked, but at least I had 3mm of neoprene between me and the cold water. We decided that I would paddle the Chute first so that Seth could assist me if I capsized. Fortunately, we both made it through the Chute without incident! And you know what, it was so much fun! We’re not experienced paddlers by a long shot, but I definitely think that if you can handle paddling 116km of wilderness, you can handle the Chute and I’d encourage people to give it a try. Take the time to plot out your route first and discuss risk management and what you will do if you capsize. Secure your gear if possible to minimize the impacts of capsize, but overall, I think the Chute is a pretty manageable objective and I was so glad that we took it on.

Although, the Chute is only the start of the adventure! Once you run the Chute, you are committed to another 1km of paddling along the fast moving river. The next section of rapids are called the rollercoaster, but they’re mostly just sections of standing waves. It’s not a big deal to go through them, you want to make sure you avoid any rocks in the river, so it’s mostly an exercise in looking for hazards. I suspect this part of the river is a bit easier in the Spring when water levels are high because there are less obstacles. 

PSX_20250616_162507

The river paddle goes by very quickly and then there’s a mandatory portage around a section of the river known as the Cascades. The portage is only 800m and it is all downhill, but the trail is in rough shape and there were a lot of tree roots and rocks that we had to go around. Then there’s another short section of paddling in the river (~600m). At this time of year, the river is moving really fast and there are some more sections of standing waves, so I found it fun to paddle. 

However, you have to be careful not to miss the sign for the last portage, because if you go too far downstream, the next water feature is Isaac Falls! The signage is pretty obvious and we pulled our boats ashore for another 500m portage. Once you finish that portage, the bulk of the portaging for the circuit is done. You launch back into the river, but are quickly pushed out into McLeary Lake.

PSX_20250603_193758
PSX_20250603_194730

McLeary Lake is one of the smaller lakes on the circuit, but it is really beautiful. There’s only one campsite on it and I don’t think it’s super popular because most people stay overnight at the top of the Chute, but I think this one would be really nice if you wanted to do the Chute later in the day. McLeary Lake felt like one of the most remote lakes to me. I think it’s because it’s shallow and it felt more like a river delta. It’s a quick paddle across the lake, which connects the Isaac River to the Cariboo River, so we pulled our boats up on the sandy shore for a break before taking on the Cariboo. It really felt like we were in the middle of nowhere and I could envision seeing a moose or a caribou at any moment.

We still had to navigate the Cariboo River, which is probably the second most challenging part of the circuit, after the Chute. You can’t portage around the river, so what makes it tricky is that it’s 6km long and there are lots of hazards lurking along the shore or just under the surface. You need to be careful to watch for deadhead (debris under/in the water) and sweepers (debris across the river) that could knock you from your boat. I’m not sure what the current is like in the summer, but in the spring, there was a lot of water and it was moving very fast. I felt that capsizing in the Cariboo River would be more dangerous than the Chute because the current moves so fast, it’s really important not to get separated from your boat. 

PSX_20250603_194107
PSX_20250603_194855

Fortunately, everything went smoothly for us and it was probably one of the most fun and beautiful sections of the entire circuit. Combined with running the Chute, Day 4 was easily our favourite day of the trip. Because the current was moving so fast, we barely had to paddle at all and we were surrounded by the most scenic and remote mountain landscapes. My jaw was on the floor of the boat the entire time! I think we had less hazards to worry about with the water being so high, but there was one large tree submerged below the surface in one section that played with my imagination because it would be quite easy to capsize if you got too close or didn’t see it. 

We had planned for a shorter day because I was worried about the Chute and the Cariboo River, but because those sections of the river are fast moving, this actually would be a good day to knock out some serious mileage if you were behind schedule. 5 Guys and the Canoe Bros were all aiming to make it to Unna Lake, which was a lofty 35km of paddling. Our goal was Turner Creek (Campsite #34), which was only 15km, and we decided to check it out before choosing if we wanted to paddle further. 

PSX_20250603_194018
PSX_20250606_122805

We ended up paddling all the way to Turner Creek for a late lunch before stopping. Once you exit the Cariboo River, you’re at the bottom of the circuit, starting with Lanezi Lake. I’d heard the south end of the circuit was particularly stunning and I didn’t want to rush through it. The wind picked up pretty much right away when we got to Lanezi Lake, so it was a bit of a work-out to get to Turner Creek, which is a few kilometres up the lake. We ended up arriving shortly after 1pm. It felt a bit early to stop, but it got a bit stormy when we landed on the beach and started to rain, so we quickly ran up the camp to the shelter.

The shelters early on the circuit are more like little ranger cabins. They’re not very big and seem to be historic to the park. On the second half of the circuit, the shelters are modern construction and clearly designed to accommodate more people. The shelter at Turner Creek was the same as at the Chute, but this one had windows, which is much more practical if you want to use the woodstove. As soon as we got to the shelter and saw the views from the campsite, it was a very easy decision to stay and have a lazy afternoon. We watched as 5 Guys and the Canoe Bros all paddled past us on their way to Unna Lake. 

PSX_20250606_123927
PSX_20250606_123000

Turner Creek is a large site and I think it’s pretty popular in the summer, so it’s hard to believe we had it all to ourselves! We picked a campsite with a gorgeous view of the lake, with the fire pit right on the edge of the site overlooking the view. Seth got a fire going in the woodstove and we unloaded the boats and changed into dry clothes. The rain was short lived and after a few hours of wind and waves, the sun came out in the late afternoon and the water got really calm. I mostly just read and soaked in the sun for a few hours, which was much needed! Seth opted to go for a quick swim, but I was still too chilled for the water, so I just enjoyed the view.

At this point of the trip, we hadn’t seen a lot of the other paddlers who started with us. There was a group of New Brunswickers who paddled faster than the rest of us and we didn’t see them after the second day. But there was also a solo kayaker who was doing the circuit with a 10 foot sit-upon kayak. We talked to him briefly on day 1 (he shared that his kayak felt very “tippy”) and then we hadn’t seen him since. I have mixed feelings about the appropriateness of this kind of kayak. Really, they are not appropriate. 10 feet is very short for this kind of trip and sit-upons lack the stability of an ocean kayak. I can’t imagine it felt very comfortable in the challenging conditions of Isaac Lake. But on Day 4, the solo kayaker eventually caught up with us and he did end up finishing the circuit, so I guess I don’t have any right to judge him. I would not recommend it, but I guess it can be done. He pulled into another site for the night, so we still didn’t get to talk to him. 

PSX_20250606_123406
PSX_20250606_123113

We spent the rest of the evening eating and enjoying the view. I made supper and Sseth got a campfire going looking out over the lake. The weather really cleared up and we didn’t get any more rain that day. Instead we just enjoyed the solitude of the site before eventually going to bed for the night. This was the only night on circuit that I was a bit cold overnight. We packed really warm sleeping equipment, but the next morning when we woke up there was frost on the kayaks, so it obviously got pretty cold overnight! 

On Day 5, we finally got a morning where the lake was dead flat in the morning and we were super excited to launch the kayaks! The sun was still hanging around and we had a really enjoyable paddle along the edge of Lanezi Lake. The mountains on the south side of Lanezi are super picturesque. There’s a few small campsites along the edge of the lake and as we were approaching one for a snack break, Seth spotted a marmot along the lakeshore! It didn’t seem like marmot habitat, but I guess this guy found a good place to make his home between some loose rocks. 

PSX_20250609_080833
PSX_20250609_080308

The weather was very temperamental, but not necessarily in a bad way. We could see the storms moving around throughout the day. You’d look one direction and it would be rainy and dark, and then you look the other direction and it’s blue sky and clouds. We weren’t immune from the rain, but the wind stayed low all day, so it didn’t bother us. We had another snack break at the end of Lanezi Lake, at Camp #37, which is a really beautiful site. 

From there, you briefly return to the Cariboo River to paddle into Sandy Lake. The river is really wide in this section and it’s not fast flowing. Sandy Lake is small compared to some of the other lakes and we did get a spot of bad weather as we were paddling into it. But there are some really nice campsites! As the name suggests, there are sandy beaches along Sandy Lake and the campsites are very large, with lots of room for tents to spread out. We took a break for lunch just as the wind was coming up, but fortunately it was short lived and seemed to calm down again after we re-launched. 

20250522_120738

The last section we had to paddle for the day was to re-join the Cariboo River until we reached Unna Lake. Unna Lake is probably the most well known site on the circuit, so it has a lot of campsites and is very popular as a place to stay. To get there, we had to paddle 21km in total, which was pretty achievable 5 days into the trip and considering we had decent paddling conditions. 

We weren’t sure what to expect from the Cariboo River in this section. We thought it might be fast moving like the section from the previous day, but it was more like a lazy river. We had to work a little bit more with the paddling, but we saw lots of birds along the way, especially kingfishers, which are my favourite bird!

PSX_20250609_081055
PSX_20250609_080957

Unna Lake is actually located off the circuit, so in order to get there, you have to paddle past the next portage to Babstock Lake, until you get to a little entrance off the river to the lake. The lake is pretty sheltered and I think it’s popular because it’s usually quite calm. There’s a huge beach with lots of campsites at Unna Lake, and if you paddle further into the lake, there’s a second lake called Rum Lake, which is where the group campsite is. The other attraction on the far end of Unna Lake is the trail to Cariboo Falls. There’s no hiking in the park except for this trail. It’s a 1km trail that hikes further along the river to the thundering Cariboo Falls. 

We could see the Canoe Bros across the lake heading out towards the trail, but the campsite was empty so we assumed they were on the way out. Again, we had a very large and popular campsite all to ourselves, which felt a bit surreal! We picked a nice spot to set up and then the sun came out and I finally felt like I might be warm enough to go for a swim. There was no one around, so the only real option for swimming was skinny dipping. I can tell you, we never miss an opportunity for skinny dipping and given the low crowds on the trail, neither of us used our swimsuits on the trip 😉

PSX_20250609_081614
PSX_20250609_081309

I finally went for a swim and because Unna Lake is so shallow, it was surprisingly warm. It felt nice to wash my body, although we had been doing heated cloth baths throughout the week and those are pretty nice too! We figured there was no rush to hike to Cariboo Falls and decided to just relax along the beachfront instead. Unna Lake is very sandy, so I can understand why it’s so popular in the summer. That said, if you can’t make it all the way to Unna or it doesn’t work with your itinerary, I honestly think Sandy Lake is just as nice, and probably gets less people. 

Later in the afternoon we got a little bit of entertainment. Once you hit Unna Lake, you’re on what is considered the West Circuit. If you don’t have enough time for the entire Circuit, you can plan a shorter itinerary on the West Circuit, which involves starting your paddle across Bowron Lake in the opposite direction. You’re permitted to paddle as far as Unna Lake, after which you have to turn around and paddle back to Bowron (because of the currents on the Cariboo River). So generally, the circuit did feel a little bit busier after Unna Lake and it was harder to guess how many people might be interested in the same campsite. 

PSX_20250609_081830
PSX_20250609_081713

As we were relaxing, a very large school group with about a dozen canoes entered the lake. They were all on the west circuit and staying at the group campsite on Rum Lake for the evening. It was at this point, when we saw the Canoe Bros starting the paddle back, that we realized they had actually been camping at Rum Lake overnight and had been planning to stay a second night. They had to pack up all their gear to vacate the group site and then they opted to paddle on to Babstock Lake instead. So we still ended up being the only people at the Unna Lake campsite for the evening. 

We planned to eat supper and then go to the Cariboo Falls trail in the evening, but around 6pm it got super windy! Unna Lake was the only campsite we ended up staying at that didn’t have a shelter, so I made a nice little tarp shelter with our paddles and the wind really put it to the test. It’s only a 10 minute paddle across the lake, but we decided to wait until morning with the wind being so high. We had planned to have a campfire, but I ended up getting chilled by the wind and decided to have a lazy night in the tent instead. I did a bit of reading and went to bed super early, but the exhaustion really catches up with you on these types of trips and I think it was much needed. Check back next week for Part 4!

PSX_20250610_220543
PSX_20250610_220724