Hiking Cirque Lake

Hiking Cirque Lake is a really unique experience located in the Callaghan Valley. I’ve never seen anything about this hike anywhere on social media, I literally stumbled across it while scrolling around GaiaGPS (something I do on a regular basis). So I wasn’t expecting it to be very busy, but other people are clearly aware of it because it was much more crowded than I anticipated.

What makes this hike unique is that you need to paddle across Callaghan Lake to access the trailhead. And in order to get to Callaghan Lake, you need some kind of slightly more rugged vehicle. Lots of information online says you should have 4WD and high clearance to access the lake, but that’s definitely overstating it. I have an AWD Hyundai Tucson SUV and I didn’t have any trouble. Callaghan Valley Road is paved, followed by an 8km drive along Callaghan Lake FSR, which is gravel. What makes it challenging is that there are water bars along the first half of the road, which is uphill. After that, it’s relatively flat and very drivable. The water bars aren’t so large that you need 4WD, although I do think AWD was helpful on one challenging water bar, but having slightly higher clearance is an asset. I wouldn’t take a sedan up to the lake (although I know people do), but I think any SUV could drive the FSR.

20250727_111606

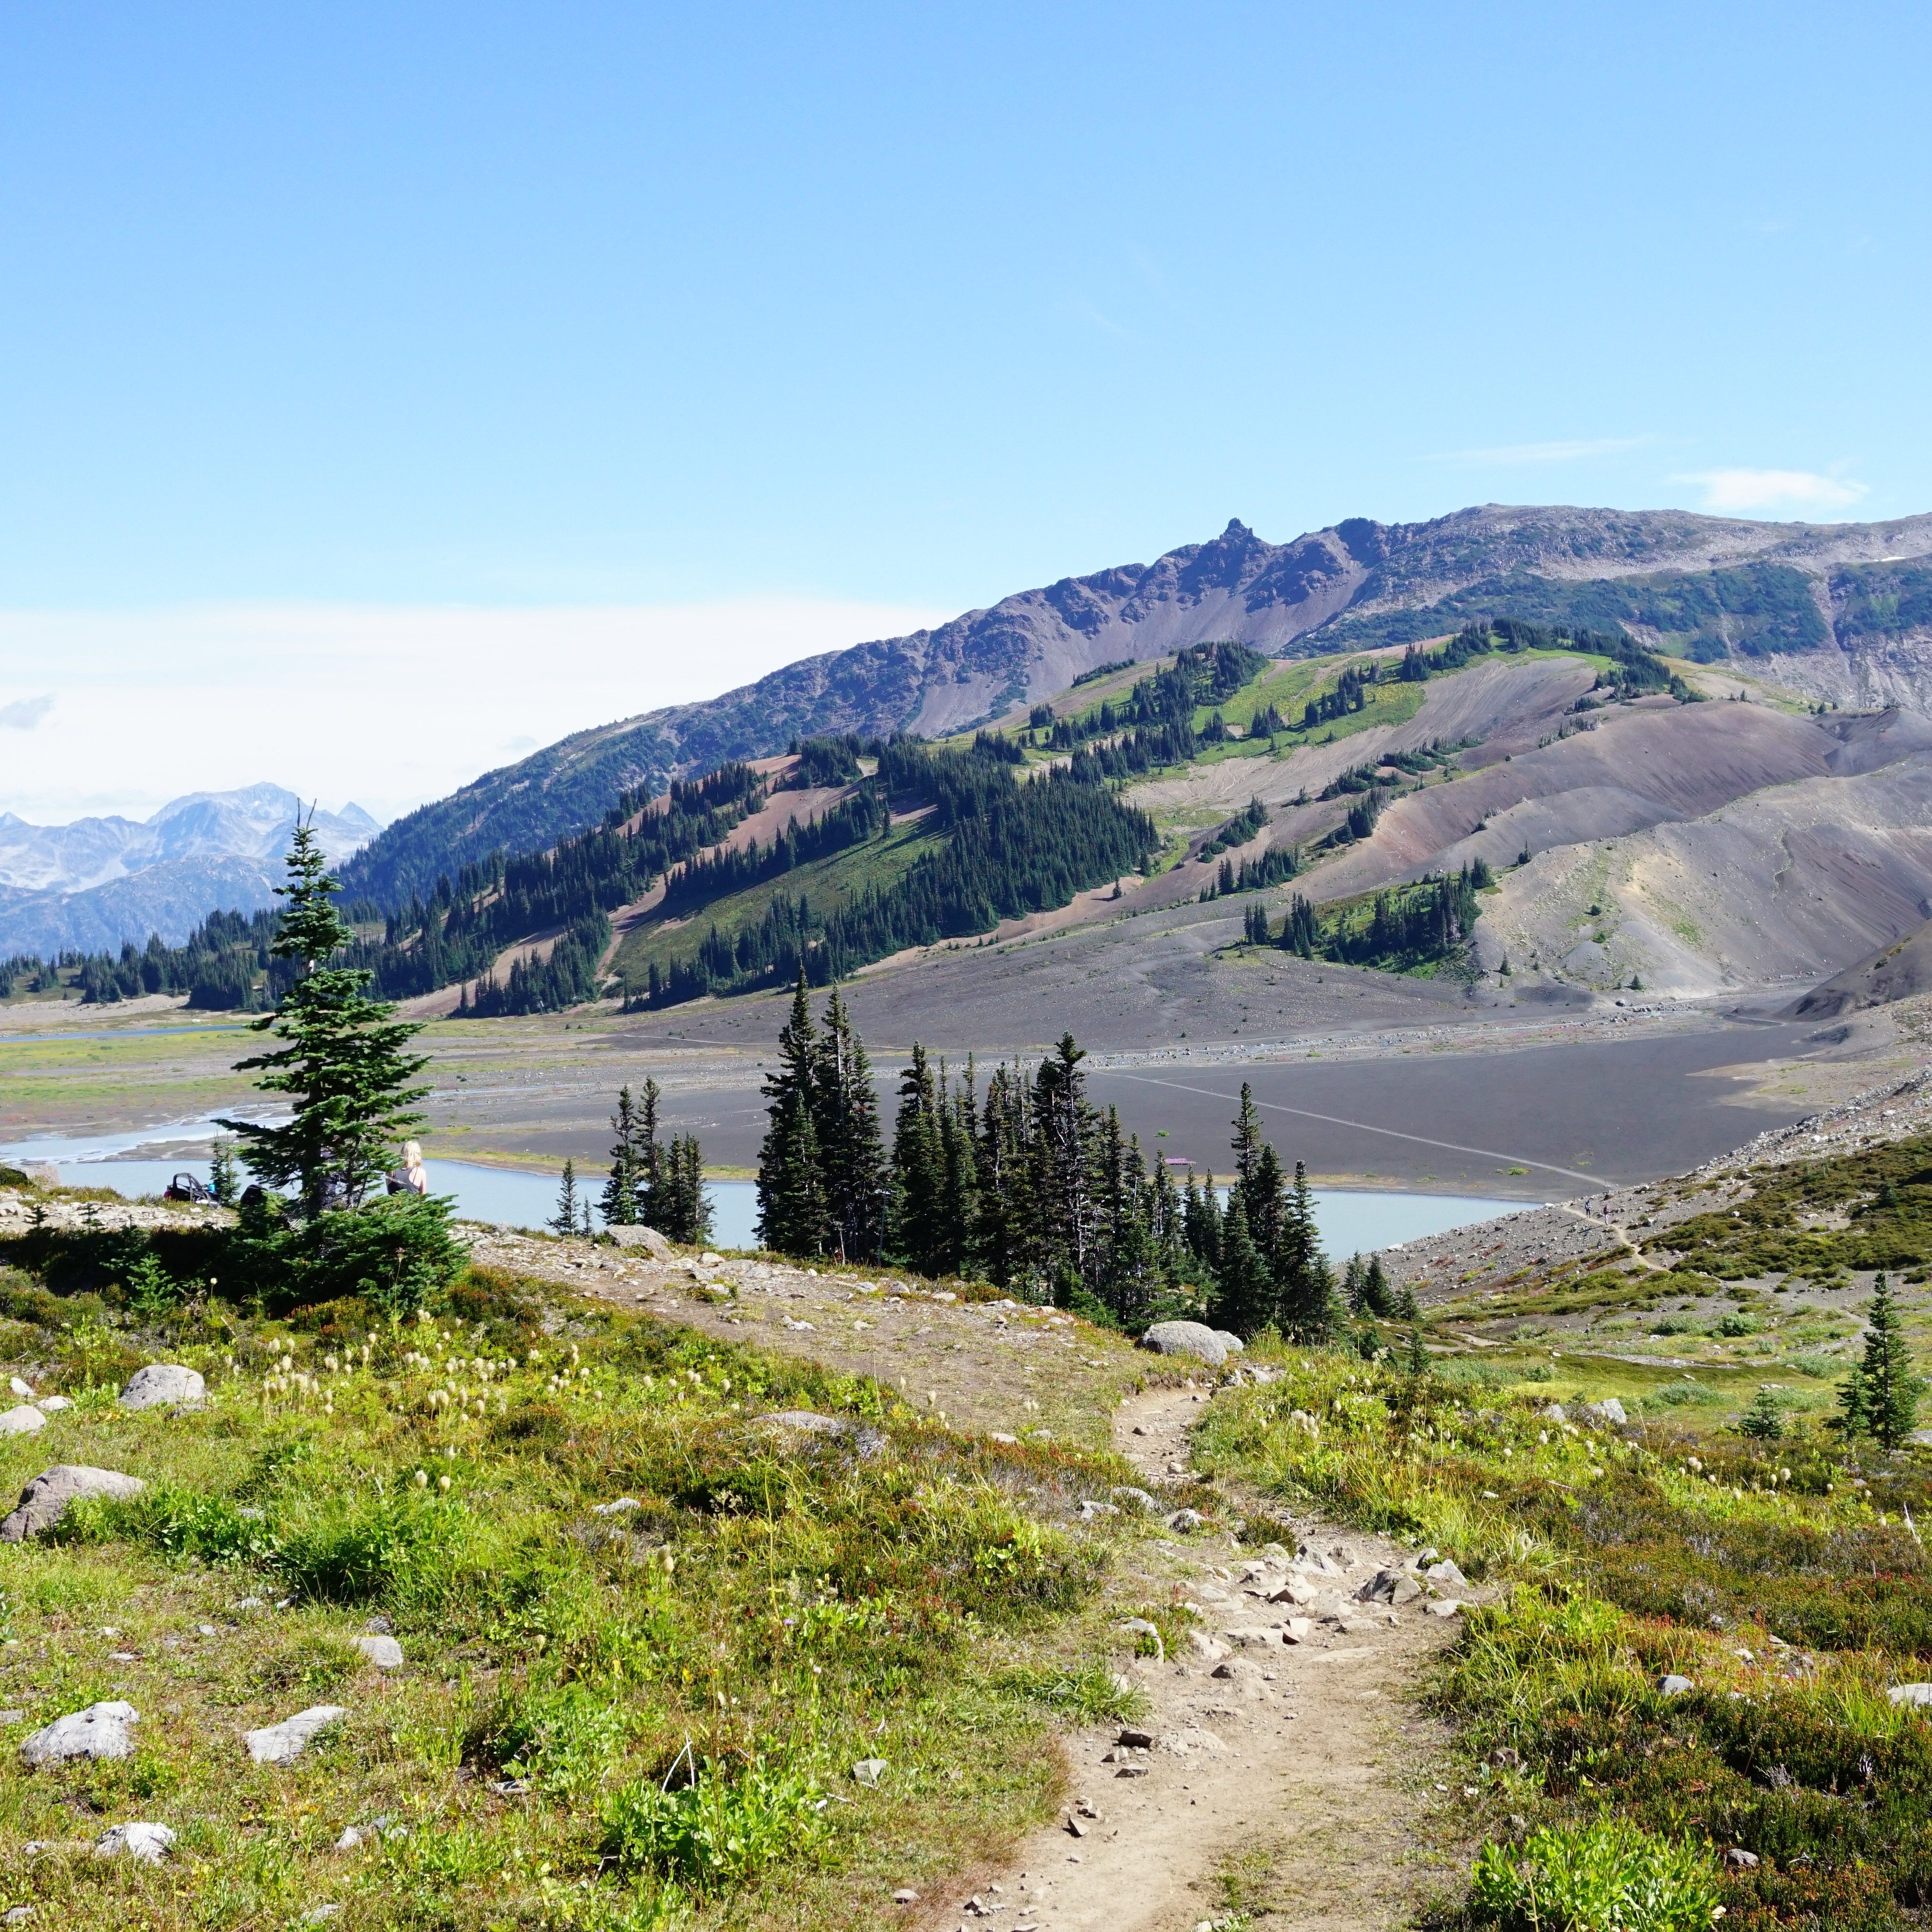
Once you make it to Callaghan Lake, there’s a FCFS campsite that is very popular. We arrived around 10am on a Sunday and there were lots of people camping, as well as a decent amount of day users. From the campsite, it’s a 2km paddle across Callaghan Lake to the Cirque Lake trailhead on the far side. Most people were using SUPs to access the trailhead, with the exception of me and Seth (we used our 16′ touring kayaks), and 1 or 2 canoers. There’s lots of room to store your boat at the trailhead and I’d guess there were 20 vessels piled up along the waterfront. So it was busier than I expected, but it didn’t feel crowded once you start hiking. 

The thing about this hike is that it’s very short, but very steep because you’re hiking up to a hanging lake. It’s just over 1.5km each way, but it has 350m of elevation gain. I don’t think it’s a frequently maintained trail, so be prepared for a more technical hike. The biggest challenge I had was that when I got out of the kayak, I realized that I’d left my hiking socks in the car! I wore my water shoes in the kayak and had packed my hiking boots, but I didn’t remember to take my socks out of the trunk of the car.  

PSX_20250811_165248
PSX_20250811_165324

If this trail had been any longer, I probably would have quit there rather than risk the blisters, but it was short enough that I decided to try anyways. I rooted around in my bag for something I could fashion into a pair of socks. I debated cutting up a buff, but landed on utilizing my first aid supplies. I made one sock out of a tensor bandage, and the other one out of a gauze roll. The gauze roll sock felt lighter and more comfortable at first, but became more scratchy the longer I was wearing it. The tensor bandage was bulkier, but mimicked sock material better. They held up, but I was definitely glad to take them off at the end of the hike!

The trail starts by hiking through the woods and quickly comes to a little stream that you have to cross. If you’re willing to get your feet wet, I recommend just walking through it, but that was the last thing I wanted while wearing band-aid socks. It’s a bit tricky to get across otherwise, it’s not fast moving, there’s just not a lot of great places to cross. We sized it up for a bit before using our poles to walk across a log.

20250727_143432
PSX_20250811_164823

After that, the trail continues uphill through the forest. It’s not too steep at first, but it quickly becomes technical as you climb up through the trees. There’s a rope section, although I didn’t find the rope particularly helpful and used the tree roots as handholds instead. Eventually, you pop out of the trees and have to climb up a boulder field. This is the most challenging part of the hike and I highly recommend poles. There’s some scree and loose rocks, so put some space between you and your hiking companions. But there are really nice views looking back towards Callaghan Lake and we could see more paddleboarders heading in as we climbed. 

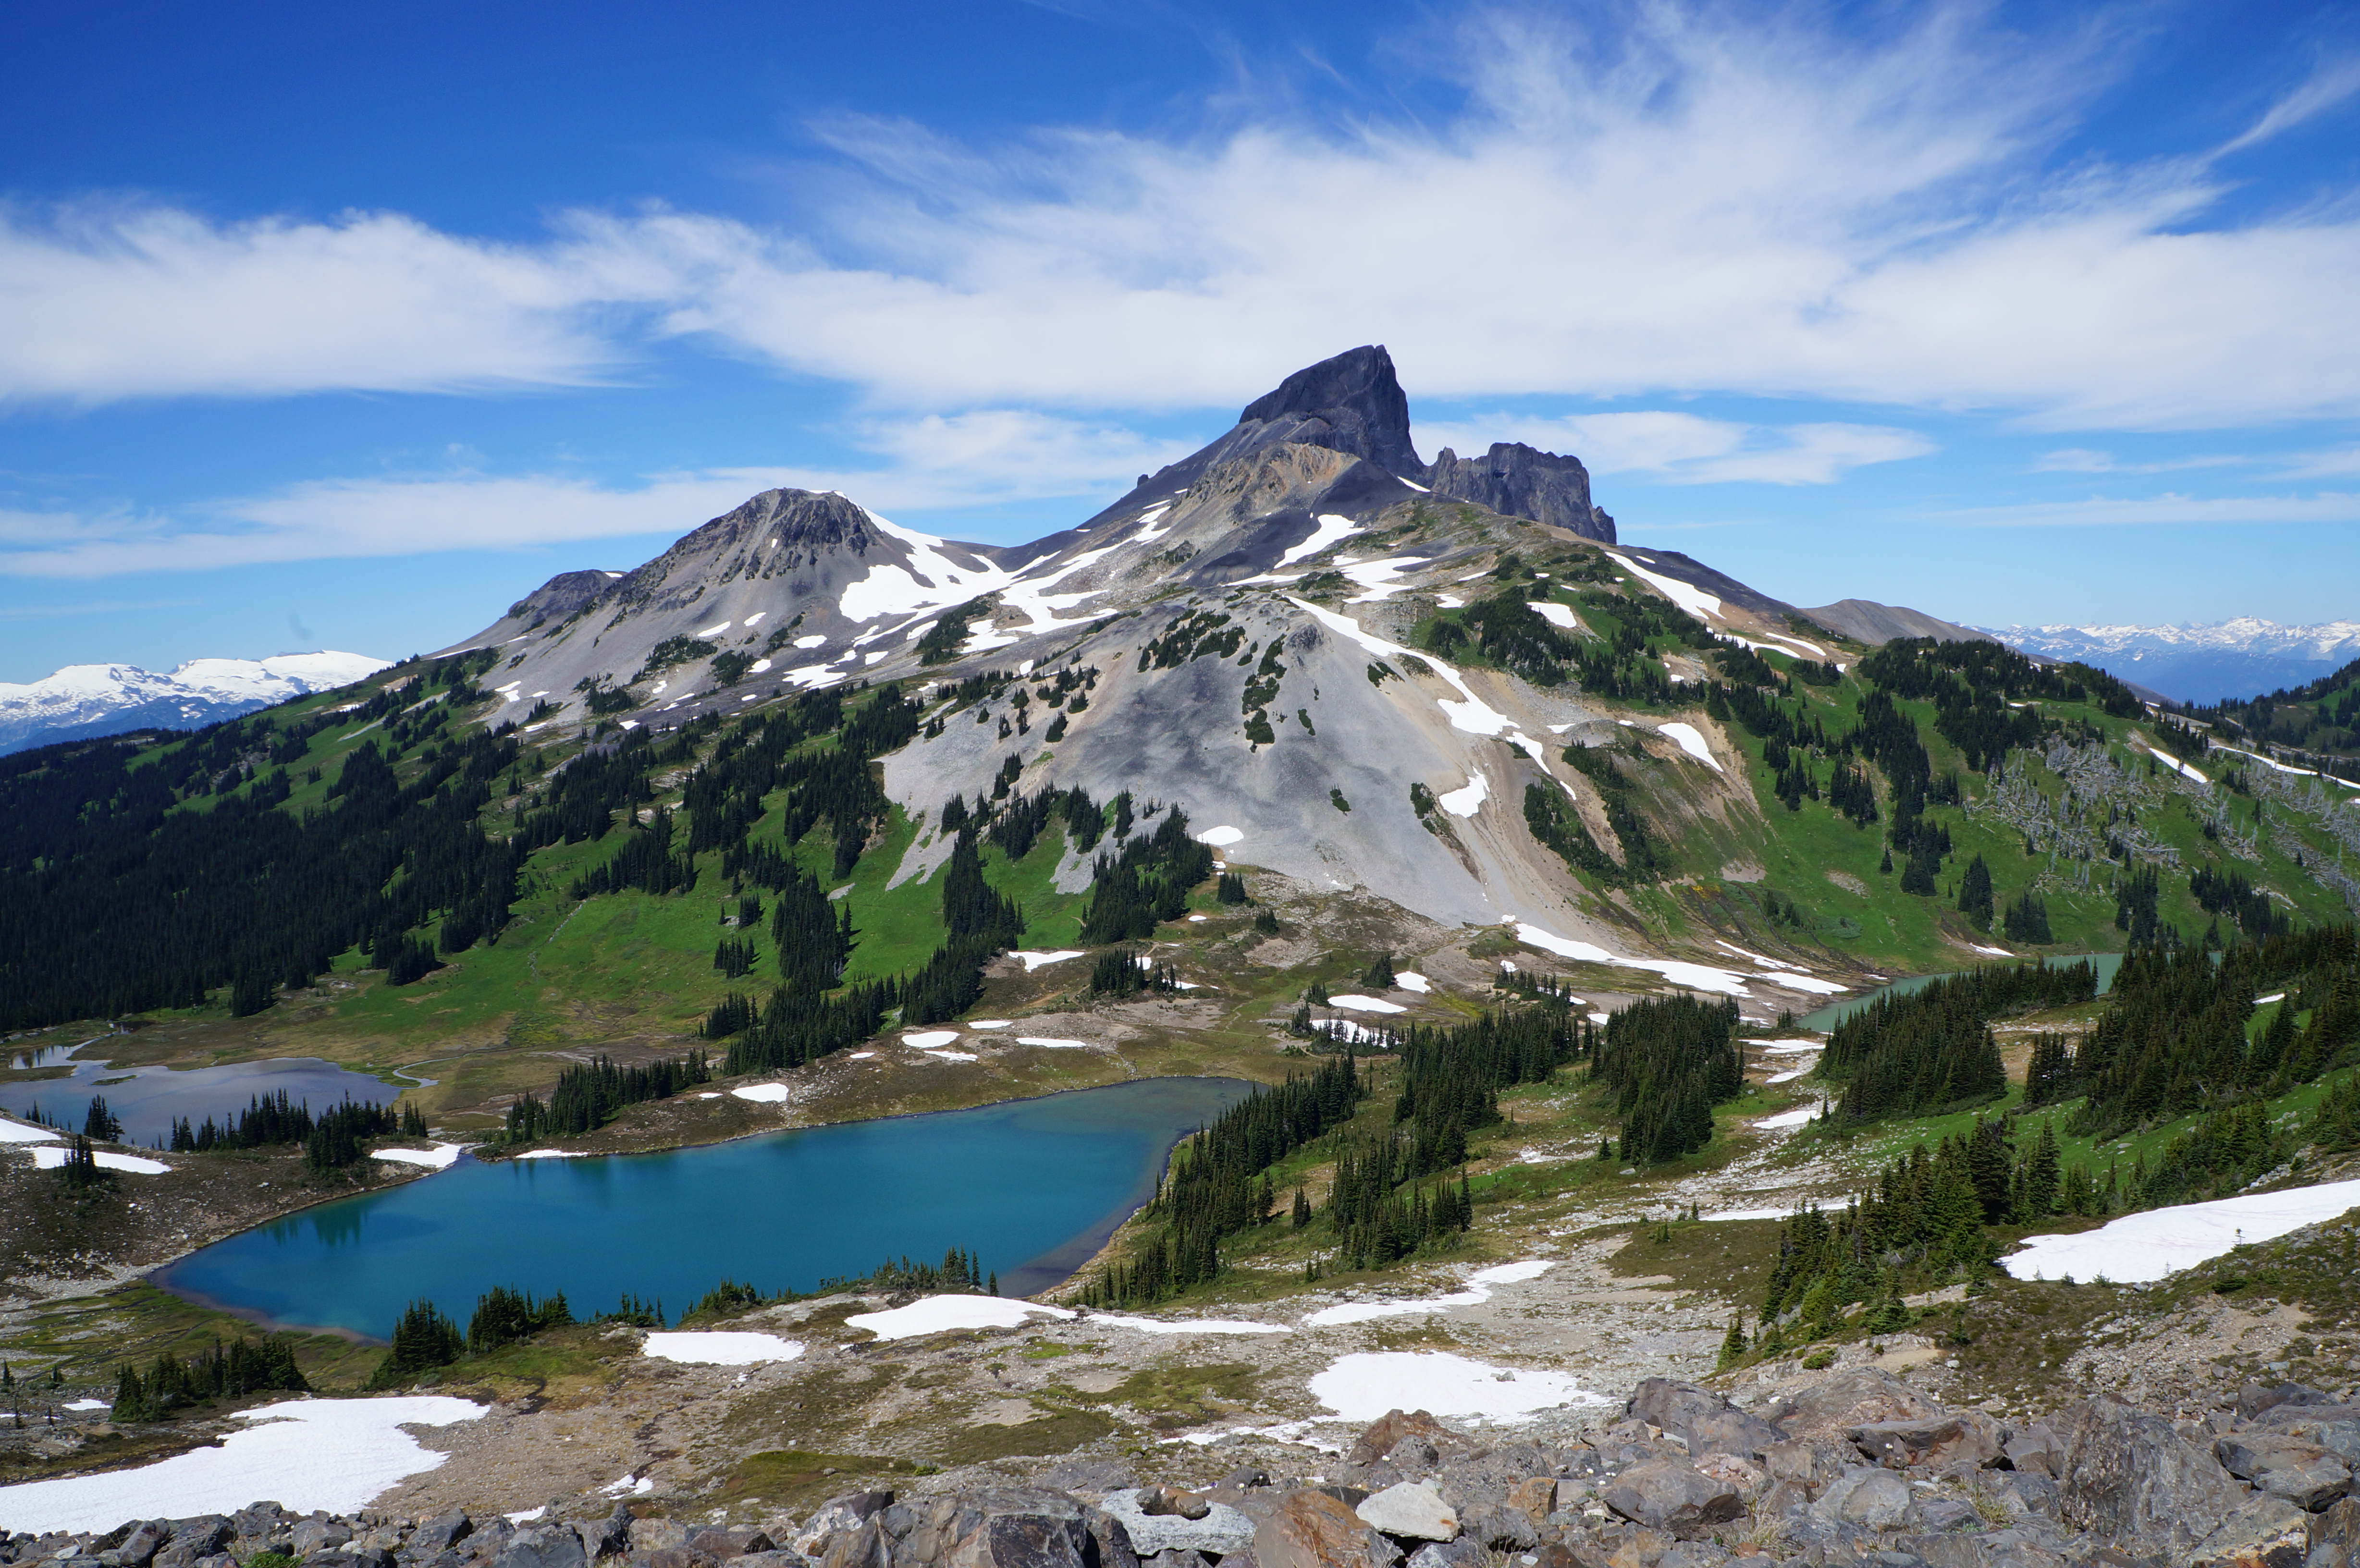
Once you get to the top of the boulder field, there’s still more uphill, but it gets a little less technical. You go back into the trees for a bit and then you climb up over the rocky headland. The trail can get confusing in this section as it branches off in a few places. There’s one place especially where the trail looks like it goes down towards the river flowing out of Cirque Lake, but it actually goes further uphill. I think either way will get you to the lake, but we followed the official trail up. This trail takes you to an overlook looking down on Cirque Lake that is really beautiful.

20250727_130704

The worst part of this hike was probably the mosquitoes. Once we got a few photos from the viewpoint, we climbed down some more scree to get to the lakefront. There’s no real beach, but you can spread out along the rocks. This is where the flies got pretty bad. Fortunately, we had our thermacell and set it up right away. Then we went for a quick swim to get away from them while the thermacell worked its magic. The water was really cold, but so refreshing! The wind picked up after we went for a swim, and between that and the thermacell, we were able to tolerate the mosquitoes and ended up hanging out for about an hour while we had lunch.

This is a really beautiful area. It’s located at the start of the alpine and you can just see some of the glaciers peaking over the mountain tops. The mountain tumbles down into the lake on the west side and the east side is carpeted in lush green meadows. You could explore further around the lake if you were inclined, but you have to navigate more boulder field and I didn’t want to trample the meadows. I had debated camping at this location, but because it’s still in Callaghan Lake Provincial Park, there were signs indicating that camping is not permitted, so it’s a great day trip option. 

PSX_20250728_193503
PSX_20250818_082700

Hiking back down to Callaghan Lake definitely had its challenges along the steep terrain of the boulder field. There’s a fair bit of scree here and poles were really helpful. Our big kayaks had looked excessive as we paddled across flat water on the way to the trailhead, but going back in the afternoon wind, we were thrilled to have them. Typically, the wind always picks up on the water in the afternoon (at least, that’s always been my experience as a paddler). There was a headwind on the way back that we were easily able to counteract in the kayaks, but several of the SUPs were struggling. People tend to go straight across the lake since it’s a relatively short paddle, but if it’s windy, always take the longer route and stick to the shoreline. 

Just because it’s a short paddle, it doesn’t remove the danger. Callaghan Lake is glacier fed, so it’s very cold – much colder than going overboard in the ocean. You’ll want to be able to get back in your boat relatively quickly if you fall in, so you should never forego a lifejacket. I didn’t see a single person other than me and Seth wearing a lifejacket. We saw two guys paddling a canoe backwards across the lake (they were sitting forwards, but didn’t realize the entire canoe was backwards), so it was obvious a lot of people weren’t avid paddlers and were just using any means necessary to access the trailhead. In my opinion, it’s not worth that risk. It’s not a hard paddle and most beginners will be fine, but at the very least, wear a lifejacket and understand that it may be much windier on the water if you come back in the afternoon.

But overall, I really enjoyed this hike. I was surprised to see it gaining so much popularity, but it’s definitely for good reason. It’s a beautiful place and it’s relatively low effort to access!

20250727_155632

Hiking Decker Tarn

There’s lots of great hiking in Whistler, but it’s easy to forget about it sometimes because of the steep price of the gondola. I buy the 5-day edge card every year, which comes with one free summer sightseeing pass, so I’ve been trying to take more advantage of this free day over the past few years. In 2023, I used it to hike the High Note Trail on Whistler when I backpacked to Russet Lake for a night. This year, I returned to check out the hiking trails on Blackcomb.

Blackcomb Trail Map

There’s lots of unmarked scrambling available on Blackcomb, but if you want to stick to the marked trails, you can knock out most of them in one day along the Decker Tarn Loop Trail. You start by taking the Blackcomb gondola up to Rendez-Vous and then heading into the alpine trail zone. We started by taking the Alpine Loop Trail (#12) onto the Overlord Trail (#13). If you want minimal elevation gain, stick to the Overlord Trail for the rest of the hike. It will take you all the way to Decker Tarn, which has a fantastic viewpoint of Overlord Mountain. 

20250726_105705

The trail to the viewpoint is ~4.5km, so it doesn’t take too long. If you want to make it a bit more challenging and enjoy some extra viewpoints, you can add in both the Lakeside Loop (#15) and the Decker Loop (#16), which is what I did. The Lakeside Loop hikes up to a little pond, while the Decker Loop has the most elevation gain and hikes up to a viewpoint. The visibility was really poor in the morning on the day I did the hike, so unfortunately, I missed a lot of the views. We enjoyed lunch at the top of the Decker Loop and the clouds started to lift in the afternoon, providing sneak peeks of the backcountry.

PSX_20250731_082816
PSX_20250731_082726

I like to do the harder terrain first, so we did the two climbs on the way to Overlord Viewpoint, and fortunately, by the time we made it there, we could see a lot more of the views. We stopped for a second break on some of the big rocks next to Decker Tarn. We debated continuing further and hiking up Decker Mountain (there’s no formal trail, but you can do a scramble to the top), but ultimately decided to head over to Whistler to see the skybridge instead.

20250726_130441(0)
20250726_131528

The only trails on Blackcomb that we didn’t do were Marmot Trail (#14), mostly because I didn’t see it, and the Blackcomb Burn, which is a series of trails climbing from the base to Rendez-Vous. This is your only option if you don’t want to pay for the gondola. Despite the poor morning views, we still had a great time exploring the trails on Blackcomb because the wildflowers appeared to be approaching peak bloom as we were visiting! I love all the colourful flowers that grow in the backcountry and have been working on my identification skills over the past few summers, so I had fun looking at all the different wildflowers.

20250726_135519

After lunch, we took the Peak to Peak gondola over to Whistler, followed by a ride on Peak Chair to the top. There’s now a bridge and lookout on the top of Peak Chair that have incredible views of the surrounding mountains. Even though I get to go up there in the winter, I do enjoy comparing the summer conditions. I don’t find the trails to be too busy on Whistler, it’s mostly locals, but the crowds around the gondola infrastructure and the skybridge are primarily tourists and it can get pretty crowded. 

PSX_20250731_083149
PSX_20250731_083044

All in all, I had a fun day. We didn’t pick the best day to do the hike since we spent the first 3 hours of the day in the clouds, but we still managed to see all the views and it didn’t cost us anything to ride to the top. Personally, I wouldn’t pay extra for this experience since I ski there every year, but it’s a nice little perk to be able to check out some of the alpine views in the summer. If you’re a local and don’t want to pay for the gondola, there’s so many other hikes to choose from, but for the tourists, I think it’s definitely worth it! Maybe I’ll return sometime in the future for Decker Mountain!

Garibaldi Provincial Park Guide

If you live in BC, chances are you’ve heard of Garibaldi Provincial Park. I’m not sure if it’s quite as popular as some of BC’s National Parks, but it’s certainly developed a pretty wide-reaching reputation. Garibaldi Park is a large backcountry access park near Vancouver that captures a lot of the wilderness area east of Squamish and Whistler. You can’t drive to any of the park attractions, but it has not slowed down the number of visitors to the park. 

A photo of Black Tusk as seen from Panorama Ridge in Garibaldi Park on a blue sky day in the summer, with the alpine meadows and mountains in the background and lake in the foreground in BC.

Getting There

It’s impressive that Garibaldi Park gets as many visitors as it does when the access to the park is solely self-powered. The park is located between Squamish and Whistler, with several key park entrances at Diamond Head, Rubble Creek, Cheakamus, Whistler, and Wedgemount. Diamond Head is closest to Squamish, while the rest of the park entrances are closer to Whistler, so it can be a bit of a drive from Vancouver. I always give myself 1.5-2 hours of driving to get to the trailhead. Parking is generally secure, but there’s always the risk of break-ins, so don’t leave anything in your car.

Driving is by far the easiest way to get to the park, as public transit is not available. There is a park shuttle (Parkbus) that runs from Vancouver to Rubble Creek (the trailhead to Garibaldi Lake and Panorama Ridge) during late June to early October. The bus only runs on Fridays and weekends, and will book up early for Saturdays. Otherwise, there’s not many options and you’re best off trying to carpool with others via a facebook hiking group if you don’t have a car. 

A hiking trail extends through the alpine of Garibaldi Provincial Park towards Helm Lake, with the forest and mountains in the background on a sunny day in British Columbia, Canada

Activities

The most popular activity in the park is day hiking. Visitors park at a trailhead and spend the day hiking to various viewpoints in the park. The trails are all well maintained and make for a very scenic day in the backcountry. However, most of the trails cover considerable distance and elevation gain in a remote environment, so visitors should be prepared with the 10 essentials and leave a trip plan with someone they trust. For more information on trip preparedness and trip planning, see my Safety post.

Backpacking is also popular as there are 10 beautiful campsites spread throughout the park that can be visited as single night trips or along thru hikes. Biking isn’t permitted everywhere, but you can bike from Diamond Head and Cheakamus Lake, which is a popular activity for cyclists. Finally, lots of winter visitors use the park for snowshoeing or ski touring, either as a day trip, or for an overnight expedition. There is one hut available for camping at Elfin Lakes, which is popular in winter. Avalanche Safety Training is highly recommended if you are recreating in the park during the winter. See my Avalanche Safety post.

A group of 3 skiers traverse the ridge on the way to the Elfin Shelter at Elfin Lakes in Garibaldi Provincial Park, BC. It's a beautiful sunny day with lots of snow and the forest and Diamond Head Mountain in the background.

Permits and Day Passes

In the 10+ years I’ve lived in BC, Garibaldi has always had a reputation as a crowded park. In 2016, BC Parks brought in a reservation system for their backcountry campsites to reduce the impact to the natural environment from overflow camping. If you want to camp at any of the backcountry campsites, you will need an overnight permit. These are available on camping.bcparks.ca for $10 per person ($5 for youth), per night, and release 4 months in advance of your desired date. So if you want to camp on Aug. 15, make sure to book your pass on Apr.15. 

During the pandemic, BC Parks further regulated park use by employing a free day pass system from mid June to mid October to manage parking at the trailhead and impacts to the park from overuse. While these passes are free, they have generated a lot of criticism and frustration from visitors struggling to obtain a pass. The day passes release 2 days before your desired date at 7am, and from what I understand, they can be challenging to obtain due to popularity. My recommendation is to be ready at 7am and keep refreshing for up to 15 minutes. If you make a reservation on Parkbus, it includes a day pass.

The sun shines down during golden hour on Wedgemount Lake with the hut and the mountains in the background in Garibaldi Provincial Park, BC.

When to Visit

The park is popular year round, but it is important to understand that travel through the park has much higher risks in Winter and Spring. The most popular time to visit the park is in the summer (from July to September), but be aware that summer in the mountains is much later than summer in the city. You can usually hike to Garibaldi Lake starting in late June, but the snow in the alpine and along the trails to Panorama Ridge and Black Tusk may have snow on them into late July. Early Fall is also a good time to visit the park, but be aware that temperatures will drop quickly in the mountains and that limited daylight hours can make certain trails more challenging. 

Winter can also be a great time to visit the park, but avalanche safety training is highly recommended no matter where you’re going. Snowshoers and ski tourers will travel to Elfin Lakes and the privately managed Kees and Claire Hut at Russet Lake in the winter. Both of these routes pass through challenging avalanche terrain and I strongly advise completing an AST1 course before attempting these routes. The Red Heather Hut is also a popular location for skiers who want to do a few laps on Round Mountain before heading home. This carries less risk than the other trails because the route is only in simple avalanche terrain, but you should still exercise caution and be prepared. 

A female hiker looks tiny in comparison to the large Wedgemount Glacier in the background in Garibaldi Provincial park, BC.

Trails

There are so many trails to explore in Garibaldi Park. I’ve hiked all of them, with the exception of the winter glacier routes. Here’s some more information on trail options and links to dedicated resources for each trail. Please note that trail distances and elevation gain are approximate.

Garibaldi Lake (18km, 800m gain) – A great option for summer day hiking, or winter snowshoeing (with AST1). Probably considered the most popular hike in the park, with the trailhead at Rubble Creek.

Panorama Ridge (29km, 1500m gain) – Completed by some visitors as a long day hike (12 hours), but recommended as part of a backpacking trip (day hike from the campsite at Garibaldi Lake or Taylor Meadows). This is a very popular trail, with the trailhead at Rubble Creek. Only recommended in the summer.

Black Tusk (25km, 1400m gain) – Completed by some visitors as a long day hike, but recommended as part of a backpacking trip (day hike from the campsite at Taylor Meadows). This is a very popular trail, with the trailhead at Rubble Creek. Only recommended in the summer.

Mount Price (25km, 1400m gain) – Completed by some visitors as a long day hike, but recommended as part of a backpacking trip (day hike from the campsite at Garibaldi Lake). This trail is not very popular and requires some wayfinding, with the trailhead at Rubble Creek. Only recommended in the summer.

Helm Creek (16km, 650m gain) – Most often used as an alternative route when backpacking to Panorama Ridge or as a thru hike from Garibaldi Lake. The trailhead is at Cheakamus Lake and this route is less popular than the trails from Rubble Creek. Only recommended in the summer.

Garibaldi Thru Hike (~30km, 1500m gain) – Only completed as a backpacking objective in the summer. People will hike from Rubble Creek to Cheakamus Lake, camping at Garibaldi Lake, Taylor Meadows, or Helm Creek along the way.

Cheakamus Lake (9km, 50m gain) – A great option for beginner hikers, backpackers, and mountain bikers. It can be completed in a single day or as an overnight trip, camping at Cheakamus Lake Campsite. The trail is popular in the summer, with the trailhead at Cheakamus Lake. Can also be completed in the winter, but the access road is not plowed, making it a much longer hike.

Singing Creek (16km, 50m gain) –  A great option for beginner hikers, backpackers, and mountain bikers. It can be completed in a single day or as an overnight trip, camping at Singing Creek Campsite. The trail is popular in the summer, with the trailhead at Cheakamus Lake.

Elfin Lakes (22km, 600m gain) – A great option in the summer for day hiking and mountain biking, and in the winter for snowshoeing or ski touring (with AST1). Complete as a day hike or stay overnight at the campground or hut. A very popular trail, with the trailhead at Diamond Head (chains required for your tires in winter). 

The Saddle/The Gargoyles (27km, 900m gain) – An extended trail option from Elfin Lakes, can be completed from the parking lot in a single day, or shortened as a day hike from Elfin Lakes. The trailhead is located at Diamond Head. Only recommended in the summer.

Opal Cone (13km, 350m) – This trail can be completed as a day hike from the campsite at Elfin Lakes, or as a stop along the way when backpacking to Rampart Ponds. The trailhead is located at Diamond Head. Only recommended in the summer.

Rampart Ponds (18km, 500m gain) – This trail can be completed as a day hike from Elfin Lakes, or as a backpacking objective if you plan to stay at the campsite. The trailhead is located at Diamond Head. Only recommended in the summer.

Mamquam Lake (22km, 600m gain) – This Trail can be completed as a day hike from the campsite at Elfin Lakes, or as a shorter route from the campsite at Rampart Ponds. The trailhead is located at Diamond Head. Only recommended in the summer.

Russet Lake via Musical Bumps Trail (24km, 1300m gain) – Completed by some visitors as a long day hike (12 hours), but recommended as part of a backpacking trip, staying at the Russet Lake Campground overnight. This route requires paying for a sightseeing pass on the Whistler Gondola and hiking along the High Note or Half Note trails and the Musical Bumps trail. The trailhead is located at Whistler. It can also be visited in winter, but AST1 is required and a backcountry pass from Whistler Resort. 

Russet Lake via Singing Pass Trail (27km, 1200m gain) – Completed by some visitors as a long day hike, but recommended as part of a backpacking trip, staying at the Russet lake Campground overnight. The trailhead is located at Whistler and this route avoids having to pay for a pass for the gondola. Only recommended in the summer.

Wedgemount Lake (14km, 1200m gain) – This trail can be completed as a day hike or an overnight backpacking trip to the Wedgemount Lake Campsite. Overnight is recommended due to the substantial elevation gain. The trailhead is located at Wedgemount Creek. Only recommended in the summer.

Garibaldi Neve – This is a winter route for experienced alpinists only as it involves glacier travel. It is generally completed over 2-3 days and avalanche training and snow camping experience are required. I don’t have any experience with this route, please look elsewhere and do sufficient research and training before attempting.

Spearhead Traverse – This is a winter route for experienced alpinists only as it involves glacier travel. It is generally completed over 3-4 days and avalanche training and snow camping experience are required. I don’t have any experience with this route, please look elsewhere and do sufficient research and training before attempting.

A group of campers sit on the ground surrounded by camp food, pots, and stoves, preparing their dinner on the beach with the trees and lake in the background at Cheakamus Lake Singing Creek Campsite in Garibaldi Provincial Park in British Columbia, Canada.

Campgrounds

All campgrounds in Garibaldi Park require permits from camping.bcparks.ca. These release 4 months in advance of your desired date. They are popular, so it is recommended to book exactly 4 months before you want to visit. Backcountry permits are $10 per person ($5 for youth), per night. 

Elfin Lakes Campground – Reservable year round. There are 35 tent pads, several outhouses, picnic tables, a bear cache, and a cooking shelter. 

Elfin Lakes Shelter – Reservable year round. There are 33 bunks and an outhouse. You must bring your own sleeping pad and sleeping bag. 

Red Heather Campground – Reservable in winter only (Dec-Apr) for snow camping. There are no tent pads, but there is an outhouse and a cooking shelter. You are not permitted to sleep in the cooking shelter.

Rampart Ponds Campground – Reservable year round. There are 12 tent pads, an outhouse, and a bear cache. Sometimes this site floods in the summer and is closed.

Garibaldi Lake Campground – Reservable year round. There are 50 tent pads, several outhouses, picnic tables, bear caches, and four cooking shelters.

Taylor Meadows Campground – Reservable year round, except in September and October (I’m guessing because of bears). There are 40 tent pads, several outhouses, picnic tables, a bear cache, and two cooking shelters.

Helm Creek Campground – Reservable year round. There are 30 tent pads, an outhouse, and a bear cache. 

Cheakamus Lake Campground – Reservable year round. There are 10 tent pads, an outhouse, and a bear cache.

Singing Creek Campground – Reservable year round. There are 6 tent pads, an outhouse, and a bear cache.

Russet Lake Campground – Reservable year round. There are 7 tent pads, an outhouse, and a bear cache.

Kees and Claire Hut – While located in the park, this hut is managed by the Spearhead Huts Society (not BC Parks). Bunks can be booked year round for $60 per night and are most popular for touring in the winter.

Wedgemount Lake Campground – Reserable year round. There are 20 tent pads, a seasonal pit toilet, and an emergency hut that can be used as a bear cache. 

Three female skiers pose in front of the Elfin Lakes shelter on a sunny day in winter with the hut in the background and snowy trees in Garibaldi Park, BC.