10 Epic Thru-Hikes in BC

If you’re an avid backpacker already and looking for an epic adventure, there are lots of multi-day trips in British Columbia to whet your appetite. I’ve only done a small sample of what BC has to offer, but these are some of my favourite thru hikes! If you’re a beginner, check out my Guide to Backpacking and Overnight Trips for Beginners posts, as well as my safety resources.

A thru-hike is basically a trip that starts and ends at different locations, allowing you not to repeat any trail. They can be somewhat harder to coordinate and plan because 2 vehicles are often needed and the trailheads may be several hours apart from one another. I don’t recommend any of these trails for true beginners as they are all multi-night trips, several of which are in more challenging or technical terrain. But if you’re an intermediate or experienced backpacker and looking to get outside for extended periods of time, check out some of these trails!

Howe Sound Crest Trail 

The Howe Sound Crest Trail (or HSCT), is the closest trail to Vancouver on this list, as well as one of the shortest. That might lead you to believe that it’s one of the easier trails, but that is not the case. I think a lot of people stumble onto this trail who are not quite prepared for the steep and technical terrain, so definitely proceed with caution. The trail is 30km long and runs from Cypress Mountain to Porteau Cove. It can be done as a 1 or 2 night hike and most people start from Cypress because then it’s a net downhill trail. There are no facilities, so be prepared to do a bear hang and dig cat holes for your waste.

I prefer to do this trail as a 2-nighter and camp at the Enchantments and Brunswick Lake, but there is no water on trail until the halfway point, so if you camp at the Enchantments, you need to do a large water carry. The trail crosses between the Lions and up and down through several small summits. The start and end to the trail are pretty straight forward, but the trail gets very technical in the middle. If you’d like to extend the trip, you can consider summiting Mount Harvey and Mount Brunswick along the way. It’s a gorgeous trail with unparalleled views of Howe Sound. 
Helm Creek Trail

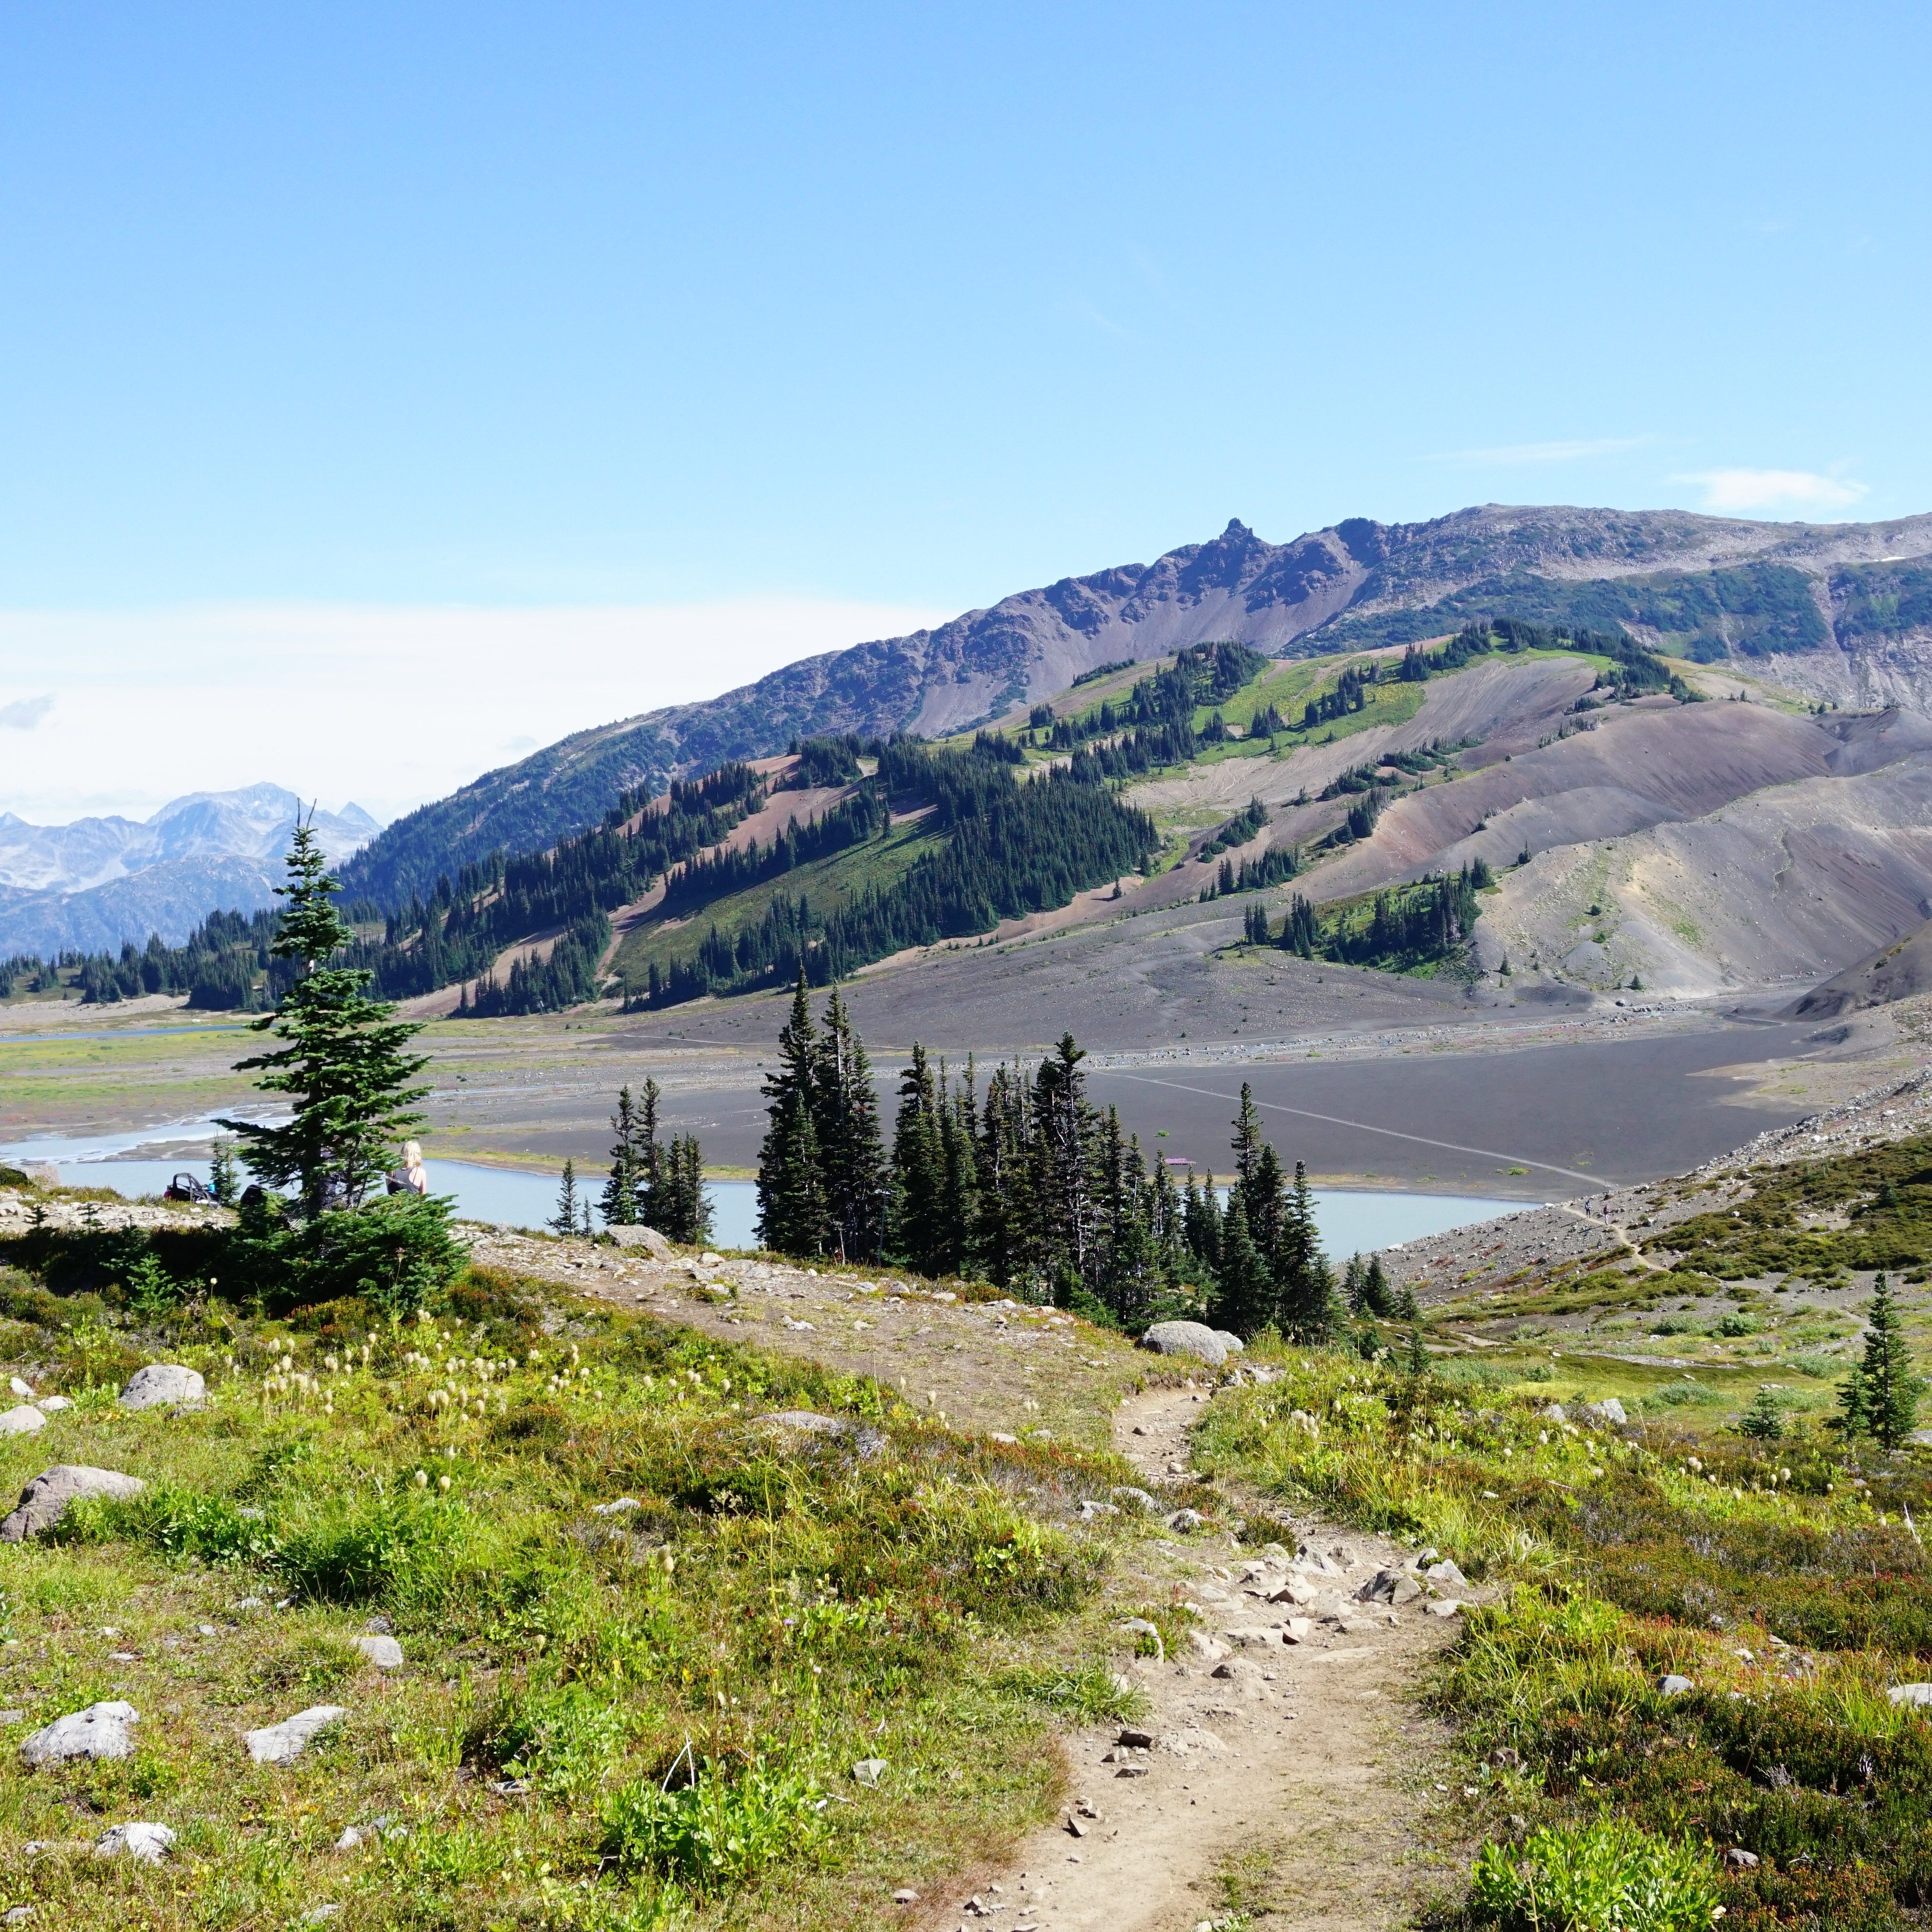
A hiking trail extends through the alpine of Garibaldi Provincial Park towards Helm Lake, with the forest and mountains in the background on a sunny day in British Columbia, Canada

This route doesn’t have a formal name, but extends from Rubble Creek to Cheakamus Lake in Garibaldi Provincial Park, near Whistler. If you’re on my website, most likely you’re familiar with this trail because of the popular trips to Garibaldi Lake, Black Tusk, and the iconic Panorama Ridge. Lots of people explore these trails as a day hike or a 1-nighter from Garibaldi Lake or Taylor Meadows. But I always recommend turning it into a multi-day trip by continuing on to Helm Creek. This trail is more appropriate for newer backpackers because of its substantial facilities. 

This hike can be customized to whatever length you prefer. Start at Rubble Creek and spend a few nights at Taylor Meadows or Garibaldi Lake and explore Black Tusk or Mount Price. When you’re ready to go to Panorama Ridge, pack up your camp and stop at the ridge on the way to the Helm Creek Campsite, which takes you through the gorgeous Helm Lake area. From there, you hike down towards the Cheakamus Lake parking lot. If you want to extend the trip further, make a detour to Cheakamus Lake or Singing Creek campsites. This hike requires camping reservations, which release 4 months in advance of your date from camping.bcparks.ca.

HBC Heritage Trail

A photo of Palmers Pond on a summer day, with the green meadows, forest, and mountains in the background, on the Hudson's Bay Company (HBC Trail) near Hope in British Columbia, Canada.

In my opinion, this is one of the most challenging trails on the list (except for maybe the North Coast Trail). HBC stands for Hudson Bay Company and is a historic trail that was originally used by the First Nations and later by the fur trade. The trail is 74km long and extends through the mountains from Hope to Tulameen. A lot of the trail is through the forest, but it has some gorgeous campsites and views along the way. It’s not an overly popular trail and you likely won’t see many people on it if you like solitude. 

What makes this trail challenging right now is the state of the trail. The trail has been revitalized in recent years and has a dedicated volunteer maintenance group, but the 2021 flood was particularly hard on this area. Volunteers have been working to clear the trail, but there is still quite a lot of blowdown in some sections and the trail does require fording at least 3 rivers. All of the campsites have nice facilities, so if you give yourself enough time to navigate the technical terrain, it is a beautiful trail.
Heather Trail

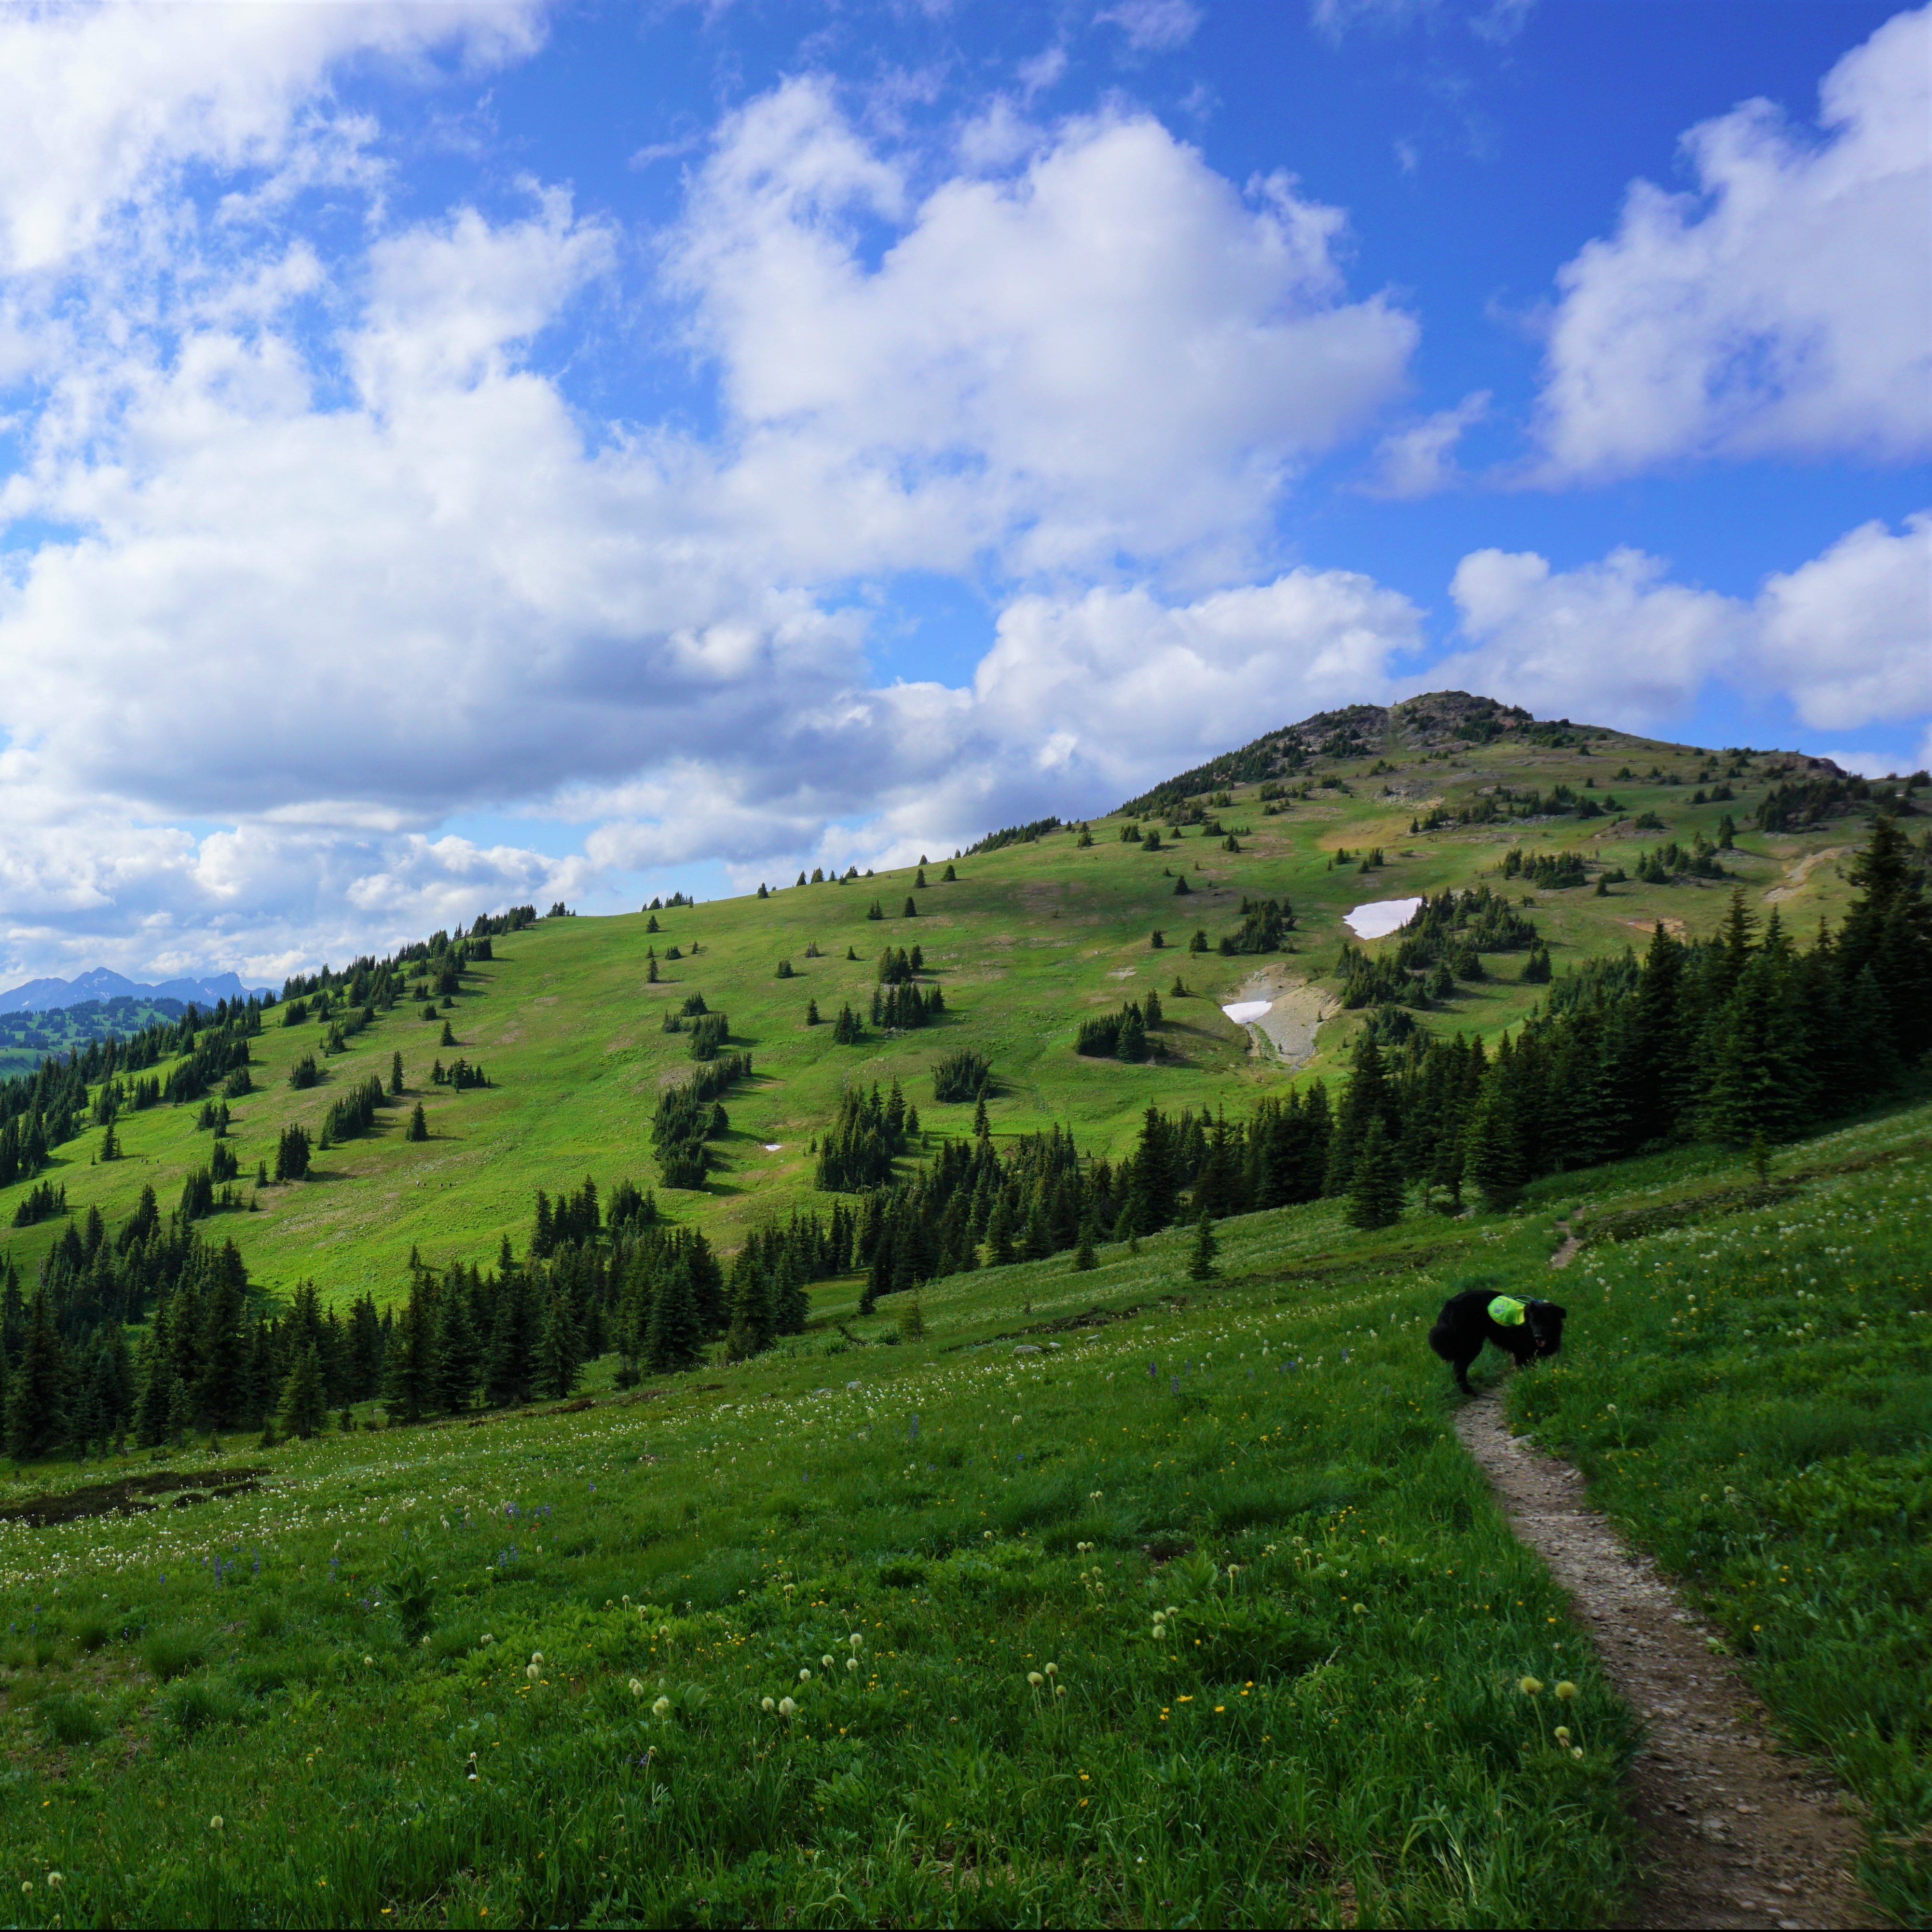
If you’re new to thru-hiking, the Heather Trail would be my recommendation. This is a relatively easy trail, with gorgeous views and brand new facilities. It’s located in E.C. Manning Park and can be done over 2-3 days. The trail starts at the top of Blackwall Road, which means most of the challenging elevation gain is done in the car. Technically, the Heather Trail is 21km, ending at Nicomen Lake and requiring an out-and-back trip. However, if you connect to the Grainger Creek and Hope Pass Trails from Nicomen Lake, you can turn this into a ~40km thru-hike, ending at Cayuse Flats.

Over 2 nights, I would camp at Kicking Horse and Nicomen Lake, or you could add a night at Buckhorn Campsite at the start of the trip and take your time. The trail is all in the trees after Nicomen Lake, and even though it’s 17km from Nicomen to Cayuse Flats, it’s a very easy trail, though there is another campsite option at Grainger Creek. You do need backcountry reservations to stay at these sites as of 2024, which can be obtained 4 months ahead of your trip at camping.bcparks.ca.

Skyline II Trail

I love Manning Park and the Skyline II Trail is one of my all time favourites. This trail is more difficult than the Heather Trail, but still a relatively easy trip. The trail is approximately 25 kilometres from Strawberry Flats in Manning Park to Whitworth Meadow in Skagit Valley Park. There is one campsite at the halfway mark, Mowich Camp. 

While this hike can be done in one night, I highly recommend doing 2 nights at Mowich Camp and making a detour to hike the 15km round trip trail along Hozomeen Ridge and back. This trail will take you to the border monument and a fantastic view of Hozomeen Mountain in the US. The trail itself is easy to follow and takes you through gorgeous alpine meadows. The campsite is pretty basic and the water source can run dry later in the summer. A backcountry permit is needed and can be obtained 2 weeks prior to your trip at camping.bcparks.ca.

Sunshine Coast Trail

Sunny view of the ocean and beach at Fairview Bay on the Sunshine Coast Trail in British Columbia, Canada

This is the longest trail on my list, but is hands down my favourite thru-hike ever! The Sunshine Coast Trail (or SCT) is 180km and extends through the entire upper Sunshine Coast, from Sarah Point on the Malaspina peninsula, to Powell River, and down to the ferry at Saltery Bay. The SCT is unique because it is a hut-to-hut hiking route, which means you can do the entire trail, staying in free mountain huts along the way. 

The trail can be a challenge to coordinate in terms of transportation and food carries, but it is incredibly well maintained by volunteers, with gorgeous facilities. You can do a section of the trail, or commit to the entire thing. The trail is primarily in the forest and tackles a lot of cumulative elevation gain. There are tons of lakes to enjoy a cool swim and some amazing viewpoints along the way. The trail can get busy, so if you plan to stay in the huts, you should still bring a tent with you as a back-up.

Juan de Fuca

The Juan de Fuca trail is often touted as a great beginner coastal trail. It is good in that it’s a lot easier than its more popular sister trail, the West Coast Trail, but it is still challenging in its own right. It’s a 47km trail on Vancouver Island between Port Renfrew and China Beach. There are several nice campsites located both in the forest and along the beaches, but like all the coastal trails on the island, it can be very technical and muddy.

It’s been several years since I did this trail and I have heard that some parts have received much needed maintenance since I did it, but it will still be quite muddy in early summer and there are several tidal points on the trail that require advance planning to cross. The nice thing about this trail is that there are several bailout points that connect to the highway if the trail is too challenging. Backcountry permits are required and can be obtained 2 weeks in advance from camping.bcparks.ca.
North Coast Trail

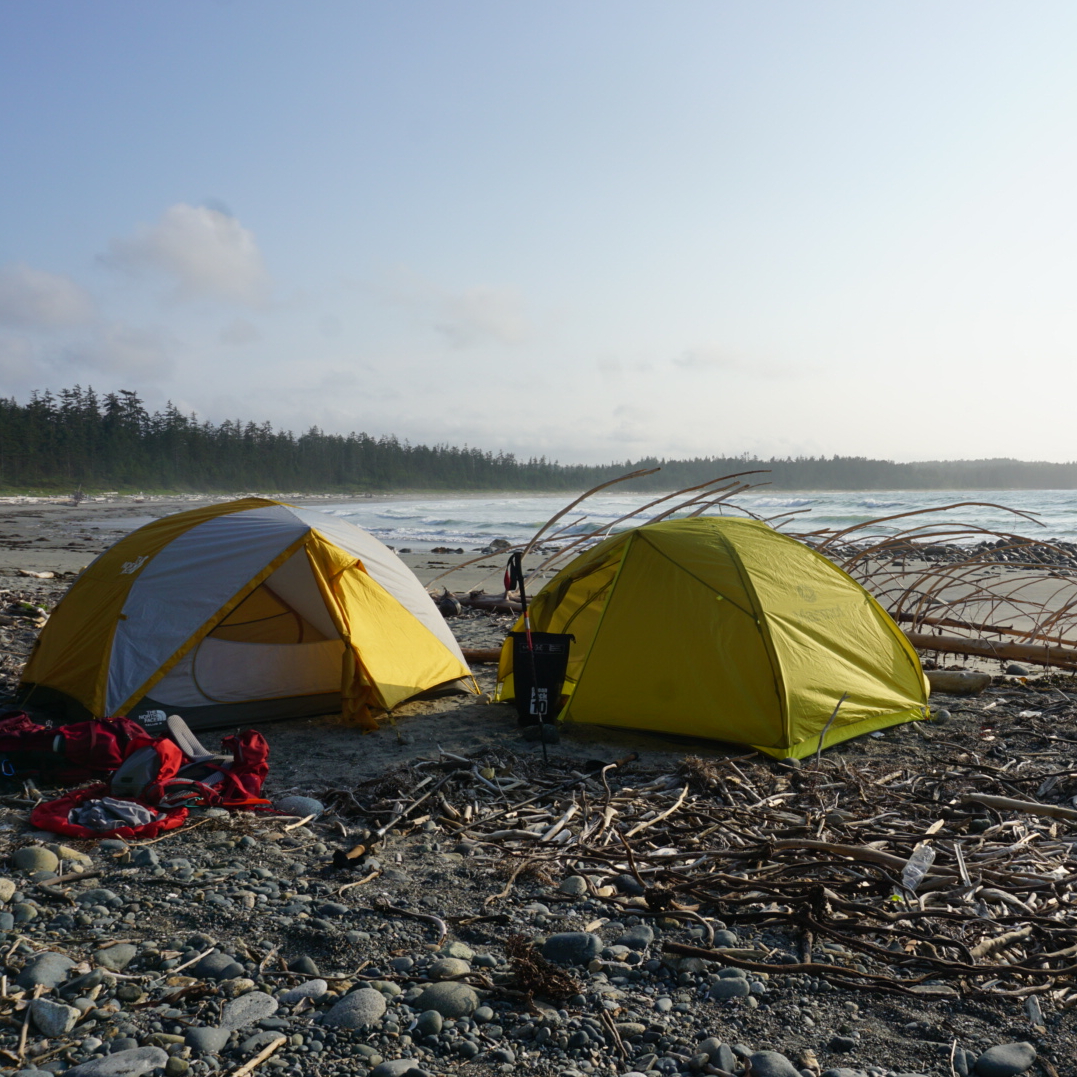
Two tents camping on a golden sand beach with drift wood and the forest and waves of the pacific ocean in the background at sunset on Irony Creek Beach in Shuttleworth Bight on the North Coast Trail on Vancouver Island in British Columbia, Canada.

The North Coast Trail (or NCT) is probably the hardest hike on this list. It’s much less popular than the West Coast Trail, but the traffic to this hike has definitely been growing. The NCT is a ~60km hike on the far north coast of Vancouver Island. It has a reputation for being extremely muddy and it doesn’t get very much maintenance. The NCT is only accessible by water taxi, so most people add on another ~25km of hiking to Cape Scott to finish this trail.

The Cape Scott Trail is accessible by dirt road and is better maintained than the NCT. The highlights of both trails are the gorgeous, remote beach campsites. There are several tidal points on the trail and you should be prepared for a very slow hiking pace through extremely technical terrain. But you’ll also likely get to view bears, eagles, and if you’re lucky, maybe even a wolf. Backcountry permits are required for this hike and can be obtained 2 weeks ahead of your trip at camping.bcparks.ca.

Mount Assiniboine

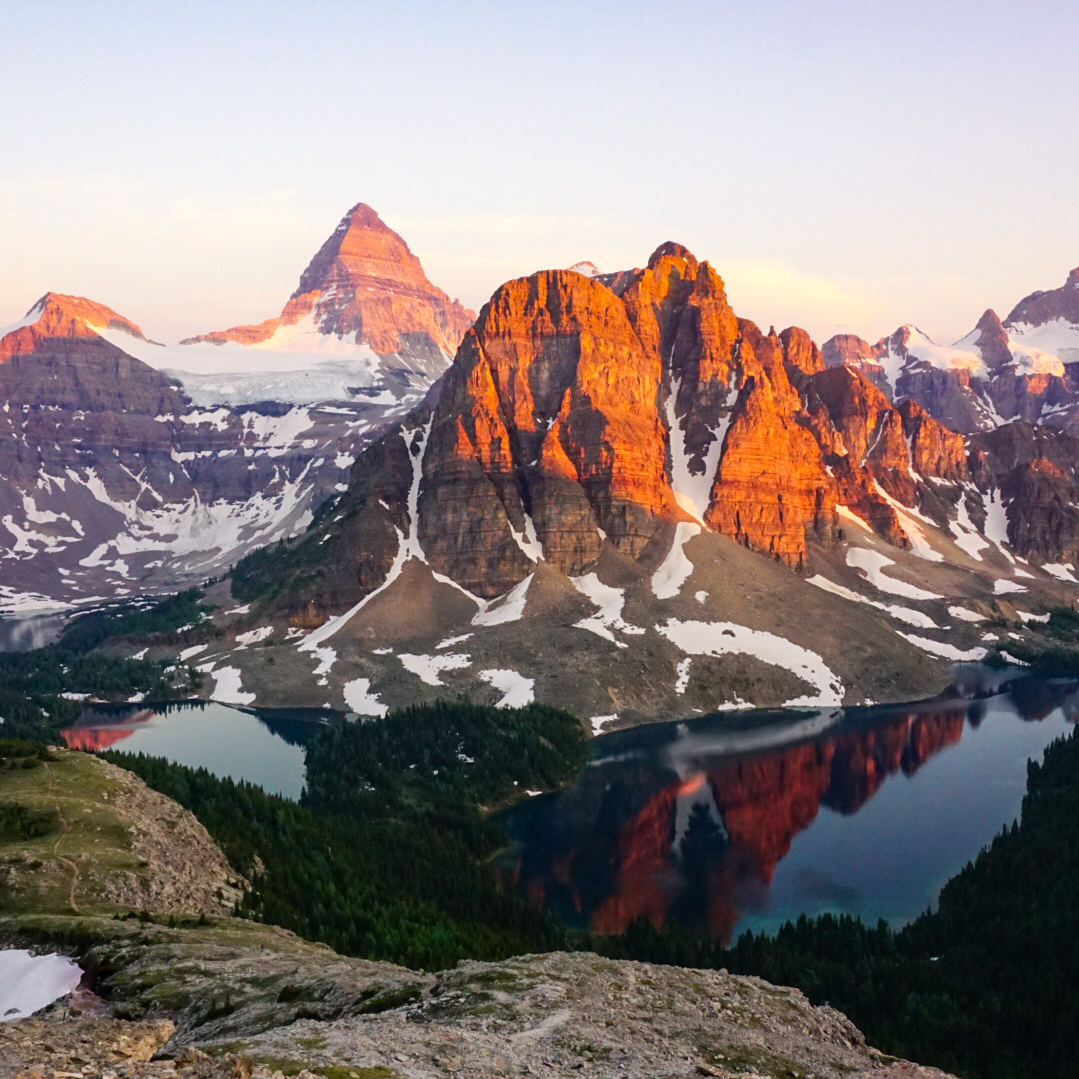
A photo of Mount Assiniboine and Sunburst Mountain and Cerulean Lake at sunset from the Nub in Assiniboine Provincial Park in British Columbia, Canada.

Mount Assiniboine can be accessed as a loop trail, thru hike, or by helicopter. Of course, I did the thru hike option. Mount Assiniboine is one of BC’s premier mountain campsites and there is a lot to explore from the core area of the park. We planned for 3 nights in the Magog Lake Campground, and 1 night on either end of the trip to hike in and out. While Assiniboine Park is located in BC, the hike is accessed through Banff National Park in Alberta.

Take the gondola up to Sunshine Village and hike through the alpine meadows to Porcupine Camp on night one, then continue to Assiniboine for several days in the park. Explore Magog Lake, Cerulean lake, and Sunburst Lake, as well as the iconic hike up to the Nub for sunset. On your way out, hike through beautiful Wonder Pass and camp at Wonder Lake before ending your hike at Mount Shark. You will need to coordinate 2 vehicles and book backcountry reservations for Assiniboine 4 months in advance at camping.bcparks.ca, as well as backcountry reservations for Wonder Lake at reservation.pc.gc.ca, which release sometime in March for the entire season. 

Rockwall Trail

The Rockwall on a sunny day with the mountains in the background and the forest in the foreground with blue sky in Kootenay National Park in British Columbia, Canada.

The Rockwall Trail is another extremely popular trail located in Kootenay National Park. It’s a 55km trail from Paint Pots to the trailhead for Floe Lake that is incredibly scenic. There are a number of campsites along the trail and it can be done in 3-4 nights. Floe Lake is the most popular campsite on the trail, but I also highly recommend staying at the Helmet Falls campsite. Along the way, you can stay at Tumbling Creek, Numa Creek, or both, they’re pretty similar sites. 

The trail is very well maintained and has lots of facilities. Campsites release for the entire season in March at reservation.pc.gc.ca, so make sure you watch for the release date, because the sites will sell out immediately. If you’re lucky enough to score permits, enjoy this beautiful trail through the Rocky Mountains and past the iconic Rockwall. 

Favourite Hikes in Southwestern BC: Part IV

If you’re thinking, “didn’t she just post her 10 favourite hikes last week?” You are correct, I did. But I have a severe backlog of trails to post about, so Part III featured my favourite trails from 2019-2020, while this post focuses on my 2021-2022 era. Part III was my “covid era”, so it featured a lot of trails closer to Vancouver. In my opinion, Part IV has some really scenic hikes because post-covid, all I wanted to do was hike and I discovered some real gems! Check out Part I, Part II, and Part III.

20220716_174404

#10 Hut Lake – Let’s start off with a really obscure hike. The snow pack was insanely high in 2022, which postponed my alpine hiking season. In our desperation to find somewhere low elevation to camp, we stumbled upon Levette and Hut Lake outside Squamish. Levette is well known by the locals, but if you continue past Levette, you’ll eventually come to the much less popular Hut Lake Rec Site. It seems to be mostly used by the 4×4 community, but we had it to ourselves on a weekend in mid-July. The hike is entirely in the forest and it’s not the most memorable lake, but I still had the best time swimming in the insanely warm water and recommend it as a good Spring hike or rainy day trail. (8km, 500m elevation gain, 4 hours)

20220916_094024

#9 Bedwell Lake – Bedwell Lake is a popular trail in Strathcona Provincial Park. It’s located at the back of the park and ease of access can depend on the current state of the road. When we visited, a normal AWD SUV would access it fine, but I’ve heard sometimes you need 4WD or high clearance. Parts of the trail are a bit technical, with some ladder sections, but you’re rewarded with beautiful views of the lake and surrounding mountains. We wanted to continue on to Cream Lake, but unfortunately we got rained out on our visit. I’m keen to return to see it in the sun! (10km, 600m elevation gain, 6 hours)

HOP_6405

#8 Slesse Memorial Trail – There are some real gems in Chilliwack Valley. Slesse is a challenging one to get to as you definitely need 4WD and high clearance. It’s a bit of a somber hike because it’s the location of a plane crash, but it also has gorgeous views of Chilliwack Provincial Park and across the border. With over 1000m of elevation gain, it is a slog to get to the top and the views are relatively limited until the summit. But once you hit the ridgeline, there’s a glacier in front of you and a wall of mountains behind you, so you really get a pay-off. (15km, 1100m elevation gain, 9 hours)

#7 Barnet Trail – One of the things I love about living near Vancouver is that you don’t have to go way into the wilderness to hike and the Barnet Trail on Burnaby Mountain has become one of my favourite semi-urban hikes. We hike here regularly with Sadie and I love the views from Burnaby Mountain Park and through the forest. We always start at Burnaby Mountain Park, and I have to admit, the best view of the hike is at the trailhead, but it’s the perfect hike to get your body moving when you don’t want to drive anywhere or have limited time. (9km, 300m elevation, 3 hours)

20220914_104306

#6 Myra Falls – I debated for a long time about whether to put this on this list or not. At 1.5km, it barely qualifies as a hike and is definitely more of a walk, but it’s such a beautiful waterfall! It’s also located in Strathcona Provincial Park and it’s so beautiful Brandon and I had to visit it twice! It’s an easy walk down to the Falls from the parking lot and then you can explore around the area. Definitely exercise caution as there are some steep sections, but after swimming in the waterfall, Brandon and I hiked down over the rocks to also swim in Buttle Lake. (1.5km, 50m elevation gain, 1 hour)

20211011_121231

#5 Seed Peak – I did this trail in the late Fall of 2021 and even before I finished, I knew I’d have to return some day. There was already snow on the ground when we visited and I was having a rough day physically, so we didn’t even finish the hike, but I was still astounded by the views. Access is a bit tricky for this one as it’s way off the beaten track outside Squamish and I’d recommend 4WD and high clearance. Part of the trail is actually located in the far north end of Pinecone Burke Park (which starts in Coquitlam) and there are gorgeous views of the backcountry everywhere you look. We only made it to the base of Seed Peak, but I definitely need to return for the rest of the hike! (13km, 800m elevation gain, 8 hours)

20220820_132359

#4 Tricouni Meadows – My apologies for including so many 4WD access hikes on this list, this is the last one, but I couldn’t leave it off! Tricouni Meadows is located way up in the wilderness north of Squamish Valley. It’s a slog to get to the trailhead and another slog to get to the lake, but you are rewarded once you get there. There are several lakes at the base of Tricouni Peak and it’s a bit technical travelling between them, but there’s space for several campsites. We visited Pendant Lake (my favourite), Spearpoint Lake, and Reflection Lake. From reflection Lake, you can continue up to the top of Tricouni Peak, which I didn’t do, but would like to return and complete as a backpacking trip. It’s a surprisingly busy campsite for such challenging access, so get there early! (8km, 500m elevation gain, 8 hours)

20220827_123959

#3 Skywalk North – This hike is north of Whistler and better known as Iceberg Lake. It’s a popular hike, but most people only hike to the lake and back. It’s a bit longer, but I recommend turning it into a loop hike by doing with the Skywalk North or South trail. We chose the North Trail, it’s longer, but more scenic. It’s a long hike through the trees, but once you hit the lake, you continue hiking up to another summit above the lake with incredible views looking back. From there you continue through several meadows before arriving at Screaming Cat Lake and returning through the trees. Pay special attention to the trail stats though, this is a rewarding, but challenging hike. (22km, 1200m elevation gain, 10 hours)

HOP_6327

#2 Opal Cone/Mamquam Lake – If you go back to my previous posts, you’ll find Elfin Lakes on my first list. Elfin Lakes remains one of my favourite hikes to this day, but I can finally add Opal Cone and Mamquam Lake to the list! This are both continuation hikes from Elfin Lakes and are not intended to be done in a day. Camp at the lake and do either one or both of these as a day hike. Personally, I like Opal Cone better, which is in peak alpine terrain, but it was rewarding to finally make it to Mamquam Lake after a failed attempt back in 2018. (14-22km, 1000m elevation gain, 9 hours)

20220905_082625

#1 Sunshine Coast Trail – No other trail had any chance of the number one spot with the Sunshine Coast Trail in the mix. I hiked this entire 180km trail in 2022 and I’m in love with every inch of it! You don’t need to hike the whole thing, there are so many highlights on this trail and lots of them are accessible as day hikes or 2-3 day trips. The backcountry huts are what make this trail so special, but my favourite sections include Tin Hat, Walt Hill, Manzanita Bluff, Sarah Point, Appleton Canyon, Inland Lake, Rainy Day Lake, and Fairview Bay – basically the entire trail. (180km, 7-12 days)

Continue on to Part V.

Maria’s Guide to the Sunshine Coast Trail

The Sunshine Coast Trail has been on my bucket list for several years and I finally hiked it in its entirety this past summer. You can read my trail blogs starting with Part I, but I also wanted to create a guide to accompany those posts for anyone thinking of doing the trail. I think this is a great trail for thru hikers because while it is long (180km), it’s not life-altering long (like the PCT). But it is still long enough to require considerable advance planning, so here are some things I learned while planning the trek:

Experience/Fitness Level

The first question to ask yourself is whether you have the experience and ability to hike a trail this long. My longest trail prior to the SCT was 85km, but I’d hiked that distance on 3 separate occasions, so I felt confident that I could attempt 180km. Compared to other popular thru hikes in BC, I would say that the SCT is actually a bit easier (comparing to hikes like the West Coast Trail), but that it shouldn’t be underestimated. I was able to hike at a much faster pace on the SCT than other coastal trails I’ve done, but there is a lot of elevation gain throughout the course of the trail, so you definitely want to be used to climbing mountains before you attempt. However, there are lots of exit points on the trail if it becomes too challenging and the huts can make things more comfortable for newer hikers. That said, if you’ve never backpacked before, get some experience on shorter trails first, or plan to section hike part of the trail instead of the whole thing, because there is a big difference in difficulty when you have to carry all your gear with you, especially on a long trip with heavy quantities of food!

PSX_20220917_112741

The Trail

The Sunshine Coast Trail is 178km long on paper, but a bit longer in practice. There have been many re-routes and trail changes throughout the years, so while there’s 178 trail markers on the trail, they’re not all actually 1km apart from each other. I clocked 190km on my GPS when I did the trail. The most notable section is from Tin Hat to Lewis Lake, which is 2-3km longer than indicated, so prepare for slightly longer days than anticipated. In addition, I tracked a cumulative elevation gain of 7500 metres over the course of the trail, so be prepared for a lot of uphill (and downhill if you have bad knees like me).

The trail starts at the far north end of the Upper Sunshine Coast, known as Sarah Point. It’s approximately 50km down the Malaspina Peninsula to Powell River and then the trail meanders through the mountains for another 130km to the trail end at Saltery Bay. The half point of the trail is at Tin Hat Mountain, which is largely regarded as the best viewpoint on the entire trail. There are lots of access points along the trail, but the two easiest are in Powell River (km 50) and Lang Bay (km 150). If you’re section hiking, I’d plan to hike one of these 3 sections, and if you’re thru hiking, these make good resupply points (more on that later).

While you can hike the trail in either direction, the majority of people go from North to South. The trail is set up for people hiking this direction so the trail markers will all be in order. Sarah Point is considerably harder to access than Saltery Bay, so it’s recommended to start at Sarah Point so that you can walk on the ferry when you get to Saltery Bay at the end of your hike and not have to coordinate transportation. For more detailed information about the entire 178km trail, pick up a copy of Eagle Walz’s book, or check out the SCT website.

20220905_082625

Time of Year

Time of year can also play a large role in determining when to hike the trail. If you don’t like crowds, then you may want to avoid the summer months and hike in the Spring or Fall. Summer can also be extremely hot and a lot of the streams can run dry in August, making it more desirable to hike in the shoulder seasons. The benefit of hiking in the summer is that you’re likely to have the driest weather, so if you don’t like hiking in the rain, this might be the best option for you, though the heat can be exhausting.

The challenges with Spring hiking are that if you go too early, there may still be snow on parts of the trail and you’re more likely to encounter rain along the trek. Whereas in Fall, you won’t encounter snow unless you go really late, but the streams are more likely to be dry in early Fall and you’re more likely to get rained on in late Fall. I wanted to do the trail in June, but I ended up doing it in August (when it was very hot) and early September (when the streams were mostly dry). But I didn’t encounter crowds during either time.

20220804_200318

Getting There

Getting to the Sunshine Coast was probably the biggest challenge for me and was the most considerable cost of the trip. If you’re going with a group and have more than 1 car, it’s relatively easy, but if you’re alone or don’t have a car, it’s a bit more challenging. You’ll have to either drive or walk on two different ferries (Horseshoe Bay to Langdale and Earls Cove to Saltery Bay) and prepare to shell out $100+pp to take the shuttle to the trailhead. Saltery Bay and Powell River are accessible by transit, but the trailhead at Sarah Point requires 4WD to access. If you have 4WD, that’s great, if not, make a booking with the Sunshine Coast Shuttle. Here’s the options I’ve identified for getting to the trailhead:

  1. Drive yourself (1 car). Park your car at Earl’s Cove and walk on the ferry, then get the SCT shuttle from Saltery Bay to the Sarah Point Trailhead. If you want to drop off resupplies, then drive on the ferry instead and park at Saltery Bay once you’ve dropped the resupplies and catch the shuttle. Once you finish the trail at Saltery Bay, your car will be waiting for you!
  2. Drive yourself (2 cars). If you have a rugged 4WD with high clearance, you can park one car at Saltery Bay, drop off your resupplies, and drive your second car all the way to the trailhead. If not, drop off your resupplies and catch the shuttle from Powell River to the trailhead. Collect your car at Saltery Bay at the end of your hike and pick up the other car.
  3. Take transit. You can walk on both ferries and there is a connector shuttle that runs between the two ferries in the summer. It runs every day except Thursday, but it only goes once per day. Once you get the second ferry to Saltery Bay, you can get the shuttle to pick you up and transport you to the trailhead, or you can take the city bus to Powell River, drop off your resupply, and then get the shuttle to the trailhead. This was what I did on my first attempt.
  4. Fly. There are several airlines that fly direct to Powell River, but I recommend Harbour Air because it flies directly to the Shingle Mill Pub, which is one of the resupply locations. So you can drop off your resupply when you arrive and then arrange the shuttle to the trailhead. The downside is you can’t fly with fuel or bear spray, but you can purchase both from the shuttle company. This was what I did on my second attempt.

All of these options assume starting at Sarah Point. You can walk off the ferry at Saltery Bay and start from there, but it’s better to take the shuttle for drop off rather than coordinate a pick-up time when you might not know how fast you’ll be hiking. Unless you plan to camp at Sarah Point on your last night and get picked up in the morning.

20220908_170220

Itinerary

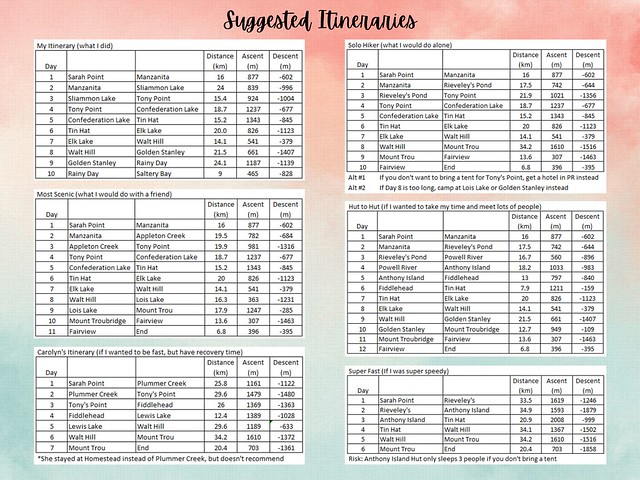
Once you’ve established you’re ready to attempt the trail, itinerary becomes an important consideration. You can hike the entire trail in one go, or you can make a couple of trips to complete in section hikes, or even day hikes if you’re ambitious and comfortable with trail running. I decided on one big thru-hike, but circumstance forced me to complete it as two section hikes. You want to be realistic about your abilities when deciding how many days to allot for the trip. Because it’s a long trail, there’s a tendency to want to do a lot of kilometres, but consider whether this will be enjoyable over an extended period of time. If you’re hiking solo, it may be easier to hike longer distances, but if you’re in a group, you will naturally need a slower pace. If you don’t have lightweight gear, also consider that packing 3-8 days of food will present a considerable challenge.

Campsite choice is also an important consideration in determining your itinerary. Are you flexible in where you camp? Are you comfortable staying at tent sites, or do you only want to stay in the huts? Either way, plan to bring a tent because the huts can fill up on summer weekends, though users are supposed to prioritize space in the huts for thru-hikers. Determining how many days you have available for the trip can help you determine your itinerary, just make sure to leave enough time for travel to and from the Sunshine Coast as getting to the trailheads can be somewhat tedious.

Green simple business model canvas poster - 2

Campsites

You don’t necessarily need to pick exactly where you’re going to camp in advance when you draft your itinerary, but it’s good to set some goals so that you can assess whether you’re ahead or behind your targeted pace while on trail. I decided on 10 nights on the trail and planned my itinerary around that. I generally had a target that I wanted to reach every second night and I was flexible on the opposite nights based on how I was feeling. I wanted to stay at Tin Hat Hut and Walt Hill Hut because I heard they were the most scenic, so I set goals for when I wanted to arrive at those locations. It’s also good to know if there’s any sites you want to avoid, so you can plan around that. For example, I really didn’t like Homestead Rec Site or Lewis Point Rec Site.

Definitely pick up a copy of the SCT guide when assessing where you want to stay. Some campsites are more rugged than others and they don’t all have bathrooms, water sources, or bear caches. Water sources are important because if you stay at a campsite without one, you will have to hike with extra water. Likewise, if you’re staying at sites without bear caches, you’ll need to put extra consideration into how you’ll protect your food. See below for more information on both of these items. Even if you plan to stay only in huts, I still recommend bringing a tent with you because the huts can fill up on popular summer weekends. However, if you’re hiking in the off season, generally you’ll be okay. I’m told the huts were extremely busy in 2021, but when I hiked the trail in 2022, they were virtually empty, both in August and September.

Green simple business model canvas poster - 1

Gear

Gear is a favourite topic of any hiker. You don’t need expensive gear to go backpacking – I hiked with cheap gear for years and did just fine. But prepare yourself for the weight of it. I’ve invested in some really lightweight gear over the years and it really paid off for me on this thru hike. I was able to hike longer and faster than if I was using cheaper, heavier gear. In some instances I sacrificed comfort for this (a smaller sleeping pad, only the essentials for clothing, a non-freestanding tent), but the comfort of the lighter pack was more than worth it for me.

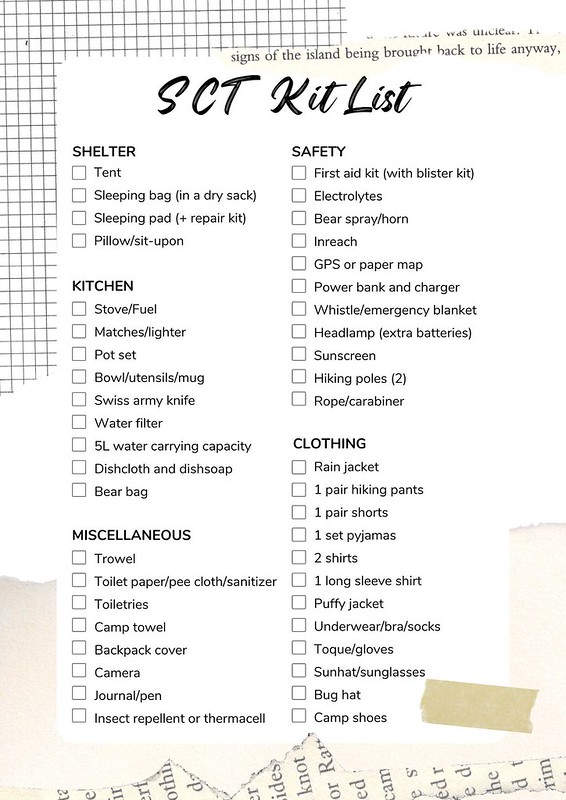
Fortunately, the SCT is not an alpine hike, so generally you can get away with cooler gear. I always bring a lot of warm gear when I’m going to the alpine, but this wasn’t needed on the SCT, especially in the middle of summer and with the huts. Plus, if you’re doing the hike with a friend, you can share gear to lighten the load. A few things I would definitely still bring include trekking poles, bear spray, and all of the 10 essentials, especially an inreach (or satellite device) and a GPS (or a large power bank for your phone).

SCT Kit List

Food

Food is one of my favourite topics when it comes to thru-hiking. Some people get really into calorie counting for a big hike, but I’ve personally never found this was accurate for me and resulted in carrying way more food then I needed. If you’ve done some practice hikes, they should give you a good idea of how much you will generally eat and then plan for slightly larger portions sizes or extra snacks since it’s a long hike. Personally I prefer to bring larger meals in lieu of extra snacks. Generally you will get hungrier the longer you hike, so plan for a bit extra towards the end of the trip. Always bring an extra day of food on a trip of this scale in case of emergency.

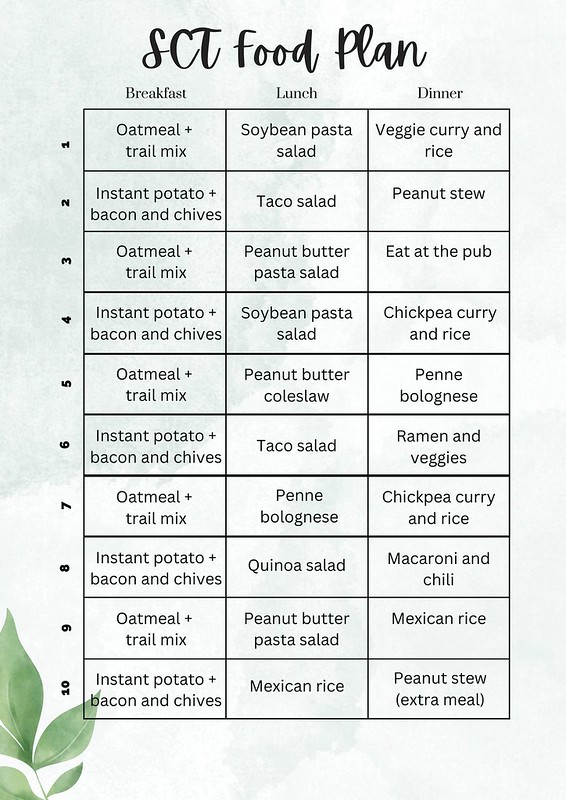
I’ve been getting really into dehydrating and I prepped my entire menu for 11 days using my dehydrator. You don’t need a dehydrator to do a multi-day trek, but it can significantly lighten your load. The average person carries 2lbs of food per day, but I was able to get my weight down to just over 1lb per day (12lbs for my 11 days on trail). The easiest way to shed weight is through dehydrated/freeze dried meals. I dehydrated my own, but you can also purchase them from a large suite of options at places like MEC, though these are often a little bulkier and very pricey. Before I got into dehydrating, my preference was to stock up on simple grocery store items like knorr sidekicks, of which there are lots of rice and pasta options, or easy dinners like ramen. The trick is finding some way to add protein. Tuna packets are a good option, but a little heavier than dehydrated proteins. Famous foods carries lots of freeze-dried options.

SCT Food Plan - 1

Resupplies

Resupplies go hand in hand with food. If you’re fast, you can probably carry all your food from the start, though carrying so much food weight may slow you down. The two easiest resupply points are the Shingle Mill pub in Powell River and the general store in Lang Bay. Shingle Mill is right on the trail, but Lang Bay involves a 2.5km road walk each way. Because of this, I opted for just 1 resupply at the pub. I carried 4 days of food at the start and then picked up 7 days of food from the pub. Another option is to pre-arrange a drop-off from the SCT shuttle company at any point where the trail crosses a road, but this is a pricey option, so I didn’t meet anyone who utilized it. Both the pub and the general store will hold your resupplies free of charge.

20220906_145447

Other Considerations

Water Supply – No matter when you hike the trail, water supply requires constant thought. Not every campsite has a water source, so you may need to carry extra water with you if you plan to camp at one of these sites and you need to know where your last reliable source of water is before you get to the campsite. When I hiked in early August, the majority of streams were still flowing, but when I hiked in early September, almost every stream was dry. This meant that I had to get almost all my water from lakes and ponds, meaning I often had to carry extra water and that a water filter was extremely necessary to purify my water. Streams are a higher quality source of drinking water than lakes or ponds, so plan accordingly when choosing your water treatment system. At times I carried 4-5L of water with me depending on my campsite and last reliable water source – 5L of water weighs 11lbs, so it’s a significant addition to your pack!

Bear Caches – Not every campsite has a bear cache. Most of the huts have them (but not all) and most of the tenting sites don’t have them. Pending on location, it may be very difficult to create a bear hang, so it’s recommended to bring either a bear bin or bear bag on the trail. Everyone has different opinions on bins vs. bags. Personally, I think a bin is the safest option, though I opted for the bear bag for weight reasons. It’s almost impossible for a bear to walk off with your bear bin, but it can walk off or crush your food with a bear bag, so I still tied mine to a tree even though it’s made of kevlar and supposedly bear proof. It was never tested.

20220905_063658