I’ve been living in Vancouver for over 10 years now and I’ve been downhill skiing every single one of those years. Most of my time has been spent at Whistler Blackcomb, but I make a point to try and ski a new resort every year. I haven’t made it to every ski resort on this list, but I’m sure I’ll get to them all one day!
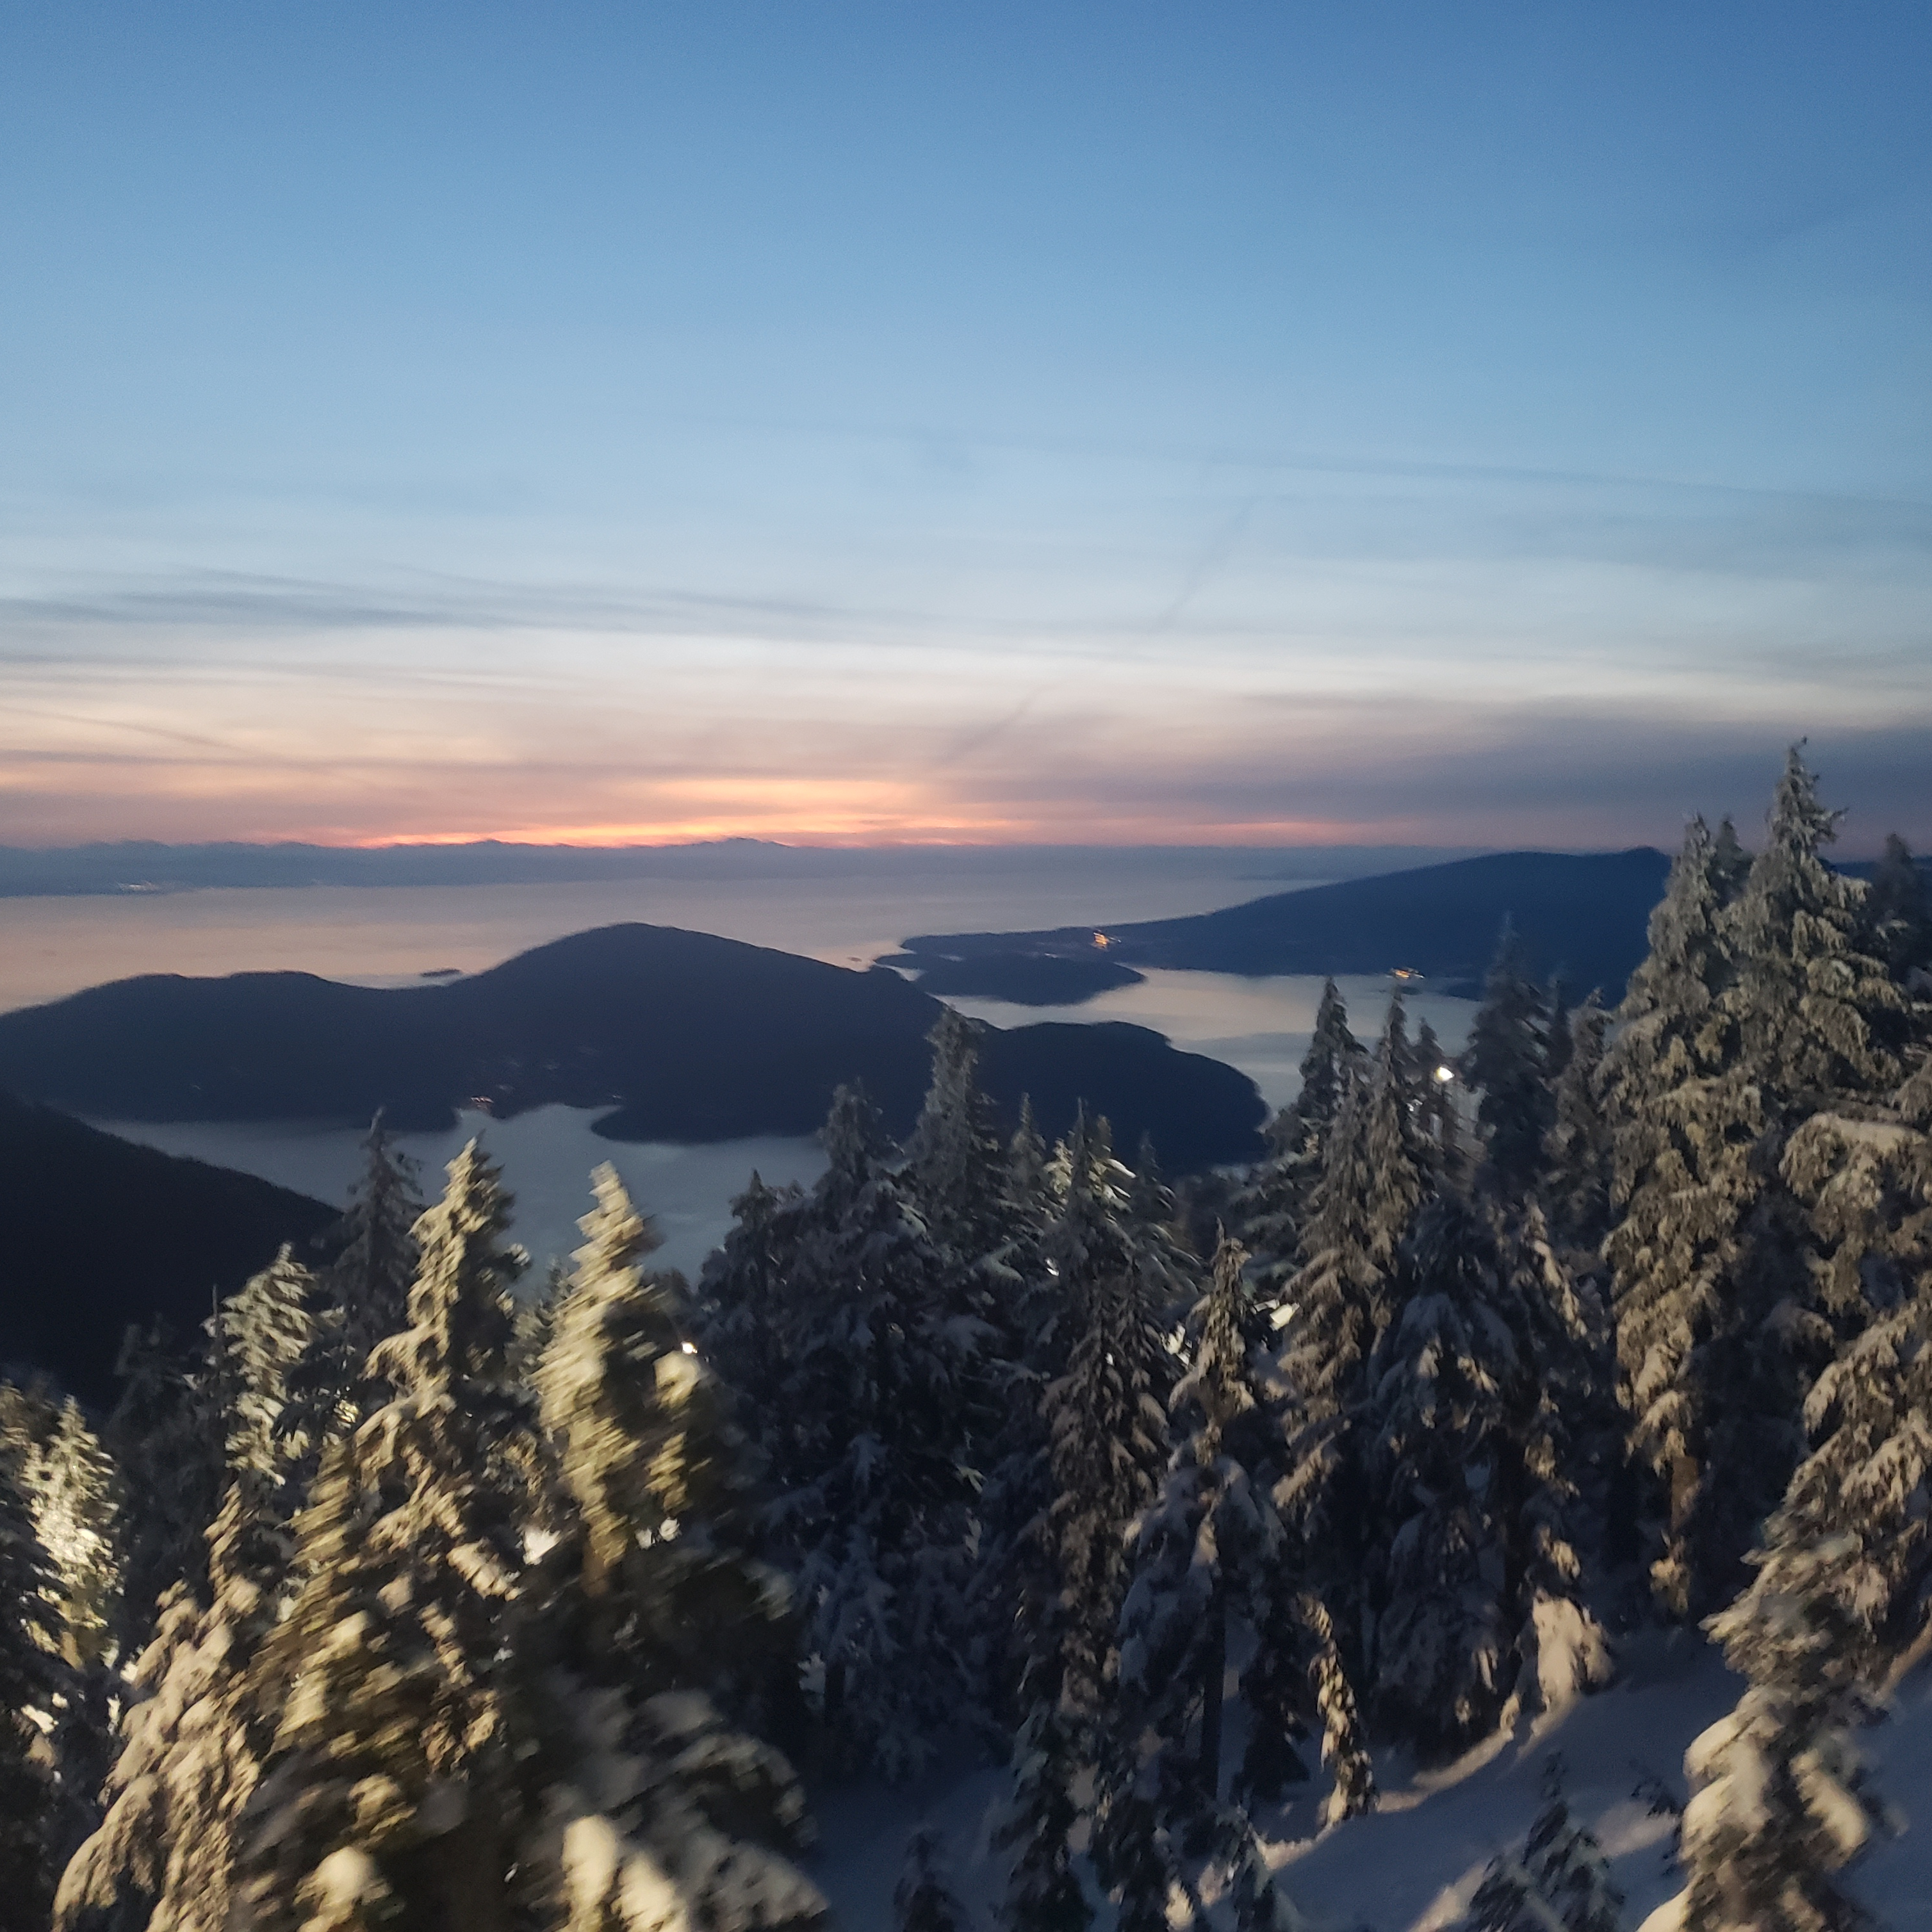
Cypress is the biggest of the local mountains and the first resort I skied in BC. The resort is split between Black Mountain and Mount Strachan and has 4 major chair lifts. It’s a very busy mountain on weekends, so my preference is hitting up the mountain after work for night skiing! The highlight of this mountain is the view of Howe Sound from the Sky Chair.
Seymour is a great family mountain. It has two lifts and is a great little mountain if you have kids or are learning to ski. It will be busy here as it’s a popular location for snowshoeing and touring as well. My favourite way to visit is to skin up to Brockton Point on my touring skis and then ski down through the resort. It’s a great place for night skiing and sunset views!
Grouse Mountain
Grouse is probably the most well known resort in the city as the ski slopes can be seen from all over the lower mainland, especially when they’re lit up for night skiing. Believe it or not, I have never actually skied Grouse, mostly because it’s the smallest resort and you have to take a gondola from the base to access anything, but I’ve heard the views are unparalleled!
Whistler Blackcomb is by far the most well known ski resort on this list, and for good reason. It’s a premier ski resort and it has access to an incredible amount of terrain. I ski Whistler Blackcomb for 5-6 days every year and I never get tired of it. It will always be busy, so embrace the early morning rise to get in a few good runs before the crowds really pick up! My favourite areas to ski are 7th Heaven on Blackcomb and Symphony on Whistler.
Sasquatch is a small resort north of Harrison. It’s surprisingly close to the city, but difficult to access because it has a gravel road that requires snow tire chains. But it’s a really nice resort with 3 chairs and low crowds (even on weekends). It didn’t have much powder when I visited it, but I’ve heard it can get a nice amount of powder and the runs seem designed around this, with lots of gladed tracks down the mountain.
Manning Park
Manning Park is another small resort. It’s further than Sasquatch, but generally easier to access. The challenge with Manning is that there are very limited accommodations near the resort. So plan to either drive up and back in a day, or stay in Sunshine Valley or Hope. I adore Manning Park for its unlimited recreation activities and while its cross country trails are much more well known, it has a nice downhill resort as well.
Mount Baker
I have explored a lot around Mount Baker, but I haven’t had the opportunity to ski there yet (not for lack of trying, I had to cancel 2 trips). Odds are, most of the people skiing Mount Baker will be from BC to take advantage of the high amount of powder they get. The North Cascades are a beautiful place to visit and I love spending time in this area. There’s no where to stay on the mountain, but you can stay in Glacier, Bellingham, or drive there and back in a day.
Sun Peaks is the next biggest resort after Whistler. It’s located just north of Kamloops and is a great ski destination! There are tons of accommodations and there is lots of terrain to explore. The runs span both sides of the highway and have a huge variety of alpine and glade runs. Some of the smaller resorts on this list can be visited in a day, but definitely give yourself at least 2 days at Sun Peaks!
Of all the resorts I’ve visited in the interior, Big White is probably my favourite. It gets great snow and it has some fabulous runs. It’s located east of Kelowna and has tons of chair lifts to keep you busy. I really liked the ski village in Big White – Sun Peaks felt really large, while other resort villages felt a bit small. I may have a soft spot for this resort because it was the location of my first group ski trip, but I definitely want to go back in the future.
Silver Star Resort is located north of Vernon and is smaller than Big White and Sun Peaks. It also attracts less crowds, but can feel busy due to the smaller number of chair lifts. I’ll admit, Silver Star wasn’t my favourite resort, but I think it’s mostly because it didn’t have great conditions when I visited. It has a really nice village and I’d definitely be willing to give it another try!
Apex is one of the lesser known resorts in the interior (or at least, it feels that way). It’s located further south, east of Princeton, but west of Penticton. It gets less crowds than the other resorts I visited, but it had some truly awesome powder! I’m not sure if this is a common theme, but I have heard it tends to get dumped on in the winter. It’s a small village, but my favourite part was the forest skate loop!
If you want to visit Vancouver Island, Mount Washington is pretty much your only option. Take the ferry to Nanaimo and then drive north to Courtenay. Mount Washington is on the boundary of Strathcona Provincial Park and while the road up the mountain isn’t it great shape, it is a really nice resort for skiing and snowshoeing!
I discovered this resort because it’s included in my edge card/epic pass for Whistler. It’s located east of Seattle and is incredibly popular among the locals. There’s no ski village, so we stayed in Skykomish and drove into the resort in the morning. Be prepared for terrible traffic coming out of Seattle and aim for an early start. The lift passes will sell out and the parking lot will fill up, both of which will result in you being denied entrance. But it’s a great ski resort with some nice terrain if you plan accordingly!
I’ve been downhill skiing since I was 10 years old. Since moving to BC, it felt inevitable that I would eventually want to get into ski touring. It’s intrigued me for the past few years, but it’s such a high buy-in for new gear that I was reluctant to commit. My downhill skis are 16 years old and very narrow for west coast skis (68mm underfoot). Me and Carolyn both decided to get new downhill skis at the same time, and as soon as she said she was getting skis for touring, I was obligated to get them too!
For those of you unfamiliar with ski touring, to oversimplify it, it’s downhill skiing without a chair lift. Meaning you stick skins to the bottom of your skis that allow you to walk uphill. The bindings are also different and use a pin in the front that allows your heel to lift out of the binding while walking. They look a bit like what most people know as telemark skis. This allows you to explore a lot of different terrain that wouldn’t be accessible to ski otherwise. Once you get to the top of the hill, you take off the skins, switch your bindings from ‘walk’ to ‘ski’ mode, and clip in your heels for a more traditional downhill ski experience.
Choosing skis, bindings, and boots was a learning experience and took me most of last winter. A great tip when deciding is to take advantage of Whistler’s ski demo program. When you have your own equipment, you can demo skis for $20 a day, you just can’t keep any one pair of skis for more than 2 hours, but you can try different skis all day. I did this once at the demo shop on Blackcomb (at Rendez-Vous) and once on Whistler (at Roundhouse). You use your own boots and poles and it’s a good way to see what you like. My favourites were the Head Kore 97 skis, which I was able to get for a really good price online. It’s been an experience getting used to my new skis though since they are 30mm wider and 10cm longer than my previous pair.
Bindings were the most expensive part of my new gear, but the most straightforward. I wanted hybrid bindings that could be used both in the resort and in the backcountry (instead of the lightweight backcountry bindings). There’s really only one hybrid set on the market (called the lab shift) and they’re made by both Salomon and Atomic. For boots, I went to a professional boot fitter and tried on boots until I was happy. This was the most challenging part as I found a lot of them really uncomfortable. I opted for Salomon boots, but I’m not 100% sold on them yet.
Anyways, back to the point. After getting all my gear last year, the season as almost over, so I only got to ski tour once last year and opted to start with Brockton Point on Mount Seymour. It’s a popular trail for touring because there’s a dedicated trail up the mountain and you can ski down the resort runs. I was hoping to do lots of touring in 2023, but it’s been a terrible year for snow, so I kicked off my season with a second run up and down Brockton Peak as well. I’ve done it twice on skis now, both with my friend, Eddie.
Eddie has been ski touring for several years, so he’s been very tolerant and supportive while I get comfortable. I wasn’t quite sure what to expect, but overall I think it’s been easier than I anticipated. The downhill part is definitely scarier than the uphill part, but the uphill part has been surprisingly comfortable. It’s very easy to walk uphill with the skins on and to be honest, it’s a lot more comfortable than snowshoeing. Your weight is distributed more and because you’re sliding your feet versus lifting them, it’s a lot easier. There are some tricky parts when the trail is steep, but overall the uphill part has been pretty enjoyable. I think a lot of people imagine that it would be exhausting, but mentally you’re prepared to go uphill for an extended period of time, so it’s really more like hiking with a fun ski out. At this point, it’s not really about the downhill ski part for me. More experienced skiers are out there chasing fresh mountain powder, but since I’m learning, it’s less about that for me right now.
Anyways, Brockton Point is a great place to learn, because like I said, the downhill part is scarier than the uphill, but since you’re just skiing in the resort, it’s no different than a normal ski run, it’s just free. You just have to plan to get a day pass and park in the snowshoe lot since you’re not purchasing a resort pass. We followed the snowshoe trail up the side of the road and then up the side of the slope to Brockton. From Brockton, you can drop back onto the resort runs. It took us about 90 minutes each time to get to the top, but I think Eddie could have down it faster without me. Eventually I’d like to try going further to Pump Peak, but I’m not quite there yet.
Touring seemed intimidating to me for a long time, but I’m thrilled to have finally taken the step to try it out. You just need to be cognizant that touring is generally a lot more dangerous than snowshoeing because skiers tend to prefer to be in steep terrain. Taking an Avalanche Safety Course is an absolute must if you’re getting into ski touring and I never go out without my beacon, shovel, probe, and helmet. Check out my winter safety post for more tips. I’m disappointed I didn’t get to go very much touring this year with the snow conditions, but looking forward to expanding this hobby in the years to come!
Elsay Lake is the last trip in my backpacking archive! Once I write about this one I’ll be all caught up on backpacking trips. Don’t fret though, I have lots of trip plans in the works for this upcoming summer and I still have lots of day hikes and frontcountry trips to write about!
Elsay Lake is one of the more random trips I’ve done. I hiked it in July 2019 when my Howe Sound Crest trip was cancelled for the third year in a row (finally did it in 2020). Me, Emily, and Carolyn had planned to go do the trip together, but ended up having to cancel it because the last part of the trail is on private land and had been closed. Parks constructed a new trail entrance before 2020, but in 2019, you weren’t able to do the trail as a through hike.
Carolyn decided to bail on an adventure altogether, but me and Emily still wanted to do something, so Carolyn agreed to drop us off at a local trail. I did a bit of quick research and we decided to try for the Elsay Lake trail, which leaves from the parking lot on Seymour Mountain.
In the summer, you can hike up the ski run to Brockton Point (the top of the chair), where you can continue into the Seymour Wilderness. Our plan was to try and hike up to Mount Seymour and do a loop trail that brings you back down towards Elsay Lake. This was a trip where my GPS app got me into a bit of trouble.
I use GaiaGPS to track my movements every time I go on the trail. I find the app to be a great resource, but you do still need to do research because the trails on the GPS are just based off of user data and are not always up to date. From Brockton Peak, the trail continues to a branch, where you can either go down the Elsay Lake trail, or up towards Pump Peak, Tim Jones Peak, and Mount Seymour. On my app, I noticed a trail shortcut to Pump Peak, so we decided to follow that. After hiking in for awhile, the trail became very steep and we lost it, so we decided to turn back. I later learned that it’s the old Pump Peak trail that has been closed, so you shouldn’t always put all your reliability in your GPS. However, deciding to stop and retrace our steps back was definitely the right decision and what you should do when you find yourself off trail. Don’t continue on because sometimes it’s possible to continue hiking up, but becomes impossible to turn around and hike back down (or vice versa) and you can find yourself stuck.
In any case, because of the lost time, we decided to ditch the Mount Seymour plan altogether and just took the Elsay Lake branch when we got back on the trail. This was definitely the right choice as the Elsay Lake trail ended up being super technically challenging and we needed to whole day to complete it.
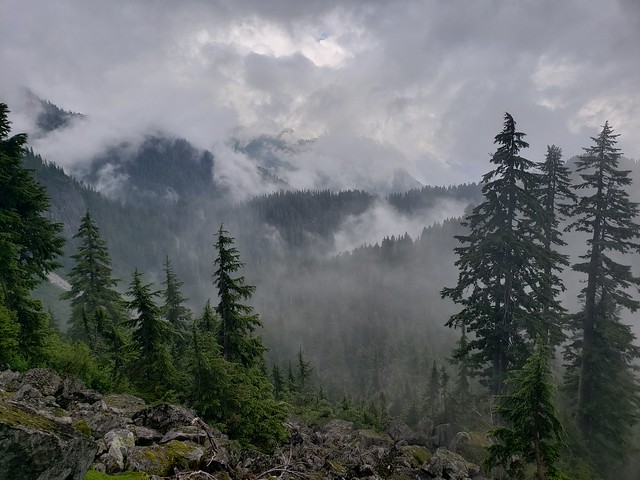
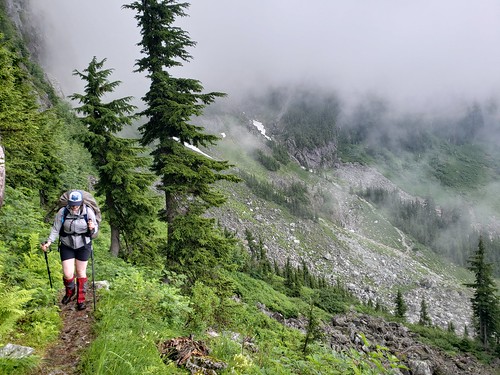
From the Elsay Lake trail branch, you descend down into the valley below Mount Seymour. It wasn’t raining, but it was a very foggy and overcast day when we did it, so at times it was poor visibility, but I also thought the valley looked so cool with the way the fog hung around the peaks. You hike down and down until you eventually come to a large boulder field. As we were hiking down into the valley, I would occasionally do my bear call as there were no other people around (most of the traffic is up on the Mount Seymour trail). After a while, we noticed that someone was starting to respond to our bear calls, and then they started yelling at us. We couldn’t understand what they were saying, but called back that we were on our way down.
When we reached the bottom of the valley, we ran into a slightly distressed couple. They asked us if we knew where we were, to which we responded, yes, and we asked if they were lost. They said they were – they’d been with a group of friends and they’d all hiked to the top of Seymour together. They’d been following their friend and gotten separated on the way down, so they’d hurried on towards the parking lot trying to catch their friend, but now they were confused and didn’t recognize anything.
Because we were familiar with the area and using a GPS, we knew exactly where they’d gone wrong. On their way back from Mount Seymour, they’d taken the wrong branch and headed further into the wilderness towards Elsay Lake instead of back towards Brockton Point. They just kept going further down the valley thinking they were heading back to the parking lot. They were upset because they’d been entirely relying on their friend. We explained to them where they’d gone wrong, showed them the map, and explained they needed to climb back up the valley and take the proper turn to head back to their car. They weren’t happy to hear they would have to climb back up, but at least now they knew where they were and headed back the right direction.
This is a prime example of why it’s so important to always be prepared yourself. One of the common reasons people get into trouble is because of the “expert halo”. They rely on someone else to keep them safe. I’m absolutely a fan of mentoring in the backcountry, but there are definitely some basics you need to take responsibility for. If you get separated from your expert or the expert gets into trouble, do you know how to take care of yourself? It’s easy to get separated and easy to get lost. The Elsay Lake trail doesn’t get a lot of traffic and this couple were unknowingly going further and further into the wilderness. Even close to the city, it’s easy to get into trouble. Check out my post on personal safety in the backcountry and resources from organizations like Adventure Smart to learn more.
But getting back to the trip, Emily and I stopped for lunch in the valley around the halfway mark, before continuing on along the trail. You continue along the edge of the valley for a while, before eventually heading into the woods. This is where the trail started to get really hard, after you pass the branch that heads up towards Mount Seymour (our initial plan). Elsay Lake is one of those rare trails, where aside from the first part, most of the trail is downhill. ‘Technical’ is definitely the word to describe the trail.
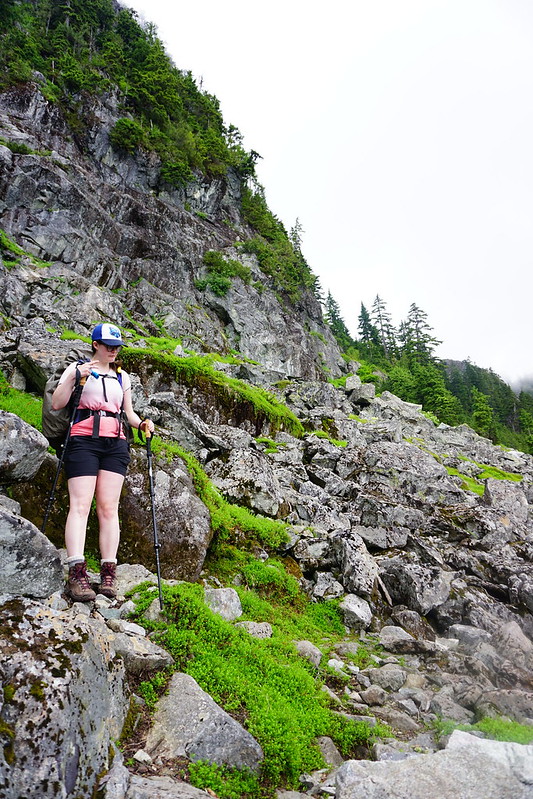
There’s lots of climbing over tree roots as you walk through the forest and several boulder fields scattered throughout. The challenge with the boulder fields is that they’re in the trees and the boulders are very large. So even though the fields are short, it’s difficult to cross them, especially if you’re short. There were several sections where we had to slide down rocks or support each other up over them because they were so large, not an easy feat when you’re both wearing large packs.
Then the trail continues down several steep sections through the forest that we had to take slowly so as not to trip or fall. Eventually you reach a flat section through the trees at the base that we did relatively quickly, until we came to a challenging river crossing. You have to ford the river, but we were trying really hard to keep our shoes dry, so we spent a long time trying to figure out a way across. We did manage to get across and stay dry, but it chewed up a lot of time. After that, you hike through some mucky areas before finally hitting the lake and hiking around the edge to the campsite.
It was only a 10km hike, but it ended up taking us about 8 hours by the time we reached the campsite. There is an emergency hut, and surprisingly, despite barely seeing anyone on the trail, the campsite was pretty busy. I mean overall there were only a few groups, but it’s not a big campsite and it took us a while to find a space big enough to pitch our tent. It was around 6pm when we arrived, so we went for a quick swim in the lake and then made dinner. There is an outhouse and we were able to store our food in the hut, so fortunately we didn’t have to mess around with a bear cache.
Our concern now was the hike back the next day. We were exhausted and we’d completely underestimated the time the hike would take. We had pre-arranged a pick up time with Carolyn that we didn’t think we’d be able to make (this was before I had an inreach), so we figured we’d just have to do our best and hope she didn’t have to wait too long for us.
We got up early the following morning to get an early start on the day. It was dry when we got up and we were able to pack up our gear pretty quickly, but shortly after we started hiking it started to pour. It was pretty demoralizing considering we were trying to go fast, but at least it was the last day. We didn’t waste time at the river this time and instead just walked right through it, getting our feet soaked. This sucked too, but it was already pouring and we didn’t want to waste time.
The trail is all uphill on the way back, which might be a downside to some, but we much prefer going uphill over going downhill, so things actually went a bit better than the previous day. We were still really slow going through the boulder fields, but persevered. As we were climbing up we came across a second couple that were struggling. The woman had injured her shoulder and her partner was now carrying both his and her packs! I can’t even imagine how difficult this was – in the boulder fields he would basically pass each pack up to her at each section and they would painstakingly carry them across. We stopped to talk to them and see if they needed any first aid. They didn’t, so we asked it they wanted us to contact Search and Rescue for them when we got cell service (since we would be ahead of them). Fortunately they had their own inreach, so they said they were going to continue on since it was still really early in the day, but would contact S&R if needed.
At the time I thought this was a reasonable approach, but after watching the S&R mini-series on the Knowledge Network, I would definitely advise just calling S&R from the beginning. There’s no fee for S&R and they won’t hold it against you for needing their help. This was an example of a couple that was actually well prepared; they had first aid supplies and a satellite device, but one of them had been injured, which is often outside your control. Don’t hesitate to call S&R if you need them. Time is the most important factor in S&R tasks and you want to give them as much time and daylight hours as possible to reach you. This was a rainy, cloudy day, so S&R likely wouldn’t be able to help this couple with a helicopter, which means they would need more time to get in the field. Perhaps this couple was totally fine, but I think S&R would probably just have encouraged them to seek help right away.
Once we got out of the boulder fields, our day improved a lot. It stopped raining and we took a break in the valley again for snacks and to change out of our wet clothes. I still had wet feet, but I was able to finish the hike in dry clothes at least. When we got back to the trail branch, I was able to get service and give Carolyn a call that we would likely be a little late. Surprisingly we’d actually made really good time and by the end of the trail, we were only 30 mins behind our original estimate.
When she heard about how challenging the trail was Carolyn seemed reassured in her decision to skip the trip, but then she went to soccer later that night and broke her ankle with an injury that takes 2.5 years to heal, so I’m not sure how she feels about the decision now! Either way, it was both a memorable and forgettable sister trip for me and Emily. The challenges were memorable, but overall I’d say the trip was forgettable and I definitely won’t be attempting the trail again. I would like to go back some day and hike up to Mount Seymour, but personally I’d give Elsay Lake a pass. I did like the trail down to the valley, but beyond that, the trail is miserable. It was a good lesson in trip preparedness though, given that we encountered two groups experiencing trouble and that we mistakenly took a wrong trail branch ourselves. The North Shore mountains are notorious for S&R tasks, so this was a good reminder to always be prepared!
Special shout out to Emily for taking ZERO pictures of me on this hike. So all you get is a million photos of her selfish butt.