ECT Series: Sugarloaf Path

I’m going to kick off my East Coast Trail series with a post about the Sugarloaf Path, which runs from Logy Bay to Quidi Vidi. It’s the most accessible trail from St. John’s and has many beautiful views along the coast, though it is rated as difficult on the ECT website.

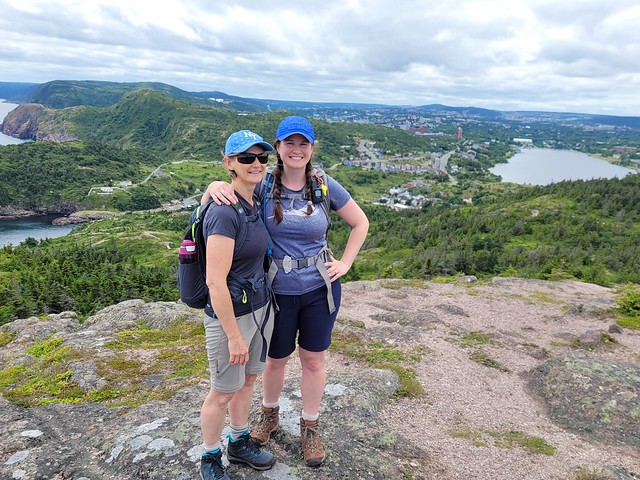
From my experience, the website slightly overestimates trail lengths and this 8.9km trail tracked as 8.5km on my GPS when I did it. Personally I don’t think it’s a very difficult trail, certainly it’s well maintained and easy to navigate, but there are two climbs throughout the trail, which is what I think contributes to the “difficult” rating. You can do the trail in either direction, the difficulty is approximately the same either way, with both directions starting with a big climb. I’ve done the trail twice, both times starting at the Ocean Science Center in Logy Bay and ending in Quidi Vidi. I like this direction because you end with a beautiful view looking down into the gut. But, the view into Logy Bay is also gorgeous, so you can’t go wrong with either direction!

IMG-20210726-WA0001

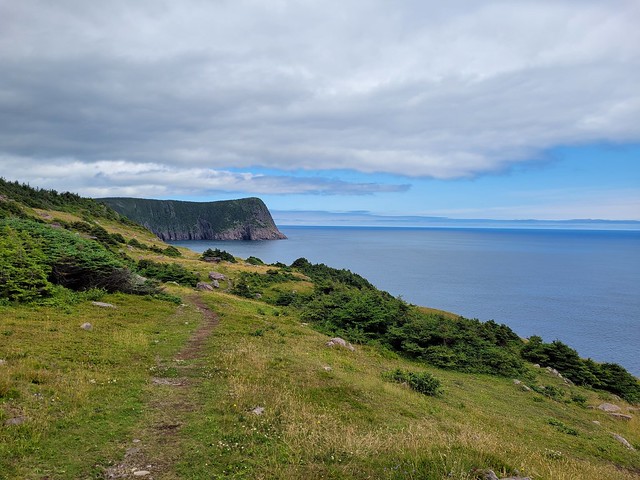
Like I said, from the Ocean Science Center, the hike starts with a climb up to the top of the bluff. I don’t find it too bad and often hike up and back just for the view. It’s a great area for blueberry picking in the Fall, but popular and often picked clean. There’s a great view down into Logy Bay from Devil’s Point and looking out towards Cape Spear at Sugarloaf Head, which is the highest point on the hike. After that, it’s a pretty gradual descent through the trees around Robin Hood Bay.

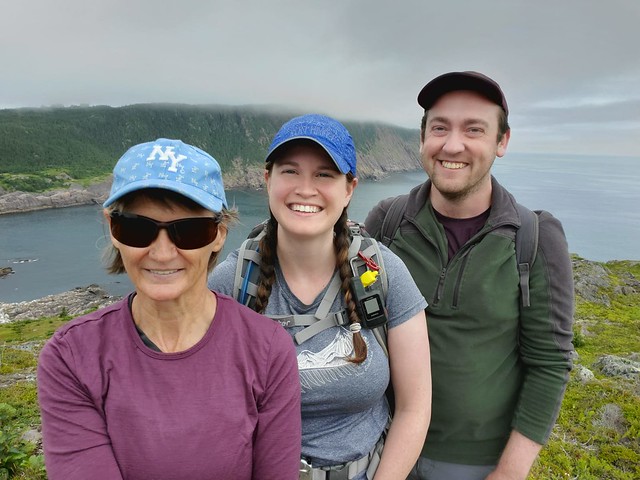
Robin Hood Bay is the only real downside of this hike. For those from St. John’s, you’ll know that this is the location of the town dump. In past years, this has created a lot of debris and plastic garbage that’s blown across the trail, but thanks to a ban on plastic bags and capping at the landfill, I couldn’t believe how much the trail was improved on my last hike here in July 2021. I visited with Sean and my Mom and we were quite impressed with how much nicer the trail is through this section now!

20210726_112844

You reach Small Point at around the halfway point in the trail, breaking out of the trees into a gorgeous meadow! It has beautiful views and makes for a great place to stop for lunch, which is what we did on our visit. The East Coast Trail is a trail that definitely benefits from nice weather. The first time I did the trail was in 2013 with Seth and it was a super foggy day, meaning that we could barely even see the ocean, despite being right next to it. On this visit, we started in the fog, but it quickly cleared out and we had a lovely view of the Atlantic from Small Point, it was honestly like a completely different trail for me!

20210726_124824

There’s an old bunker located along the cliffside in this stretch, which Sean informed us was an old lookout for U-boats and that there are many of them scattered along the trail (he works for Parks Canada). We did a little bit of poking around, but it’s dug out of the cliffside and the ladder is busted, so I wouldn’t recommend going inside. We got lucky though and saw a bunch of whales fishing off the coast while we were hiking along the exposed sections.

After Small Point, the trail meanders in and out of the woods. We could still hear the whales spouting while we were in the trees and then every now and then we would pop out of the trees to catch up with them. There’s a nice little river crossing at Bobbies Cove, shortly after which you reach an old road, which is the low elevation point on the hike. You start the second climb of the trail after that; it is a bit steep, but like most of the ECT, there are stairs on this section, so you can just take your time and it doesn’t take too long to get back up to the top of the bluff.

20210726_124625

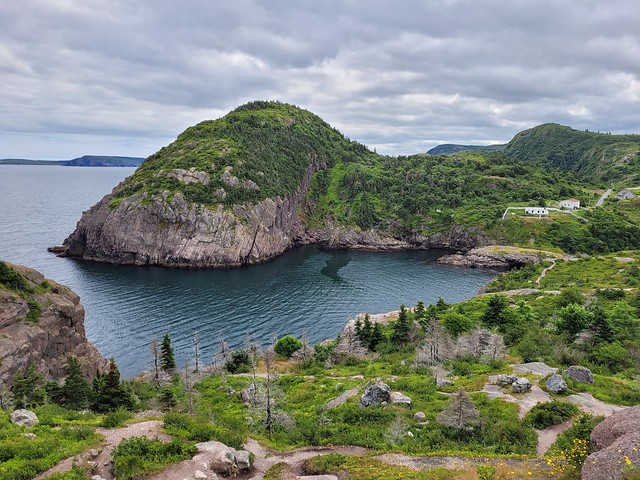
Shortly after Boulder’s Cove, you reach the top of the climb and have the most gorgeous view looking down towards Quidi Vidi. Then it’s only a short walk back down towards the gut. Pay close attention to the trail markers in this section though – it’s frequented by mountain bikers, so there are a lot of other paths crisscrossing the ECT. It is easier to follow the path up from the other direction, which is one of the benefits of doing the path in reverse. It looks like any of the paths should get you down, but there is one tricky section where there’s a bit of a ravine and only one path across, so if you get off the official ECT, you might miss it and then have to climb back up. Me and Seth got super lost when we did it, but we knew to pay attention when I did it with Sean and Mom and we didn’t have any problems.

20210726_141251

The fun thing about the ECT is because NL is so rocky and barren, you often have to look down for trail markers, which are affixed directly to the rock. Watch for arrows engraved and painted in the rock, or the wooden trail stakes, which are painted striped black and white. The universal symbol along the trail for the ECT is a white triangle.

Eventually you reach the end of the trail along Cadet Road, right before the village. You can leave a second car parked along the road, otherwise you’ll have to go back to Logy Bay or get picked up. The trail ends right next to the Plantation and Brewery, so check out the local artisans, have a pint, or see if the local ice cream truck is open for a sweet treat if you’re there in the summer!

20210726_135803

East Coast Trail Hiking Series

I’ve decided to branch out a bit with a new series about hiking the East Coast Trail. I’ve done a ton of hiking (and blog posts) about my adventures in BC and my travels abroad, but I haven’t taken the time to write about one of my all time favourite trails. I grew up in St. John’s, Newfoundland and have spent lots of time hiking this unique trail over the past 10 years or so. I figured it was time to share it with the rest of you!

The East Coast Trail is approximately 300km of trail that runs down the entire coast of Newfoundland’s Avalon Peninsula. It’s hard to determine the exact length of the trail because it stops in many communities as you travel down the coast and can be completed either as a thru-hike, or much more popularly, as section hikes. According to the East Coast Trail Association, which maintains and manages the trails, the trail is comprised of 25 paths that connect more than 30 coastal communities. It you opt to do the trail as a thru-hike it would be more than 300km with all the road walking between communities. The longest section of trail is 23km, so most Newfoundlanders opt to do the trail as a series of section hikes, either with 2 vehicles or as a round trip. You are permitted to camp anywhere along the trail, but there are 5 official campsites along the larger sections of trail if you want to do some sections as an overnight.

PSX_20210801_001531

The trail is entirely coastal, though of course it does go through large sections of wooded areas where the coast is not directly accessible. While it’s not mountainous, it is still a very strenuous trail as it will take you up and down through many beaches, coves, and headlands over the length of the trail. Some trails are more well maintained than others, making for some pretty technical hikes along some of the longer and less travelled paths. But the trail passes through some of the most beautiful coastline and rural communities and I love hiking there on a sunny day, with the wind blowing at my back, eating copious amounts of fresh berries and watching the whales fish along the cliffs.

I’ve slowly been working on tackling this trail over the past 10 years and currently I am about 60% complete. However, the ECT association is always working on continuing to expand the trail and have added 4 trails down the northwest side of the peninsula over the past few years, so the trail is always growing! There’s some variation in paths and I have 28 to complete on my list. My plan is to list all the trails here and then work on individual blog posts for the sections I’ve completed and link them back here as I go.

TrailFromToDistanceTimeRating
Long Shore PathTopsailPortugal Cove17.2km6-8 hoursStrenuous
Piccos Ridge PathPortugal CoveBauline14.5km7-9 hoursStrenuous
White Horse PathBaulineCape St. Francis18.2km8-10 hoursStrenuous
Biscan Cove PathCape St. FrancisPouch Cove7km2-4 hoursModerate
Stiles Cove PathPouch CoveFlatrock15.1km5-7 hoursDifficult
Father Troy’s TrailFlatrockTorbay8.9km2-4 hoursModerate
Silver Mine Head PathTorbayMiddle Cove1.9km1-2 hoursEasy
Cobblers PathOuter CoveLogy Bay5km2-3 hoursModerate
Sugarloaf PathLogy BayQuidi Vidi8.8km3-5 hoursDifficult
Signal Hill Trail**Quidi VidiThe Battery3km1-2 hoursModerate
Deadmans Bay PathFort AmherstBlackhead10.5km4-7 hoursDifficult
Blackhead PathBlackheadCape Spear4.4km1-2 hoursModerate
Cape Spear PathCape SpearMaddox Cove11km4-6 hoursModerate
Motion Path*Petty HarbourShoal Bay Road20.1km5-8 hoursDifficult
Spout Path*Shoal Bay RoadBay Bulls22.5km7-9 hoursStrenuous
Mickeleens PathBay BullsWitless Bay7.2km2-4 hoursModerate
Beaches PathWitless BayMobile7.1km2-3 hoursEasy
Tinkers Point PathMobileTors Cove5km2-3 hoursEasy
La Manche Village PathTors CoveLa Manche7.8km2-3 hoursEasy
Flamber Head Path*La MancheBrigus South12.9km5-8 hoursDifficult
Brigus Head PathBrigus SouthAdmiral’s Cove6.4km2-3 hoursModerate
Cape Broyle Head Path*Cape BroyleCalvert18.3km7-10 hoursStrenuous
Caplin Bay PathCalvertFerryland5.6km2-3 hoursEasy
Sounding Hills PathFerrylandAquaforte5.4km2-3 hoursModerate
Mudder Wet PathAquaforteAquaforte2.9km1-2 hoursEasy
Spurwink Island Path*AquafortePort Kirwan17.1km7-9 hoursDifficult
Bear Cove Point PathPort KirwanRenews11.9km4-6 hoursModerate
Island Meadow PathRenewsCappahayden10km3-5 hoursModerate
Total285km
*Campsite located on trail **not official ECT section

Hiking Seed Peak

Over the years it’s become a bit of a tradition that me and Brandon always go hiking together on the Thanksgiving long weekend. The forecast was calling for gorgeous weather on Thanksgiving Monday, so we got to planning where we wanted to hit up this year. Brandon had a long list of hikes to try, but once we started doing a bit of research, we found it to be a bit challenging to find a suitable hike for the conditions.

Because I believe in always putting ample research and consideration into every hike you do, I’ll walk your through our process. First we crossed off some of the longer and more strenuous hikes from Brandon’s list. One of the hikes was a whopping 1800m in elevation gain and we were concerned about having enough daylight hours to do such a long hike. Next we took into consideration the weather. It had been uncharacteristically cold the week previous and in true Vancouver fashion, it had rained all week. A bit of research confirmed our suspicion that many of the local peaks were now covered in snow. Brandon was keen to do Tricouni Peak outside of Squamish, but the two routes up to summit involve either fording 2 creeks, or crossing what is described as the “mud gauntlet”. Both of these options sounded like a bad idea given the amount of rain that had fallen earlier that week and the peak was still quite high in elevation (meaning more snow), so eventually we landed on Seed Peak.

20211011_155947
4WD access road to the trailhead (E110)

Seed Peak is a less trafficked trail off of Mamquam FSR in Squamish. It was 300m lower in elevation than Tricouni, and while we knew there would still be snow, we guessed the access road would be snow free and overall make for a shorter, less strenuous hike. After having done the hike, I wouldn’t say it’s not strenuous, but hey, that’s how we ended up giving it a try!

Mamquam FSR is in good condition and any vehicle should be able to make it to the end of the road. AllTrails actually lists this hike as 19.5km starting from the end of Mamquam FSR. Brandon hates hiking on anything he could have driven, so we took his 4runner a fair bit further than that. From the end of Mamquam, you branch off onto E100 and then E110 to get up to the trailhead. E100 is a bit steep at the beginning, but still in pretty good shape, I think most SUV’s and AWD could make it up to the end of E100. We were able to get Brandon’s car all the way to the end of E110, but I would advise hiking up the last little switchback (about 300m). There’s a pullout before a steep rugged section and I didn’t think it was really worth risking the drive up that part.

IMG-20211011-WA0069
Logging at the trailhead

I would only recommend Seed Peak if you have good wayfinding skills. It’s pretty intuitive to know where to go, but there are parts without a well defined trail (and some parts with no trail), so if you’re hopeless with navigation I’d give it a pass. The most confusing bit for us was finding the trailhead. This is an active logging road and there has been some slashing between the road and the trailhead, which run parallel one another for a few hundred metres. I suspect they weren’t supposed to log onto the trail, but it looks like it happened nonetheless. We did some crawling over the logs to try and get to the trail, only to miss it entirely and then hike up the edge of the slash until we found trail markers. My recommendation would be to walk right to the very end of the road, from there you’ll see a trail marker, you may have to climb over a few logs, but you can pick up the trail a lot easier from there rather than trying to cut across all the downfall.

20211011_110354

After that it’s pretty easy to follow the trail markers up about 1km to the sub-alpine. This was the only part of the trail that didn’t have snow on it when we did it. The snowline started around 1400m. The great thing about this hike is that only the first 1km is in the woods, after that you have views for pretty much the entire hike! It was the main reason we picked it, because we figured if the conditions were too bad or snowy to do the whole thing, at least we still had a good chance of seeing some nice views early in.

It is a challenging trail though. It’s not been the easiest hiking season for me as I’m still pretty out of shape from the pandemic with all my normal exercise activities still being cancelled (or high risk). It’s 12km round trip to the top of Seed Peak, but the elevation gain is misleading as there is a lot of up and down and it is quite steep. Fortunately we were prepared with microspikes as we definitely couldn’t have done the trail without them given how steep it is. I was a little bit concerned as we were going up that it would be a struggle to come back down, but it was manageable with the spikes.

20211011_121231

After you pop out of the woods, you immediately start a steep climb up to the first peak. I can’t see a name for this peak on Gaia, but it has great views if you’re looking for a shorter hike. It’s very flat on the top, so we wondered around snapping photos before continuing on. This trail is also known as Pinecone Trail, so you might see it listed as that on some trail apps (Gaia included). The reason it’s called Pinecone Trail is because after the first peak, you cross the border into Pinecone Burke Provincial Park! I was particularly excited about this because I live in Coquitlam and go hiking in Pinecone Burke all the time.

For a bit of history, Pinecone Burke was first established in 1995 and has the unfortunate legacy of being one of BC Parks least funded parks. Despite it being a huge park located right in the lower mainland, it receives very little upkeep or promotion. Most of its users access it from Harper Road on Burke Mountain and it’s popular for mountain biking. There are a handful of trails in that area, but otherwise the park is mostly wilderness. It’s sandwiched between the Coquitlam Watershed and Pitt Lake in the south end, and continues north until it intersects with the south end of the much more popular Garibaldi Park. There’s limited access in the north end and Seed Peak is one of the only trails I can find exploring this end of the park, so I was excited to see a completely different side of it.

20211011_110712

After the first peak, the trail has a steep false descent, after which you climb up to a second smaller peak before beginning the real descent. We were one of 4 groups on the trail, so it was very empty. However, we were the last group, so we didn’t have to make tracks and just followed the trail the previous groups had created. This may or may not have been a good thing. Whether or not there is an actual trail in the summer is hard to tell when it’s covered in snow, so we don’t know how much we were actually walking on the real trail and definitely went through some vegetation. The upside is that all the rocks were covered in snow, so we didn’t have to navigate any boulder fields and mostly just cut a path straight down. We were definitely in the vicinity of the intended trail (according to my GPS), but I’m not sure if it would be any easier on a warmer day.

IMG-20211011-WA0025

The descent is a bit of a bummer when you know you have to continue climbing again. As you start to climb up the next peak (also unnamed on my GPS), you do get a few glimpses down to the beautiful jade waters of November Lake. It was a bit of a slog going up, but you’re surrounded by beautiful views on all sides. Unfortunately, there’s still one more peak to go after that. It took us about 2.5 hours to make it to this section, we continued a little bit further to get up to this hump before Seed Peak, but we opted not to go the whole way up Seed Peak. We did have enough time, but we could tell it was still a bit of a slog to get up there and we wanted to conserve some energy for the way down. So instead, we had a nice long lunch break in which to enjoy the view!

IMG-20211011-WA0040

If you do go the whole way, I think you get a view down to Pinecone Lake, which you can’t see from below because there’s a big ridge between Seed Peak and Mount Gillespie that blocks it. But there are still incredibly gorgeous views down into the valley and the snow-covered wilderness. I’d definitely be keen to return in the summer and camp along the ridge, although there’s limited water sources so you would have to come prepared for that.

Either way, we had a great time hanging out and filmed some fun videos to pass the time. It was definitely cold; I had a lot of layers, so my body was warm, but I had worn my hiking boots instead of my winter boots and unfortunately my feet did get wet from the snow getting trapped between the sides of my microspikes.

20211011_132116

We thought it might take us even longer to hike back because really steep sections are often worse on the downhill, but fortunately it wasn’t too bad and we cut about a half hour off our time on the way back. I was exhausted on all the uphill sections though, so I definitely need to start doing a bit more exercise on my non-hiking days. The trickiest part is that there is one rope section on the first peak (early in the hike). It’s even worse going down and we all guided each another on foot placement on the way back. I had been debating bringing Sadie on the hike with me, but I’m glad I didn’t. We read there was one rope section and I was worried about her on that part and with all the snow. I think a dog could get up the rope section, but I honestly don’t know how you would get them down. Overall there’s a lot of narrow edges and cliffs, so I would have been very weary with Sadie. I would likely have to let her off leash for my own safety in sections and I’d be worried about her making a mistake near a cliff edge. Also, we saw a GIANT black bear on the drive in, so they are definitely still active.

20211011_132815

Overall, we were hiking for just shy of 6 hours, so it was a great end-of-season hike. It’s about an hour drive from Squamish and we made it back to town around 5pm. The downside was there was an accident on the Sea-to-Sky. We had dinner at Howe Sound Brewing to try and avoid the traffic back-up, but it had only gotten worse and we ended up sitting at a standstill for 45 minutes. I think it was shortly after 9pm when I finally made it home, making for a bit of a long day! Either way, I’d recommend checking out this hike earlier in the season next year if you have 4WD or high clearance and like a challenge!

IMG-20211011-WA0054