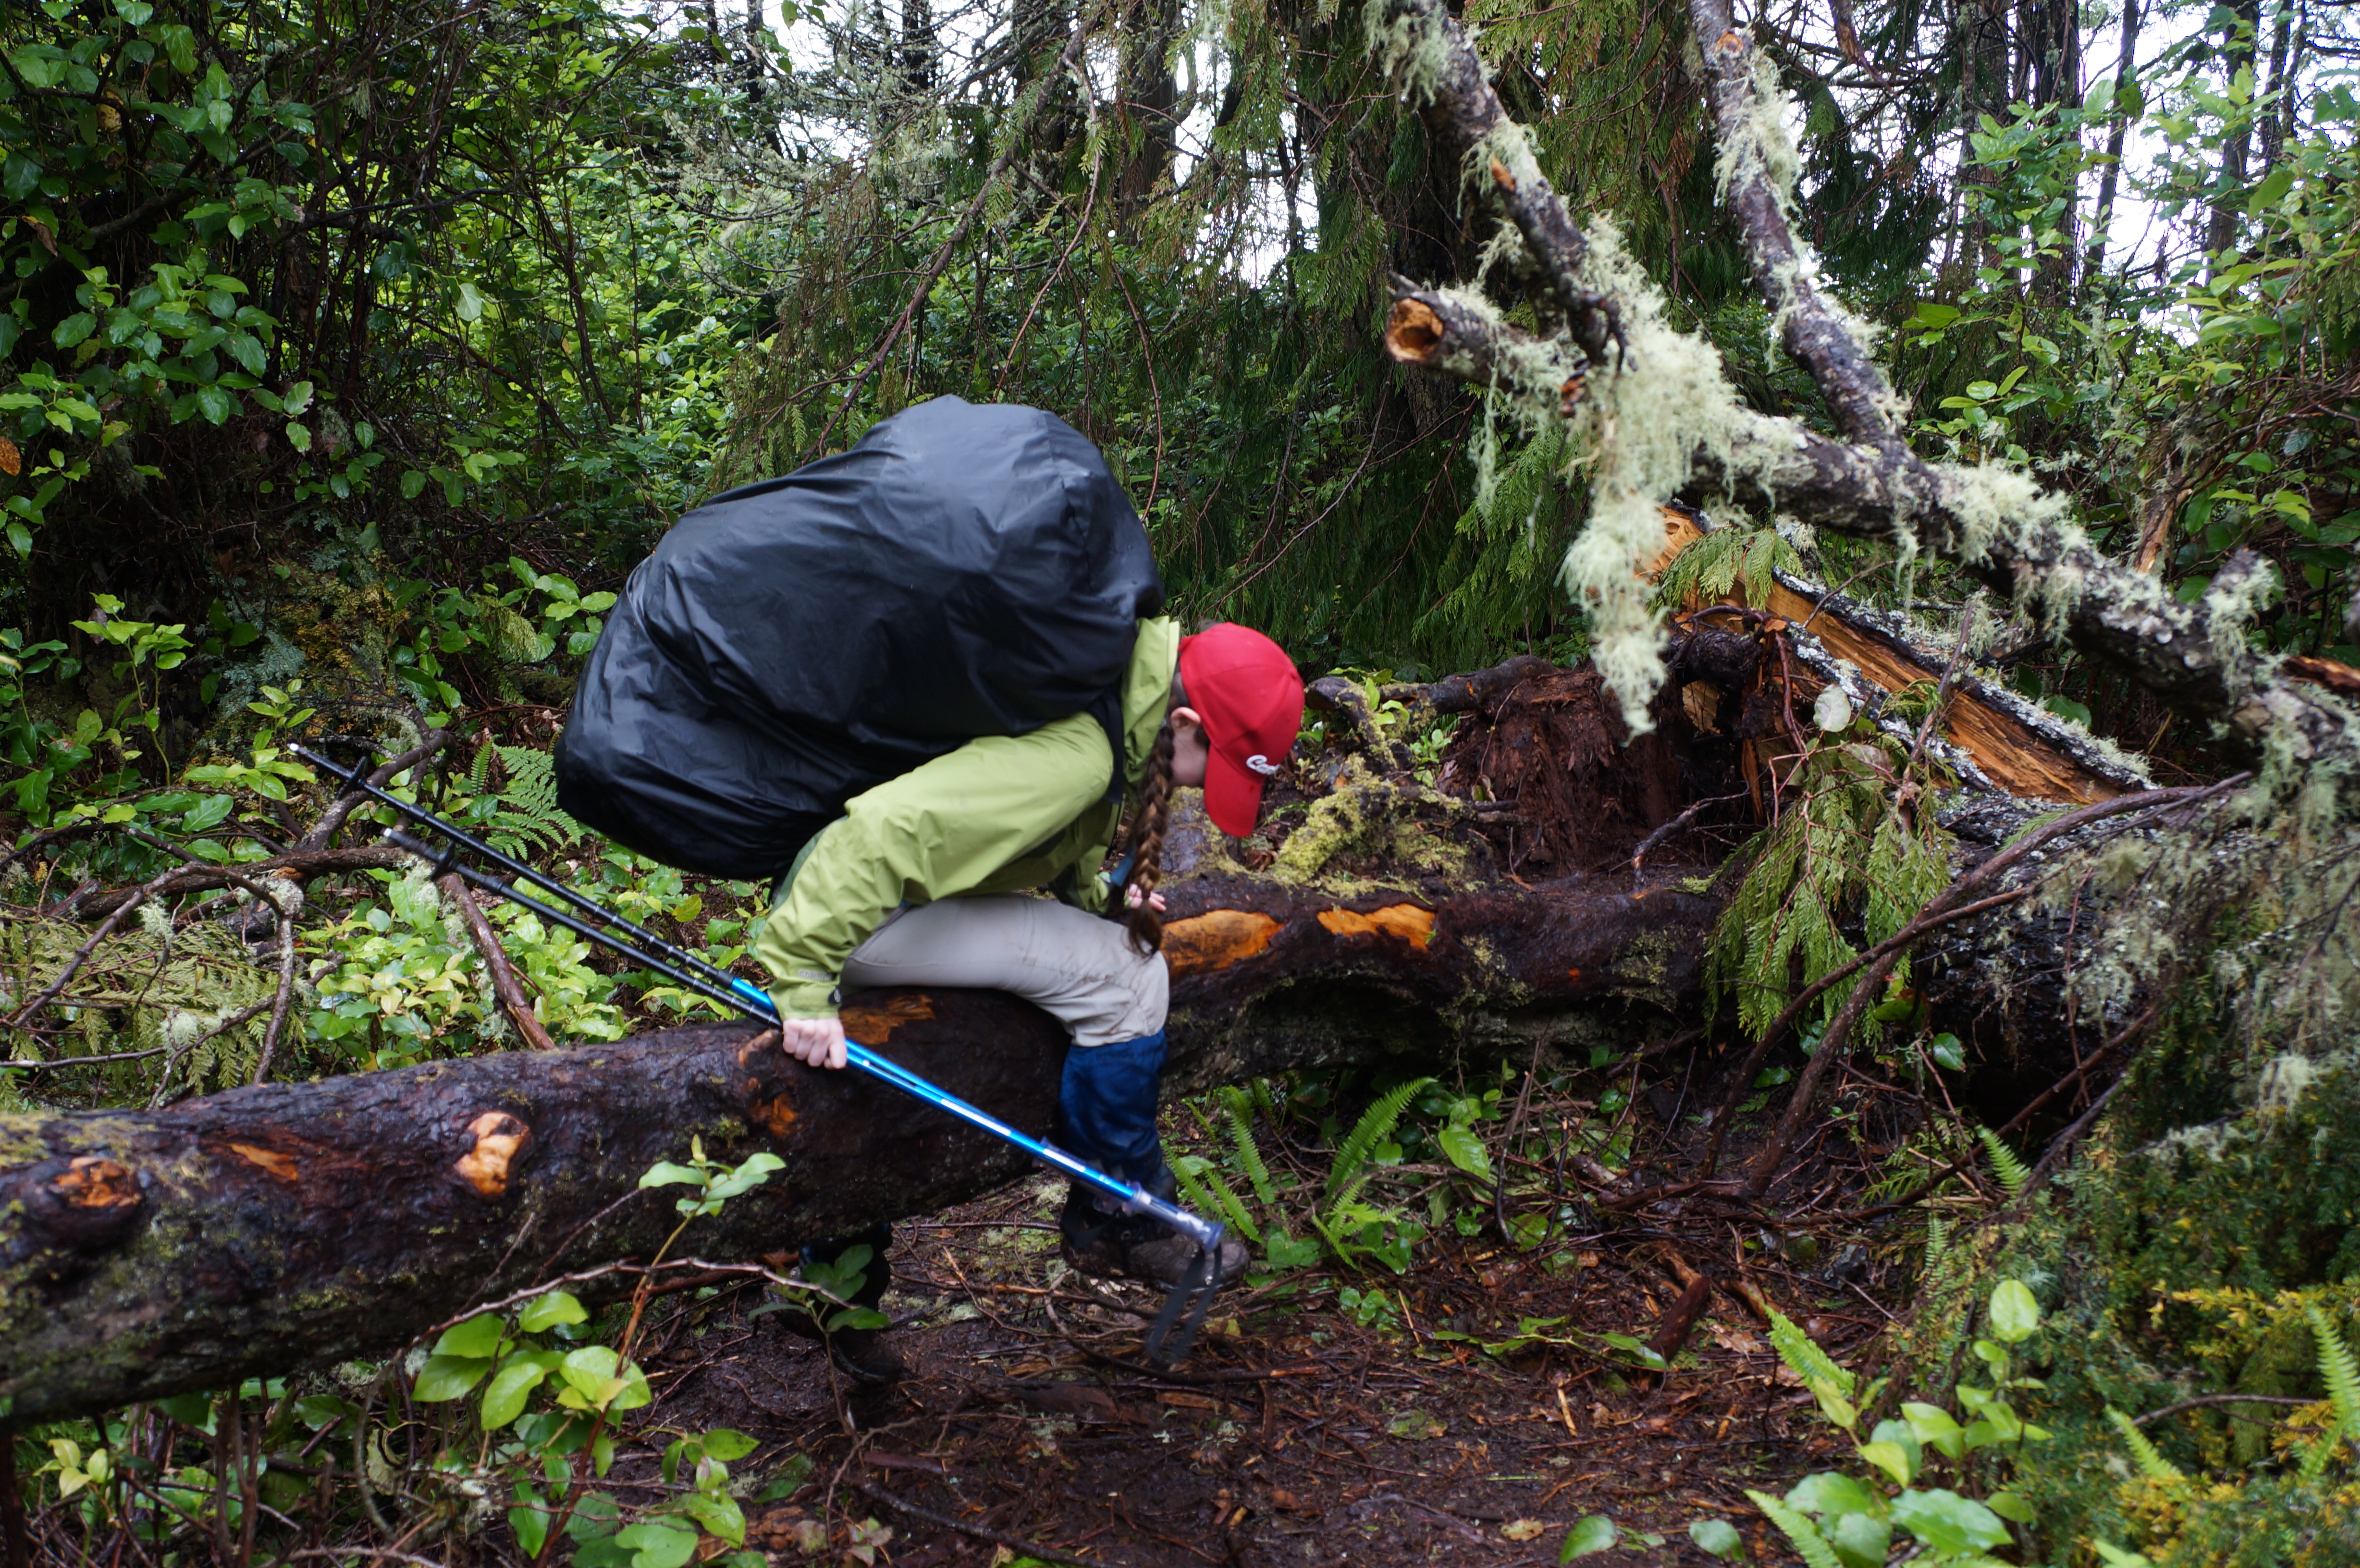
In my opinion, Mickeleen’s Path is one of the best mid-length day hikes for when you only have one vehicle. This section of the trail goes from Bay Bulls to Witless Bay, so it’s only about a 40 minute drive from St. John’s and it has a convenient ATV trail that you can use to loop back to where you started instead of having to hike back along the entire trail. There’s nothing to see on loop back, so the official ECT section is a lot more scenic, but if you want to cut some time off, you can walk back along the ATV track instead.
When driving there, turn left off the highway and into Bay Balls harbour and follow Southside Road to the very end, where there is a small parking lot. I believe you have to walk a bit further down the road to get to the trailhead, but then follow the left trail branch along the coast. Most of the first part of the trail is in the woods, but around the 2km mark you reach the grassy bluffs and can continue around the headland. The trail does continue to pop in and out of the woods, but it’s very scenic for a solid 3-4km as you go around South Head.
I hiked it solo in early August and made my first pit stop in Island Cove for a small lunch. I saw several whales right at the edge of the harbour as I was eating and I had a good laugh when O’Brien’s whale watching tour blazed right past when the whales were diving without being any the wiser. I’m sure they knew where else to find whales since I later spotted both the boat and the whales on the other side of South Head, but it was still comical to watch them motor right over where the whales were feeding.
For some reason I thought Mickeleen’s Path wasn’t very scenic, so I was thrilled at the views as I continued along the coast. It was extremely windy on the day that I visited, but I also got some blue skies, so it made for really nice photos. I stopped for a second lunch on the bluffs past Upper Red Cove that look out towards Gull Island. One of my favourite parts of hiking around Witless Bay is the ecological reserve and I loved spotting the puffins frantically flapping over the top of the water.
If you’re doing the trail as a one-way, you can end on Bear’s Cove Road in Witless Bay and drive home from there. In that scenario, it’s approximately a 7km hike. However, since I was solo and only had the one vehicle, Sean had given me a tip about the ATV track, so I decided to continue on along that route. To find the track, take a left on the road when you get off the main trail and then very shortly after, take a right to get on the ATV trail. It’s a lot like Shoal Bay Road if you’ve ever hiked the Spout – gravelly with lots of potholes – so if it’s rained recently, you may have a lot of large puddles to navigate around. The road follows a horse shoe shape around the headland and eventually connects back in with the original trail just before you get back to the parking lot in Bay Bulls. This route is just over 11km, so it definitely beats going the whole way back and is pretty flat.
Overall I’m definitely a fan of Mickeleen’s Path and recommend it as a great solo hike or for when you only have one car. The whole route took me just under 3.5 hours, with 2 breaks, so budget 4 hours if you’re doing the loop trail. And keep your eyes open for puffins and whales!
Johnston Canyon is a quintessential hike if you’re visiting Banff National Park, and the great news is you can hike it all year round! I thought I’d been there once before in the summer, but after visiting on this trip, I think this was actually the first time. It’s located about halfway between Sunshine Village and Lake Louise, but it can be a bit tricky to get to.
It’s not off the main highway, but instead located on the Bow Valley Parkway, which runs parallel to Highway 1. It’s just a one-lane highway and it’s not in the best shape, so assume a much slower pace than driving on the main highway. You can enter the Parkway from just past Banff, or at the turn for Highway 93 that runs down towards the Kootneys. I’m not sure what the deal with the road is, but the exit outside of Banff isn’t always open, so even though you have to do a bit a backtracking, sometimes you have to go all the way to the second turn off to get on the Parkway (as was the case when we visited). It was disappointing because it results in a longer journey, though with the speed you can try on Highway 1 I’m not convinced it’s shorter on the Parkway. But I’ve heard the Parkway is incredibly scenic, so I’m sad we didn’t get to drive the whole thing.
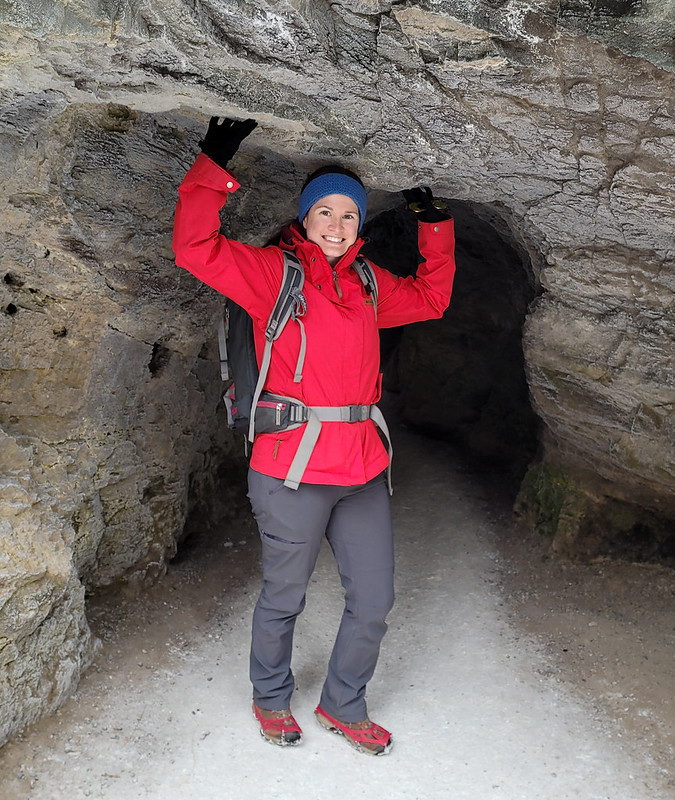
In any case, Johnston Canyon is a pretty popular place to visit and it’s nice that you can hike it all year round. There will be snow in the winter, and though it’s all packed down from the frequent traffic, microspikes or cleats are definitely required, especially on some of the uphill and downhill sections. We brought our own spikes with us, but if you’re just visiting, you can rent them from any of the outdoor equipment stores in Banff. There were a few people without them, but actually most people had some kind of traction and they were all very similar, so I assume most people were using the rented cleats.
In the summer, I think you may need to get there early to secure parking, but it wasn’t a problem in the winter. Since it’s a shorter trail, there should also be a lot of turnover in the lot. The trail hikes through the forest and then along the side of the steep walls of the canyon. In many cases you go right through the canyon on grated walkways that are bolted to the side of the canyon wall. It’s a little scary in winter because the snow elevates the trail, meaning the rails only come up to about mid-thigh, so use caution when navigating some of the narrower parts of the canyon. A few times we waited for people to pass coming in the opposite direction so as not to crowd the trail.
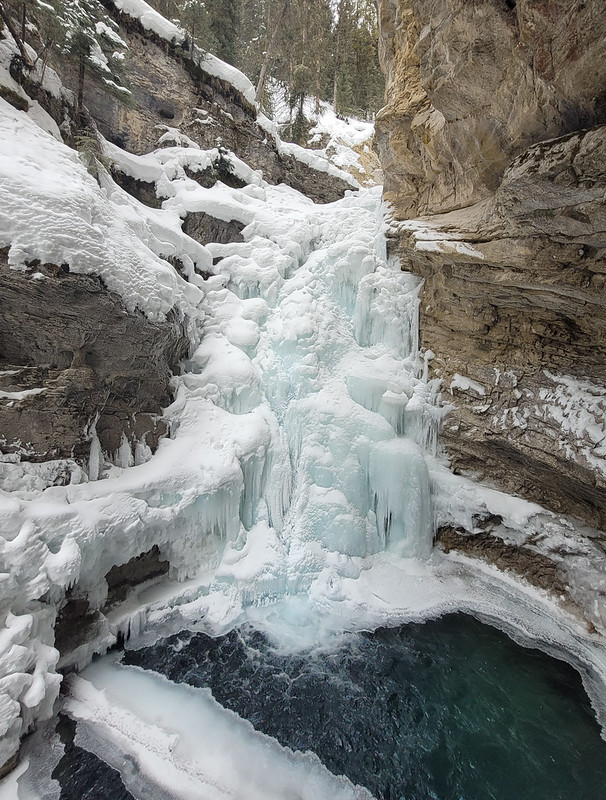
There’s lots to see along the way and we really enjoyed all the frozen waterfalls and ice structures that form along the side of the canyon. The first big attraction is the lower falls, which you descend down to and cross a bridge before walking through a short tunnel to get an even better view of the river and the lower falls. It’s quite unique, which is how I knew I hadn’t been there before. The tunnel is cool and we hung around for a bit watching the falls. The surface of the falls looks frozen, but the river is still running underneath, so it creates this cool, half frozen pool at the base.
Some people just go as far as the lower falls and then turn back, but we decided to continue on to the upper falls. You go past several more waterfalls along the way and before you get to the upper falls, there is a path through the woods to go down to the river. At the right time of year, you can walk on the river to the upper falls. We opted not to because we could see a lot of dicey sections from the moving water along the river, but lots of people were walking on the ice, so I assume it was relatively safe. It’s a gentle uphill most of the walk to the falls and then when you finally reach the upper falls, there’s a big viewpoint looking down on them.
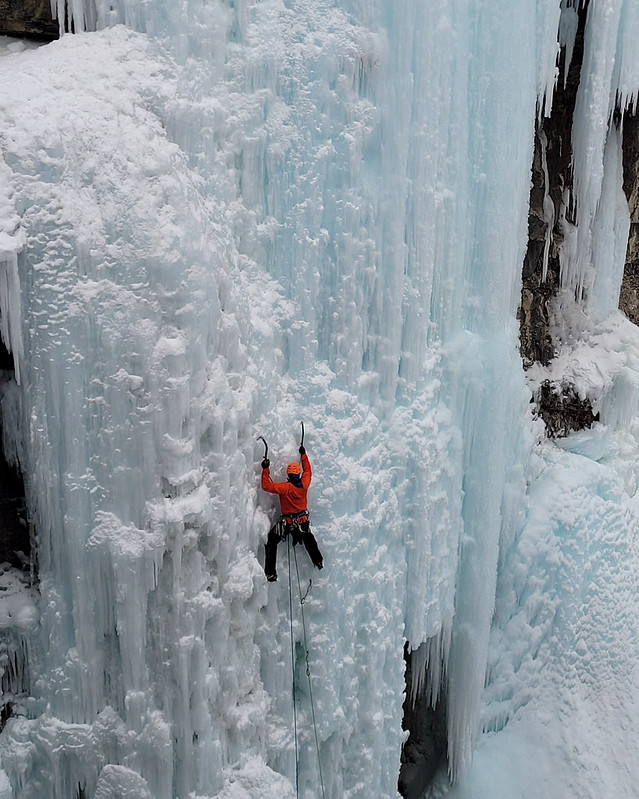
The upper falls were completely frozen this time of year, but we had the added benefit of getting to watch ice climbers! Turns out it’s a popular location for ice climbing and there were several groups climbing along different sides of the multiple ice faces. Ice climbing is definitely a sport that is too intense for me, but it’s really interesting to watch other people do it, so we settled down for our lunch and enjoyed watching the climbers while we ate. The trail was relatively busy, but manageable. We were able to see what we wanted to see and while there was a good number of people, it wasn’t crazy crowded. It was a weekday though, so it might be worse on the weekends and I’m sure it’s a lot busier in the summer.
All in all, the hike was approximately 5km to the upper falls and back, with about 130m in elevation. So it’s definitely a great hike for beginners and had a really interesting topography. But as always, exercise caution when going on any hike, especially in the cold season. We had a good time and I’m glad I got to cross this popular hike off my list.
First aid is one of those things I always knew was important, but it took me a while to really learn just how useful it is. Being able to swim was something that was always really important to my Mom, so she put me in swimming lessons as a kid and later signed me up for lifeguarding courses when I turned 14. I did junior lifeguarding until I was 16, when I completed my National Lifeguard course and was certified for 4 years. First aid is a major component of this course and it is something that has served me well ever since. I’ve done several variations of first aid courses for work and guiding ever since and I think it is so worthwhile to invest time in learning basic first aid. Even if you don’t have a formal certification, being able to recognize symptoms and treat simple emergencies is a huge asset in the outdoors.
I was employed for 2 summers as a lifeguard at age 18, other than that I’ve never had any formal capacity as a first aider. Yet, since then I’ve treated a seizure, heat exhaustion, heat stroke, a broken arm, injured knees, and any number of cuts, scrapes, and blisters. I never leave my first aid kit at home, and I’ve been surprised by how often I’ve needed it. You can be resourceful in the wilderness, but I’ve never regretted carrying along a few extra first aid items (and you will definitely regret if you need them and don’t have it). I think the most important thing is knowing what to bring and how to recognize symptoms.
First Aid Training
Let’s start with training. The easiest way to learn is to do a formal course. There are 3 basic first aid courses: Emergency, Standard, and Wilderness First Aid. Having done them all at least once, I think Standard First Aid is the best bang for your buck. I don’t like Emergency First Aid, it’s only a 1 day course and it covers very little outside of CPR and AED. While these are good skills to have, I don’t think they are the most practical. I’m much less likely to need CPR and much more likely to need to bandage a broken wrist, so I find Standard First Aid more practical (plus you learn CPR/AED in all 3 courses).
Standard First Aid is generally a 2 day course and covers diagnosing and treating all different kinds of ailments, which is why I think it’s more useful. Treating heat stroke was the most life threatening thing I’ve ever done and I was able to diagnose it incredibly quickly, to the benefit of the individual (read about that experience here). Even for simple things, diagnosis can make a big difference. I was once 3 days into the wilderness and had a frightened hiker approach me with heartburn, I gave him pepto-bismal and it resolved in no time (somehow he’d never heard of heartburn – he described his symptoms and Emily immediately diagnosed it as heartburn since she gets it a lot, while I sang the pepto-bismal rhyme and he looked at us like we had 3 heads). So in my opinion, Standard First Aid is more practical than Emergency.
Wilderness First Aid sounds like it would be the most applicable for outdoor adventure (and it is), but it’s also the most expensive and has the biggest time commitment (2 long days or 3 shorter days). In my opinion, Wilderness First Aid is glorified Standard First Aid. It covers the same material, but from the perspective of someone in the wilderness with limited resources. So you practice splinting with sticks, homemade stretchers, and hypothermia wraps, but it’s not substantially different. Though once you have Wilderness First Aid, it’s half the work to re-certify it every 3 years (just a day), so I try and keep mine up to date. So if financial is a concern, I’d recommend Standard First Aid as the best course.
An idea of what “technical” means
Understanding Your Abilities
The second part of first aid is knowing what to bring with you and keeping a cool head in an emergency. If you panic, your patient will panic, so my approach has always been to be reassuring while asking lots of questions. Honestly, the presence of a first aid kit and care from someone who seems like they might be able to help is often reassurance enough for the patient. The other important thing is knowing when to call for help and doing so immediately. For example, you can probably handle small cuts and scrapes yourself, as well as mild dehydration. When my friend broke her wrist on a hike, I was able to wrap it for her to make her comfortable enough to walk back to the car on her own.
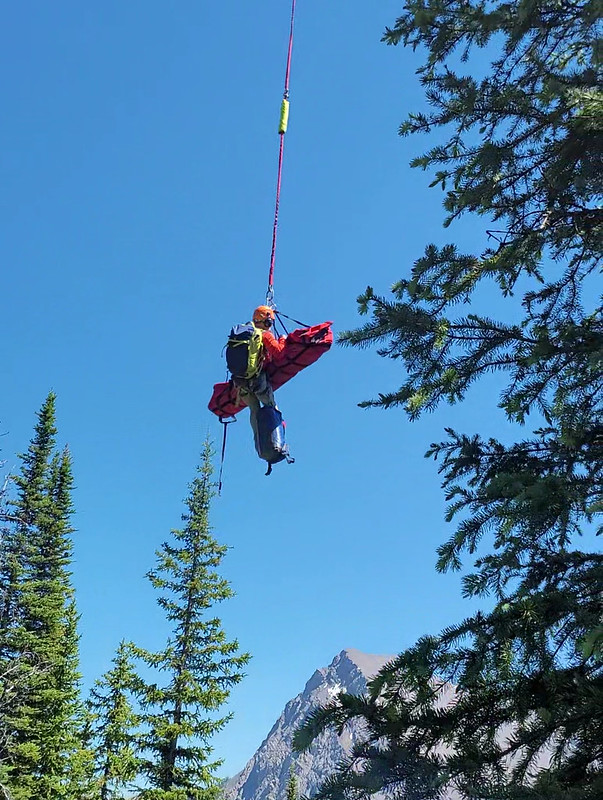
Dehydration is one of the more dangerous problems you can encounter, so being able to recognize it is important so that you can self treat. When I did the North Coast Trail, on the third day, me and Emily were both feeling really low and when Emily started to complain of an upset stomach, I immediately made the whole group stop hiking and we took a break while we both chugged a litre of electrolytes. While Emily’s energy remained low, our quick action prevented it from getting worse and we were able to finish the day in good spirits, with no injuries. In contrast, when my friend got heat stroke on the trail to Assiniboine, I didn’t know she was feeling bad until it was really too late. Her muscles started cramping, she couldn’t stand, and she even started losing feeling in her legs – all of these symptoms occurred within 15 minutes of her stopping to say she felt sick. In this case, I immediately made an SOS to emergency services on my inreach and spent 3 hours rehydrating her while waiting for help. Don’t try and be a hero; sometimes professionals and a quick extraction are needed and you are much wiser to make the call in those scenarios. Read my post on personal safety for more about communication devices and preparedness.
What to Bring
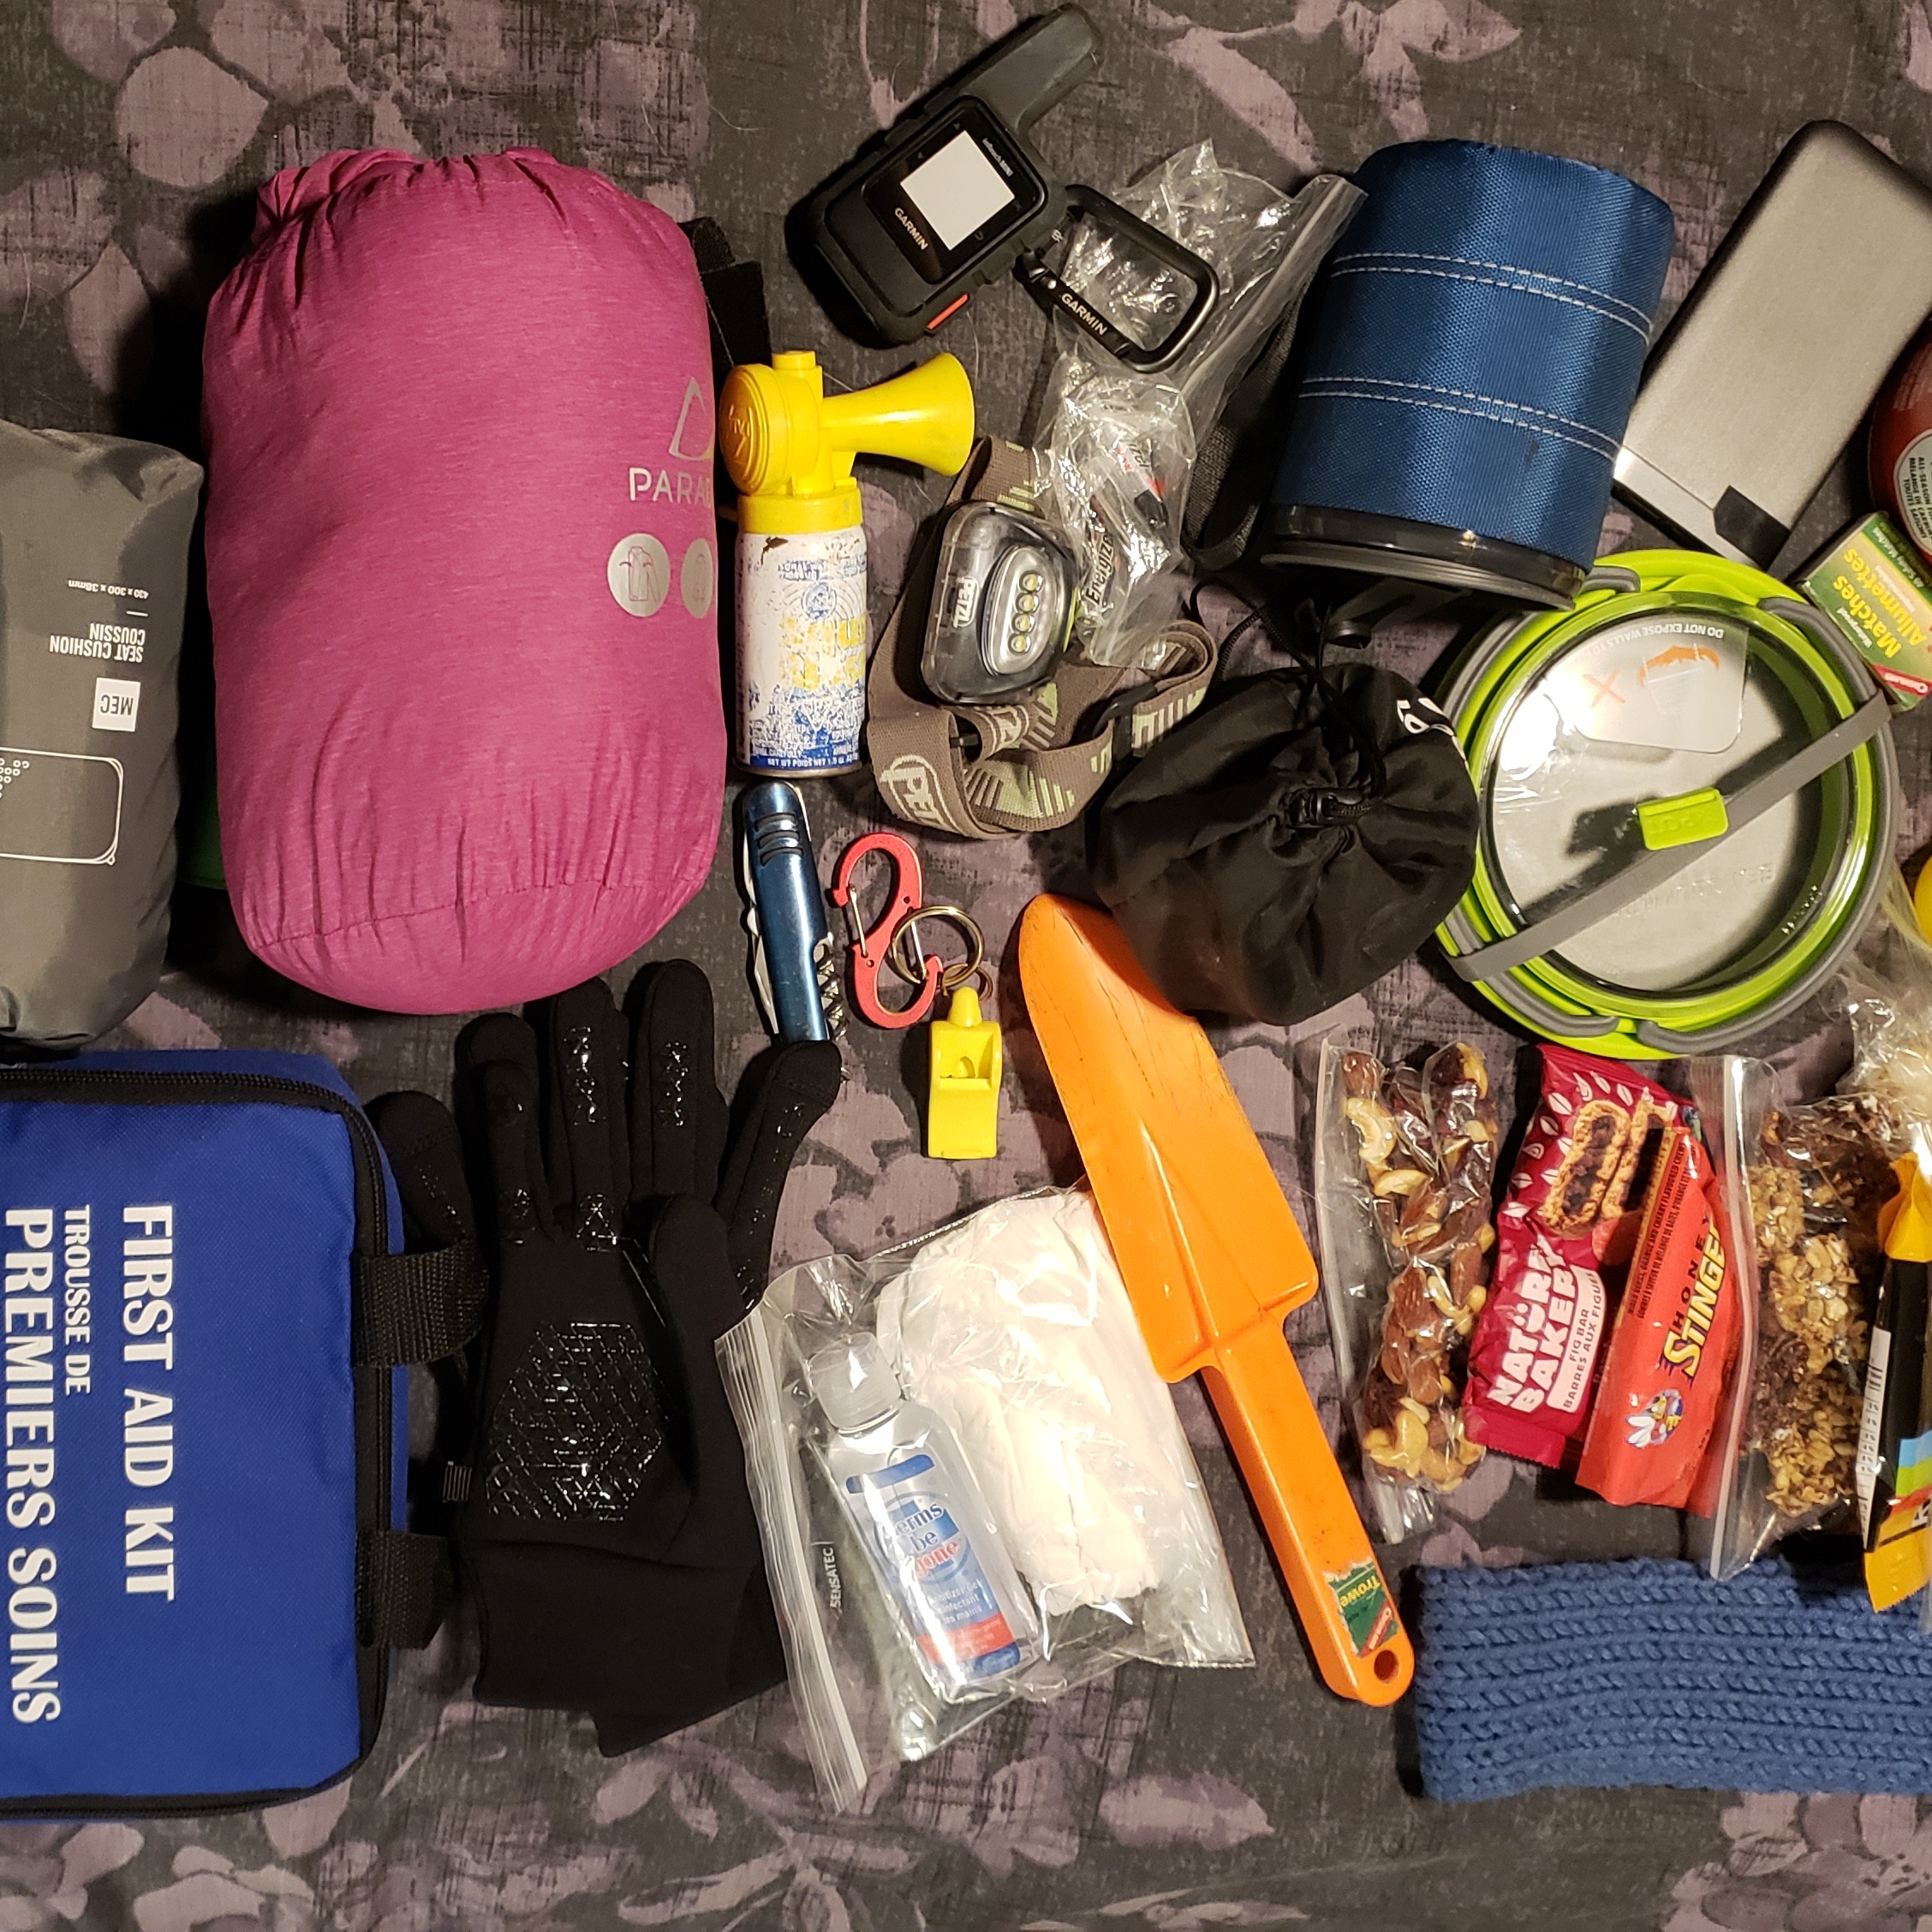
And the last thing I want to highlight is the more practical side of what to bring with you. Lots of places sell small first aid kits and most people opt for a tiny one to throw in their backpack. I wouldn’t say my first aid kit is large, but it is more sizable than what most people bring. Sometimes I lament the extra weight, but I always bring it. REI has a pretty comprehensive list of what to bring, which you can view here. Personally, I like to bring band-aids in varying sizes, a blister kit, sutures, antibacterial wipes, dressings, compression gauze, a tensile bandage, surgical scissors, triangle bandage, tweezers, safety pins, medical tape, polysporin, and latex gloves. I also bring electrolytes, advil or tylenol, pepto-bismal, and an emergency blanket and bivvy sack. Depending where I’m going, sometimes I throw in a small bottle of aloe and in the winter I will add hand warmers. One thing I don’t have is a sam splint, which I’ve been considering adding because it’s on a lot of first aid kit lists, but I’m not convinced I couldn’t just use a stick or a hiking pole in an emergency.
Your first aid kit is only meant to complement your 10 essentials, so make sure you also have extra clothes, food and water, as these can also help in a first aid emergency. If someone in your party is injured and it takes you longer to hike back – you don’t want to further endanger yourselves by not having other essentials, like a headlamp. I always remind myself to pack for the hike that goes wrong rather than the hike that goes right. I bring my insulated seat cushion on most hikes as well, because it can make a big difference to your comfort if you’re stuck sitting on the cold ground for hours waiting for help.
To conclude, my biggest recommendation is to get a first aid kit and learn what to do with it. Learning how to diagnose symptoms and how to treat them can make someone feel a lot more comfortable in an emergency, and may even save your life or the life of a friend. Stay safe out there!