Favourite Hikes in Southwestern BC Part III

I moved to BC in 2014. In late 2016, I wrote a post sharing my top 10 favourite hiking trails in Southwest BC, which I followed up with Part II in late 2018 with 10 more of my favourite trails. I’ve been wanting to write a follow up post for a while, but I’ve hiked well over 100 more trails since my last post in 2018, so it’s a lot a trails to choose from! I decided to break it into two more posts. Part III will cover another 10 of my favourite trails that I hiked between 2019 and 2020, while Part IV will cover 2021 to 2022. Is this a bit excessive? Maybe… but my blog, my rules! I like the symmetry of a top 10 post for every 2 years I’ve been here, so I guess you’ll get Part V at the end of 2024!

Without further ado, here’s a few of my favourite hikes from the 2019-2020 era!

HOP_5389

#10 High Falls Creek – Squamish has a few hidden gems and in my opinion, this is one of them. It’s located about 30 minutes out on Squamish Valley Road and after a quick ascent, boasts beautiful views of both High Falls Creek and the Squamish River. It’s a bit of a scramble on the way up, so I would save it for a fair weather day. The waterfall is the main highlight, but my favourite part is the viewpoint after the waterfall and the peaceful forest walking. Turn this into a loop by walking back the Forest Service Road, which has more incredible views of the Valley! (10km, 500m elevation gain, 4 hours)

DSC00125

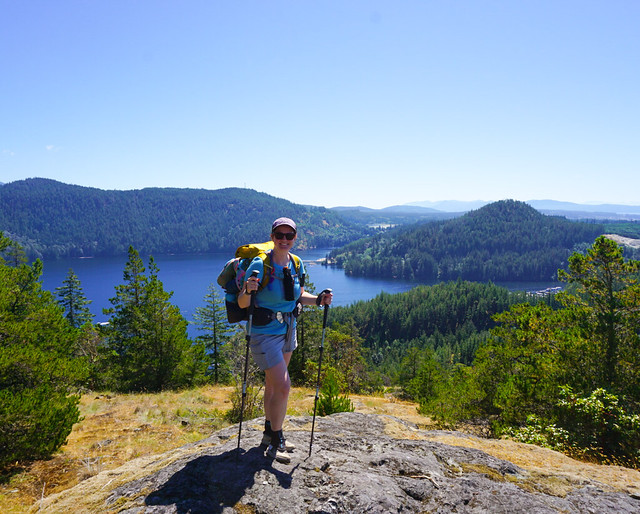
#9 Mount Norman – I stumbled upon this short little hike when I kayaked around Pender Island. The formal hike starts just past the bridge to the South Island and it’s a short uphill hike to a viewpoint over Bedwell Harbour and the surrounding Gulf Islands. It’s only 3km round trip, but if you’d like to extend it, take the left branch before you get back to the road and hike down to the Beaumont Campground, which has gorgeous views out over the bluff and along Bedwell Harbour. (3-6km, 300m elevation gain, 1-2 hours)

PSX_20210605_203736

#8 Viewpoint Beach – This hike is located in Golden Ears Park and has been gaining a lot of popularity since the pandemic as a good beginner backpacking trail. Because of it’s low elevation, it’s snow free in the Spring and is an easy 8km round trip hike along Gold Creek to Viewpoint Beach. It makes for a great day trip, or an overnight trip, though it can get busy. I’d recommend hiking in Friday night or early Saturday morning. The trail continues on to Half Moon Beach if you’d like to extend the trip, but it’s not well maintained, so be prepared for a bit of route finding. (8km, 200m elevation gain, 3 hours)

PSX_20210314_180305

#7 Zoa Peak – I’ve attepted Zoa Peak twice now, once in the Fall (where I got smoked out by wildfires) and once in the Winter. For this reason, I’ve never made it past the sub-peak, but I still recommend it as a good all year hike. I think the Coquihalla Summit Rec Area is vastly underrated and Zoa makes for a scenic hike in the summer and a relatively safe snowshoe in the winter. Don’t go past the sub-peak in the winter without your Avalanche Safety Training, but it’s a popular area for ski touring in the winter! (10km, 700m elevation gain, 5 hours)

DSC01099

#6 Elk/Thurston Mountain – Elk Mountain is a popular hike in the summer and especially in the Fall when it gets a pop of colour. There’s a lot of elevation gain, but it’s a relatively simple trail until close to the top, when you pop into the woods for a steeper ascent to the summit. It’s 8km round trip to the Elk Mountain Summit, but 800m in elevation gain, so don’t underestimate it! If you have the time, I recommend continuing on another ~2km as the hike continues along the ridgeline to Thurston Peak. It’s an 16km round trip to go all the way to Thurston, but there’s no view from Thurston Peak, so if you’d like to save yourself a bit of time, just enjoy the ridge walk for a few kilometers and then turn around. From Elk Mountain onwards are beautiful views of Chilliwack Valley and Mount Baker. (8-16km, 800-1000m elevation gain, 4-8 hours)

#5 Pinecone Burke Provincial Park – Pinecone Burke was one of my best pandemic discoveries. When we weren’t allowed to leave our neighbourhood in 2020, I spent a lot of time hiking around Eagle Mountain, Minnekhada, and Pinecone Burke. Pinecone Burke is located right on the northern edge of Coquitlam (in the Burke Mountain area) and it’s BC Parks least funded park. As a result, it has no infrastructure (not even a toilet) and gets few visitors. It’s mostly frequented by mountain bikers, but there are some truly lovely trails in this park! My personal favourite is to extend the Woodland Walk up to Sawblade Falls, but the Coquitlam Lakeview Trail is also reasonably popular. The park is primarily forest views, so it’s a perfect rainy day or Spring hike. You can hike the Woodland Walk year round, but the Lakeview Trail usually has snow until June. (8-14km, up to 700m elevation gain, 2-6 hours)

PSFix_20201005_141057

#4 Brew Lake – Brew Lake is another relatively unknown trail off the Sea to Sky Highway, just before Whistler. Even I discovered this trail by accident when the Rainbow Lake trailhead was closed due to an aggressive bear. We decided to hike to Brew Lake instead and spend the night in early Fall and were rewarded with beautiful lake views and an empty trail. We didn’t know what condition the road was in, so we parked at the Whistler RV Park and hiked the full 17km round-trip trail. But if you have the proper vehicle, you can considerably shorten the trail along forestry roads. If you have time, extend the hike a little further to Brew Hut, which I still have to return for. (17km, 900m elevation gain, 9 hours)

DSC08281

#3 Minnekhada Regional Park – Minnekhada Park was my other pandemic discovery and remains one of my favourite places near the city for a leisurely hike. The highlight of the park is High Knoll, which is known as the “Quarry Rock of Coquitlam” and has beautiful views down to the Pitt River and Pitt-Addington Marsh. Part of the park burned down in 2022, but it recently re-opened and is great for bird watching along the lakes. (5-8km, 200m elevation gain, 2-3 hours)

DSC06277

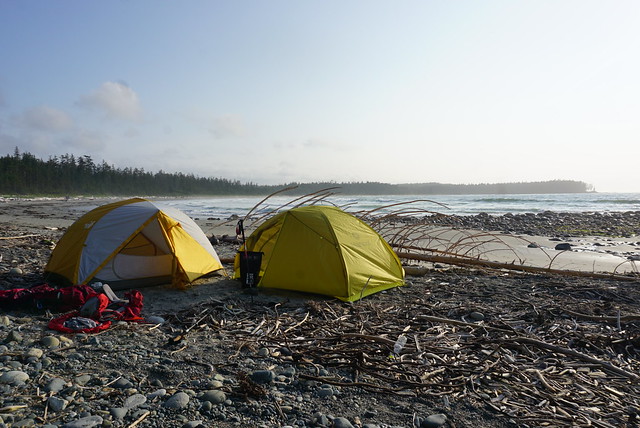
#2 Cape Scott and the North Coast Trail – This is where I stretch the boundary of “Southwestern BC” just a little bit. Cape Scott and the NCT are at the far northern tip of Vancouver Island, but I feel this was one of the defining hikes I did between 2018 and 2020. We hadn’t planned to do this hike, but when our Assiniboine trip got cancelled during the pandemic, we decided to hike 85km along this intense and remote coastal trail instead. This trail is a real challenge and is not for the faint of heart. Be prepared for an incredibly slow pace and knee high mud, but boy is it a rewarding hike. One of my most memorable. (85km, 5-7 days)

DSC07622

#1 Howe Sound Crest Trail – This is another incredibly challenging trail that tested my endurance when I did it in 30 degree weather, but it’s a trail I think about often. It was on my bucket list for 3 years before I finally did it over the course of 2 nights and was able to soak in every inch of this scenic trail. The trail provides the opportunity to summit the West Lion, Mount Harvey, and Mount Brunswick. I didn’t summit any of them, but I camped beneath the Lions and lounged in vibrant Brunswick Lake instead. I’d like to return one day for each of these summits, but this was a trail where it was more about the journey than the summits. (30km, 1500m elevation gain, 2-3 days)

Continue to Part IV.

Maria’s Updated Gear Guide

I’ve already written one gear guide, but it’s a bit outdated compared to what I currently use, so I decided it’s time for an update! These days I’m a lot more focused on ultralite gear, so my set-up is quite different. I’ll try and share a few options for each key part of my camping set-up, depending on your preference!

Backpack

PSX_20220917_112741

My opinion hasn’t changed that much from my last post – I still think Gregory has some of the best value backpacks on the market. They’re lightweight and cheaper than brands like Osprey, while still being super comfortable and well designed. I don’t think you can go wrong with a Gregory pack, especially if you’re a beginner. However, if you’re looking for something ultralite, I swear by Gossamer Gear, which I think are super light without compromising on comfort or utility. A lot of ultralite packs aren’t super comfortable because they either don’t have any internal frame, or only a very small one. Gossamer Gear has a small metal frame providing some structure, but more importantly, they have a removeable sit-light pad that provides more structure to the bag and can also be used as a sit-upon. I hiked 180km with the pack on the Sunshine Coast Trail and it was so comfortable.

Can you use an ultralite pack even if you’re a beginner? You sure can! But make sure you assess your other gear first. Ultralite packs can’t carry as heavy loads as traditional packs. So assess how much your other gear weighs before committing to one. Beginners tend to have heavier packs because it’s expensive to buy a lot of gear at once and you typically have to compromise on quality to afford everything you need or borrow it, plus beginners tend to take a lot of comfort items while they’re learning. There’s absolutely nothing wrong with this approach, but consider how heavy your gear realistically is before getting an ultralite pack. In addition, most outdoor stores don’t stock many ultralite options, so they often have to be ordered from the US. There are a lot of benefits to trying your backpack on first to make sure it’s comfortable, especially for beginners, which is why I like to also recommend Gregory packs. If you’re a beginner and starting from scratch, I would probably start with a 60L pack. If you have smaller gear, I personally prefer a 50L pack or smaller (I use the Gossamer Gear Gorilla 50).

If you’re shopping for a day pack, always look for a pack that has waist straps as this will make hiking so much more comfortable. Consider what you’ll be using the pack for, if it’s mostly for summer, a smaller pack may suit you better (though I don’t like anything smaller than 20L because I always take my essentials); but if you plan to use it in the winter, you may want a larger pack to house your cold weather gear, or consider a pack with snowshoe straps or space for avalanche gear.

Note: keep in mind that while the Gossamer Gear backpacks appear similarly priced to Gregory, these are listed in USD and you will have to pay both shipping (~CAD$50) and duties (~CAD$60).

Best Value / Best for Beginners: Gregory Jade 53/63 (women’s); Gregory Amber 55/65 (women’s); Gregory Stout 60 (men’s)

Best Ultralite: Gossamer Gear Gorilla 50 (unisex); Gossamer Gear Mariposa 60 (unisex)

Best Summer Daypack: Gregory Maya 20 (women’s); Gregory Juno 24 (women’s); Gregory Miko 20 (men’s); Gregory Citro 24 (men’s)

Best Winter Daypack: Deuter Freerider 28 (women’s); Deuter Freerider 30 (men’s); Gossamer Gear Kumo 36 (unisex)

Sleeping Bag

DSC04795

In my opinion, if there’s one item you’re going to splurge on, make it your sleeping bag. There’s no compromise for a comfortable night’s sleep and a really warm and lightweight bag will cost you money. Personally I prefer down bags for warmth, but pay close attention to the comfort and survival ratings when choosing your bag. My experience is that cheap bags typically have a larger gap between the comfort and survival rating. The closer the ratings are to one another, the more I generally trust the rating. Women’s bags typically run a bit warmer and fit better (less empty space for cold air to settle), so consider a women’s bag if you’re female.

It’s hard to recommend sleeping bags because everyone is different and where you live will really govern how warm it needs to be. Living in Canada, I would never buy a bag rated less than -5 degrees celsius. When picking a bag, it’s really a balance of weight to warmth to cost. Consider how much money you’re willing to spend and how much weight you’re willing to carry. If you’re a beginner, I recommend a standard mummy zip bag, but if you’ve been backpacking awhile, do yourself a favour and consider buying a quilt.

A quilt compromises on weight by acting more like a blanket that’s strapped to your sleeping pad. They generally have an enclosed footbox, but no back. The bottom of your sleeping bag doesn’t give you very much warmth – the warmth underneath you comes from your sleeping pad, which insulates you from the ground – so by cutting out the back of the bag, you can save on weight and still be able to stay warm. However, this only works with a quality sleeping pad, so don’t compromise one for the other. I bought my first quilt last year that’s rated to -6 degrees celsius and I am obsessed with it! My quilt is from UGQ Outdoors – I love this option because every quilt is custom; and my sleeping bag is from MEC, which I think make quality bags with a decent price tag.

If you’re looking for a winter sleeping bag, there are limited options on the market and they will cost you a lot of money. I have a -30 degree bag for snow camping that I paid a lot of money for, but it’s not my favourite because it’s a unisex bag and it’s too big for me. It does keep me warm, but it’s a bit of work for me to get warm in such a large bag. I have lots of thoughts on winter bags if you ever want to DM me, but I don’t want to recommend a bag I haven’t tested.

3- Season Sleeping Bag: MEC Delphinus -9 (women’s); MEC Draco -9 (men’s)

Quilt: UGQ Bandit -6/-12

Sleeping Pad

It’s so easy to overlook your sleeping pad, but it’s such an important part of your sleep system. You could have the warmest bag in the world, but if you go to sleep on a crappy sleeping pad, you will still be cold. Personally I think Thermarest has the best sleeping pads on the market. They are expensive, but they are so warm and comfortable (some people think they are crinkly and noisy, but it’s never been a problem for me). For backcountry, I swear by the Neoair line because they are both the lightest and smallest on the market. I use the Xlite for 3-season camping (rated R4.5) and I use the Xtherm for snow camping (rated R7). I’ve recommended a few cheaper sleeping pads if you’re on a budget; I don’t find them as comfortable, but there’s nothing wrong with them, just make sure the R-value is 3.5 or higher, especially if you’re in Canada.

If you’re snow camping on a budget, just put a foamy under your 3-season pad for extra insulation. Otherwise, commit to the Xtherm, trust me, it’s the best.

Best 3-season: Thermarest Neoair Xlite (R4.5)

Best 4-season: Thermarest Neoair Xtherm (R7)

Budget 3-season: MEC Reactor (R3.8)

Tent

PSX_20220929_122048

If you’re trying to lighten your pack, you’ll get the most bang for your buck with your tent. A standard 2p tent can weigh 5-6lbs, which you can easily lighten by going with an ultralight or non-freestanding version. If you’re a beginner, I recommend sticking with a freestanding tent, they’re much easier to set up and generally more comfortable. But if you’re a little more experienced and don’t mind dealing with condensation and a more nuanced set-up, you can lighten your pack a lot with a non-freestanding tent (usually doesn’t come with poles and is erected using your trekking poles and tension from the pegs).

For freestanding tents, a lot of people swear by the MSR Hubba Hubba, but I’ve never tried it. Personally, I like Marmot for an easy-to-use lightweight tent. For non-freestanding tents, which are popular among thru-hikers, an important thing to understand is that most of them are single walled, meaning they don’t have a separate fly. They work great in California, but if you live in Canada and hike in the alpine, it means the inside of your tent will generally be filled with a lot of condensation every morning. I use a single walled non-freestanding tent from Gossamer Gear, but I’ve had some growing pains with it because I don’t like dealing with the condensation. The people who prefer them generally learn to deal with it, or else they don’t hike in the Canadian alpine and therefore don’t have to. Fortunately, there is a double walled non-freestanding tent on the market and unsurprisingly, it’s made in Canada! It’s a bit heavier than a single walled, but Carolyn has one and she loves it. So I will begrudgingly link my Gossamer Gear tent, which I love for it’s size and how easy it is to set up, but be prepared to deal with condensation.

Standard 2p Tent: Marmot Tungsten

Lightweight 2p Tent: Marmot Tungsten Ultralight

Non-freestanding (single wall) 2p Tent: Gossamer Gear The Two

Non-freestanding (double wall) 2p Tent: Durston X-Mid

Kitchen

IMG_0347

I don’t have as many opinions on stoves and pot sets as I do for the “big 4” described above. But I have learned a few things over the years.

For stoves, I like to use an isobutane stove. The stoves are very straight forward to use and fuel is relatively lightweight and easy to find. You can get away with an isobutane stove for most of the year, but if you’re going to be snow camping, consider getting a white gas stove instead (any of the white gas stoves from MSR). Isobutane can freeze in cold temperatures and a white gas stove is the most reliable option. Another alternative is an alcohol stove, but I don’t personally recommend these. I have 2 isobutane stove recommendations because I think one is better for solo trips (when you have a small pot) and the other is better for when you’re cooking on a full size pot.

Isobutane stove (solo trips): BRS mini

Isobutane stove (2+ people): Primus stove

White gas stove: MSR Whisperlite, Dragonfly, or XGK

For pot sets, I don’t have strong opinions. I have a small pot that I use for solo trips that I absolutely adore and is well priced. I don’t personally see the point in spending a lot of money on a pot set, they’re generally going to get beat up over time, so don’t break the bank on it. The most important thing for me is a well-fitting pot lid. Some people really like the sets that come with dishes, but I just like something that easily fits my stove inside it. For multi pot sets, I prefer to have a lid for each pot rather than a shared lid (but I’ve yet to find a set that comes with 2 lids and no dishes).

Solo pot: GSI Halulite Minimalist

Other Gear

Sit-upon: I’ve been using the MEC Seat Cushion for years and I love it!

Pillow: I used to use my sit-upon as a pillow too, but I recently switched to the MEC Pillow and it’s a lot comfier

MugGSI Infinity Mug 

Microspikes: I think every hiker needs a good paid of microspikes, I use Kahtoola Microspikes 

Communication Device: A satellite device could save your life, I used one in 2021 when my friend had a serious medical emergency and highly recommend the Garmin InReach Mini 

Clothing

You don’t need a bunch of expensive clothing for hiking. I try to avoid cotton, but you can find pretty much everything you need at Costco, you just need to time your purchases for some of their featured items. They sell nice merino shirts from cloudveil once a year in the Fall and they sell lightweight puffy jackets every winter. They also stock merino wool socks in the winter and have base layer merino year round from paradox (though be aware, this brand is only about 15% merino, but still made with poly and appropriate for the backcountry). Other items I’ve found throughout the years include a lightweight pair of puffy slippers for winter camping and hiking shorts from Eddie Bauer.

The only thing I don’t really trust from Costco is a quality rain jacket, so I decided to spend a bit more money on this item. If you’re looking for a more environmentally sustainable company than Costco, I personally like Patagonia.

Hiking in Yllas

Anyone who’s ever been on holiday with me will tell you I’m not really the relaxing kind of vacationer. I like a good beach day, but I love experiences more and I am generally trying to cram in as much adventure as I can in a limited amount of time, which makes me an early riser. I had to try and let that go in Lapland. Since we were up every night looking for the aurora, we couldn’t also get up early. So we had a lie-in our first morning in Yllas and got up just in time to take advantage of the free buffet breakfast, which could definitely not be missed.

This was by far the most intense buffet breakfast I’ve ever had in my life. The resort had a full continental breakfast spread with a bread and oatmeal bar, cheese and meat plates, yogurt and fixings, and a whole smoked salmon. Then they had a full hot breakfast bar with eggs, bacon, potatoes, waffles, and even reindeer sausage, plus they had drink machines with all kinds of sparkling juice.

20230227_123421

We had 2 full days in Yllas, so our plan for the day was to go skiing. You can ski down either side of the mountain, with the main part of the ski resort on the Yllas side. However, there is a smaller chalet on the Akaslompolo side as well, so we decided to start there. It was a beautiful sunny day when we got up and we were shocked by how few people were on the mountain when we parked. We went through a long questionnaire to rent skis before one of the employees finally informed us that the top of the mountain was totally closed because of wind, which explained why it looked so empty. The bottom half of the mountain was still open, but there’s limited lifts on this side, so we’d have to drive around the mountain to access the rest since you couldn’t ski over the top. Staff thought it likely the top would be closed the following day too, but we decided to take our changes and postponed skiing.

PSX_20230303_142411
20230227_131445

Instead, we backtracked to the visitor centre for Pallas-Yllastunturi National Park. They have a video that shares lots of information about the park and we got some recommendations for snowshoeing from the park staff. Originally we’d been planning to rent snowshoes, but they’re pretty expensive and despite how cold it is, Lapland only gets about 1m of snow base every year, so we decided to save our money and make do with our microspikes instead (which we’d brought from home). People seem to use studs for walking around in the city, but we didn’t see anyone hiking in microspikes. People were either just walking in their winter boots or they were trudging along in snowshoes that weren’t needed.

20230227_132410
PSX_20230310_203526

There’s tons of walking and ski trails in the park and around the ski resort. Nordic skiing is incredibly popular and I feel like we probably should have tried it, but I really have no interest in it (sorry nordic lovers!) so we did an assessment of the walking trails instead. Like I said, it’s not a particularly mountainous region, so a lot of the trails are flat, either through the forest or across the frozen lakes. I like a bit more of a challenge, so we picked Kuertunturi, which is one of the few hilly views. It’s across from Yllas mountain and I figured if the ski resort was still closed the following day, we’d at least get a view from the hike.

We returned to the cabin and re-packed our bags for hiking. There’s a few options for hiking Kuertunturi: you can hike to the summit from either side of the mountain as a there-and-back trip, or you can thru hike it and then make a loop back to your car along the road. We decided to start from the Akaslompolo side, which leaves from the church and is supposed to be more scenic if you only do one side. We figured we could decide at the top if we wanted to hike back or do a loop.

PSX_20230331_183252

The hike starts off with a gentle incline hiking through the trees. It’s not too steep or challenging and you meander up the side of the mountain. Once you hit the open top (it felt like the alpine, but I think it’s just barren), it gets a lot steeper to the summit. It could be hiked in boots, but I was really glad we had the spikes at this section for better traction on the steep ups and downs.

The views from the exposed section are phenomenal, but the downside was that it was indeed extremely windy. We could understand why the lifts were closed at the top of Yllas while hiking Kuer. But it felt good to be out hiking. I’d been quite cold for most of the trip because we didn’t do a lot of extraneous activities, but I felt really good hiking Kuer. I only needed my fleece on the way up and even at the top, my puffy was still sufficient to keep me warm until we stopped for a break.

PSX_20230305_172543

We didn’t stay at the top too long because of the wind and found some shelter under a tree. It was an easy decision to forgo the loop trail, but on a less windy day I think I would have gone for it. Instead we hiked back down and found a cafe for some hot chocolate before taking a break at the cabin and going out in search of supper. The KP was supposed to peak on this night, so we went for pizza supper around 6pm when it started to get dark. Before we’d even finished dinner I was getting notifications from my app that the aurora would soon be visible, so we didn’t waste any time in heading down to the lake around 7:30pm.

PSX_20230305_173243
20230227_195141

Holy moly, the aurora on this evening was something to behold. It’s the kind of aurora I only dreamed of seeing. The KP was over 6 and we were in the height of a geomagnetic storm. We later learned that people had been able to see the aurora in Scotland and as far south as England, so you can only imagine how it looked north of the Arctic Circle. Even as we were walking to the lake, the sky was completely lit green by the aurora. I practically ran there and even though it was incredibly windy on the lake, we were overwhelmed by the dancing night sky.

PSX_20230402_213931

I quickly set up my tripod, but it was hard to even know where to aim it because the aurora was literally everywhere and the sky was filled with green and purple. The sky looked like it was on fire and the photos turned out incredibly vibrant. The first two nights we’d seen the aurora moving, but I’d say this was night where it really looked like it was dancing. It warps across the night sky and we could see it from horizon to horizon. The photos turned out amazing, but it’s hard to capture the scope when you’re surrounded by them.

Like I said in my last post, the aurora goes through cycles, so we hung around for about 90 minutes watching the show. To be honest, it was hard for me to leave even after an hour and a half, but eventually the cold does start to creep in (especially with the wind) and my camera battery kept freezing on me. But it was really special. That was our third night seeing the lights and while we would see them for the next 3 nights, this was by far the best show we got while in Lapland. The aurora always shows up better on camera, but even to the naked eye, it was an amazing sight.

PSX_20230318_164452
PSX_20230402_213635