I finally hiked the Howe Sound Crest Trail!
Seriously, I’ve been trying to hike this trail since 2017. We couldn’t do it as planned in 2017 because there was too much snow on the trail, in 2018 it was too smoky, and in 2019 there was an issue with re-routing the trail. But the stars finally aligned and I hiked it in mid August with Carolyn and Emily. It was not at all what I expected – I knew it would be a tough trail, but the topography was so much more challenging than I anticipated. That said, we had amazing weather for it and still had a great time!

The Howe Sound Crest Trail is a 29km trail that runs from Cypress Mountain to Porteau Cove. It passes by several iconic peaks and is popular among trail runners. The window for hiking the trail is short, which is why we had so much trouble with it – there’s generally still snow up there in June, which is very dangerous because of snow bridges and snow wells. But what makes the hike so challenging is water access. Once you leave Cypress, there’s no water access for 14km, so you either have to bring a lot of water with you, or hike the most challenging part of the trail in a single day. 14km doesn’t really sound like that much, but there’s a lot of elevation gain and it involves crossing many challenging peaks. It can definitely be done, but I think it would make the trail less enjoyable as there’d be less time to appreciate the views. Plus the most challenging part of the 14km is the last 4km, so it’s easy to think you’re making a good pace and then get hung up at the end.
So long story short, we opted to bring extra water. I think this was definitely the right choice for us, but it was a 30 degree weekend and we drank more than we thought and ended up having to conserve at the end, so in future I would bring even more. But let’s start at the beginning. Because we were planning to do the trail over 3 days, we took Friday off work to get a head start on the trail. Generally there is no pass needed to hike the HSCT, but BC Parks has the new day pass system, so I got up at 6am to get passes for us. I managed to snag 3 passes, but they sold out by 6:01am, so you definitely have to be on the ball.
We arrived at Cypress around 9am and there were a ton of people hanging out in the parking lot. The first stop on the HSCT is St. Mark’s Summit, which is super popular among day hikers, so we think that’s who was taking up most of the day passes. After St. Mark’s the traffic on the trail was drastically reduced. Seth dropped us off and I believe we started hiking sometime around 9:30am. I figured this would give us lots of time, but it was still almost 6pm by the time we rolled into our campsite at the 11km mark, so definitely give yourself lots of time.
Thanks to the early start we were able to hike at a pretty leisurely pace. It didn’t take long at all to get to St. Mark’s, mostly I think because me and Carolyn hadn’t seen each other in a while and we were gabbing the whole way there. We stopped at St. Mark’s for a snack break and then got lost trying to get back on the trail. Overall the trail isn’t too hard to follow, but there were definitely several sections where we ended up off course, so I was glad me and Carolyn both had GPS as we used it more than once to find the trail.
The second stop on the trail is Unnecessary Mountain – I found this one a little confusing because there were two unnecessary mountains showing up on my GPS, the first of which was marked South. We were getting pretty hungry for lunch, so we stopped to eat when we hit the ridge, before reaching Unnecessary Mountains. Like I said, it was a hot day. We thought it would be cooler up in the mountains, but most of the trail is exposed, so it was definitely hot the whole weekend. I had a large iced tea before starting the trail to hydrate, but Emily forgot and was pretty dehydrated starting out, so she drank her water a lot faster.
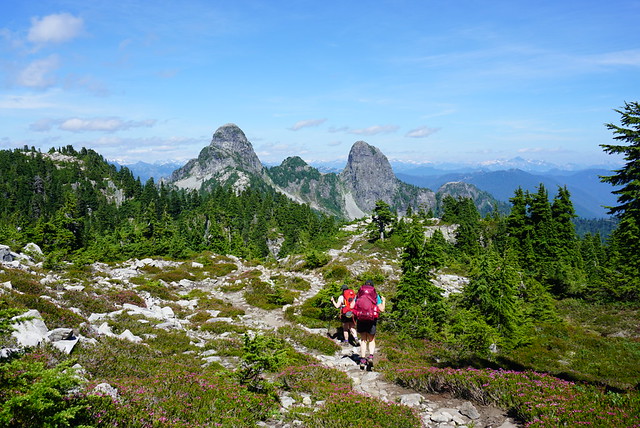
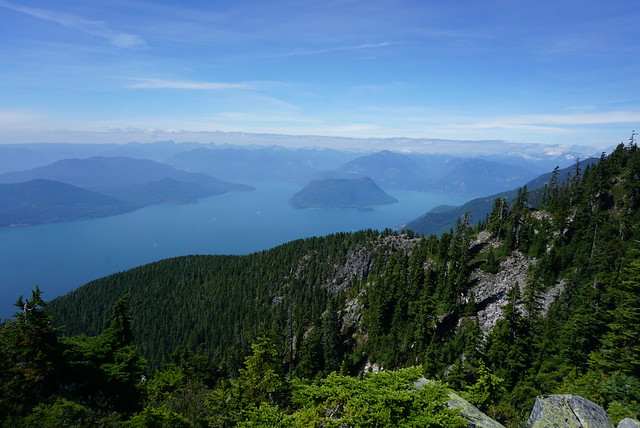
The view of Howe Sound and the Lions from Unnecessary Mountain is gorgeous, but after that the trail gets a lot harder. It’s a pretty technical trail, with lots of rope sections, climbing, and steep ascents and descents. It’s a through trail (rather than a loop), so you can hike from either direction, but almost everyone goes from Cypress to Porteau Cove because you’re basically hiking from Cypress Mountain down to the highway and people want to avoid all the elevation gain.
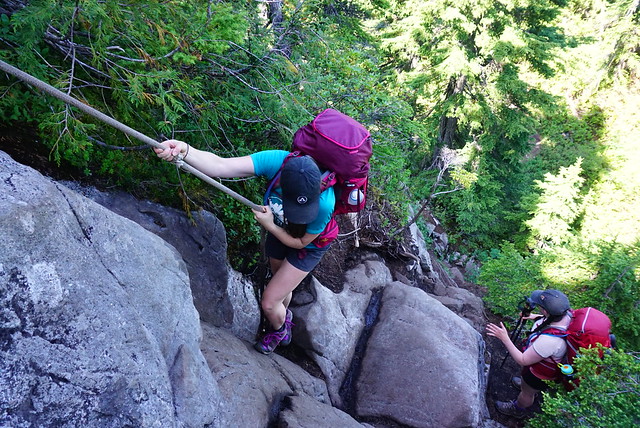
It may be challenging, but the section of trail leading up and past the Lions is one of the most beautiful parts of the trail. We hiked along the ridge up towards the West Lion. It was a bit of a climb, so we continued to drink lots of water with the sun bearing down on us. You can summit the West Lion along the trail – we hadn’t decided whether we were going to attempt it or not – but once we got a look at it, me and Emily were firmly in the ‘no’ category. Carolyn is much more intrepid than us and I know she would have hiked it in a heartbeat, but it was now after 4pm and the trail started with two steep rope sections, so we all agreed it wasn’t really a wise choice.
Instead we had a break under the West Lion and then started the descent down and around it. For those not familiar with the Lions, they are two iconic mountains located just outside Vancouver. The familiar looking humps can easily be seen from the city and have become a bit of a symbol of Vancouver. I’ve seen them tons of times, from the city, from other trails, and even from helicopter, but I’ve definitely never been so close to them – it felt a little unreal. Both Lions are incredibly steep, I’m not sure if you can physically hike the East Lion or not, but either way, you’re not allowed to because it’s located in the watershed. Metro Vancouver has one of the best protected watersheds and absolutely no recreation is permitted inside it. The HSCT skirts right along the watershed and the trail unbelievably enough, goes right between the two Lions.

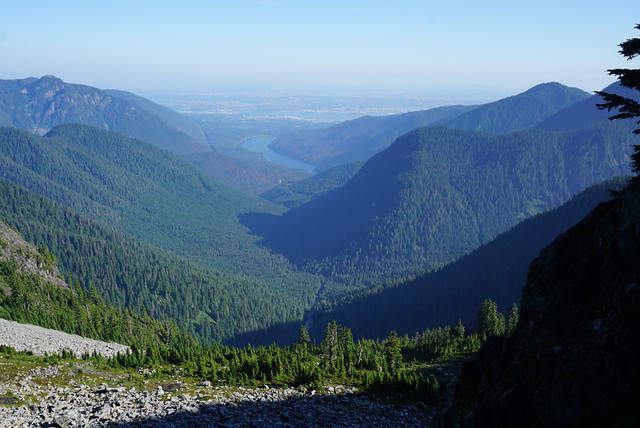
Between the two lions there is another smaller peak called Thomas’ Peak. The scariest section of the trail was definitely traversing down the side of the West Lion to Thomas Peak. You go down a steep section, which isn’t too bad, but then you have to navigate a small ledge around the edge of the Lion and up to Thomas Peak. It’s not terrifying, but you definitely proceed with caution. From there though there’s an amazing view down into the watershed and Capilano Lake. Some of the best city views of the Lions are from Cap Lake, so the same can be said when you’re looking back the other way too.
As we went over Thomas Peak, we were starting to get pretty done with hiking. There’s 3 official campsites on the trail, and one unofficial, which is the one we were aiming for. I couldn’t find its location on any maps and had just seen it listed as “the ridge above Enchantment Lake”. I knew it was located around 11km, so we were planning to just look for anywhere good to camp along the trail once we passed the Lions (which are located around 10km). From Thomas Peak, you can see the trail as it winds over peak after peak, but we couldn’t really see anywhere that looked great to pitch a tent.
As we started to come down, I noticed a ridge branching off the main trail that looked promising. Fortunately, it wasn’t too far away (less than a km, as we’ve established) and when we reached the branch, it quickly became evident this was the place. We were just confused because we assumed “the ridge” was on the trail, but it’s just off to the right of the trail as you come down Thomas Peak. There’s no easily accessible water source from the trail, but there are some flat spots to pitch a tent. If you’re desperate, you can hike down to Enchantment Lake, but it’s a bit of a trek. There’s also a small pond on the other side, but it’s located in the watershed, so this should not be part of your plan.
We had to do a bit of water assessment after we set up our tent. Emily had drained her 2 litre platypus around the West Lion, but me and Carolyn were still on our initial supply. We had each brought 4litres. It was enough, but only because we put a lot of effort into conserving towards the end. My logic had been 2L for the first day, 1L for overnight, and 1L for the 3km the next day. We had brought sandwiches for lunch to avoid needing water for cooking, but had forgotten to take into account water for our oatmeal (only 150ml a person, so not the end of the world), but we hadn’t taken enough for how hot it was. Also, the 3km the following day was SUPER challenging and ended up taking us 3 hours, so we really could have used more water for that as well. It’s not a great feeling having to conserve water, so if I did it again I would bring 5-6L. We might have had a different experience on a cool day, but always plan for the worst.

Our campsite was amazing though! We shared it with one other group of 2 women, who we’d been passing back and forth on the trail all day. We were located right under the Lions and it was dreamy to watch the sun set over the Sound and then watch the stars come out around the Lions. I thought there would be too much ambient light for stars, but the stargazing was actually great – though there was still too much ambient light for star photography (at least for a notice like me). So overall, it was a challenging, but fun first day on the trail and we were thrilled with the location of our campsite! You definitely need nice weather to hike this trail though, I can only image how slippery and dangerous it would be in the rain – plus camping would be very exposed in any adverse conditions. But luckily for us, all we had to worry about was heat management.
I’ll end the post there for now – check back in for my next post on the second half of the trail!