Berg Lake Trail Backpacking Guide

The Berg Lake Trail is one of the most iconic backpacking trails in the Canadian Rockies. It’s been on my bucket list for a long time, but it was closed for 3 years due to flooding that washed out portions of the trail in 2021. It finally re-opened in 2025 and I was super keen to visit the same summer. I spent 6 days hiking along the trail and it was easily the highlight of my summer! I’ve already published a 3-part trail report about my experience, which you can read starting here, but I had a lot of other learnings about the trail that I’d love to share. Reservations for the 2026 season are releasing at 7am on December 2, 2025. so here’s everything you need to know about the Berg Lake Trail!

The Trail

The Berg Lake Trail is a 42km there-and-back trail located in Mount Robson Provincial Park in BC. The trail starts at the parking lot north of the visitor centre and continues for 21km to the beach at the back of Berg Lake. There are 7 campgrounds in the park, with the most popular being the Berg Lake Campground.

There are a few options for how to hike this trail. If you’re not a backpacker, it is possible to day hike the entire thing, but you should give serious consideration to your fitness ability and previous hiking experience if you decide to attempt it. While the trail itself is not technical, it is a considerable distance and it covers almost 1000m in elevation gain. Approximately 500m of the gain is done in a 3km span, so it is a challenging and tiring hike. If you are not used to hiking long distance or you don’t have experience hiking in the mountains with significant elevation gain, I strongly recommend against attempting this as a day hike. If you do plan to day hike, I recommend starting before sunrise to give yourself lots of time, or consider biking as far as Kinney Lake. I found that the day hikers were primarily tourists who either don’t camp, or weren’t aware of the lead time required to secure permits.

If you are able to backpack it, I think this is a more enjoyable way to experience the trail. I did the trail over 5 nights, splitting the trail into 2 parts on the way up and down, and then camping 3 nights at Berg Lake to do day hikes. If you have more time to spend in the park, there’s lots to explore, but you can also enjoy this trail over a shorter period. I’d recommend a minimum of 2 nights. Most likely your itinerary will be limited by what permits you are able to obtain.

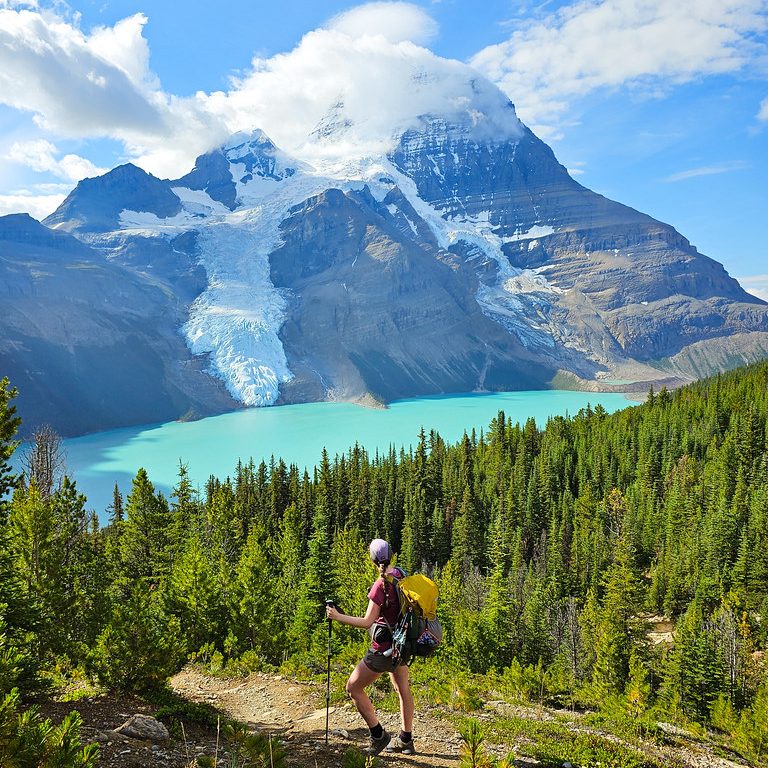
A photo of a female backpacker on a mountain overlooking Berg Lake and Mount Robson on a sunny day, on the Berg Lake Trail in Mount Robson Provincial Park in BC.

Time of Year

The best time of year to visit the Berg Lake Trail is pretty straight-forward. Mount Robson is the tallest mountain in the Canadian Rockies, so the trail is covered in snow for most of the year, limiting the core hiking season from late-June to mid-to-late September. You can visit year round, but you must be prepared for winter conditions and be aware of avalanche risk, which I won’t be discussing in this post.

I think there is slightly less traffic in September, as it gets cold quickly in the Rockies, but otherwise, avoiding the crowds isn’t really possible. If you go in late-June, be aware that there may still be snow on some of the trails; and if you go later in the summer, it’s more likely that your trip might be impacted by wildfires. Mid-to-late July might be the sweet spot, but I visited during the first week of August and lucked into great conditions. The mountains are always susceptible to storms, so be prepared for that.

Getting There

I think it may be possible to take a bus to Mount Robson Provincial Park from either Jasper or Kamloops in the summer, but it’s not a common route and I don’t know how reliably buses run. Similar to other popular Canadian parks, the easiest way to access is by driving. The park is located on Highway 16, which is a 5 hour drive from Edmonton, 7 hours from Calgary, and 7.5 hours from Vancouver (all without breaks). It’s not an easy park to access, but I promise it is worth your time. There is a very large parking lot at the trailhead, which is relatively secure, but never leave valuables in your vehicle.

Permits

Without a doubt, getting permits will be the hardest part of your trip to Berg Lake. This is a world-renowned hiking trail and attracts crowds of visitors every year. If you don’t get camping permits, then day hiking may be your only option to visit the park. If you want to try and get camping permits, then it’s important to mark your calendar with the permit release date. The permit release date for 2026 is Dec. 2, 2025. Unlike other BC parks, the permits for the Berg Lake Trail are released all on one day. The date is usually announced on the Mount Robson Provincial Park page, as well as on BC Park’s instagram. They usually don’t give a lot of notice (1-2 weeks), so you should be prepared to check in regularly at the end of the year until it is announced. The easiest way is to follow their social media.

Once released, you will have to book your permits on camping.bcparks.ca. Unlike Parks Canada, there is no random queue generator and you will have to login to your account, so there is no benefit to using multiple devices to try and get higher up the queue. However, if you have multiple people going on the trip, it is advantageous if you all login to your respective accounts to try for reservations (effectively giving you multiple chances to get your desired itinerary). I recommend creating an account in advance of release day (when the website will likely be slow due to traffic) and logging in before the sites release.

Once booking opens, select “backcountry reservations” and search for your start date. You will be forced to build your itinerary day by day, which can be a little frustrating. Once you get a date in your cart, you don’t need to worry about losing it, but it will become more challenging as the dates book up to continue building the itinerary. For example, by the time you get Whitehorn in your cart for your first night, Berg Lake may no longer be available for your second night. People are constantly adding and changing dates and campsites in the rush to get their itinerary, especially if you have multiple people from the same party trying to make 1 booking. So the trick is to frequently refresh. Just because you don’t see Berg Lake available right away, doesn’t mean it won’t show up if you keep refreshing.

My recommendation for booking a longer itinerary is to take what you can get and make changes later. If Berg Lake is not available, book Marmot or Rearguard and move on to the next day before those dates book up too. Once you have secured a booking for each of the dates in your itinerary, go back and look for cancellations. Keep refreshing until you see one, and then make a change to your booking to add it. This does cost more money as the change fee is $6, but I was able to get bookings for Berg Lake after the fact using this hack. When I made my first booking, I had 3 nights split between Marmot and Robson Pass campsites. I was able to change my reservation from Robson Pass to Berg Lake within the hour from people dropping sites, and I was able to get a cancellation later in the season and change my booking from Marmot to Berg Lake. So in the end, my starting itinerary (which had no nights at Berg Lake) ended up with 3 nights. You can track cancellations on Schnerp, which will notify you when a site opens up.

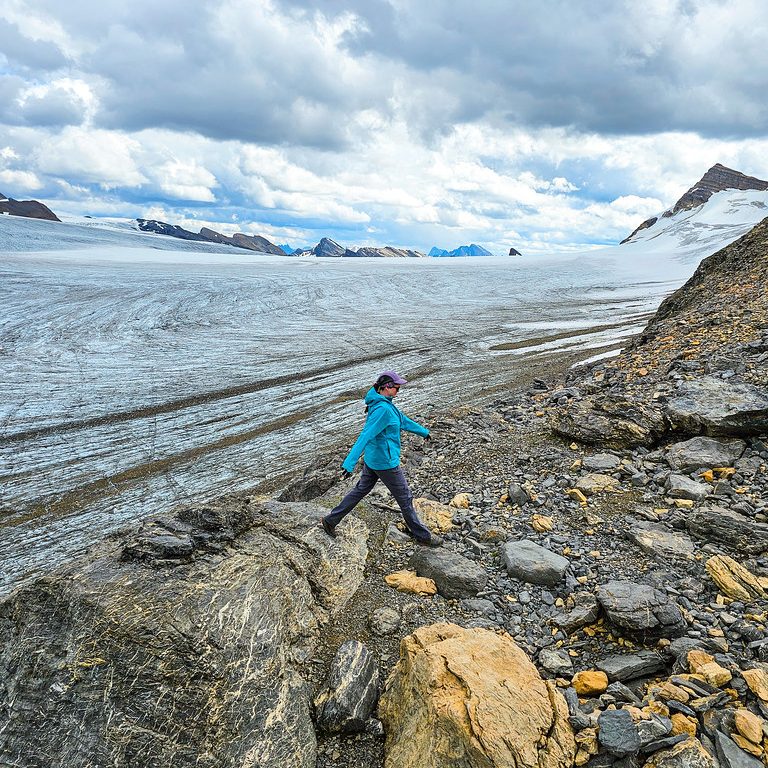
A female hiker walks in front of an epic glacier icefield at the top of Snowbird Pass in Mount Robson Provincial Park, off the Berg Lake Trail, in BC.

Campsites

There are 7 backcountry campsites in the park, so there are lots of options for where to stay and opportunities to customize your trip. The first 3 campsites are located along the trail to the lake, while the last 4 campsites are all located within 3.5km of one another around the lake. I’ll discuss itineraries below, but here’s an overview of the 7 campsites along the trail. All campsites include outhouses and bear lockers and as discussed above, require valid permits for the duration of your visit.

Kinney Lake – This is the first campground, located right on Kinney Lake at the 7km trail marker. It has 18 tent sites and a large open-air shelter. It’s a beautiful campground with several lakefront tent pads and a lovely view from the shelter. The trail to Kinney Lake is a gentle uphill, so this campsite is often overlooked because it is less than halfway to Berg Lake. But it’s a great option if you have a late start on your first day, as well as for families or those who want to experience Mount Robson’s backcountry, but have concerns about the strenuous hike up to Berg Lake. There are bike racks located at the back of Kinney Lake for those who bike up.

Whitehorn – This campground is located along the Robson River at the 11km trail marker. It has 22 tent sites and a large open-air shelter. This campground is ideal if you’re looking to split the hike to Berg Lake in half. It splits the elevation gain in half as well, though day 2 is slightly more strenuous. Some of the tent pads are along the river, while others are in the woods, but there’s a beautiful view of the valley and the backside of Mount Robson from the campground.

Emperor Falls – This campground is located just past the viewpoint for Emperor Falls at the 16km trail marker. It has 9 tent sites and some picnic tables, but it does not have a shelter. While the tent pads are located right next to the river, making for a nice view, the main downside to this campsite is that it’s located at the top of all of the elevation gain, so it leaves you with a big day if you’re hiking from the parking lot. I would probably avoid it on the way up, but it’s a good option to shorten your hike on the last day.

Marmot – This is the first of the upper campgrounds, any of which can be used as a base for day hikes. It’s located at the foot of Berg Lake at the 19km trail marker. It has 7 tent sites and a recently constructed semi-enclosed shelter (this one has windows, unlike the shelters at Kinney Lake and Whitehorn). Most of the tent pads are located in the woods, but 1-2 have a direct view of Mount Robson. While the view from Marmot is not quite as good as from Berg Lake, it is located right on the lake and would be my first choice if I couldn’t get a site at the Berg Lake Campground. Some people really like this campground because of how small it is, so you can avoid the crowds.

Berg Lake – This is the most popular campground on the trail. If you can score a permit for this campground, do not hesitate to book it. It’s located at the head of Berg Lake at the 21km trail marker. It has 26 tent sites and a fully enclosed cooking shelter with a large porch and view of the Berg Glacier. This is the most beautiful campsite on the trail, but it will be very busy as a result. Most of the tent sites are in the woods, though there is one premium tent pad with a lake view. A few of the sites at the back of the campground also have mountain views.

Rearguard – This campsite is located just past the Berg Lake Campground at the 22km trail marker. It has 6 tent sites and is a good option if you weren’t able to get a campsite at Berg Lake. It’s not located on the lake, but it does have nice views of Mount Robson and the river delta. The main downside is that there is no shelter, so if it rained, I’d prefer to be at Marmot.

Robson Pass – This is the last campsite in the park, located at the 23km trail marker. It has 15 tent sites. It’s located a little bit further away, but it can still be a great base if you’re planning to do some day hikes. You can access Snowbird Pass from this campsite, as well as you can hike up the backside of the Mumm Basin Trail – although be aware that this trail no longer connects to the Toboggan Falls trail due to a rockslide in recent years – but I’ve heard it still has a great view. Similar to Rearguard, the main downside of this campsite is that it doesn’t have a shelter.

Robson Hut – Another option to be aware of in the future is that the ACC is currently constructing a brand new mountain hut at Robson Pass, which should be open for the 2026 season. You will be able to book this hut through the ACC and it will be the swankiest accommodation available in the park. Please note that this is separate from the BC Parks booking system and it is not an open hut that you can visit. A booking will be required to use the hut.

Robson Meadows – Just to cover my bases, I want to mention that there is a frontcountry campground located off the highway near the visitor centre, which is a great option for camping the night before or after your backpacking trip.

A photo of Mount Robson on a sunny day with the Robson River in and trees in the foreground and the mountains and glacier in the background, on the Berg Lake Trail in Mount Robson Provincial Park, BC.

Itineraries

I’ll keep this fairly simple. It’s not easy to get permits, so it’s really a take what you can get scenario, but there are a few strategies you can employ.

Strategy 1: Hike all the way to Berg Lake in a day. The idea with this strategy is that you book as many nights as you want at the lake, prioritizing day hikes from the lake. The benefit is that you can immediately concentrate on getting bookings for Berg Lake before they fill up and maximize your time at the lake. The downside is that you need to be prepared to do the full 21km in a day, which is challenging, but allows you to spend more time at the lake if time is limited.

Strategy 2: Break up your hike to Berg Lake into 2 days, staying at one of the middle campgrounds on the way up, but planning to hike all the way back to the parking lot in a single day. Again, book as many nights as you want at Berg Lake after you arrive. This makes your hike in easier than strategy 1, but still gives you extra time at the lake, as the hike down is much easier than the hike up.

Strategy 3: Break up your hike to Berg Lake into 2 days on both the way up and down. If you have more time available, you can still book multiple nights at Berg Lake in the middle to do day hikes, but the benefit is it gives you a more relaxed hiking timeline, especially if you are worried about the challenging terrain.

Personally, I would only do strategy 1 if I only had 1 night. I used strategy 3 for my visit because I had lots of time, but I would have been comfortable with strategy 2 as well. It is more manageable to do the hike down in a single day. Here’s a couple of options based on the number of nights you have. (D=day, N=night)

Number of NightsFirst Choice CampgroundAlternate Campgrounds
2 days, 1 night (strategy 1)D1: Hike to Berg Lake
D2: Hike out
Marmot, Rearguard
3 days, 2 nights (strategy 1)D1: Hike to Berg Lake
D2: Day hike, stay at Berg Lake
D3: Hike out
Marmot, Rearguard
3 days, 2 nights (strategy 2)D1: Hike to Whitehorn
D2: Hike to Berg Lake
D3: Hike out
N1: Emperor, Kinney Lake
N2: Marmot, Rearguard
4 days, 3 nights (strategy 2)D1: Hike to Whitehorn
D2: Hike to Berg Lake
D3: Day hike, stay at Berg Lake
D4: Hike out
N1: Kinney Lake
N2: Marmot, Rearguard
N3: Marmot, Rearguard
4 days, 3 nights (strategy 3)D1: Hike to Whitehorn
D2: Hike to Berg Lake
D3: Hike to Whitehorn
D4: Hike out
N1: Kinney Lake
N2: Marmot, Rearguard
N3: Kinney Lake, Emperor
5 days or moreSame as 4 day options, but add multiple nights at Berg Lake

Day Hikes

There are several great options for day hiking along the Berg Lake Trail. I really think it’s worth it to try and fit in at least one day hike if you can get multiple nights at campsites near the lake, but if you can’t, it’s not the end of the world either. Berg Lake is a world-class trail on it’s own and the entire trail is stunning, whether you have time for side quests or not. If you do have time, here’s the trails I would recommend.

20250805_105047

Snowbird Pass – In my opinion, this is the best trail in the park. People like to prioritize the Berg Lake Viewpoint on the Toboggan Falls Trail, but this trail is the real gem. It’s a 20-km round trip hike from the Berg Lake Campground, so you definitely need a full day for it, but it features views of both the Robson Glacier and the Reef Icefield. It’s stunning from start to finish. If you don’t have enough time to do the whole trail, it’s still worth it to hike the 3km from Berg Lake to the lake at the base of Robson Glacier. I’ve written an entire blog post about this trail.

Toboggan Falls to Berg Lake Viewpoint – This is the most popular side trail in the park. From the Berg Lake Campsite, you can hike 1km up along the Toboggan Falls trail (enjoying the view of Toboggan Falls along the way), to a junction that takes you another ~1km up to the Berg Lake Viewpoint. From here, you can get the iconic photo of Berg Lake, the delta, and Berg Glacier. You don’t need a full day to do this hike, so if you’re short on time, you can probably knock it out in ~2 hours after you arrive at camp.

Hargreaves Lake Loop – If you have a full day, expand your hike up to the Berg Lake Viewpoint to also include the loop around to Hargreaves Lake via Marmot Campground. It’s approximately 7km round trip and in my opinion, Hargreaves Lake is really underrated. There’s a small viewpoint off the trail that takes you up to a lookout of Hargreaves Glacier and the Marmot branch of the Berg Glacier at the same time. I’d recommend a day if you’re doing the whole loop, but if you’re staying at Marmot, you could easily hike up to Hargreaves Viewpoint and back in an evening, as it’s only ~3km round trip.

Adolphus Lake – I haven’t done this trail myself, but if you have the time, you can hike out from Berg Lake to Robson Pass and then continue on to see Adolphus Lake. It’s ~2.5km from the Berg Lake Campground, but along completely flat ground. It’s a great option if you’re staying at Robson Pass.

20250805_114645

South Chilcotin Backpacking Trip – The Lakes

Continuing on from Part I, Part II, and Part III. After arriving at Trigger Lake on Day 4, we were firmly in the second part of our trip. We planned to hit Spruce Lake for the next evening, which was 14km away. The hiking was pretty easy on Day 5, and we left Trigger Lake, hoping the next lake would be better for swimming. After a few kilometres, we arrived at Hummingbird Lake. The edge of the lake is located on a rock slide, so you have to cross several boulder fields as you walk along the length of the lake. The campsite is located on the east end of the lake, which is where we were heading, but I could tell it looked pretty shallow on that end. So we stopped before the campsite, on the edge of the boulder field, to go for a swim.

20240801_113506
PSX_1723002734202

It was an excellent choice. We found a big rock to hang out on and Brandon had a snack while I went for a swim. It was cold, but refreshing and I had a good bath, it was the first time I actually felt clean on the trip. The rocks were still pretty muddy and every one you touched would knock off an inch of mud into the water, but at least you don’t sink down into it! A product of the remoteness I guess, and lack of visitors.

Most of the hiking for the day was in the forest. There’s not a lot of landmarks, so it was hard to decide where to stop for lunch. Eventually we found a nice meadow and took a break for lunch before climbing up towards Spruce Lake. There’s another small campsite called Cowboy Camp along the way, but it doesn’t have any amenities and seemed a bit buggy.

20240801_130324
20240801_145535

Spruce Lake is interesting because only the east side of the lake is actually located in the Park. There’s a small cutout on the west side of the lake where people own lakefront properties, and we saw some people out on the water in boats. There’s two BC Parks campsites on the lake, but the south site is currently closed. I think there’s a bunch of dead trees in the area that are a fall hazard, so you can’t stay there.

The walk around Spruce Lake to the North campsite is pretty disappointing because you can’t actually see the lake from the trail, so it felt like a long walk. The Spruce Lake campground is by far the largest and most widely used campsite in the park. In was a Thursday, so we were the only ones there when we arrived, but the solo hiker we ran into on our first day told us there had been 11 tents there when she stayed on a Saturday Night.

20240801_145330
20240801_155500

It’s a large campsite, with lots of space for tents. It has 2 outhouses, a bear cache, and a ton of picnic tables. We claimed the campsite closest to the lake and took over the picnic table. There’s a large wharf, which is used for the float plane operation, and the Tyax lodge is located 10-minute walk away. I went for another swim, but Spruce Lake is also very mucky. I jumped in off the end of the wharf, but it’s not very deep and I could still feel the vegetation tickling my toes. There’s no ladder, so I had to brute strength my way back onto the dock.

Eventually some other mountain bikers passed through and went for a swim on their way to the lodge. A bike packer showed up around sunset and camped for the night, but otherwise no one else arrived. It was a warm evening and the sky was clear, so I decided to do a bit of star photography from the dock. Once it got dark, I lay out to take some photos of the milky way. I was still hoping for a glimpse of the northern lights, but no luck! I had to lie super still so as not to rock the wharf and ruin the photos, but I had fun! I also had a good laugh when I realized I could hear Brandon’s snores from the tent echoing across the water!

PSX_20240825_152927

We’d planned to stay another full day in the park, but we decided to head out one day early. We were going to do another day hike and then re-locate to WD Camp, but it was a Friday heading into the long weekend and we decided we were ready for a real bed. The float plane was running back and forth all morning with a steady stream of long weekend visitors. One couple stopped at Spruce Lake while we were packing up, dropped a pile of giant Rubbermaid containers at the site, and then took off in the plane again, telling us they had a party of 12 on the way in.

To get ahead of the crowds, we decided to do a big day and hike the full 22km back to the car. I’m not going to lie, it was pretty brutal, but I don’t regret it. The first 6km back to WD Camp were pretty good, but re-doing the Tyaughton Creek Trail sucked. There’s a huge climb through some really exposed meadows, which we hit around noon. It was getting really hot and we crawled up it, before stopping for lunch near a stream. The black flies were also pretty relentless, so it was hard to take any good breaks. We passed several groups of hikers and bikers later in the day, who were entering the park for the weekend, which was probably the most people we’d seen all week!

20240802_070919

We were a sweaty mess and covered in dirt by the time we reached the car, but so happy to be done! We took a river bath at Tyaughton Creek Rec Site on the way out, and then drove straight to the lodge for supper. It was a lot busier than when we’d entered the park, but they made room for us on the patio, which was nice. There’s not many things more rewarding than a cold beer after a long hike!

Friburg Rec Site was totally full with all the long weekend visitors, so we drove to Mowson Pond Rec Site instead. We easily found a site and Mowson Pond is so much nicer than Friburg! I definitely recommend it as the preferred option if you ever visit. It’s still really close, but it has actual campsites, rather than just a parking lot. There’s also the Gun Creek Rec Site, which is a bit further, but we checked it out on our way back, and it’s also really nice.

20240801_135714
20240802_173042

So we exited the trail on Friday night and returned home on Saturday. We took the Hurley Forest Road again and discovered an awesome little famers stall in Pemberton Meadows on the way home. It’s basically a little produce stand with a couple of refrigerators. The local farmers stock it and it’s just run on the honour system. Take what you want and put your cash in the money box. I got carrots and beets, and they were the juiciest vegetables I’ve ever had! So good!

So overall, I would definitely consider this trip a success. I’m thrilled that the trip finally made it off my bucket list, but I’ve now added 3 other trails in the park to my list, so it’s really been a net gain. Either way, I’m happy we did it and I would absolutely return again in the future!

20240802_133400

South Chilcotin Backpacking Trip – Deer Pass

Continuing on from Part I and Part II, on Day 4, we had a big hike up and over Deer Pass to access the southern part of the park. It has been relatively cool in previous days, but the weather was starting to get hotter. We got up early to say goodbye to Siwash Meadows. Fortunately, we didn’t see any bears while we were staying in the meadow, but I did see 2 deer. On the first morning, I saw a doe staring at me while I made breakfast, and on the second morning, I saw a buck prancing through the meadow! Brandon wasn’t lucky enough to see either, but being at the base of Deer Pass did live up to its name.

20240730_193308
20240730_070703

The day started with a river crossing. Once you cross over from the meadow, you start a pretty steep climb up through the trees. We ran into our mountain biker friends again when they passed us on the trail (the first rider got spooked by Brandon and thought he was a bear), otherwise, we didn’t see anyone on the trail again that day.

20240731_094330
20240731_112932

I didn’t mind the hike up through the woods. There’s shade and I didn’t find it too painful. Eventually you pop out in the sub-alpine and continuing climbing until you get into the real alpine. We stopped for a break to take advantage of the shade, since the rest of the pass is extremely exposed. Deer Pass is much more rugged than Lorna Pass. Lorna Pass was a gentle uphill over established trail, while Deer Pass had a lot more switchbacks and exposure to steep run-out zones. There was one part of the trail that was a little confusing because there seems to be have been a small slide that covered the trail and we had to navigate across it.

20240731_113802

We were much slower hiking up Deer Pass. In some ways, it’s more scenic. The summit is much more rugged and there’s a gorgeous meadow down in the valley, but you also feel much more exposed. We had to layer up because it started to get really windy and we crawled up some of the steeper sections. But I still really enjoyed it! I think I liked Lorna Pass a little better than Deer Pass, but both are really striking sections of the trail. I love being in the alpine and it felt really rewarding after a lot of forest walking!

20240731_125444
PSX_20240827_175350

Eventually we reached the top of the pass and it’s an incredible feeling crossing over to the other side. The Chilcotin mountains are quite barren and eroded, but when you summit the pass, you can see a whole new mountain range in the distance. They are more characteristic of the rest of the mountains in southwest BC, in that they are less eroded and have glaciers and snow-capped peaks year round.

20240731_132553

There’s a little tarn at the top of the summit, which supposedly can be used as a campsite, but it’s extremely windy and exposed up there, so I wouldn’t recommend it. We sheltered behind some bushes to eat lunch, but it was pretty chilly and we put extra layers on for the descent. The descent is a lot more like Lorna Pass, it’s a gradual downhill through the meadows, with a gorgeous creek flowing through it. I’m sure the mountain bikers bombed down a lot faster than we did, but we definitely enjoyed the scenery more!

20240731_144842
20240731_145327

You stay in the alpine for a few kilometres before returning to the trees. The hike gets really steep again and we climbed down through the trees for what felt like forever, but was in reality, only a few kilometres. Once you reach return to the valley, it’s a short walk to the first of several lakes. All of the lakes have established campsites, and we planned to stop at the first one, Trigger Lake, for the evening. In total, we only hiked 12km, but it took us most of the day.

20240731_144025

Trigger Lake is really beautiful and a deep blue colour. Unfortunately, it’s located right in the middle of a river delta. We were the only people at the campsite again, but at least this one had an outhouse, bear cache, and picnic table. We decided to take turns bathing in the lake. There’s no beach and the ground looked pretty muddy, but I found a small rocky section that I thought looked okay.

20240731_164736
20240731_174346

I knew it would be cold, so I decided to enter the lake at a run, which was a mistake. It turns out, the rocks almost immediately transitions to mud and before I could stop, I was knee deep in it! I more or less collapsed into the water to get my feet out of the mud, but it was hard to bathe while treading water. I eventually went back to shore and almost got stuck in the mud again while walking in. It was so gross; I can still feel the phantom plant life clinging to my toes!

20240731_194746

So I would NOT recommend Trigger Lake for swimming. I got an inreach message from Seth, letting me know that the Northern Lights might be visible over the next two nights. I had a look for them when I got up to pee overnight, but I was so exhausted, I didn’t really look too hard. Like with my last post, I have so many photos from this section of the trail, so here’s a few more of my favourites! Continue on for Part IV.

20240731_124236
20240731_153209
PSX_20240812_092819
DSC03488
20240731_141715