Let’s Talk: Avalanche Safety

Let me start this post with a disclaimer – I am a newbie to avalanche terrain and only have level 1 training. I am not a reliable resource for avalanche safety. I decided to write this post anyways because I think a lot of people go out into the backcountry in the winter without understanding the risk. I went snowshoeing and camping for 3 years and told myself I was safe because I “checked the forecast” and only went on popular or “safe” trails. I was pretty conservative, but in retrospect, I didn’t actually know how to read the avalanche bulletins and I was unknowingly venturing into avalanche terrain. Without taking a course, I feel it’s hard to get the proper education on identifying avalanche terrain and my main goal with this post is to convince you to take the AST1 course. If your internal reasoning sounds anything like mine above, trust me, take the course.

Growing up on the East Coast, I 100% didn’t understand the threat that avalanches can pose. I figured they were pretty rare and the odds of me getting caught in one were low. In reality, in 90% of avalanche accidents, the avalanche was triggered by the victim in the accident. So while your odds of getting caught in a naturally triggered avalanche are slim, it’s easier than you think to trigger one. Human triggered avalanches are more commonly triggered by backcountry skiers and boarders rather than snowshoers because of the terrain type, but snowshoers are at risk from other phenomenon’s such as cornices. In addition, avalanche risk is generally at its highest after major snowfalls and that tends to be when lots of people crowd into the backcountry to enjoy fresh powder.

PSX_20210314_180305

Even if you don’t have avalanche safety training, if you’ve spent any substantial time snowshoeing, you are probably familiar with the avalanche bulletin. The bulletin is a regional mountain forecast issued by Avalanche Canada that tells you the avalanche danger level, problems to look out for, and additional details on the weather and snowpack. Users can also submit reports from their trips on any incidents or avalanche indicators they witnessed, so it’s a useful resource for assessing risk.

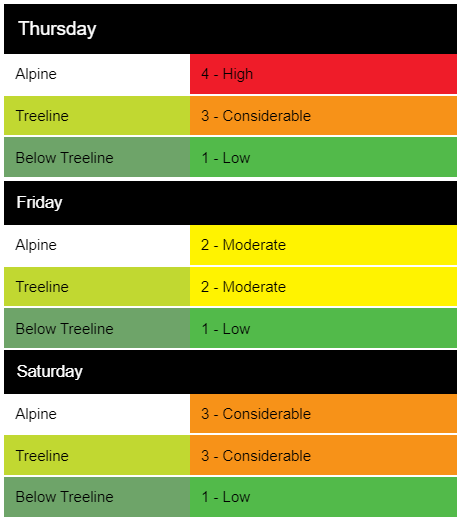
The bulletin has 3 parts that are all equally important, but unfortunately most people (myself included in the past) take one look at the danger rating and never make it past the first section of the bulletin, which contains a 3 day colour-coded rating system. There are 5 levels: low, moderate, considerable, high, and extreme. Level of caution depends on the user. Before I did the training I would comfortably go out in low and moderate conditions, but not considerable. However, I know a lot of users view “considerable” as fine and only stay home in high and extreme circumstances. After doing the training, I wouldn’t venture into avalanche terrain above low unless I had appropriate safety gear.

While it’s great to check the danger rating, the other sections of the report are just as important, particularly the problem areas. These tell you what avalanche risks to look out for, where to look for them, and how catastrophic they might be if encountered. For example, the problem below tells me that the chance of a storm slab avalanche in the treeline and above is actually very likely on all aspects of the slope, but not likely to be larger than a size 2 avalanche. But for the record, a size 2 avalanche is still fairly large and can kill you, so don’t be deceived by the fact that the scale goes up to 4.

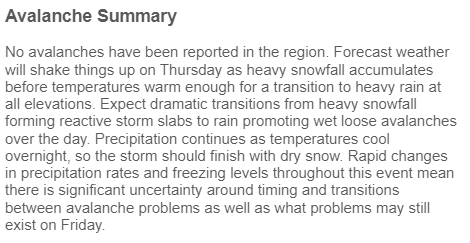
Finally, the details section tells me what to expect in terms of weather and snowpack and how accurate the bulletin is. The summary below indicates that heavy rain and snow result in uncertainty around avalanche problems and inclement weather makes the mountains a particularly dangerous place to be at that time. The forecaster indicates further in the report (not shown) that because of significant precipitation, they only had a moderate level of confidence in their predictions, so they should be taken with a grain of salt and other risks could be present.

For me, the avalanche bulletin has become a critical part of my avalanche training and planning because it helps me in making decisions about when to go out or not and what to look for if I do go out. There are lots of ways to mitigate your risk in the backcountry. One is by avoiding avalanche terrain altogether – ie, if I’m not going to go to terrain where there is a risk of avalanche, then I don’t need avalanche safety training. There are some trail maps on Avalanche Canada that indicate the different types of avalanche terrain so that you can avoid challenging or complex terrain. But the bigger problem is that without training, I think it is somewhat challenging to identify what isn’t avalanche terrain. There is often information available on the internet about specific trails, but you are most protected if you’re able to identify avalanche terrain and hazards yourself (although I still highly recommend doing specific trail research as well).

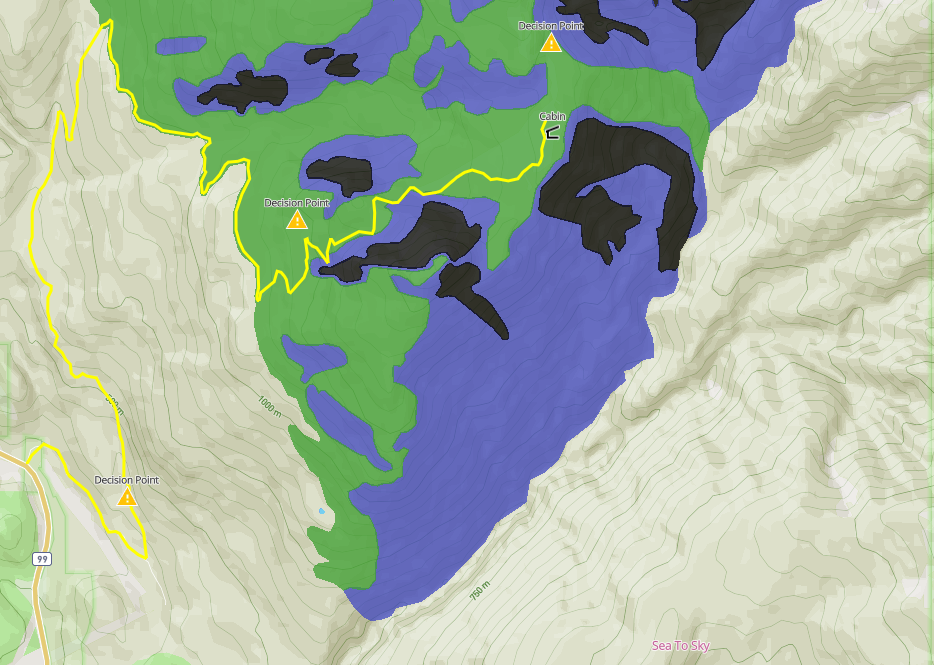
Which brings me to the second part of avalanche awareness – staying safe by avoiding avalanche risks in the backcountry. Most of the terrain I’ve travelled through has been simple terrain, meaning low angle or forested terrain with lower risk of triggering an avalanche (beware though, avalanches can happen in the trees too, so don’t assume you’re safe just because you’re in the forest). However, I did unknowingly travel through some slightly higher risk terrain before getting my AST1. For example, Elfin Lakes and Zoa Peak are two popular winter snowshoe trails – the Elfin trail is all in simple terrain (green), but it does pass under some challenging and complex terrain (blue and black) that could potentially place you in the run-out zone. Likewise, if you go all the way to Zoa Peak, you pass through a section of challenging terrain, but if you just go as far as the sub-peak, you stay in simple terrain. Knowing how to read the terrain and identify potential problems or hazards (all taught in the training), allow you make smart choices when recreating.

For me, these were the two parts of the training that were most eye-opening. Sure, you also learn how to use a beacon, probe, and shovel to conduct a rescue, but so much of the training is about avoiding ever having to rescue someone or be rescued. The more you learn about something you didn’t know very much about, the more you realize how little you actually knew. This was very much the case for me with avalanche training. I was completely blind to so many of the risks that it would have been so much easier for me to walk into a scenario that I didn’t know how to escape from. Now, though I’m still a learner, I can at least acknowledge the magnitude of the information I don’t know.

Finally, the last part of the training is about avalanche rescue. What to do if the worst has happened. You learn to mitigate risk further going around avalanche terrain and by making sure to stagger your party on those occasions when you do have to pass through avalanche terrain so that if there is an avalanche, no more than 1 person will be buried, leaving multiple people to initiate rescue. If you’re not able to be rescued by your companions, it’s very unlikely you will be rescued at all. 91% of people survive if rescued within 18 minutes, after that survival drops to 34% in burials between 19 and 35 minutes.

IMG-20200301-WA0035

For this reason, who you recreate with is extremely important because you are potentially relying on your friends to save your life. For this reason, I did my AST1 course with 3 other friends and we practiced together on our snow camping trip last year. I don’t yet own my own beacon and probe (just a shovel), but I have been renting them since I did the training and hope to buy one soon. It’s great if one person in your party has training and can identify hazards and mitigate some of the risk, but unless you all have beacon, probe, and shovel and know how to use it, you will likely be shit out of luck in a real emergency. Fortunately, there are lots of AST1 providers, so I recommend signing up for a course to learn all about avalanche safety and prioritize your safety in winter conditions in the backcountry. I did my course with The Mountain School.

*stats from National Geographic via: https://www.dosomething.org/us/facts/11-facts-about-avalanches#fn3
**since writing I have acquired my own probe and beacon!

A Bucket List for 2022

The last time I made a bucket list on this blog was in 2015. I tried to make one for 2020, which was obviously a horrible fail, but now that things are starting to open up again post pandemic, I thought 2022 would be a great year to make a new bucket list! Unfortunately I wrote this post pre-omicron, which seems determined to undermine my plans, so I’m not sure how many of these I will get the opportunity to do, but I’m not super rigid about my bucket lists anyways. So here’s a few things I’d like to try and accomplish this year if I get the chance, organized by season. Leave a comment and share some of your bucket list items for 2022!

Winter Activities

  • Go on a snowshoeing fondue adventure
  • Go snowshoeing with my Trex unit (girl guides)
  • Build a snow cave
  • Go on a 2-night snow camping adventure
  • Ski Manning Park
  • Visit my cousin in Finland
IMG-20200301-WA0005

Spring Activities

  • Run once a week and do a road race if possible
  • Go on a backpacking trip with Trex
  • Get my Level 1 Kayaking certificate
  • Go on our annual May Long weekend camping trip
  • Go kayaking with Seth
IMG-20210405-WA0016

Summer Activities

  • Thru hike the SCT
  • Kayak Desolation Sound
  • Learn to identify wildfloewrs
  • Go on a multi-day trek with Trex
  • Overnight on the East Coast Trail
  • Hike to Twin Lakes
HOP_4999

Fall Activities

  • Visit a spa or hot spring
  • Make a long weekend trip to Portland
  • Go hiking in the Cascades
  • Finish my reading goal of 60 books
IMG_4406

ECT Series: Cape Broyle Head Path

I’ve been trying to do an overnight hike on the ECT for a few years now and I finally succeeded with Cape Broyle Head. Emily’s done more of the ECT than me and this was the only section with a campsite she hadn’t done, so we went for it in early August of 2021. In total, there’s only 5 official campsites on the entirety of the ECT, but you can generally free camp along other parts of the trail if you can find a good spot for it.

The campsites are located on longer sections of trail, which Cape Broyle Head is at 18km. It’s listed on the ECT website as difficult to strenuous. It’s a bit of a drive from St. John’s and at the time my family was all sharing one car, so Mom and Dad decided to drive out with us on Saturday, hike a few kilometres, and then turn around and return the next day to pick us up on the other end. The trail runs from Cape Broyle to Calvert. We didn’t put too much thought into direction – the campsite is located 7km from Cape Broyle, so we decided to start in Calvert to get the longer distance (11km) done on the first day.

DSC00161

There’s a nice view out towards Ferryland as you leave Calvert. On this particular day it was extremely windy, but there’s a viewpoint located approximately 1km past the trailhead, which we made a visit to. After that you climb up and over the headland. It’s a bit of a slog uphill, but honestly it’s not that bad and we didn’t really think much of it. Probably about 15 minutes in total. Mom and Dad hiked over with us in hopes of another viewpoint. Sadly though, after the headland it’s a pretty steady hike through the forest with no viewpoints, so we stopped in the woods and had lunch and then Mom and Dad turned around to go back to Calvert.

20210807_124537

This section is pretty flat and easy and continued to the 4km mark, where you can descend off the trail to a nice viewpoint. It might have made for a nicer lunch stop, but there’s not much room there, so I’d recommend continuing on and we only stopped briefly. The weather was pretty good for hiking, it was overcast and calling for rain later in the evening, but it hadn’t yet made an appearance. The trail continues to meander up and down around Church Cove, Shag Rock Cove, and Shipwreck Point. It’s a bit of a slog though – you get a few viewpoints down to each cove, but for the most part it’s in the trees. But we did make a lovely discovery at the top of Church Cove! There is a picnic table in this location, so it makes for a really nice rest point or lunch break. I can’t recall seeing many picnic tables along other sections of the ECT, so it was a nice surprise.

DSC00184

Just before you hit the 10km mark, you get a beautiful view down into Lance Cove. It was a pretty calm day on the water and there were a few boats that had pulled ashore with some families hanging out along the beach. Despite glimpsing lots of beaches on the ECT, often they’re not accessible from the trail. We assumed this to be the case for Lance Cove because it looked pretty sheltered, but we were thrilled to find a steep staircase heading down to the beach right at the 10km mark! We continued down the trail and found a nice place along the beach to drop our packs and go for a quick dip in the ocean. It was pretty cold, but it’s always nice on your tired muscles after a day of backpacking.

20210807_164031

By this time, it was getting later in the day, about 5 or 6pm, so we packed up to hike the last kilometer to the campsite. The campsite is located at Freshwater Point which looks down to Lance Cove from the other side of the bluff. There’s an outhouse and it’s just a short walk down to the river to get water. I can’t remember exactly how many tent pads there were, but I want to say about 5. They’re all in the trees and there’s not really enough space to free camp on the ground anywhere, so we had to stay on one of the pads. Unfortunately the tent pads are kind of in rough shape, with missing boards and loose nails, but we were able to find enough space to set up the tent. There was one other woman camping overnight and she had set up on another pad and gone down to Lance Cove for supper.

20210807_174013

There’s not a great view from the campsite, but you can peak down to Lance Cove through the trees. In this case, there was a storm coming in that night, so we were happy to be sheltered in the trees. We did also run into another couple while we were getting water and they told us they had happened upon a small cabin on the way in and decided to stay there. We passed it the next day and it had a couple of bunks, but I’m not sure the history of it or whether it’s supposed to be accessible. But it turns out, of everyone else we encountered on the trail, we were the only ones going from Calvert to Cape Broyle. Apparently the headland has a bit of a reputation from the Calvert side and the other campers were impressed we had hiked up over it. We were impressed they were saving the longer distance for Day 2 considering there was a fair bit of rain in the forecast for Sunday, but some of them were just turning around and going the same way back after Lance Cove.

DSC00167

We had a nice supper and hot chocolate before getting ready for bed. There’s no bear cache at the campsite, but there are bears in Newfoundland, so we decided to hang our food. It’s pretty rare to encounter bears, so I don’t really know anyone in Newfoundland who practices bear safety. I always like practicing my bear caching skills, so we went for it. I didn’t have the best luck though, I ended up with too strong a throw that wrapped itself around the branch twice and it took me a while to get it down again to hang it properly. Then in the morning, one of our carabiners had become stuck on a branch overnight and we ended up having to get a really long stick to poke our food out of the tree, so not the best bear cache I’ve ever made.

IMG-20211222-WA0031

Unfortunately the rain moved in overnight and it was pretty wet when we got up the next morning. We did a tent breakfast before packing up to hike out in the rain. It did stop raining not too far into our hike, but there’s a lot of vegetation and mud along the trail and we still got soaking wet from rubbing against all the plants on the way out. We only had to hike 7km, but it resulted in a much slower pace than the previous day and we knew Mom was probably going to be waiting a little while for us on the other end.

20210807_191417

Overall it was a bit of a miserable hike out. Aside from Lance Cove and the view right out of Calvert, there’s not really a lot to see on this long trail. It’s almost entirely forested and didn’t make for the most inspiring day. I did really love Lance Cove, but I think if I was ever to return, I’d probably just hike out to Lance Cove and back from Cape Broyle since that’s the only real highlight on the trail.

Eventually we stumbled into Mom on the trail, she’d decided to hike in and meet us and we hiked the last 1 or 2 kilometres out together. There is a nice beach right at the end of the trail, but if you’re coming from Cape Broyle, you don’t really have to hike far to get to it. We had a good time because we love hiking and camping and the two of us don’t really get to do it together very much anymore, but I wouldn’t rank it as one of my favourite sections of the ECT. Best done as an overnight.

DSC00172