Widgeon Creek has been on my bucket list for a long time! It’s a paddling route that leaves from Pitt Meadows, starting with a crossing of the Pitt River, and then meanders up Widgeon Creek through Widgeon Marsh and Pinecone Burke Provincial Park.
It’s only a half hour drive from my house, but the reason this sat on my bucket list for so long is because I was afraid of crossing the Pitt River. You have to cross the river at the entrance to Pitt Lake, which can get pretty windy, and the Pitt River is tidally influenced, meaning you can get some pretty fast currents coming in and out of the lake. Even though I know people cross the river all the time, in all manner of vessels (many of which are much less robust than my 16 foot sea kayak), I found the idea of crossing the Pitt River pretty intimidating.
But I finally decided to go for it on a gorgeous day in early April. I didn’t want to go during freshet, when the flows increase from snow melt, and I didn’t want to go during the summer when it’s highly trafficked, so the conditions seemed to align in April. Now that I’ve done it, I’m kind of wondering what I was so afraid of! I know my risk aversion keeps me safe, but it was much less intimidating than I imagined.
We got up early on a Saturday morning to beat the crowds. Fortunately, the creek wasn’t very busy at this time of year and we had no trouble crossing the Pitt River. There was definitely a current when we crossed and a headwind when we returned, but it was very manageable in our kayaks. I’d probably be too nervous to cross the river on a SUP, but there were some people doing it in the afternoon. Although I find it shocking the number of people who go out without a PFD!
The water was very calm when we crossed and the creek was almost completely still. I’ve heard the creek can run dry or very low in some sections during the hot summer, but we crossed near high tide and had no issues in either direction. It was such an enjoyable paddle on the way up the creek that me and Seth kept remarking that we had to spend more time exploring the area in the future (our go-to trip is generally paddling to Jug Island).
We didn’t see any other paddlers on our way up the creek since it was still pretty early in the morning. You paddle through Widgeon Marsh, which is a regional park, and eventually cross into Pinecone Burke Provincial Park. I think this is so cool because I love Pinecone Burke – it’s such a large and underrated park – and I’ve now explored it from 3 different entry points. The most common entry is from Harper Road in Coquitlam, but I’ve also entered the Park along the trail to Seed Peak (east of Squamish), and now via Widgeon Creek.
The final destination by kayak is the Widgeon Creek campsite. There were a few boaters here who had come in the previous day and were camping overnight. We hauled our kayaks up on the shore and then re-packed our bags for a little hike to Widgeon Falls. The paddle to the campsite takes about 75 minutes, and it’s a 6km round trip hike from the campsite, so it makes for a nice day trip with a variety of activities. You can hike to the Falls mostly along an old forestry road, which is faster, but we opted for the detour through the forest, which is much more scenic.
The Falls are really nice and we hung out for an hour enjoying our lunch. We were the only people there, although we passed some other hikers along the way. We took the road back to the campground and then paddled out from there. We encountered more paddlers on the way back and the wind definitely picked up in the early afternoon. The hardest part of the day was crossing the Pitt River because we had a headwind, but it was very manageable in our kayaks. I wouldn’t want to do it on a SUP, and I did wonder if the people crossing on SUP realized they would have a pretty substantial headwind on the way back.
But overall, I absolutely loved everything about this trip! I’m keen to go back and I don’t think I’ll be quite as hesitant in the future. Since it’s a short paddle, it’s easily doable on a Friday night, so maybe we’ll come back some day and stay at the campground. You can also continue the hike up to Widgeon Lake, though I’ve heard it’s a bit of a slog, as the trail is not well maintained and usually has snow on it until July.
Definitely play it safe if you’re planning on doing this trip and plan around the wind and current conditions, but it was a much less intimidating trip overall than I thought it would be. In the summer, you can rent kayaks from the parking lot, so it’s pretty accessible if you want to check it out! I think parking can get challenging though because this is also the parking lot for people recreating at Pitt Lake, so I recommend going early because then you can easily find parking and take advantage of the early morning calm on the water!
This is the final saga of my experience on the HBC Heritage Trail. See Part I and Part II for the full story.
It was such a relief on Monday morning to look out the tent and see an overcast sky! I love the sun, but it was so hot on this trip and with the general fatigue from the previous 2 days, I was looking for a bit of relief.
Carolyn was anxious to get going early in hopes of getting home a bit earlier, so we were quick in having breakfast and packing down the tent. My foot was generally feeling better, but I was still getting arch pain when putting my full weight on my right foot – not as pronounced as the previous day, but I wasn’t sure what 22km of walking would do to it.
We were finished with the bulk of the trail, but arguably, we had some of the toughest sections ahead. We left the campsite at around 7:30am and started with almost 800m of elevation loss over 5km. It was pretty steep in parts, but I wasn’t feeling too bad and we were having good conversation, so we flew through the first section to Sowaqua River. Sowaqua River was our last river crossing of the trip and even though the trail was relatively flat for the next 7km between Sowaqua and Colville Camp, we knew we were going to encounter some blowdown.
Rivers are a central cause of problems in a flood, so we weren’t surprised to encounter a lot of blowdown immediately after the river. This was probably the most concentrated area of blowdown across the entire trail, but fortunately it wasn’t too long. The trail was tricky to follow in some parts, but after the first kilometre, it got a lot easier. Had I not been experiencing foot problems, I think this would have been an enjoyable trail walk, but the monotony of the flat sections turned out to be the most challenging on my foot.
When we finally got home I was able to diagnose the problem as plantar fasciitis, which was confirmed by an ER doctor and in my case was caused by putting too much stress on my foot. Plantar fasca is the connective tissue that runs along the length of your foot and I triggered the problem generally by pushing too far without proper training. So I definitely learned my lesson. But unfortunately, the longer I hiked on it, the more painful it got, and flat sections were the hardest because it was harder to distribute my weight to other parts of my foot and there was nothing else to distract from the pain. It also started to rain a little bit, but honestly it was a nice relief from the sun and it wasn’t enough to actually get wet, except for our feet, which had no hope with all the wet blowdown anyways.
So my pace definitely slowed down towards Colville Camp and I was relieved when we finally got there for lunch around noon. Colville Camp was a pretty cool forest campsite, but it had a lot of blowdown and pretty limited campsites, so it probably wouldn’t be one of my first picks for where to stay. We took a break for about an hour, which actually helped my foot a lot, before continuing on to the hardest part of the day.
We had a 3km climb up to the top of Manson’s Ridge, but it was also ~550m of elevation gain, so it was a bit of a slog. The first part of the climb isn’t too bad until you hit Fool’s Pass, which is a small relief in terms of elevation gain, but a mental slog! There were a few big trees down in the pass and there’s a few small declines you know you’ll have to ascend again, so it was pretty torturous at this point in the day. The last part of the climb up to Manson’s Ridge is really steep, but I honestly preferred it because it distracted from my foot pain. I was pretty slow, but eventually we made it to the top and it was all downhill from there. Unfortunately there’s no view unless you do an extra 400m to the summit, which normally I would do, but on this day I just didn’t have it in me.
The section between Manson’s Ridge and Manson’s Camp is only 2kms, but you undo all of the previous 500m of elevation gain and there were several huge trees down on the path, so it was also a slow descent. We knew the trail had been cleared by volunteers after Manson’s Camp, so our focus was solely on that reward.
We made it to Manson’s Camp shortly after 4pm. Manson’s Camp is really nice! It’s not very big – pretty much just a small plateau with enough space for a few tents – but it has a really nice view of the surrounding mountains. We will thrilled to sit down on the benches and planned a short stop before the last 6km. I was definitely hurting, but feeling in better spirits knowing we were approaching the end.
Unfortunately we still had a few roadblocks standing between us and the trailhead, we just didn’t know that yet. This was one section of trail where we should have done a bit more research, but in our defense, when I did the research after, it was still very difficult to access the right information.
I rely heavily on GaiaGPS when in the wilderness and my Gaia showed two options for finishing the trail: the “new route” and the “old route”. Pretty self explanatory, but we knew from the facebook group that the route had been cleared and we were confused when we could not find the entrance to the new route (where indicated on Gaia). Carolyn bushwacked through some trees and then found some flagging tape in the woods, but it was definitely not cleared and we were getting a funny feeling about it, so we returned to the campsite.
The “old route” is very obvious and leaves from the back of the campsite, so we decided to take our chances on that. To be honest, it didn’t really look cleared either because there was a lot of shrubbery growing into the trail, but there was no blowdown, so it could have been a lot worse. A couple hundred metres into the “old route” we came across a sign pointing down into the woods for the new trail “to be completed in 2022”. In my opinion, this is the biggest shortcoming on the entire trail. The “to be completed” was very foreboding to me and I can’t guess why anyone would install an official looking sign before actually finishing the trial. Our guess was that the trail never actually got finished because of the 2021 flood and we decided to stick with the “old route”. This was the right call and was exactly the case. The new trail was flooded before it was completed and they are still working to re-establish it, so please please please, someone take this sign down!
The old route continues through the woods for a while along a very gentle decline until you eventually pop out on a forestry road. The forestry road is now defunct because of washout from the 2021 flood, so it has a pretty unique feel of a place that’s been reclaimed by nature. The grass is growing up through the old road after 2 years of no use and it would have been a leisurely walk had my foot not been throbbing with every step.
It’s only 6km from Manson’s Camp to the end, but the road blocks continued. It’s easy walking until 3km before the end where there’s some flagging tape and a sign saying that the road is washed out and to follow the detour. We didn’t actually get to see the road washout, but I can assume it’s pretty bad because the detour takes you all the way up in the woods to navigate around the creek where the washout occurred. Fortunately this is the only detour, but it was already 6:30pm at this point and I was so done with walking. It was discouraging to have to walk way up into the forest and because we didn’t even know if we were on the correct trail (since we didn’t know the new route was still not complete), we were nervous there would be more road blocks or detours that would prevent us from finishing the trail.
There was a lot more washout after the detour, but you’re able to walk through it. It’s definitely creepy though. There’s a large uphill slope on the right side of the road and a steep embankment going down the left side. None of the banks looked particularly stable and the road is littered with giant boulder debris that was knocked down during the flood. After a very hot weekend, the sky was finally threatening rain and as the dark clouds moved in, we rushed through the landslide areas out of caution.
Within the last kilometre of trail, we tried calling a cab to come pick us up. We’d read that a lot of cars get broken into on the Hope side of the trail, so we had parked at the Hope Visitor Centre and decided to call a taxi. It took us a while to get a signal, but eventually we got through and they gave us a 30 minute wait time. It started to sprinkle as we were doing the last 500m of the trail and as we exited the trailhead, it started to absolutely pour! We were dreading having to wait in the pouring rain for 30 minutes and were ecstatic to see a shelter at the trailhead where we could stay dry while killing some time.
This was where we made our final error of the trip. We didn’t realize that the taxi’s don’t actually come all the way up to the trailhead. There’s a gravel road for ~2-3km from the highway to the trailhead that they don’t like to drive on (understandably). We were supposed to walk all the way to the road, which led to a very confused driver calling us to find out where we were. Fortunately he was a gem of a human being and drove his Prius all the way up to the end of the road to pick up 2 soaking wet, dirty, smelly hikers! We thanked him profusely and gave him a very generous tip – but please learn from our mistakes and just walk to the highway!
So overall it was almost 7:30pm when we finished the hike, resulting in another 11.5 hour day of hiking, with a total of 24.5km. All of which I suffered through with an injured foot. As I said, it turned out to be plantar fasciitis, and since then I have been out hiking again. It hurt to bear weight on it for a full week after the hike and after that I had to build up my hiking distance again. I went to physio as soon as possible and have been doing exercises twice a day ever since. It still gets tired and I’m weary not to stress it too much, but I have been able to work it up enough not to lose an entire season.
I was upset to have to cancel on my girl guides though. I was supposed to go on a 4 day trip to Garibaldi with my girl guide unit 2 weeks later that I had to bail on (though they were still able to go without me). I did a few nature walks and day hikes in early August, but I didn’t attempt any more backpacking for a month. I just went on my first backpacking trip since the injury in late August – it was only a 1 night and I hiked ~12km each day. I took precautions to take care of my foot and stopped every hour to roll it on a ball and that seemed to work, so I am going to attempt a 4 day trip very soon (with much more moderate distances than this trip).
So as usual, I learned a lot from this trip. No matter how many trips I go on, there always seems to be some kind of challenge that arises. You’d think that would be a deterrent, but I think it’s a part of what makes the trips so addicting. There’s always a large sense of accomplishment that comes with completing a particularly difficult trail. I felt a little bit invincible after solo-hiking the Sunshine Coast Trail last year, so it was a good reminder to always be re-assessing your abilities and boundaries. I think it’s important to tell yourself you can do something and build confidence, but be realistic about your abilities as not all injuries can be healed with a few days of rest.
If you’re thinking of doing this trail, I’d definitely encourage you to go for it, but be aware that the trail is in rough shape and there is a lot of uphill and downhill with relatively few views. I love forest hiking, so it was still a winner for me, but I know not everyone does and it’s a long trail for ~4km of truly scenic alpine hiking. Thrilled to finally have completed this small piece of BC’s history!
Last week I said Tricouni Meadows might be my favourite hike of the season… then I did Skywalk North and now I can’t decide! After such a successful hike at Tricouni, I was enthusiastic to try another day hike. This time we decided on the Skywalk North Trail in Whistler – it doesn’t require any off-roading, but is a much longer trail with much more elevation gain.
I’ve heard of the Iceberg Lake hike, which is quite popular, but I hadn’t heard much about the Skywalk trails, which I found in the 105 Hikes book by Stephen Hui. There’s a ton of hiking trails in the area and many mountain bike paths – the Skywalk trails consist of 2 loops with a shared middle section. The South Trail leaves from Alpine Way and the North Trail leaves from Mountain View Drive (both in Whistler). The South Trail is a bit shorter, but if you want to visit Iceberg Lake, they’re both probably about the same length because it’s a branch to visit the lake on the South Trail, whereas the North Trail goes right past it.
So both trails are ~20km including the lake, though we tracked 22km on GPS, and over 1000m in elevation gain, so it is definitely a big hike and you should give yourself enough time to complete it. We started just before 10am and didn’t finish until just after 7pm. For the most part it’s not a very technical hike and it has a lot of flat sections, but this just means it does a lot of gain in a short distance, so it is steep.
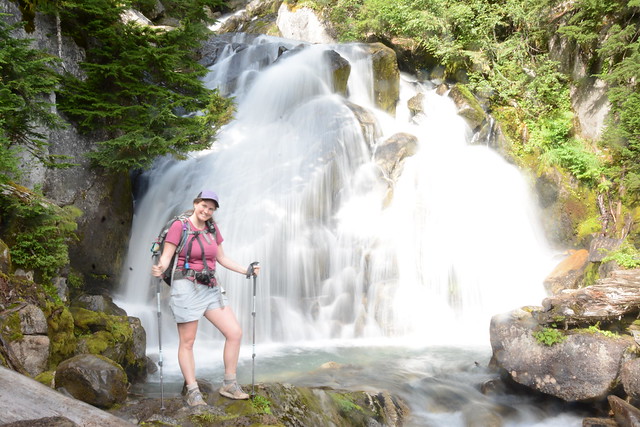
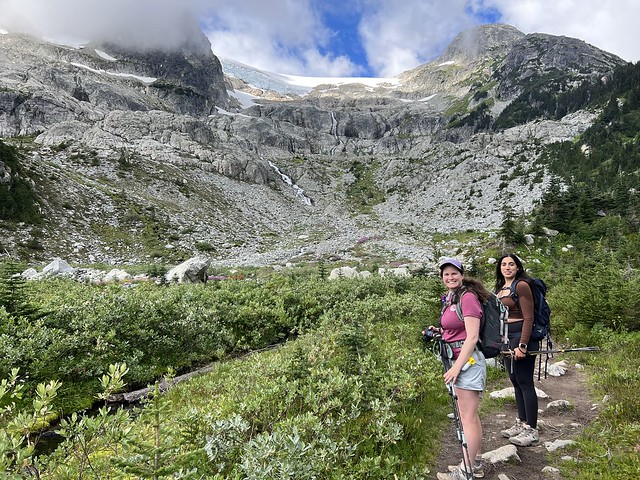
On VancouverTrails, it says it’s 7.5km to the lake, but my GPS tracked 9km and 900m of elevation gain, but I didn’t find this part of the trail difficult at all. The trail starts with a steep climb, then flattens as you walk through the trees along the river and past some waterfalls. Then you climb again up to the meadows where you meet the junction for the Skywalk South Trail. There’s an outhouse and a gorgeous view up to the glacier. It’s another 1km to the lake, which is the most technical part of the hike. You have to hike up through the boulder field to the base of the glacier. This was one of my favourite parts of the hike though because there were lots of wildflowers growing around the streams coming down from the glacier and it was very scenic!
It took us about 3 hours to get up to Iceberg Lake. We barely saw anyone on the hike up to the meadows and once we left the lake, but it was fairly busy from the meadows to the lake. It was strangely cold on the day we visited though. Vancouver had been nursing a steady heatwave since mid July, but on the weekend we went, we got a brief cold spell and we had to layer up with fleeces and windbreakers at the lake. But not before I went for a swim!
I pride myself on almost always going for a swim, no matter how cold the water is and this was no exception. I knew I was going to get cold fast once I stopped moving and my sweat cooled, so I stripped down to my swimsuit immediately. It was definitely some of the coldest water I’ve been in and I didn’t stay in for more than a minute. By the time I crawled out my body was already starting to go numb, but it was cool to briefly swim with all the bergy bits – that was a first for me!
We hung out at the lake for a bit before continuing on. If you’re doing the South trail, you’ll have to hike back to the meadows, but the North trail climbs up over the pass on the right side of the mountain to continue into the sub-alpine. Unless you’re doing the shortest route (up and back on the Iceberg Lake Trail), I’d really recommend Skywalk North (though I haven’t done the South Trail yet). The hike up the pass was my favourite part of the whole hike because you get to look down on the lake and the glacier, which is a cooler vantage point than looking up on it.
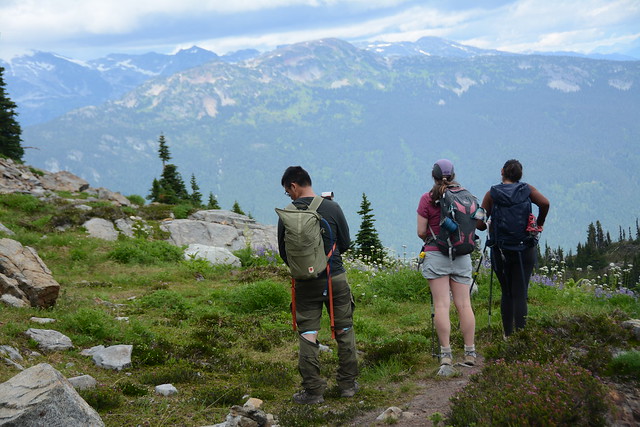
Once you get to the top of the pass, the trail flattens out again and you spend a lot of time hiking through meadow after meadow. We stopped at the top for a bit of a photoshoot and then took our time hiking down. What I liked about the North trail is that you get to spend a lot more time in the sub-alpine than if you just did the Iceberg Lake trail. There’s a great view looking out towards Whistler-Blackcomb, Wedgemount, and Pemberton and the alpine meadows were all in bloom with yellow arnica, purple lupins, white sitka valeria, and pink mountain heather. Plus by doing a loop you get to experience all new terrain!
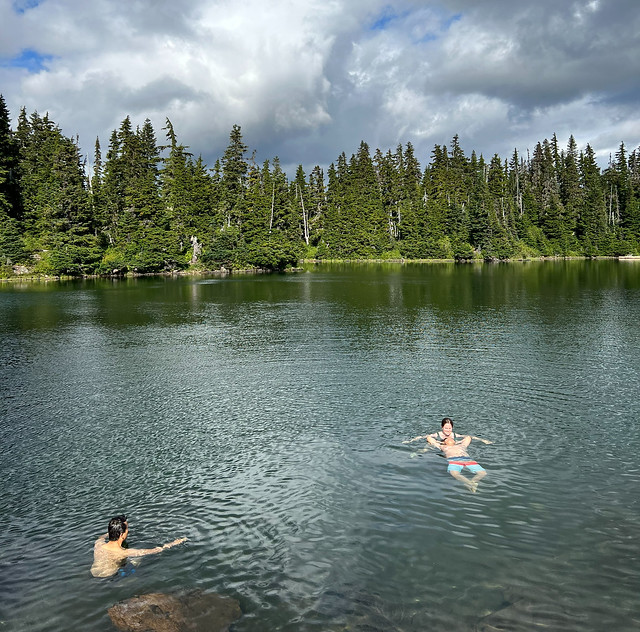
This part of the hike did take us a bit longer than anticipated. The down side to Berg Lake is that you eat your lunch when you haven’t done half of the trail, so it does make for a long afternoon. We hit Screaming Cat Lake around 4pm, which is a large lake before you start the downhill. I decided to go for a swim again and I was thrilled because Screaming Cat is not a glacial lake and is much warmer, so you can actually go for an enjoyable swim. It was still pretty cold, but once you got in, it was actually warmer in the water than out of it and we stayed in for a while, with both Lien and Brandon joining me.
The rest of the hike was pretty painful for me. It’s been a while since I’ve done so much elevation gain in one day and my knees were starting to bother me. After Cat Lake you have to do about 850m of downhill, which gets progressively steeper. It’s still a very nice hike – the trees aren’t tightly packed, so the forest had a very sunny feeling, but my knees were both killing me. I got slower and slower and pretty much crawled down the last 2km. We added a bit more distance to take the less steep routes where possible to save my knees. Even still, it was just after 7pm when we exited the trail, which I thought was pretty good all things considered!
We drove back to Squamish and had a delicious meal before heading back to Vancouver. I don’t think I got home until 11pm, so it was a very long day, but I really loved the hike! It’s a lot of work, but high reward and a lot of time spent in the alpine! Definitely recommend for those long summer days. Though I’d be wary of going on a really hot day – a lot of the hike is exposed and it’s a lot of climbing to do with no shade.