Snowshoeing Hollyburn Mountain

We’re now firmly into the winter hiking season, which means it’s time to take out the snowshoes! I’ve done a decent amount of snowshoeing over the past few years and I’m hoping to do lots of snowshoeing this season, but I haven’t written about very much of it. So I decided to kick off the season by writing about one of my favourite local snowshoe trails: Hollyburn Mountain.

DSC07995

I have snowshoed Hollyburn on 3 separate occasions, so I’m pretty familiar with it. It’s one of the most well known snowshoe hikes in the lower mainland and with good reason. It’s not the easiest snowshoe trail, but you’ll be rewarded with amazing views and a good workout. I’ve hiked it every year since 2017, but the last time I hiked it was in January 2019, which stands out as one of my favourite times making the trek to the top.

The Hollyburn trailhead is located at the base of the Nordic Ski Area at Cypress (take the right branch before you get to the ski hill). You can rent snowshoes at the base, however if you rent them you will also be forced to pay the trail fee. If you snowshoe within the nordic area, you need to pay the trail fee whether you bring your own snowshoes or not, but since Hollyburn is located outside the trail area, you can snowshoe for free if you bring your own (or rent at the North Van MEC to avoid paying the extra cost)! It’s a popular trail, so you will be accompanied by lots of other snowshoers, but they usually disperse along the trail so it doesn’t feel too crowded.

20160123_135150

The trail started with a steep walk uphill and then flattens out somewhat as you walk along the edge of the cross country ski run. Overall it’s an uphill trail, but the middle stretch has a nice easy grade. It’s the last third of the trail that is the most challenging as you navigate up a wide corridor cut through the trees. Since Hollyburn is so close to the city, I tend to go with larger groups, so we take our time as we head up to the top. On this occasion I was also dogsitting Jordie the Australian Shepherd, so we had a bit of a slow start.

The hardest part of doing Hollyburn is deciding what equipment to use: snowshoes or microspikes. The first half of the trail is narrow and winds through the woods; it sees a lot of traffic so unless it just snowed, it’ll almost surely be packed down, making it ideal for microspikes. But once you reach the wide part of the trail, the defined track disappears somewhat and it’s a bit of a choose-your-own adventure up to the top, so it’s fun to have snowshoes. The last time I went I brought both.

DSC02309

My backpack has straps for carrying snowshoes, so I carried them up the first half and then switched over. Its definitely easier in microspikes, but maybe not worth it if the rest of your group is wearing snowshoes anyways because they won’t be able to keep up with you. If there hasn’t been any fresh snow in a while, you might be able to get away with spikes on the whole trail, but you never know what it’s going to be like until you get up there and it does give you less freedom to explore.

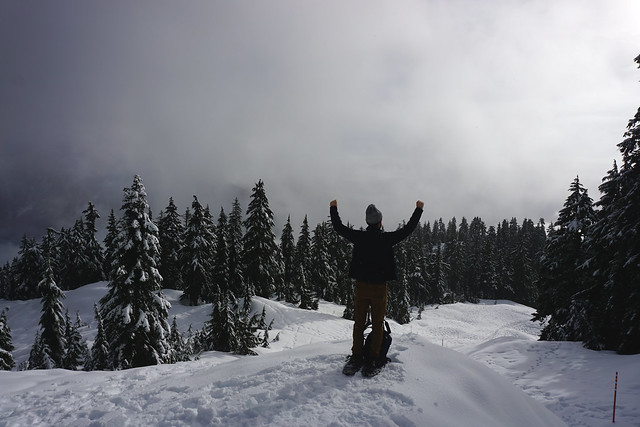
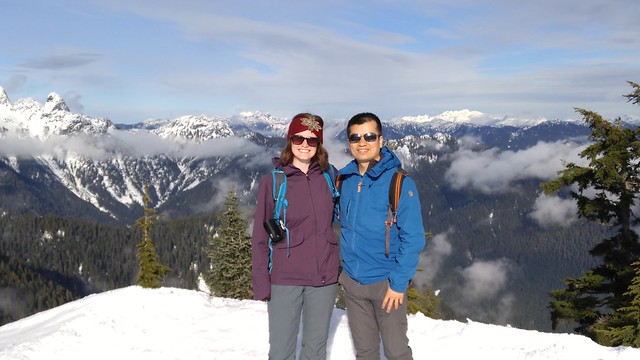
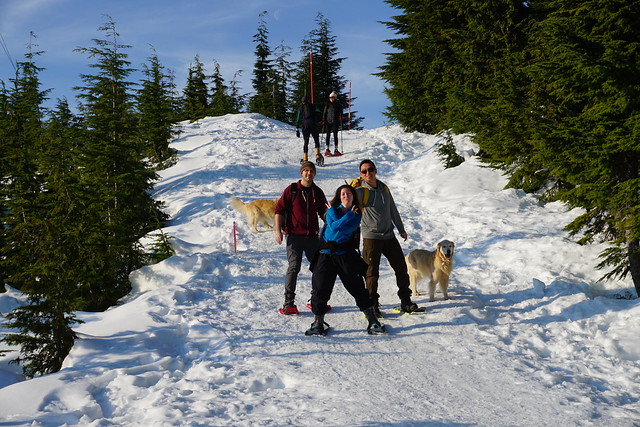
On this particular day it was a bit overcast, so we couldn’t see much of the view, but it still made for some fun shots as the clouds moved around us. It did eventually clear out at the top and we got a glimpse of the city through the clouds. On a clear day you also get a great view looking back at Cypress Mountain and the uninhabited North Shore mountains, which is my favourite view from the top. Jordie had a great time hiking up the mountain, but make sure to keep your dog on a leash. One time I saw a woman with a small dog who got fined by the park ranger for having her dog off leash.

DSC08029

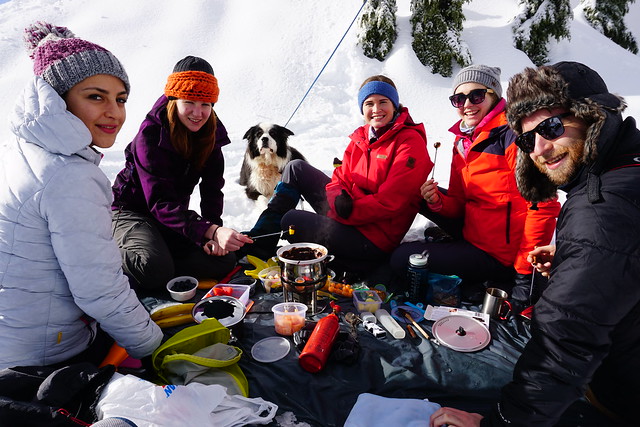
The highlight of the day for me though was that Brandon decided he wanted to have a fondue picnic at the top of the mountain. The idea sounded pretty epic to us so we each dutifully lugged a container of pre-cut fruit that Brandon doled out to us up to the top of the mountain and Brandon carried up his stove and fondue kit. I’m not going to pretend like we didn’t all poke fun of him with his full size backpack the whole way up, but we all ate our words at the top when we saw the huge spread he’d brought up for us! He melted a ton of chocolate and before we knew it we were enjoying chocolate covered strawberries, bananas, pineapple, mango, marshmallows, and some other mystery fruit, while the rest of the hikers gaped at us. Definitely one of my favourite snowshoeing experiences, so thanks Brandon!

DSC08013

The hike back down is where things really get interesting. I’m not gonna lie, the last section of the trail is pretty steep and you’re exhausted by the time you reach the top. Going down is less tiring, but definitely not easier. It’s really hard to go down the trail on snowshoes and most people opt to slide down on their butt instead. My word of advice for this is that if you’re going to slide down, take your snowshoes off. Otherwise they just create a hazard and make it really easy for you to break your leg. Snow pants are a good idea on the way down to stay dry, but don’t bring a sled of any kind. There’s actually signs up now prohibiting sleds and crazy carpets, but I did it once on a crazy carpet before said signs went up and I can confirm it’s dangerous. You pick up too much speed and it’s hard to control. Your best bet is to just walk sideways as much as possible until you get past the steep section, or slide on your butt.

Coming down is fun though because on the right day you get a great view looking down the mountain to the city! So overall a great snowshoe trail that I’ll definitely continuing doing! It’s close to the city, free, and has great views. The only downside is the crowds – if you’re going on a weekend, try and get there early if you want to get a parking spot!

DSC02300

5 Ways to Visit Lindeman Lake

Lindeman Lake is a short hike in Chilliwack Provincial Park, which has somehow ended up being one of the hikes I’ve done most often. It’s only a 3.5km trail round trip, but has 350 metres of elevation gain in under 2 km, making it a challenging hike, but not a long one. I’ve visited it twice as day hikes and twice as overnight hikes, where I explored several other trails in the area. I really think there’s something fun for everyone in this park, so without further ado, here are some of the different ways to visit Lindeman Lake and the surrounding trails!

Day hike to Lindeman Lake

Lindeman Lake is a great hike for beginners because like I said, it’s challenging, but it’s short. It’s a great early season hike because it’s at a low elevation, so the snow melts pretty fast, and you’ll get a great work-out on the hike to the top. It can get pretty busy (like most hikes), so I’d suggest getting to the parking lot early. The first time I visited, I was actually car camping in the provincial park, so this was a perfect easy day hike for us. One tip, the campsite area where the trail ends gets very little sun and while it provides a nice view, there are better lake views. If the water level is low enough, you can cross the logs at the river outlet to scramble over the rocks on the other side of the lake. But my recommendation would be to follow the trail at the lake edge back into the trees for another kilometre until you arrive at the far end of the lake. There’s a rock slide at the far end with lots of big rocks to eat your lunch on while admiring the view. In my opinion, this is the best view of the lake and it’s a great place to go swimming (which I’ve done twice… in May. It was really cold!)

Day Hike or Camp to Greendrop Lake

There is a great trail network in the Lindeman Lake area, so if you want to make it a longer day trip or turn it into a camping weekend, that is totally doable. If you continue past Lindeman Lake towards the back of the lake, the trail continues up a rock slide and through the trees until you reach Greendrop Lake. In total, Greendrop Lake is about a 11.5km round trip from the parking lot, or an 8km round trip from the Lindeman Lake campsite. There is wilderness camping at both Lindeman Lake and Greendrop Lake and both campsites have a pit toilet and a bear cache. Greendrop Lake can definitely be done in a single day, or if you’re looking to take your time and enjoy Lindeman Lake (like I was), it’s also great as an overnight trip. We camped two nights at Lindeman Lake and day hiked to Greendrop Lake on our second day.

Both campsites are first come, first serve. I’ve only ever camped there on the May long weekend and it’s always been busy, but we’ve always managed to get a spot. I expect it’s probably a little busier later in the summer though. I love the Lindeman Lake campsite because it’s such a short hike, so we brought up a ton of extra fun gear like hammocks and frisbees and those fancy inflatable couch things. Greendrop Lake is less busy than Lindeman, but I personally didn’t like that campsite. There’s not really a great view of Greendrop Lake and because it’s higher elevation than Lindeman Lake, it was a lot colder. Granted, I visited in May, which is really early, but there was still snow on the ground walking up to Greendrop at this time and the trail was a little more challenging to follow. Overall, I’d recommend camping at Lindeman or visiting as a day hike.

Day Hike or Camp to Flora Peak

The second time I camped at Lindeman Lake, we wanted to try a different trail, so we camped at Lindeman Lake and then day-hiked to Flora Peak. Logistically it doesn’t make the most sense because in order to go from the Lake up to Flora Peak, you actually have to backtrack back to the parking lot and take the right branching trail at the start of the trailhead. But we really wanted to camp at the lake, so we did it anyways, so ideally this probably works better as a day hike. Like I said, the trail goes in the opposite direction of the Lindeman Lake trail and is substantially more challenging than the Lindeman and Greendrop trails because of the significant elevation gain.

The Flora Peak trail is about 12km round trip from the parking lot, but has an elevation gain of ~1300 metres, which is significant! You will pretty much be climbing the entire time. There’s not much to see for the first half of the trail up until you reach a small viewpoint poking out through the trees. Continue for a little while after that and the trail will eventually spit you out on the ridge looking down over Chilliwack Lake. This was by far the highlight of the trail for me. The rest of the trail remains pretty open and you eventually start ascending Flora Peak in a loop before coming back to the ridge. Sadly for us, our trip ended on the ridge. Because it was May, there was still a fair bit of snow at the higher elevations. We used microspikes to get up to the ridge, but we decided not to ascend the peak because there were a lot of snow bridges and it would have been easy to fall through the melting snow. But it was worth it just getting to the ridge and we ate lunch with an amazing view of the lake.

Like I said, I did it as an overnight, but I do think it probably works better as a day hike. You can also snowshoe up to Flora Peak in the middle of winter. I would recommend spikes and snowshoes for this, but I haven’t tried it yet because the trail is unmarked in winter and there is avalanche risk, so I’m waiting until I complete the avalanche safety course. A great trail for summer though, just be prepared for a big climb!

Snowshoe to Lindeman Lake

So here’s the thing about snowshoeing to Lindeman Lake. Only do it if there’s been a lot of snow at lower elevations. It’s not very high and it doesn’t get a lot of snow, but it does get ice. If Vancouver has snow, I’d say its safe to grab your snowshoes and head up to the lake. In my case, there wasn’t much snow, but microspikes were definitely required. Me and my friends learned a big lesson on this trail. We showed up with snowshoes, but the trail didn’t have enough snow for it, so I was the only person with spikes, but we decided to go up anyways. We had a great time on the trail and made hot chocolate and had a picnic lunch at the top. But it’s definitely dangerous without spikes. My friend ended up falling about halfway down and broke her wrist. Fortunately she is a champ and we did have a first aid kit (ALWAYS take a first aid kit and your 10 essentials when going into the wilderness), so we were able to patch her up and help her down the mountain. We still had a lot of fun and have good memories of the trail, but definitely be prepared with the proper equipment.

As I mentioned in the trail above, you can also snowshoe up to Flora Peak in the winter, but again, be prepared. It’s unmarked, so bring a GPS and make sure you have avalanche appropriate training and gear and have checked the forecast.

Complete the Flora Lake Loop

This is the only one on the list I haven’t actually done, but if you’d like to knock out all the trails in one visit, this is the way to go. I’ve talked about two trails leaving from the parking lot, one which goes straight up to Lindeman and Greendrop Lakes and the second which branches off and goes up to Flora Peak. But the trails actually do form a 20km loop between all 3 points of interest, plus Flora Lake. 20km is doable in a day (I have a feeling it would make a great trail run), but it does have over 1000 metres in elevation gain, so I’d probably personally prefer to do it as an overnight trip. There are campsites at all 3 lakes, Greendrop is located at ~7km and Flora Lake at ~11km, so either would be an option if you were doing it as an overnight! Again, just keep in mind the season. I would wait until July to go if you want to make sure most of the snow is gone from the trail.