Snowshoeing Brockton Point

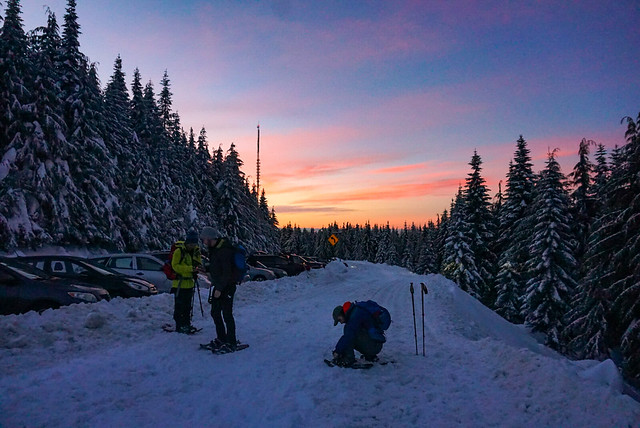
Vancouver got a lot of snow through the Christmas holidays in 2021 and when I returned from my trip to Newfoundland I was excited to get up in the mountains and enjoy it! So the first weekend back in January we woke up super early to be at Mount Seymour when the gate opened at 7am. We’re not quite on the ball enough to get there right on time, but we were able to get parking and hit the hill around sunrise. If you’re visiting these days, you will need to get a parking pass from BC Parks in order to park in the backcountry lot. These are available at https://bcparks.ca/reservations/day-use-passes/ and release at 7am, 2 days in advance of your trip. They are free, but will sell out on the weekends, so make sure to get it right away when it releases.

PSX_20220118_191016

Our desired destination was Pump Peak, which is located past the top of the ski lift, about mid-way to Mount Seymour. I hiked up the ski lift towards Pump Peak once in the summer on my way to Elsay Lake and I snowshoed to Brockton Point the previous winter during my avalanche training course. But it was pouring rain and foggy on that occasion, so I didn’t remember too much about the trek. It’s about 7km out and back to Pump Peak and we were planning to have breakfast at the top. We never ended up making it past Brockton Peak, which was for the best because we later learned that beyond Brockton Peak is avalanche terrain, so it is highly recommended that you take an Avalanche Safety Course and bring proper equipment with you if you are hiking past Brockton.

PSX_20220111_201923

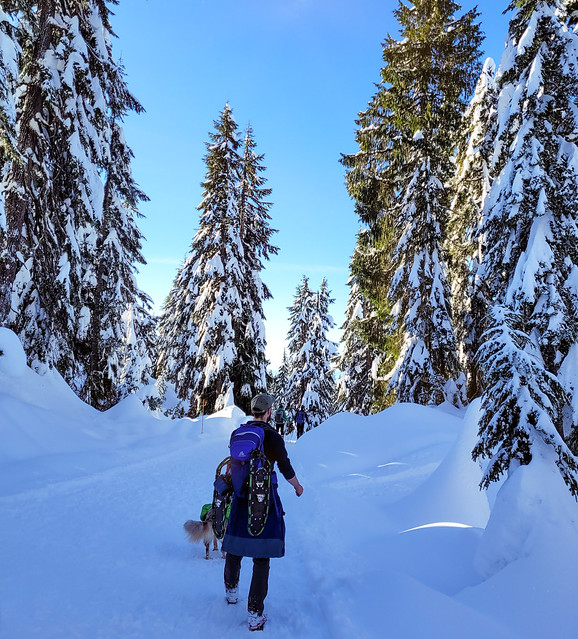
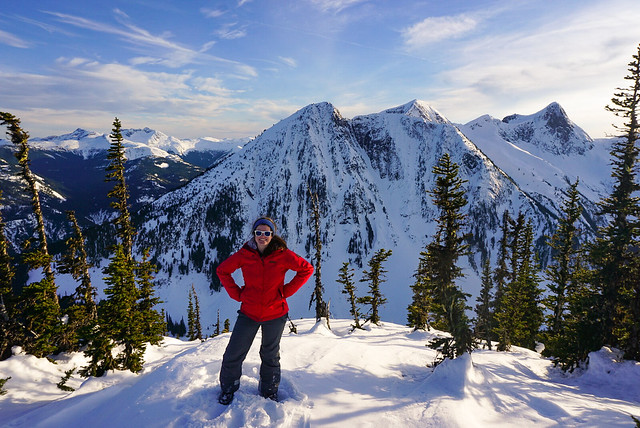
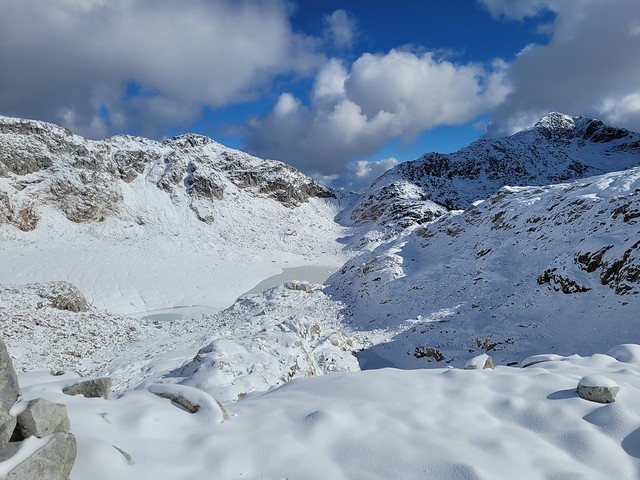
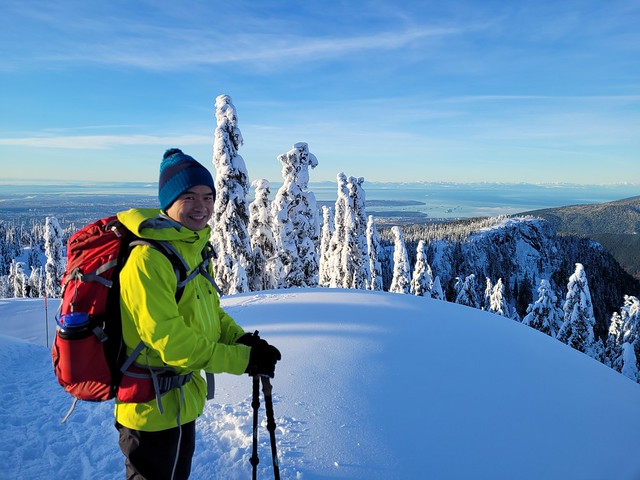
It’s a bit of a slog to snowshoe up to Brockton Point, which is at the top of the ski lift. The snowshoe trail runs parallel to the ski run, but never connects. It’s a wide trail and it’s a pretty steady uphill trek, but boy is it beautiful! The weather blessed us on our visit and it was a gorgeous blue sky day with several inches of fresh powder from the day before. Once you get up to Brockton Point, there are beautiful views in all directions and you can see both out to the backcountry and down to Vancouver. We brought our dog Sadie with us and she had a lot of fun in the snow. However, she is a reactive dog (which basically means she doesn’t like strange dogs approaching her) – this is an on-leash trail, but a lot of dog owners ignore the rule and let their dogs run free, so be aware if off-leash dogs make you or your pup uncomfortable.

PSX_20220117_221628

If you’re looking for an easier day, I recommend stopping at Brockton Point, which is about 4-4.5km round trip from the main ski parking lot, but add another 1km each way from the backcountry parking lot, which is where you’ll be required to park. We started to hike towards Pump Peak, which is easily visible from Brockton Point. The trail descends from Brockton to do a bit of a round about of Pump Peak to climb up from the the back. We started towards it, but as we snowshoed, we checked the time and realized we might not have quite as much time as we needed. We weren’t really that slow, but we weren’t super fast either. We only had a day pass for the morning and Carolyn’s puppy Jasper was home alone, so we wanted to be back down to the car for noon.

20220109_093505

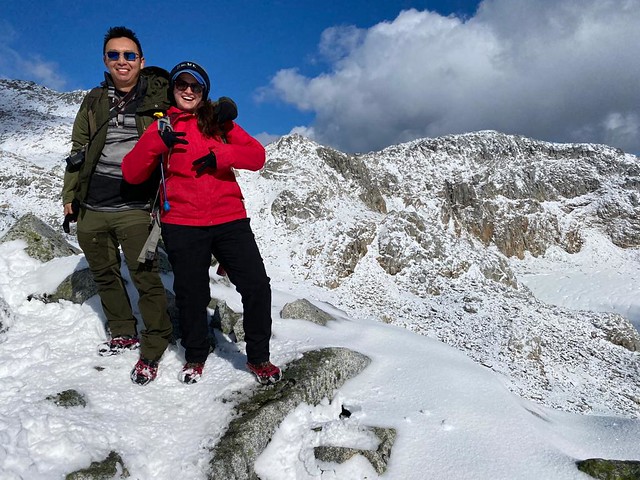
We could have pushed on to Pump Peak, but we would have had to turn around immediately upon getting there, so we decided to stop at a viewpoint near Brockton Point instead (which given the avalanche terrain concerns, was the right choice). We’d all brought our stoves to make breakfast and the views were gorgeous all along the ridge, so we didn’t mind missing out on the peak. Me and Seth made oatmeal, Carolyn and Steve made breakfast sandwiches, and Brandon outshined us all with mountaintop dim sum! It was a warm enough day with the sun shining down on us and we liked having a long relaxing break in the snow instead of rushing up and down to Pump Peak.

DSC00141_1

A few words of advice if you’re visiting Seymour – as I mentioned above, there is now a winter permit system to access the mountain. People have a lot of mixed feelings about this and I think the system has definite pros and cons, but it seems like it’s here to stay, so make sure to get your pass before visiting the mountain. Seymour Resort staff will be checking for permits at the base of the mountain, so you won’t get past the gate without a permit and you won’t get past the snowshoe parking lot without a ski pass. So be prepared for the extra walk up and back to the parking lot. I recommend going early because even with the new system, as this is a very popular destination and even with the pass, you might get stuck parking very far down the lot (which means more hiking added to your journey).

IMG-20220109-WA0011

A lot of people visit Seymour to hike Dog Mountain, which is an easier trail, but there are a lot of people recreating out to Pump Peak as well. The pass system has thinned out the trails a bit, which is nice, but be prepared to encounter lots of snowshoers, skiers, and dogs. A lot of the trail is multi-use, but there are a few places where it branches and skiers will often take slightly different routes, so my advice as a snowshoer is to follow the trail markers.

20220109_091301

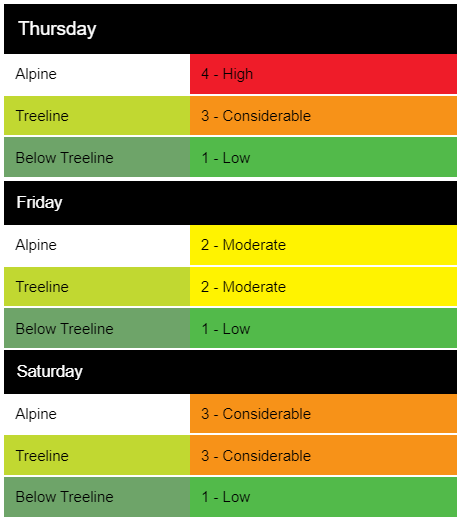
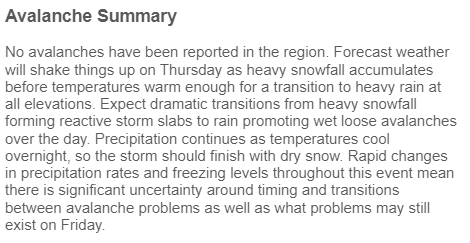
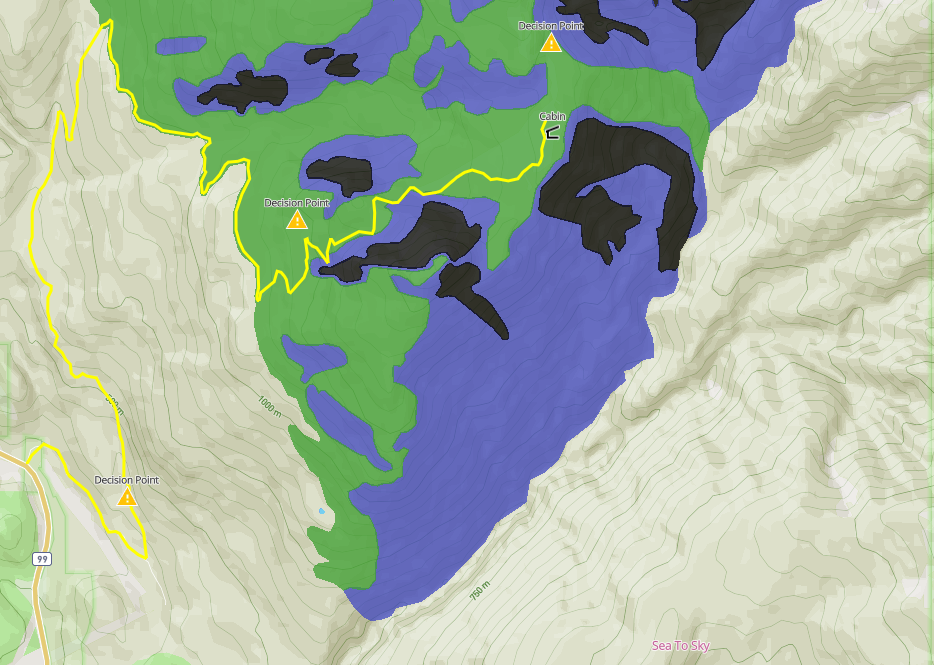
As mentioned, you are entering avalanche terrain if you choose to go all the way to Pump Peak. The trail along the ski resort is in simple terrain, so you’re probably mostly okay without avalanche equipment if you’re only going to Brockton Point, but eventually you will reach a sign with the avalanche danger rating just before Brockton Point. After this point, you are leaving simple terrain and entering challenging terrain, so make sure you are familiar with avalanche hazards and take the proper equipment with you. See my post on avalanche safety for more details.

DSC00146

But if you’re prepared, Brockton Point/Pump Peak make for a great snowshoe adventure! I still haven’t made it to Pump Peak, which is why I titled this point Brockton Point instead, but whenever I don’t finish a trail, I just say it was because I had to leave something to come back for! So one day I’ll be back to finish this trail for real!

PSX_20220118_204616

Let’s Talk: Avalanche Safety

Let me start this post with a disclaimer – I am a newbie to avalanche terrain and only have level 1 training. I am not a reliable resource for avalanche safety. I decided to write this post anyways because I think a lot of people go out into the backcountry in the winter without understanding the risk. I went snowshoeing and camping for 3 years and told myself I was safe because I “checked the forecast” and only went on popular or “safe” trails. I was pretty conservative, but in retrospect, I didn’t actually know how to read the avalanche bulletins and I was unknowingly venturing into avalanche terrain. Without taking a course, I feel it’s hard to get the proper education on identifying avalanche terrain and my main goal with this post is to convince you to take the AST1 course. If your internal reasoning sounds anything like mine above, trust me, take the course.

Growing up on the East Coast, I 100% didn’t understand the threat that avalanches can pose. I figured they were pretty rare and the odds of me getting caught in one were low. In reality, in 90% of avalanche accidents, the avalanche was triggered by the victim in the accident. So while your odds of getting caught in a naturally triggered avalanche are slim, it’s easier than you think to trigger one. Human triggered avalanches are more commonly triggered by backcountry skiers and boarders rather than snowshoers because of the terrain type, but snowshoers are at risk from other phenomenon’s such as cornices. In addition, avalanche risk is generally at its highest after major snowfalls and that tends to be when lots of people crowd into the backcountry to enjoy fresh powder.

PSX_20210314_180305

Even if you don’t have avalanche safety training, if you’ve spent any substantial time snowshoeing, you are probably familiar with the avalanche bulletin. The bulletin is a regional mountain forecast issued by Avalanche Canada that tells you the avalanche danger level, problems to look out for, and additional details on the weather and snowpack. Users can also submit reports from their trips on any incidents or avalanche indicators they witnessed, so it’s a useful resource for assessing risk.

The bulletin has 3 parts that are all equally important, but unfortunately most people (myself included in the past) take one look at the danger rating and never make it past the first section of the bulletin, which contains a 3 day colour-coded rating system. There are 5 levels: low, moderate, considerable, high, and extreme. Level of caution depends on the user. Before I did the training I would comfortably go out in low and moderate conditions, but not considerable. However, I know a lot of users view “considerable” as fine and only stay home in high and extreme circumstances. After doing the training, I wouldn’t venture into avalanche terrain above low unless I had appropriate safety gear.

While it’s great to check the danger rating, the other sections of the report are just as important, particularly the problem areas. These tell you what avalanche risks to look out for, where to look for them, and how catastrophic they might be if encountered. For example, the problem below tells me that the chance of a storm slab avalanche in the treeline and above is actually very likely on all aspects of the slope, but not likely to be larger than a size 2 avalanche. But for the record, a size 2 avalanche is still fairly large and can kill you, so don’t be deceived by the fact that the scale goes up to 4.

Finally, the details section tells me what to expect in terms of weather and snowpack and how accurate the bulletin is. The summary below indicates that heavy rain and snow result in uncertainty around avalanche problems and inclement weather makes the mountains a particularly dangerous place to be at that time. The forecaster indicates further in the report (not shown) that because of significant precipitation, they only had a moderate level of confidence in their predictions, so they should be taken with a grain of salt and other risks could be present.

For me, the avalanche bulletin has become a critical part of my avalanche training and planning because it helps me in making decisions about when to go out or not and what to look for if I do go out. There are lots of ways to mitigate your risk in the backcountry. One is by avoiding avalanche terrain altogether – ie, if I’m not going to go to terrain where there is a risk of avalanche, then I don’t need avalanche safety training. There are some trail maps on Avalanche Canada that indicate the different types of avalanche terrain so that you can avoid challenging or complex terrain. But the bigger problem is that without training, I think it is somewhat challenging to identify what isn’t avalanche terrain. There is often information available on the internet about specific trails, but you are most protected if you’re able to identify avalanche terrain and hazards yourself (although I still highly recommend doing specific trail research as well).

Which brings me to the second part of avalanche awareness – staying safe by avoiding avalanche risks in the backcountry. Most of the terrain I’ve travelled through has been simple terrain, meaning low angle or forested terrain with lower risk of triggering an avalanche (beware though, avalanches can happen in the trees too, so don’t assume you’re safe just because you’re in the forest). However, I did unknowingly travel through some slightly higher risk terrain before getting my AST1. For example, Elfin Lakes and Zoa Peak are two popular winter snowshoe trails – the Elfin trail is all in simple terrain (green), but it does pass under some challenging and complex terrain (blue and black) that could potentially place you in the run-out zone. Likewise, if you go all the way to Zoa Peak, you pass through a section of challenging terrain, but if you just go as far as the sub-peak, you stay in simple terrain. Knowing how to read the terrain and identify potential problems or hazards (all taught in the training), allow you make smart choices when recreating.

For me, these were the two parts of the training that were most eye-opening. Sure, you also learn how to use a beacon, probe, and shovel to conduct a rescue, but so much of the training is about avoiding ever having to rescue someone or be rescued. The more you learn about something you didn’t know very much about, the more you realize how little you actually knew. This was very much the case for me with avalanche training. I was completely blind to so many of the risks that it would have been so much easier for me to walk into a scenario that I didn’t know how to escape from. Now, though I’m still a learner, I can at least acknowledge the magnitude of the information I don’t know.

Finally, the last part of the training is about avalanche rescue. What to do if the worst has happened. You learn to mitigate risk further going around avalanche terrain and by making sure to stagger your party on those occasions when you do have to pass through avalanche terrain so that if there is an avalanche, no more than 1 person will be buried, leaving multiple people to initiate rescue. If you’re not able to be rescued by your companions, it’s very unlikely you will be rescued at all. 91% of people survive if rescued within 18 minutes, after that survival drops to 34% in burials between 19 and 35 minutes.

IMG-20200301-WA0035

For this reason, who you recreate with is extremely important because you are potentially relying on your friends to save your life. For this reason, I did my AST1 course with 3 other friends and we practiced together on our snow camping trip last year. I don’t yet own my own beacon and probe (just a shovel), but I have been renting them since I did the training and hope to buy one soon. It’s great if one person in your party has training and can identify hazards and mitigate some of the risk, but unless you all have beacon, probe, and shovel and know how to use it, you will likely be shit out of luck in a real emergency. Fortunately, there are lots of AST1 providers, so I recommend signing up for a course to learn all about avalanche safety and prioritize your safety in winter conditions in the backcountry. I did my course with The Mountain School.

*stats from National Geographic via: https://www.dosomething.org/us/facts/11-facts-about-avalanches#fn3
**since writing I have acquired my own probe and beacon!

Hiking Seed Peak

Over the years it’s become a bit of a tradition that me and Brandon always go hiking together on the Thanksgiving long weekend. The forecast was calling for gorgeous weather on Thanksgiving Monday, so we got to planning where we wanted to hit up this year. Brandon had a long list of hikes to try, but once we started doing a bit of research, we found it to be a bit challenging to find a suitable hike for the conditions.

Because I believe in always putting ample research and consideration into every hike you do, I’ll walk your through our process. First we crossed off some of the longer and more strenuous hikes from Brandon’s list. One of the hikes was a whopping 1800m in elevation gain and we were concerned about having enough daylight hours to do such a long hike. Next we took into consideration the weather. It had been uncharacteristically cold the week previous and in true Vancouver fashion, it had rained all week. A bit of research confirmed our suspicion that many of the local peaks were now covered in snow. Brandon was keen to do Tricouni Peak outside of Squamish, but the two routes up to summit involve either fording 2 creeks, or crossing what is described as the “mud gauntlet”. Both of these options sounded like a bad idea given the amount of rain that had fallen earlier that week and the peak was still quite high in elevation (meaning more snow), so eventually we landed on Seed Peak.

20211011_155947
4WD access road to the trailhead (E110)

Seed Peak is a less trafficked trail off of Mamquam FSR in Squamish. It was 300m lower in elevation than Tricouni, and while we knew there would still be snow, we guessed the access road would be snow free and overall make for a shorter, less strenuous hike. After having done the hike, I wouldn’t say it’s not strenuous, but hey, that’s how we ended up giving it a try!

Mamquam FSR is in good condition and any vehicle should be able to make it to the end of the road. AllTrails actually lists this hike as 19.5km starting from the end of Mamquam FSR. Brandon hates hiking on anything he could have driven, so we took his 4runner a fair bit further than that. From the end of Mamquam, you branch off onto E100 and then E110 to get up to the trailhead. E100 is a bit steep at the beginning, but still in pretty good shape, I think most SUV’s and AWD could make it up to the end of E100. We were able to get Brandon’s car all the way to the end of E110, but I would advise hiking up the last little switchback (about 300m). There’s a pullout before a steep rugged section and I didn’t think it was really worth risking the drive up that part.

IMG-20211011-WA0069
Logging at the trailhead

I would only recommend Seed Peak if you have good wayfinding skills. It’s pretty intuitive to know where to go, but there are parts without a well defined trail (and some parts with no trail), so if you’re hopeless with navigation I’d give it a pass. The most confusing bit for us was finding the trailhead. This is an active logging road and there has been some slashing between the road and the trailhead, which run parallel one another for a few hundred metres. I suspect they weren’t supposed to log onto the trail, but it looks like it happened nonetheless. We did some crawling over the logs to try and get to the trail, only to miss it entirely and then hike up the edge of the slash until we found trail markers. My recommendation would be to walk right to the very end of the road, from there you’ll see a trail marker, you may have to climb over a few logs, but you can pick up the trail a lot easier from there rather than trying to cut across all the downfall.

20211011_110354

After that it’s pretty easy to follow the trail markers up about 1km to the sub-alpine. This was the only part of the trail that didn’t have snow on it when we did it. The snowline started around 1400m. The great thing about this hike is that only the first 1km is in the woods, after that you have views for pretty much the entire hike! It was the main reason we picked it, because we figured if the conditions were too bad or snowy to do the whole thing, at least we still had a good chance of seeing some nice views early in.

It is a challenging trail though. It’s not been the easiest hiking season for me as I’m still pretty out of shape from the pandemic with all my normal exercise activities still being cancelled (or high risk). It’s 12km round trip to the top of Seed Peak, but the elevation gain is misleading as there is a lot of up and down and it is quite steep. Fortunately we were prepared with microspikes as we definitely couldn’t have done the trail without them given how steep it is. I was a little bit concerned as we were going up that it would be a struggle to come back down, but it was manageable with the spikes.

20211011_121231

After you pop out of the woods, you immediately start a steep climb up to the first peak. I can’t see a name for this peak on Gaia, but it has great views if you’re looking for a shorter hike. It’s very flat on the top, so we wondered around snapping photos before continuing on. This trail is also known as Pinecone Trail, so you might see it listed as that on some trail apps (Gaia included). The reason it’s called Pinecone Trail is because after the first peak, you cross the border into Pinecone Burke Provincial Park! I was particularly excited about this because I live in Coquitlam and go hiking in Pinecone Burke all the time.

For a bit of history, Pinecone Burke was first established in 1995 and has the unfortunate legacy of being one of BC Parks least funded parks. Despite it being a huge park located right in the lower mainland, it receives very little upkeep or promotion. Most of its users access it from Harper Road on Burke Mountain and it’s popular for mountain biking. There are a handful of trails in that area, but otherwise the park is mostly wilderness. It’s sandwiched between the Coquitlam Watershed and Pitt Lake in the south end, and continues north until it intersects with the south end of the much more popular Garibaldi Park. There’s limited access in the north end and Seed Peak is one of the only trails I can find exploring this end of the park, so I was excited to see a completely different side of it.

20211011_110712

After the first peak, the trail has a steep false descent, after which you climb up to a second smaller peak before beginning the real descent. We were one of 4 groups on the trail, so it was very empty. However, we were the last group, so we didn’t have to make tracks and just followed the trail the previous groups had created. This may or may not have been a good thing. Whether or not there is an actual trail in the summer is hard to tell when it’s covered in snow, so we don’t know how much we were actually walking on the real trail and definitely went through some vegetation. The upside is that all the rocks were covered in snow, so we didn’t have to navigate any boulder fields and mostly just cut a path straight down. We were definitely in the vicinity of the intended trail (according to my GPS), but I’m not sure if it would be any easier on a warmer day.

IMG-20211011-WA0025

The descent is a bit of a bummer when you know you have to continue climbing again. As you start to climb up the next peak (also unnamed on my GPS), you do get a few glimpses down to the beautiful jade waters of November Lake. It was a bit of a slog going up, but you’re surrounded by beautiful views on all sides. Unfortunately, there’s still one more peak to go after that. It took us about 2.5 hours to make it to this section, we continued a little bit further to get up to this hump before Seed Peak, but we opted not to go the whole way up Seed Peak. We did have enough time, but we could tell it was still a bit of a slog to get up there and we wanted to conserve some energy for the way down. So instead, we had a nice long lunch break in which to enjoy the view!

IMG-20211011-WA0040

If you do go the whole way, I think you get a view down to Pinecone Lake, which you can’t see from below because there’s a big ridge between Seed Peak and Mount Gillespie that blocks it. But there are still incredibly gorgeous views down into the valley and the snow-covered wilderness. I’d definitely be keen to return in the summer and camp along the ridge, although there’s limited water sources so you would have to come prepared for that.

Either way, we had a great time hanging out and filmed some fun videos to pass the time. It was definitely cold; I had a lot of layers, so my body was warm, but I had worn my hiking boots instead of my winter boots and unfortunately my feet did get wet from the snow getting trapped between the sides of my microspikes.

20211011_132116

We thought it might take us even longer to hike back because really steep sections are often worse on the downhill, but fortunately it wasn’t too bad and we cut about a half hour off our time on the way back. I was exhausted on all the uphill sections though, so I definitely need to start doing a bit more exercise on my non-hiking days. The trickiest part is that there is one rope section on the first peak (early in the hike). It’s even worse going down and we all guided each another on foot placement on the way back. I had been debating bringing Sadie on the hike with me, but I’m glad I didn’t. We read there was one rope section and I was worried about her on that part and with all the snow. I think a dog could get up the rope section, but I honestly don’t know how you would get them down. Overall there’s a lot of narrow edges and cliffs, so I would have been very weary with Sadie. I would likely have to let her off leash for my own safety in sections and I’d be worried about her making a mistake near a cliff edge. Also, we saw a GIANT black bear on the drive in, so they are definitely still active.

20211011_132815

Overall, we were hiking for just shy of 6 hours, so it was a great end-of-season hike. It’s about an hour drive from Squamish and we made it back to town around 5pm. The downside was there was an accident on the Sea-to-Sky. We had dinner at Howe Sound Brewing to try and avoid the traffic back-up, but it had only gotten worse and we ended up sitting at a standstill for 45 minutes. I think it was shortly after 9pm when I finally made it home, making for a bit of a long day! Either way, I’d recommend checking out this hike earlier in the season next year if you have 4WD or high clearance and like a challenge!

IMG-20211011-WA0054