A Guide to Snow Camping Near Vancouver

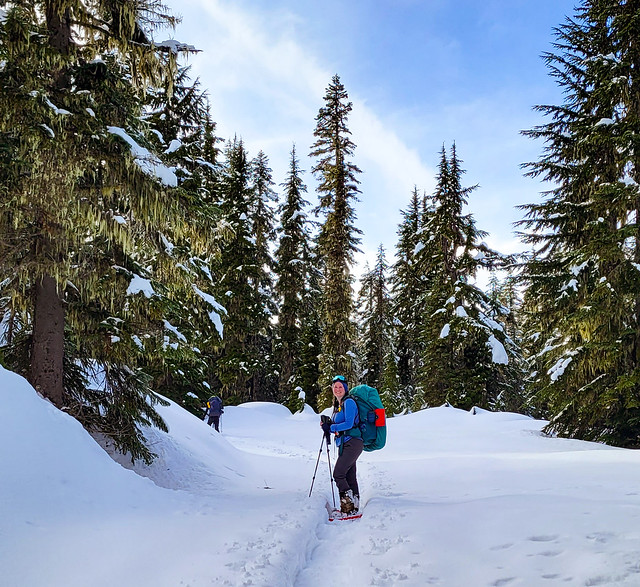
Camping is one of my favourite things to do in the summer, so I would always be sad when the season ends and I’d have to wait a whole year to sleep in the backcountry. I quickly came to the conclusion that I didn’t need to wait and decided to get into snow camping! 

It’s definitely not for the faint of heart. It is much more intensive than camping in the summer and it is a lot of work to stay warm. Not to mention, quality 4-season camping equipment is not cheap. I’ve written an entire guide to winter camping and how to stay safe and warm. Once you’ve established you’re ready to try winter camping, the next dilemma is assessing where to go! First check out my guide to avalanche safety and then take a look at some of these recommendations.

Lone Duck I Campsite

A small log cabin at Lone Duck II Campground covered in a fresh layer of snow on the ground and cabin, with tall trees with the sun peaking out behind the trees, in E.C. Manning Provincial Park in British Columbia, Canada.

This is my number one pick for snow camping if you’re brand new to it. The Lone Duck I Campsite is located in Manning Park and is a first-come-first-serve site through the winter. It has a field for tenting and a communal hut with a woodstove for eating and hanging out. You do need to bring your own firewood, but the benefit is that this campsite is only a couple hundred metres from your car. So if you don’t have the money to invest in quality winter camping equipment, you can just lug in a bunch of gear from your car and not have to worry about fitting everything in your backpack. The site is located right next to Lightning Lake and has immediate access to cross-country skiing and snowshoeing trails. Permits are available through camping.bcparks.ca

Mount Seymour Group Campsite

Mount Seymour Group Campsite on a sunny day in Winter with snow on the ground and the warming shelter and picnic tables in Mount Seymour Provincial Park, BC.

As the name suggests, this is a group campsite, so if you’d like to use it, please make sure you actually have a group. But if you do, this is one of the easiest and closest options to Vancouver for snow camping. Its located off Mount Seymour road, just below the ski resort. The site is a large field with a warming hut and outhouse, only 100 metres from the parking lot. Similar to Lone Duck, you can use the hut to keep warm and it’s easy to carry in lots of warm gear. Reservations are required and can be booked through camping.bcparks.ca

Falls Lake Campsite

Falls Lake is my top pick for beginners that want to go backpacking because it’s only a short hike from your car. It gives the illusion of remoteness, but in a pinch, if you’re really cold in the middle of the night, it’s not too far to hike back out. Falls Lake is located off the Coquihalla Highway at the exit for Zoa Peak. In the summer, you can drive almost to the campsite, but the road isn’t plowed in the winter, so it’s a short ~2km hike to the lake along the unplowed road. There is an outhouse at the lake and reservations or permits are not required.

Lightning Lakes

A group of hikers have set up a snow camp in a clearing in the forest, with a 4-season tent and snowshoes and shovels around at dusk. There are many snow covered trees on the mountain in the background at Lightning Lakes in E.C. Manning Provincial Park in BC.

Lightning Lakes is another great option for snow camping when the lake is frozen. In the winter, the lake usually completely freezes except around the bridge between the first and second lake. Technically, there’s no official campground here, but there is some open forest area at the end of the second lake (~3km hike) where you can set up camp. I know some people will head as far as Flash Lake to get access to the summer campsites, but the trail to Flash Lake is adjacent to steep terrain where there could be overhead avalanche risk, so I haven’t gone past the end of the second lake. There is no outhouse, so only consider this location if you’re comfortable digging winter catholes. A permit is required from camping.bcparks.ca

Red Heather 

Red Heather hut is located halfway to Elfin Lakes in Garibaldi Provincial Park. You can’t camp here in the summer, but snow camping is permitted in the winter. It’s a 5km hike up an old forestry road to get to the site. This hike is a bit longer than the other beginner options and is all uphill, but I include this in beginner backpacking because there is both a warming hut and an outhouse at this site. You cannot camp in the warming hut, you must set up somewhere in the meadow, but it’s a great option to have access to the hut. Chains are required to drive the last 2km to the trailhead (or you can park at the lower lot) and a backcountry permit is required from camping.bcparks.ca

Ottomite Peak

Photo of a snowy winter scene, with snow covered trees and mountains in the background, taken from Ottomite Peak in the Coquihalla Summit Rec Area in British Columbia, Canada.

Ottomite Peak is located off the Coquihalla Highway at the Zopkios Rest Stop. This trail is a bit longer than the beginner trails noted above and has uphill travel to the peak, but overall it’s not a challenging trail. It’s ~4.5km along an old forestry road and it passes through simple avalanche terrain only. There is no official campsite, but there’s a nice place to pitch a few tents at the top of Ottomite Peak. The area is more popular for ski touring, but I was the only one camping there where I visited. There’s no permits for this option, but also, no outhouse.

Zoa Subpeak

A female backpacker smiles at the camera from the door of her big orange 4-season tent, and she snow camps at Zoa Subpeak, surrounded by snow and mountains in Coquihalla Summit Rec Area in British Columbia, Canada.

Zoa Subpeak is also located off the Coquihalla Highway and shares the same trailhead as Falls Lake. Park on the side of the road and hike in over the unplowed forestry road. Once you reach the summer parking lot, you can hike up along Pipeline Road until you hit the winter trail to Zoa Peak through the trees. The key with this trail in the winter is to only head as far as the subpeak, which is ~5km. The trail to the subpeak is a bit steep through the trees, but it’s all in simple avalanche terrain. The trail to the actual peak goes through challenging terrain, so I don’t recommend it. There’s lots of open space near the subpeak to camp for the night and I’ve heard it has better views than the actual peak. There’s no permit required, but again, no outhouse available either.

Poland Lake Campsite

An orange tent is set up in the snow for camping with snowshoes and shovels outside the tent and a large snow covered lake and snowy trees in the background, on a sunny blue sky day at Poland Lake in E.C. Manning Provincial Park in British Columbia, Canada.

Poland Lake is located in Manning Provincial Park and has an actual campsite. The winter route to the campsite is a bit tricky because you can’t park at the ski resort overnight, so you have to park at Strawberry Flats. You can either walk along Gibson Pass Road, or you can take the trail that runs parallel to the road. However, it’s important to get off the trail partway to avoid going through the middle of the ski resort. You have to hike along the side of a beginner ski run to get up to the official trailhead. This trail is all in simple avalanche terrain, but I noticed a fair bit of overhead avalanche risk when I visited, so I think it’s better to have AST. The campsite is on the far side of the lake, but we opted not to hike across the lake, so I can’t confirm if there is actually an outhouse there. This trail is almost 8km, so it’s definitely a more challenging option due to length. A backcountry permit is required from camping.bcparks.ca

Elfin Lakes Campsite or Hut

Elfin Lakes is a very popular campsite, which people can misconstrue to mean that it’s safe to go there. In the winter, you can opt to either book the hut (which is very popular and books early), or camp in the snow. At 11km, this is by far the most challenging trail on the list. 11km may not seem that long, but it can be very tiring in deep snow with a large pack. Plus, a lot of the trail is located along the ridge, which can be windy and have poor visibility. But the main thing to be aware of is that this trail passes through challenging avalanche terrain, so I don’t recommend it without AST. If you are comfortable in avalanche terrain, I highly recommend this campsite and trail, as both are very beautiful. Reservations are required for the hut and a permit is required for camping from camping.bcparks.ca

Pump Peak

A group of snowshoers head downhill in winter on a snowy mountain with snow covered trees and a view of Vancouver city in the background from Brockton Point in Seymour Mountain Provincial Park in British Columbia, Canada.

I left Pump Peak for last because this trail and peak are both located in challenging avalanche terrain (whereas Elfin Lakes just passes through challenging terrain). Pump Peak is a super popular trail due to its proximity to the city and the incredible views. It definitely attracts a lot of people without AST, but I don’t recommend camping here without it. It’s a great option if you want to stay near the city, but I wouldn’t consider it a beginner trail. Once you feel comfortable in avalanche terrain and camping, check this one out. Permits are not required, but you do need a day pass in order to park at the base of the mountain, available at camping.bcparks.ca

Mount Seymour Snow Camping

This post will be a bit different from my usual snow camping trip, but there’s so many ways to enjoy the outdoors and I like highlighting all of them! It is on my bucket list to one day snow camp on Pump Peak, but if you’re nervous about the exposure (and avalanche terrain) and want to get out with a group, there’s an excellent alternative just below the base of the ski resort! 

This trip was done with my Trex unit, which is a special branch of Girl Guides of Canada that is focused on outdoor adventure for teenagers. It’s not part of the core guiding program, which is for all ages (Kindergarten to grade 12), and is more well rounded and focuses on art, STEM, physical and mental well-being, and activism, in addition to camping skills. Trex is for teens (including girls, trans-girls and non-binary individuals) who want to go to the next level with their outdoor skills.

20250111_112344

This winter we reserved the Mount Seymour Group Site to practice snow camping! The site is located next to the P1 Parking Lot and is closed to the public unless you have a booking. It’s a very economical option for non-profit groups, but a little more expensive for others (but still very reasonable). The site has a warming hut with 6 picnic tables and a large field to camp in. Unfortunately, our camp was at the end of a week of particularly warm weather, so there was very little snow on the ground. We weren’t able to practice making snow shelters, but it was still a good opportunity for Trex to camp outside in below zero conditions in a safe environment. 

We were able to hang out and eat all our meals in the shelter, which has a wood stove. So it was easy to keep warm before bed. As a precautionary measure, one of the guiders (in this case me) slept in the hut all night to keep the fire going in case of emergency, but all members did great overnight and everyone slept in their tents for the full night! 

PSX_20250113_175017
20250111_225808

Given the proximity to Seymour, we were able to take advantage of the nearby recreation activities. We walked up the road to the ski resort base and spent some time playing in the snow along the trails. We didn’t do a full hike, but nearby options include snowshoeing Dog Mountain or Brockton Point, or exploring within the Mount Seymour trails. We got some wet snow in the morning, followed by sunny breaks in the afternoon and an absolutely gorgeous morning on our second day.

There’s not too much else to share about the site. Like I said, you do need a booking to stay there. A day pass is required in the winter to visit Mount Seymour, but you can just use your permit for the group site to get up the mountain. It’s only a minute walk from the parking lot at P1 to the site and there is an outhouse. There’s also a tap, but it’s turned off in the winter, so make sure you bring all the water you need with you. We used snow melt for washing dishes, but didn’t want to drink it since there hadn’t been any fresh snow in at least a week.

20250111_151941
20250111_152818

The only downside is that people will continually walk through your site despite 3 signs instructing them not to and informing of a fine. Please don’t do this, especially when youth groups are using the site. I was there with minors, and while I know you just want to take a photo with the pretty snow on the trees, I have a responsibility for their care and can’t have randoms walking around the site where they sleep, taking photos. The site was closed for 2 years during COVID, so people seem to think it’s just fair game now. 

Overall, we had a great time. We’ve also stayed at the Lone Duck group site in Manning Park. I would say the Lone Duck site is nicer (it’s more private, gets more snow, and it’s right on the lake), but the real benefit of Mount Seymour is how close it is to the city. A great option if you’re looking for a safe way to try snow camping!

Ottomite Peak Snow Camp

I didn’t do much hiking in the Fall last year, but as soon as winter hit I’ve been out exploring in full force! I only did one snow camp last year and was really keen to try and fit 2 in this year. It’s always a challenge because I like to ski a lot too and the snow season is so short.

Fortunately, the weather aligned for us to make a trip out to the Coquihalla in early February. After a very snowy December, it’s been a pretty warm start to the year and all the local mountains were above zero degrees. The Coquihalla can get cold, but it reliably has snow, so it’s one of my favourite places to go in the winter. To date, we’ve been to Falls Lake and Zoa Peak.

PSX_20230205_201133

It rained most of our drive up the Coquihalla, but it switched to snow just before we got to the Summit Rec Area, which was very lucky. I’d never even heard of Ottomite Peak, but Carolyn came across it somewhere and it’s a pretty low risk trail, so we decided to check it out. You park in the lot at the base of Yak Peak (across the road from the Needle Peak parking lot) where there is a really nice rest stop bathroom. The trail starts around the edge of the bathroom and runs slightly parallel the highway as you ascend up towards the peak.

20230204_135419

I tracked just over 4km from the parking lot to Ottomite Peak. The trail is mostly in the trees and is all simple avalanche terrain until Ottomite. It’s also popular for ski touring and most of the skiers were continuing past Ottomite to Iago Peak. We considered it, but the trails goes into challenging terrain near Iago Peak and the avalanche risk was considerable in the alpine at the time, so we opted not to. There was a beaten track until the branch to Ottomite Peak, which has a really beautiful view and would also be great for camping.

20230204_142234

The trail continued on towards Iago, but we had to break the trail to Ottomite Peak. It’s pretty rare to have to break trail in Southwest BC, the only other time I’ve done it was when we snow camped at Poland Lake last winter. It’s a lot more work, but fortunately it’s not too far to the peak of Ottomite Peak. Overall it took us about 2 hours from bottom to top. There’s a great view of the north mountains from Ottomite Peak, so we decided to camp at the top.

20230204_145933

As usual, there were 4 of us on the trip, but Steve couldn’t make it, so our friend Marie accompanied Carolyn instead! Brandon and I shared his big 4 season orange tent as usual, and Carolyn experimented with her summer tent. She typically uses her 3 season MSR Elixir, but she has a non-freestanding 2p Durston tent that she wanted to try out. It took her a while to get it set up properly as it’s a bit tricky since it relies on using your hiking poles and tension to stand. But she managed to get a good pitch and said it worked fine for the night.

20230204_154708

The weather was surprisingly nice on Saturday. We were expecting it to be overcast and snowy, but it cleared up a lot while we were hiking in and we actually got some blue sky and sun while we were setting up. Eventually the clouds moved back it, but we got some really lovely views from the peak, which we easily could have missed.

20230204_172103

We built a nice big snow kitchen where we hung out for the better part of 4 hours while melting snow and preparing supper. Marie made hot lemon whisky and I made Kahlua hot chocolate bombs for happy hour and Brandon made our favourite thai chicken curry for supper. Then we had Marie’s apple crumble for dessert, so it was quite a spread! If you think me and Carolyn got off easy, I made lunch sandwiches and she made us homemade egg mcmuffins for breakfast!

20230204_172312

The temperature was really hovering around zero, so it was one of our warmer snow camps and we were lucky it didn’t rain to be honest. We stayed up until around 8:30pm, which is pretty late for snow camping, before hitting the sack for a long night’s sleep. I slept pretty good early in the night, but then I was treated to the symphony of Brandon’s snores later in the night. The moon came up overnight and I enjoyed a beautiful view when I got up to pee, with the moonlight reflecting off the snow, it was super bright and I didn’t even need my headlamp.

20230205_092132

Otherwise it was a low key morning and we packed up our gear and headed back to the parking lot. It was a lot faster hiking out and we stopped in Hope on the way back for the Blue Moose Café. Considering how little known this trail is – I really liked it! It is in avalanche terrain, but it’s pretty low risk terrain, so I think it’s good for beginners. I’d definitely like to go back some day and go all the way to Iago Peak, or maybe revisit in the summer, when you can hike several peaks back into the wilderness! Overall, another successful trip!

20230205_111557