Top 10 Unbeatable Trails in Southwestern BC

I’ve been living in British Columbia for almost 11 years now. Every 2 years I compile a list of my top 10 favourite hikes in Southwestern BC during that period. This means that I have almost 300 hikes in my overall hiking log and 50 hikes in my “favourites” list. I decided to create one more ultimate top 10 list using only the trails from my last 5 compilation posts (Part 1, Part 2, Part 3, Part 4, Part 5). Most of these are very well known hikes, with good reason, though there are a few slightly lesser known trails. After a decade living on the West Coast, these are the trails that I’ll never stop recommending!

#10 Howe Sound Crest Trail

DSC07622

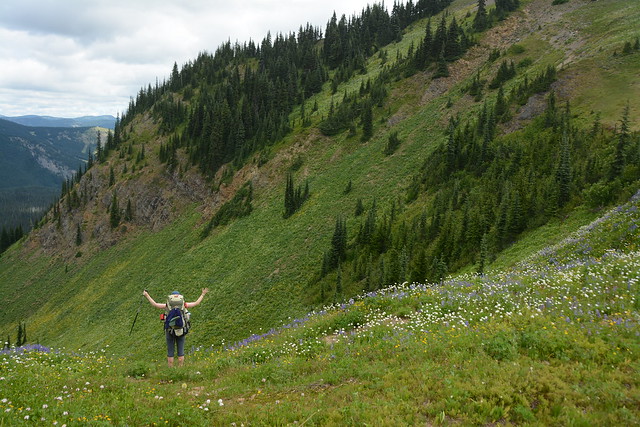
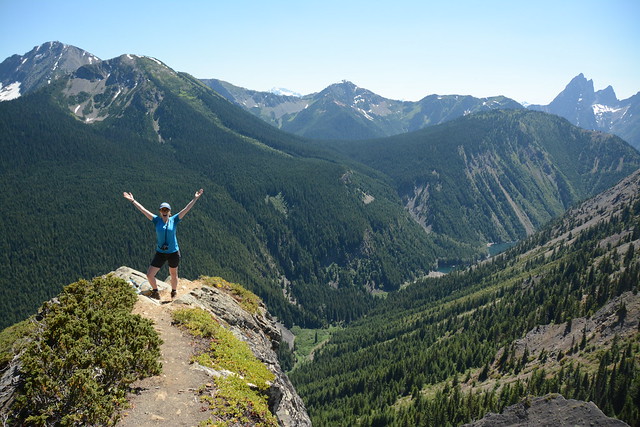
The Howe Sound Crest Trail is a quintessential hike located just outside of the lower mainland. It is a very challenging hike, but iconic due to its proximity to the city and the towering Lions mountains. The hike leaves from the top of Cypress Mountain and hikes 30km of ridgeline parallel to Howe Sound, ending at Porteau Cove. It can be done in a single day as a trail run, but it’s a very technical and challenging hike and I recommend at minimum, 1 night on the trail (I did 2 nights). The trail passes through the Lions and then hikes up and down several peaks to the halfway point at Magnesia Meadows. From there, you can summit both Mount Harvey and Mount Brunswick, before continuing back in the forest to campsites at Brunswick Lake and Deeks Lake. It’s a beautiful trail, but there is a lot of elevation gain and it should not be underestimated. (30km, 1500m elevation gain, 2-3 days)

#9 South Chilcotin

20240731_113802

There are tons of hiking trails available in South Chilcotin Provincial Park and it is a great place to escape the crowds. Day hiking definitely isn’t possible here, but if you really want to escape out of the city and spend an extended period of time in nature, this is a great choice. The route I took involved hiking into the park along the Tyaughton Creek Trail and doing a loop around the park. Highlights included hiking up to the top of Lorna Pass and over Deer Pass. There are some beautiful lakes on the south side of the park. I did a 90km route over 6 days and I’m already dying to go back and explore more of the park. (30-90km, 2-6 days)

#8 Cheam Peak

DSC06554

Camping isn’t allowed on Cheam Peak, so this hike can only be done as a day hike. It’s extremely popular, but notoriously difficult to access. 4WD and high clearance are definitely required to get to the trailhead, so don’t even try to take a small vehicle up there. There are a lot of water bars and they start early, so don’t try and park on the road either as it will only create more barriers. But if you can find a ride to the top, this is a truly iconic hike in the Fraser Valley. The entire hike is in the alpine and you start by hiking into a grassy meadow before a steep slog up the mountain to the top. From the top, you can see the entire Fraser Valley on one side and the sweeping backcountry on the other. I’ve done this one twice and always enjoy it, despite the crowds. (10km, 650m elevation gain, 1 day)

#7 Mount Price

HOP_0525

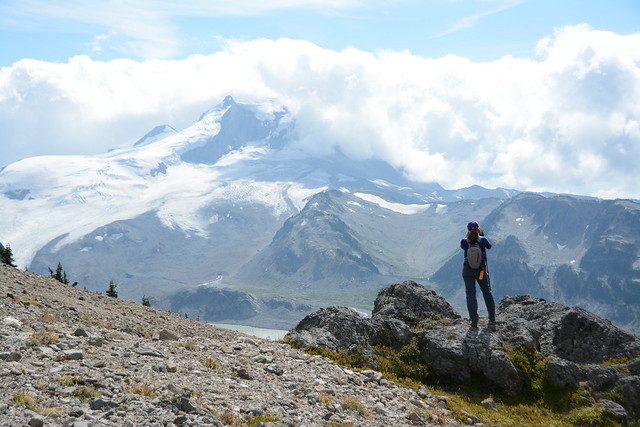
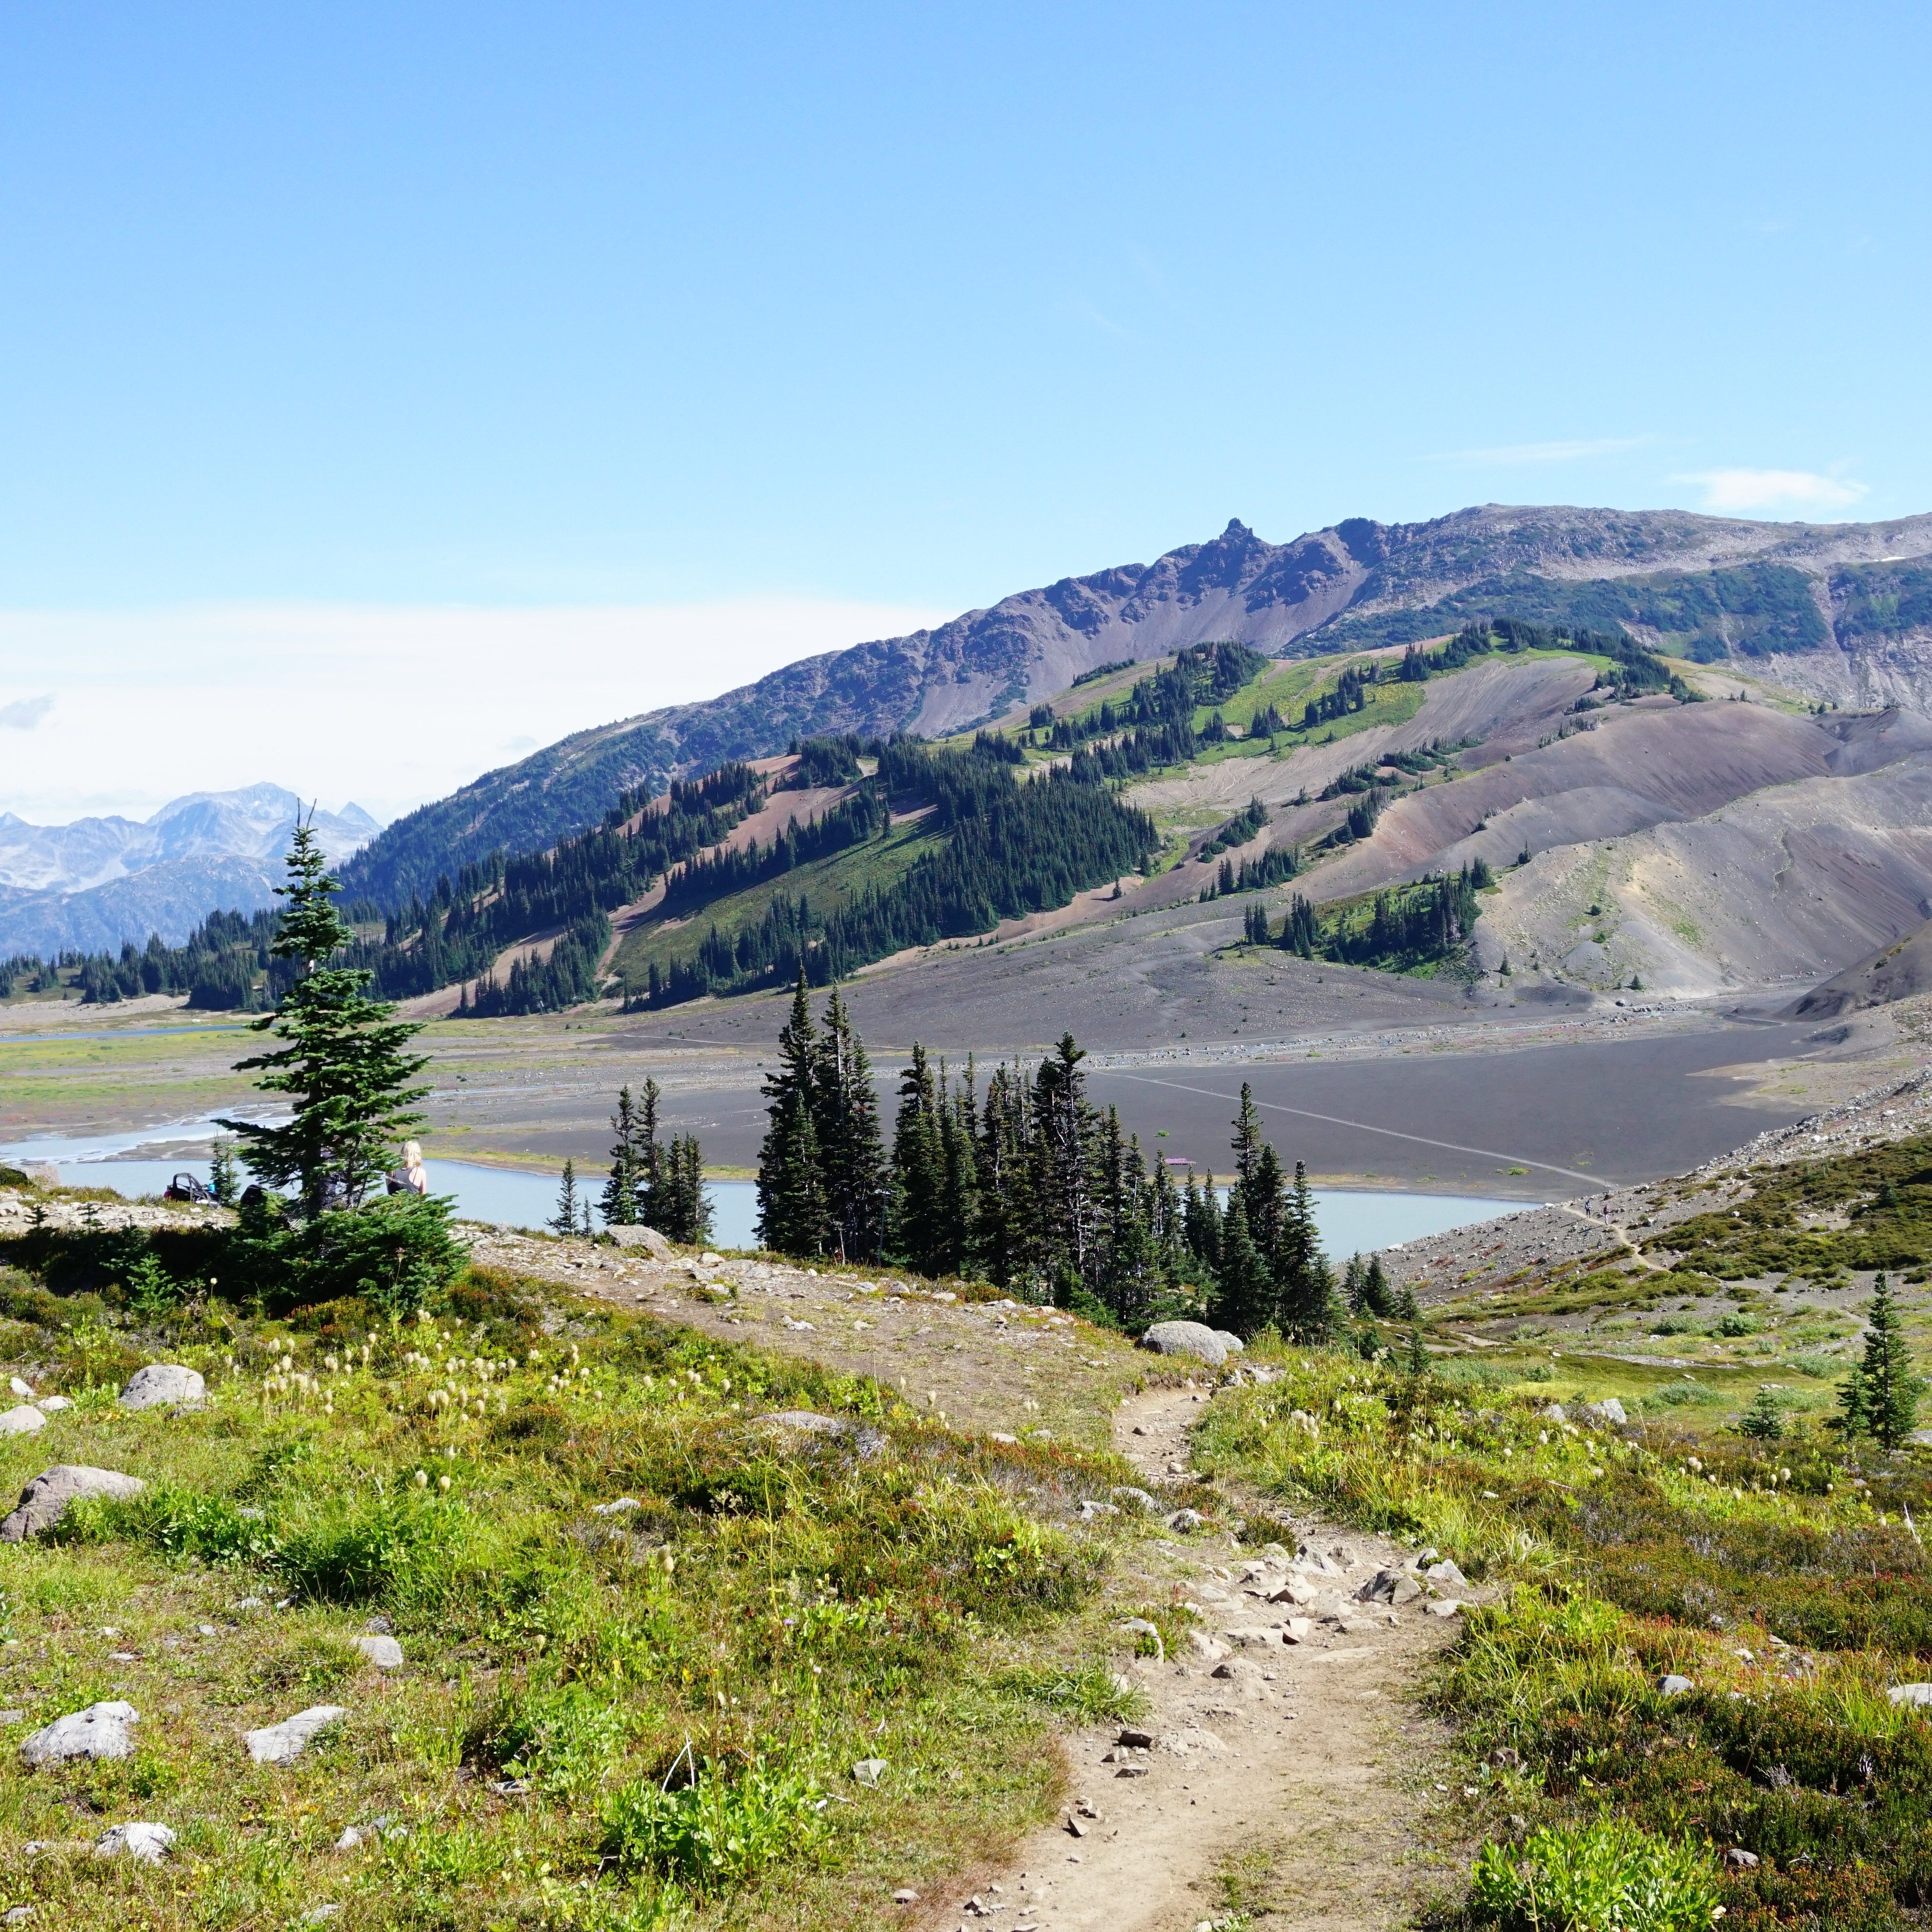
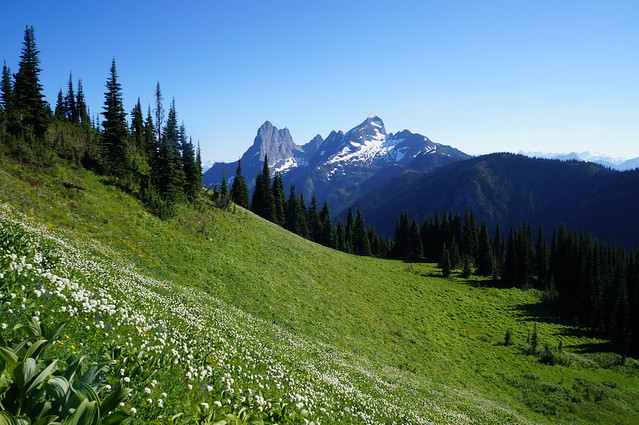
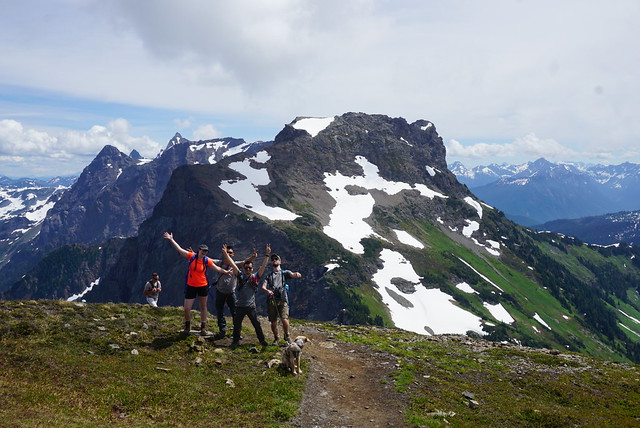
Mount Price is the secret version of Panorama Ridge. I haven’t done this hike since 2018, so it may have gotten more popular since then, but when I visited, it was empty compared to the crowds in the rest of the park. Similar to Panorama Ridge, this trail is located in Garibaldi Provincial Park and can be completed in a day, but is best done overnight at the lake. While the Panorama Ridge trail goes up the north side of Garibaldi Lake, the Mount Price Trail goes up the south side. You walk along the lake doing some light bushwacking, before you hit a large boulder field that you have to scramble up to the large flat top of Mount Price. From there, you can admire the Garibaldi backcountry in every direction! Enjoy the gatorade blue hues of Garibaldi Lake, the towering glacial peaks of Mount garibaldi, and the iconic Black Tusk, home of the Thunderbird. (29km, 1400m elevation gain, 1-3 days) 

#6 Russet Lake

IMG_4814

Mount Price is only one of many breathtaking hikes in Garibaldi Provincial Park. Another gorgeous hike can be found along the High Note and Musical Bumps trail to Russet Lake. In theory, this could be done as a day hike, but I really recommend it as an overnight hike due to the length and late opening time of the gondola. The Russet Lake trail starts in Whistler and can be accessed from either the top of Peak Chair (which comes with a hefty price tag, but is worth it in my opinion), or from the base of the mountain along the Singing Pass Trail. The Singing Pass Trail is free, but is mostly in the trees and involves a lot of elevation gain. The route from Peak Chair follows the High Note Trail to Flute Summit, before merging with the Musical Bumps Trail. The entire trail is in the alpine and breath-takingly gorgeous, but it does involve doing several mini summits, so it is still a very tiring trail. It’s highly worth the payout! (24km, 550m elevation gain, 2 days)

#5 Panorama Ridge

HOP_0804

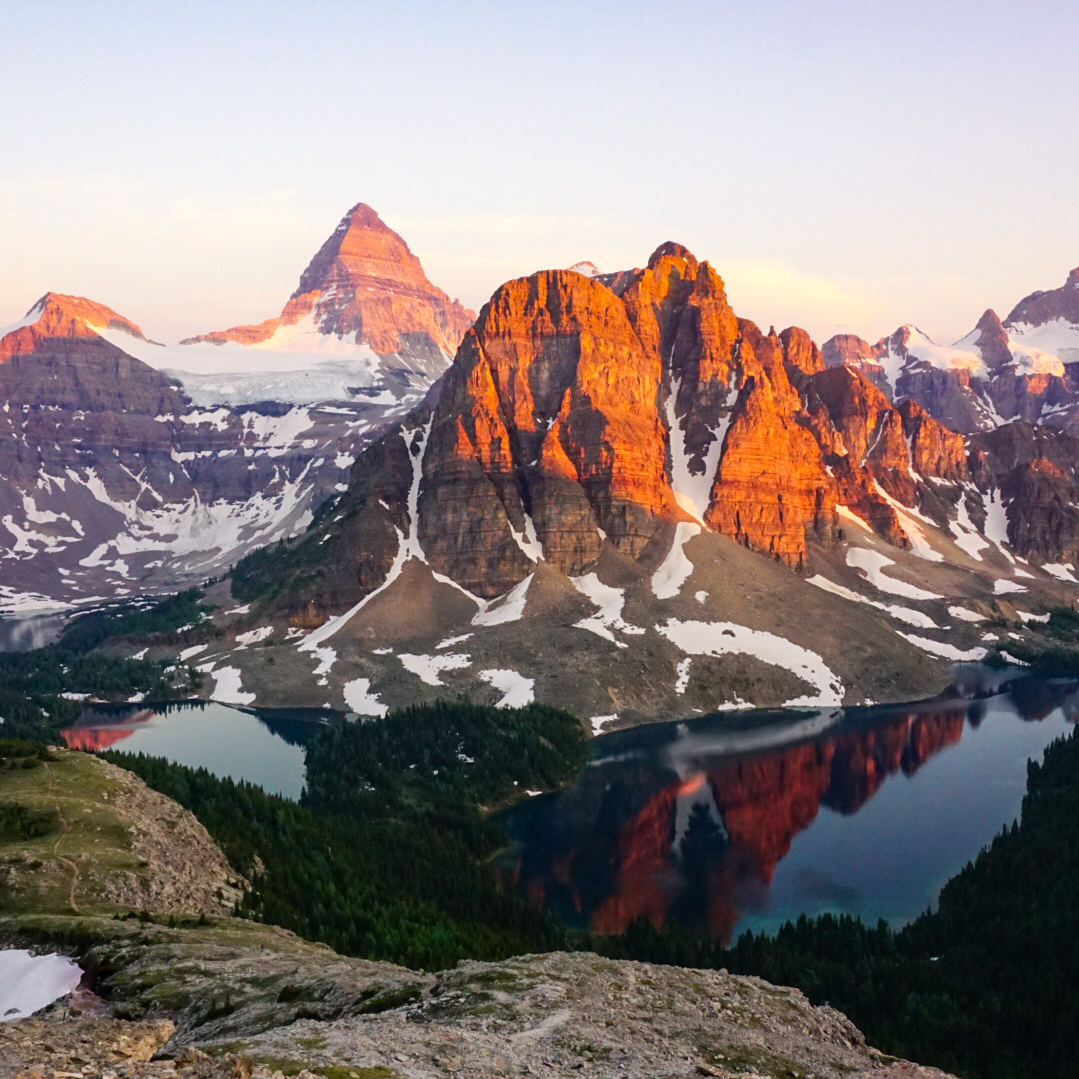
I’m just realizing how many of the hikes on this list are in Garibaldi Park! I don’t think this hike needs any introduction. Panorama is the crown jewel hike of Garibaldi and one of the most iconic hikes in the entire province. I admit that I am a bit resentful of this hike because of the huge number of people it attracts, but I’ve still made the trek up there on more than one occasion to admire the views. Lots of people do it as a big day hike, but I’ve always camped at the lake. My preferred way to visit Panorama Ridge is to thru hike from Garibaldi Lake to Helm Creek and stop at Panorama Ridge along the way. Helm Creek is another stunning area of the park and makes for a fantastic thru hike. If you want to avoid some of the crowds, you could enter the park from the Cheakamus Lake entrance and day hike Helm Creek, since most people come via the Rubble Creek entrance. (30km, 1500m elevation gain, 1-3 days) 

#4 Heather Trail

DSC05851

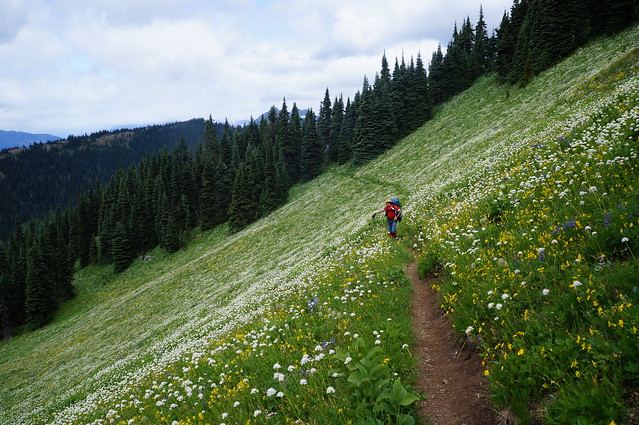
We’ve almost concluded the Garibaldi Park hikes, so let’s talk about my other favourite park, E.C. Manning Provincial Park. I absolutely adore Manning Park, which has always attracted less visitors than Garibaldi Park, but the crowds are definitely increasing in recent years, especially in the Fall on the Frosty Mountain Trail. But the Heather Trail is where I’d rather spend my time. If you just want to do a day hike, drive to the top of Blackwall Road and hike out and back to 3 Brothers Mountain, which captures a lot of the highlights of the trail. You do most of the elevation gain in the car, so most of the hike is located in the alpine and is very well known for its alpine wildflowers. But I like to extend the trip by backpacking the Heather Trail, which continues further to Nicomen Lake. From Nicomen, you can turn around and hike back to your car, or continue on the Grainger Creek Trail and thru hike to Cayuse Flats, which is what I did. (38-42km, 1000m elevation gain, 2-3 days)

#3 Skyline II Trail

HOP_5700

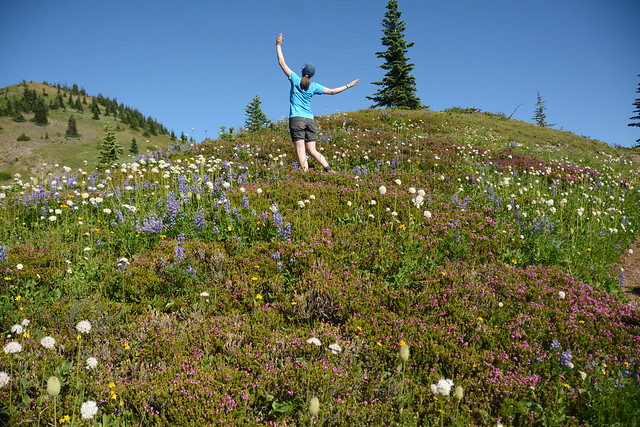
As much as I love the Heather Trail, the Skyline II Trail is my favourite trail in Manning Park! It gets less crowds than the Heather Trail, but it is becoming more popular in recent years. If you just want to do a day hike, follow the trail up to Snow Camp Mountain and back, which features a breaktaking viewpoint before Despair Pass, and beautiful alpine meadows after the pass. The most iconic mountain on this trail is Hozomeen Mountain, which is located just across the border. My preferred trip is to backpack to Mowich Camp and then do a day hike to Hozomeen Ridge on the second day. I returned to my car along the same route, but you can thru hike the Skyline II Trail down the other side of the mountain into Skagit Valley Provincial Park if you have two cars. (17-40km, 500m elevation gain, 1-3 days)

#2 Elfin Lakes

HOP_6418

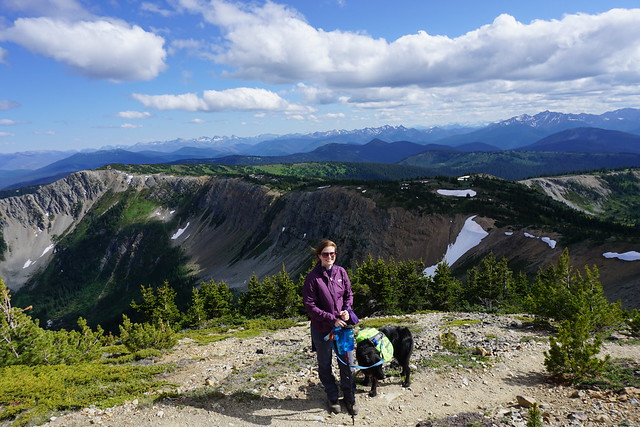
Elfin Lakes is the last hike on my list from Garibaldi Park. It’s also a very popular hike, but not on the same level as Panorama Ridge. That said, of all the trails in Garibaldi Park, this one is by far my favourite and I keep returning to it year after year (I think I’ve been up there 7 times now)! This trail can be done as an overnight or a day hike, in all seasons (although there is some avalanche risk in the winter). You can either tent or stay in the shared hut. The reason I love this hike is because the views from the tent are absolutely phenomenal and it’s great for stargazing. Plus, there are several options for day hikes from the campsite and I’ve had a lot of fun exploring the Gargoyles, Opal Cone, and Mamquam Lake over the years. I never get tired of this hike! (22-42km, 600m elevation gain, 1-3 days)

#1 Sunshine Coast Trail

20220905_082625

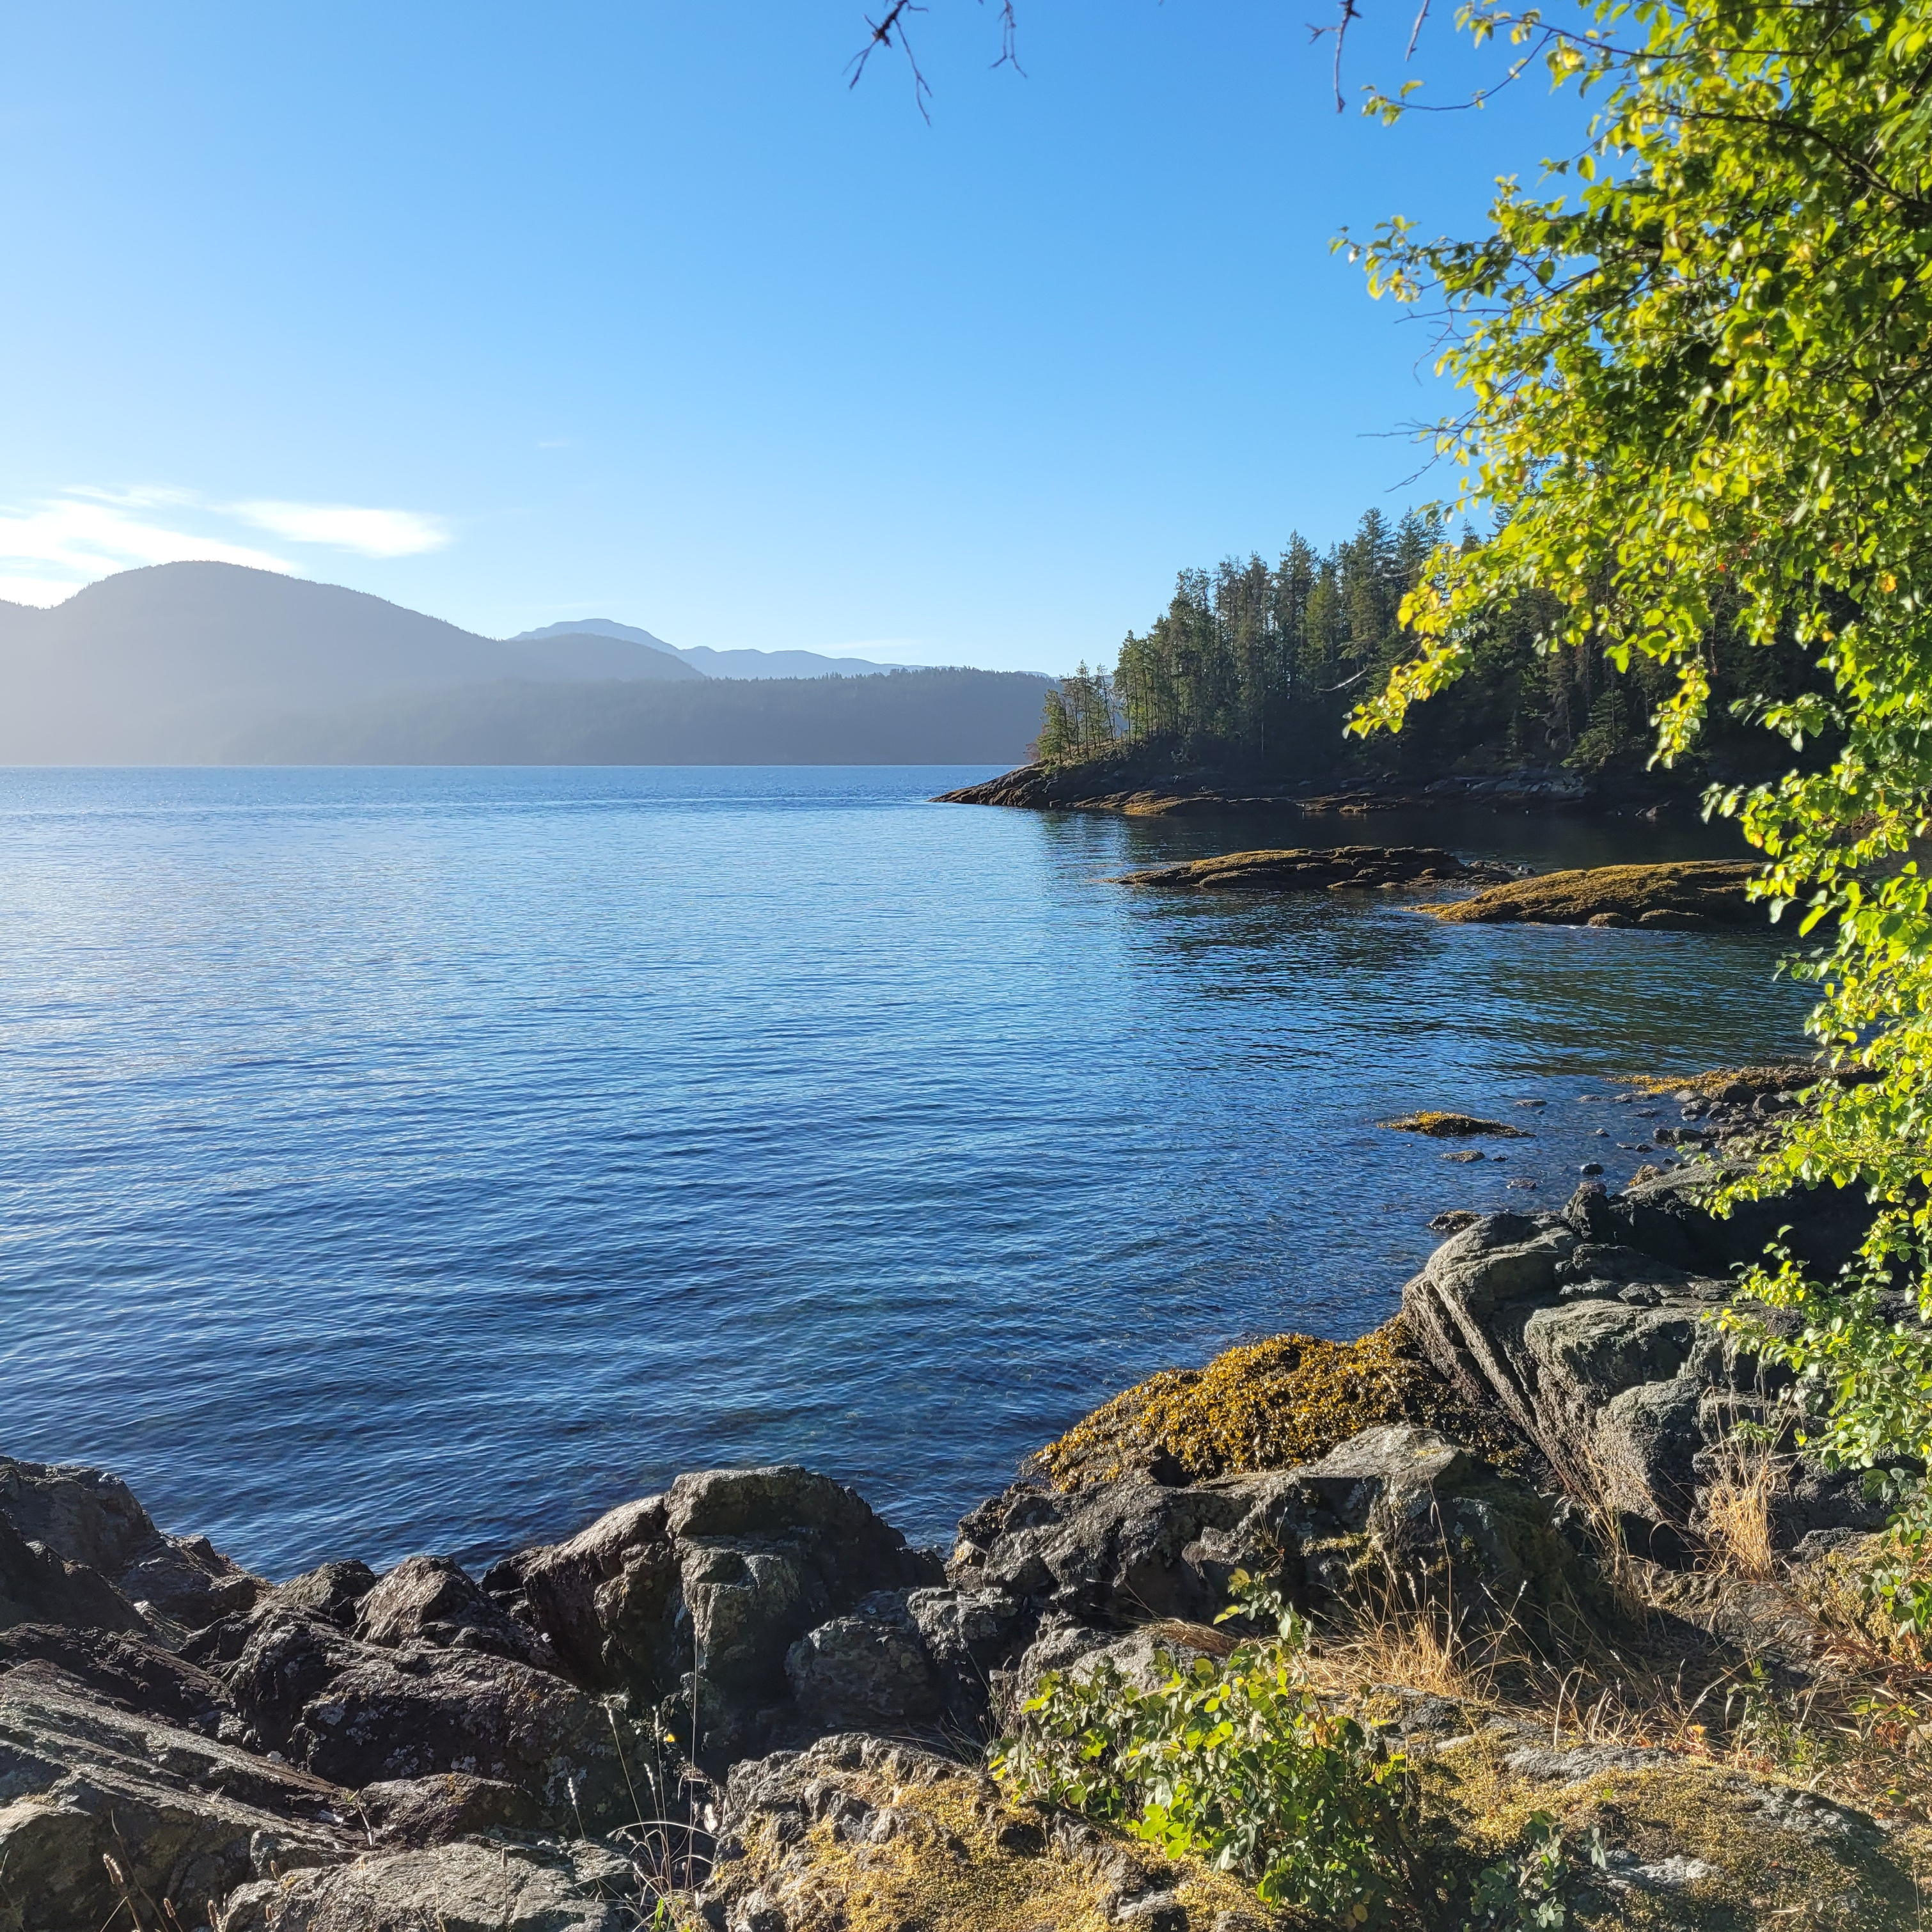
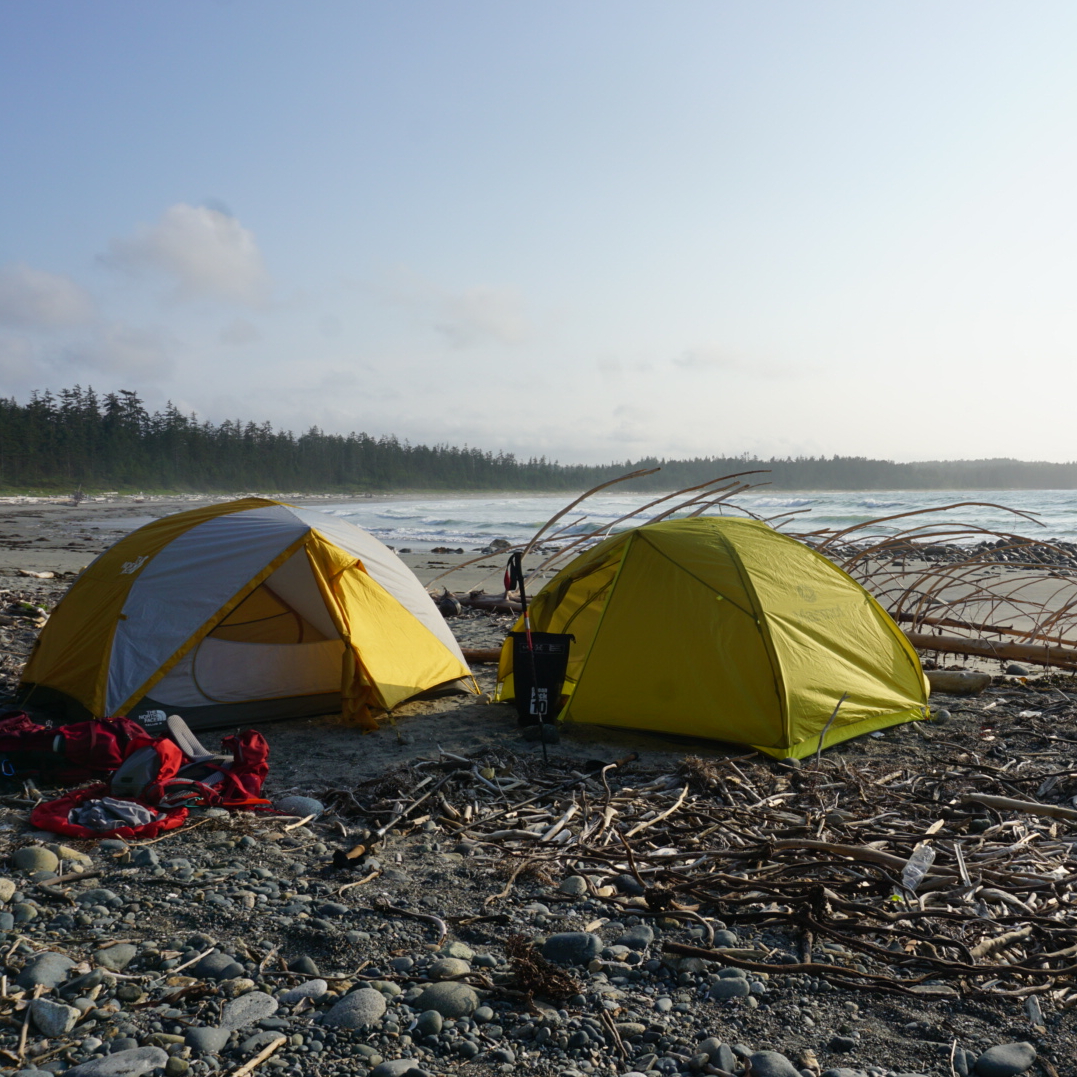
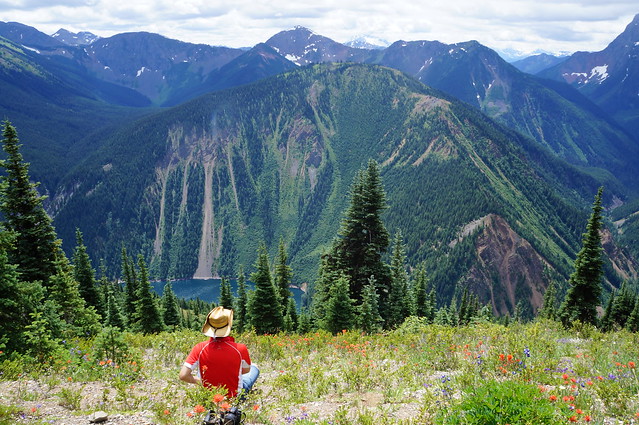
The Sunshine Coast Trail will always top my list and is a very sentimental trail to me. It’s a 180km trail that can be done in sections or as one large thru hike. I did it in 2 sections in 2022. I did the first 50km with my sister, and the second 130km alone. It remains the only trail I’ve ever backpacked on my own. The trail has a large system of huts that you can stay in and is maintained by a committed network of volunteers. While the trail does have a number of gorgeous viewpoints, it is a lot of forest walking. I can’t quite pinpoint what is so special about this trail, I think it’s a combination of all the elements of the experience, but it will always have a special place in my heart. The highlights for me included Sarah Point, Manzanita Bluff, Appleton Canyon, Inland Lake, Tin Hat Mountain, Walt Hill, Rainy Day Lake, and Fairview Bay. So basically, the entire trail! (180km, 7-12 days)

10 Epic Thru-Hikes in BC

If you’re an avid backpacker already and looking for an epic adventure, there are lots of multi-day trips in British Columbia to whet your appetite. I’ve only done a small sample of what BC has to offer, but these are some of my favourite thru hikes! If you’re a beginner, check out my Guide to Backpacking and Overnight Trips for Beginners posts, as well as my safety resources.

A thru-hike is basically a trip that starts and ends at different locations, allowing you not to repeat any trail. They can be somewhat harder to coordinate and plan because 2 vehicles are often needed and the trailheads may be several hours apart from one another. I don’t recommend any of these trails for true beginners as they are all multi-night trips, several of which are in more challenging or technical terrain. But if you’re an intermediate or experienced backpacker and looking to get outside for extended periods of time, check out some of these trails!

Howe Sound Crest Trail 

The Howe Sound Crest Trail (or HSCT), is the closest trail to Vancouver on this list, as well as one of the shortest. That might lead you to believe that it’s one of the easier trails, but that is not the case. I think a lot of people stumble onto this trail who are not quite prepared for the steep and technical terrain, so definitely proceed with caution. The trail is 30km long and runs from Cypress Mountain to Porteau Cove. It can be done as a 1 or 2 night hike and most people start from Cypress because then it’s a net downhill trail. There are no facilities, so be prepared to do a bear hang and dig cat holes for your waste.

I prefer to do this trail as a 2-nighter and camp at the Enchantments and Brunswick Lake, but there is no water on trail until the halfway point, so if you camp at the Enchantments, you need to do a large water carry. The trail crosses between the Lions and up and down through several small summits. The start and end to the trail are pretty straight forward, but the trail gets very technical in the middle. If you’d like to extend the trip, you can consider summiting Mount Harvey and Mount Brunswick along the way. It’s a gorgeous trail with unparalleled views of Howe Sound. 

Helm Creek Trail

A hiking trail extends through the alpine of Garibaldi Provincial Park towards Helm Lake, with the forest and mountains in the background on a sunny day in British Columbia, Canada

This route doesn’t have a formal name, but extends from Rubble Creek to Cheakamus Lake in Garibaldi Provincial Park, near Whistler. If you’re on my website, most likely you’re familiar with this trail because of the popular trips to Garibaldi Lake, Black Tusk, and the iconic Panorama Ridge. Lots of people explore these trails as a day hike or a 1-nighter from Garibaldi Lake or Taylor Meadows. But I always recommend turning it into a multi-day trip by continuing on to Helm Creek. This trail is more appropriate for newer backpackers because of its substantial facilities. 

This hike can be customized to whatever length you prefer. Start at Rubble Creek and spend a few nights at Taylor Meadows or Garibaldi Lake and explore Black Tusk or Mount Price. When you’re ready to go to Panorama Ridge, pack up your camp and stop at the ridge on the way to the Helm Creek Campsite, which takes you through the gorgeous Helm Lake area. From there, you hike down towards the Cheakamus Lake parking lot. If you want to extend the trip further, make a detour to Cheakamus Lake or Singing Creek campsites. This hike requires camping reservations, which release 4 months in advance of your date from camping.bcparks.ca.

HBC Heritage Trail

A photo of Palmers Pond on a summer day, with the green meadows, forest, and mountains in the background, on the Hudson's Bay Company (HBC Trail) near Hope in British Columbia, Canada.

In my opinion, this is one of the most challenging trails on the list (except for maybe the North Coast Trail). HBC stands for Hudson Bay Company and is a historic trail that was originally used by the First Nations and later by the fur trade. The trail is 74km long and extends through the mountains from Hope to Tulameen. A lot of the trail is through the forest, but it has some gorgeous campsites and views along the way. It’s not an overly popular trail and you likely won’t see many people on it if you like solitude. 

What makes this trail challenging right now is the state of the trail. The trail has been revitalized in recent years and has a dedicated volunteer maintenance group, but the 2021 flood was particularly hard on this area. Volunteers have been working to clear the trail, but there is still quite a lot of blowdown in some sections and the trail does require fording at least 3 rivers. All of the campsites have nice facilities, so if you give yourself enough time to navigate the technical terrain, it is a beautiful trail.

Heather Trail

If you’re new to thru-hiking, the Heather Trail would be my recommendation. This is a relatively easy trail, with gorgeous views and brand new facilities. It’s located in E.C. Manning Park and can be done over 2-3 days. The trail starts at the top of Blackwall Road, which means most of the challenging elevation gain is done in the car. Technically, the Heather Trail is 21km, ending at Nicomen Lake and requiring an out-and-back trip. However, if you connect to the Grainger Creek and Hope Pass Trails from Nicomen Lake, you can turn this into a ~40km thru-hike, ending at Cayuse Flats.

Over 2 nights, I would camp at Kicking Horse and Nicomen Lake, or you could add a night at Buckhorn Campsite at the start of the trip and take your time. The trail is all in the trees after Nicomen Lake, and even though it’s 17km from Nicomen to Cayuse Flats, it’s a very easy trail, though there is another campsite option at Grainger Creek. You do need backcountry reservations to stay at these sites as of 2024, which can be obtained 4 months ahead of your trip at camping.bcparks.ca.

Skyline II Trail

I love Manning Park and the Skyline II Trail is one of my all time favourites. This trail is more difficult than the Heather Trail, but still a relatively easy trip. The trail is approximately 25 kilometres from Strawberry Flats in Manning Park to Whitworth Meadow in Skagit Valley Park. There is one campsite at the halfway mark, Mowich Camp. 

While this hike can be done in one night, I highly recommend doing 2 nights at Mowich Camp and making a detour to hike the 15km round trip trail along Hozomeen Ridge and back. This trail will take you to the border monument and a fantastic view of Hozomeen Mountain in the US. The trail itself is easy to follow and takes you through gorgeous alpine meadows. The campsite is pretty basic and the water source can run dry later in the summer. A backcountry permit is needed and can be obtained 2 weeks prior to your trip at camping.bcparks.ca.

Sunshine Coast Trail

Sunny view of the ocean and beach at Fairview Bay on the Sunshine Coast Trail in British Columbia, Canada

This is the longest trail on my list, but is hands down my favourite thru-hike ever! The Sunshine Coast Trail (or SCT) is 180km and extends through the entire upper Sunshine Coast, from Sarah Point on the Malaspina peninsula, to Powell River, and down to the ferry at Saltery Bay. The SCT is unique because it is a hut-to-hut hiking route, which means you can do the entire trail, staying in free mountain huts along the way. 

The trail can be a challenge to coordinate in terms of transportation and food carries, but it is incredibly well maintained by volunteers, with gorgeous facilities. You can do a section of the trail, or commit to the entire thing. The trail is primarily in the forest and tackles a lot of cumulative elevation gain. There are tons of lakes to enjoy a cool swim and some amazing viewpoints along the way. The trail can get busy, so if you plan to stay in the huts, you should still bring a tent with you as a back-up.

Juan de Fuca

The Juan de Fuca trail is often touted as a great beginner coastal trail. It is good in that it’s a lot easier than its more popular sister trail, the West Coast Trail, but it is still challenging in its own right. It’s a 47km trail on Vancouver Island between Port Renfrew and China Beach. There are several nice campsites located both in the forest and along the beaches, but like all the coastal trails on the island, it can be very technical and muddy.

It’s been several years since I did this trail and I have heard that some parts have received much needed maintenance since I did it, but it will still be quite muddy in early summer and there are several tidal points on the trail that require advance planning to cross. The nice thing about this trail is that there are several bailout points that connect to the highway if the trail is too challenging. Backcountry permits are required and can be obtained 2 weeks in advance from camping.bcparks.ca.

North Coast Trail

Two tents camping on a golden sand beach with drift wood and the forest and waves of the pacific ocean in the background at sunset on Irony Creek Beach in Shuttleworth Bight on the North Coast Trail on Vancouver Island in British Columbia, Canada.

The North Coast Trail (or NCT) is probably the hardest hike on this list. It’s much less popular than the West Coast Trail, but the traffic to this hike has definitely been growing. The NCT is a ~60km hike on the far north coast of Vancouver Island. It has a reputation for being extremely muddy and it doesn’t get very much maintenance. The NCT is only accessible by water taxi, so most people add on another ~25km of hiking to Cape Scott to finish this trail.

The Cape Scott Trail is accessible by dirt road and is better maintained than the NCT. The highlights of both trails are the gorgeous, remote beach campsites. There are several tidal points on the trail and you should be prepared for a very slow hiking pace through extremely technical terrain. But you’ll also likely get to view bears, eagles, and if you’re lucky, maybe even a wolf. Backcountry permits are required for this hike and can be obtained 2 weeks ahead of your trip at camping.bcparks.ca.

Mount Assiniboine

A photo of Mount Assiniboine and Sunburst Mountain and Cerulean Lake at sunset from the Nub in Assiniboine Provincial Park in British Columbia, Canada.

Mount Assiniboine can be accessed as a loop trail, thru hike, or by helicopter. Of course, I did the thru hike option. Mount Assiniboine is one of BC’s premier mountain campsites and there is a lot to explore from the core area of the park. We planned for 3 nights in the Magog Lake Campground, and 1 night on either end of the trip to hike in and out. While Assiniboine Park is located in BC, the hike is accessed through Banff National Park in Alberta.

Take the gondola up to Sunshine Village and hike through the alpine meadows to Porcupine Camp on night one, then continue to Assiniboine for several days in the park. Explore Magog Lake, Cerulean lake, and Sunburst Lake, as well as the iconic hike up to the Nub for sunset. On your way out, hike through beautiful Wonder Pass and camp at Wonder Lake before ending your hike at Mount Shark. You will need to coordinate 2 vehicles and book backcountry reservations for Assiniboine 4 months in advance at camping.bcparks.ca, as well as backcountry reservations for Wonder Lake at reservation.pc.gc.ca, which release sometime in March for the entire season. 

Rockwall Trail

The Rockwall on a sunny day with the mountains in the background and the forest in the foreground with blue sky in Kootenay National Park in British Columbia, Canada.

The Rockwall Trail is another extremely popular trail located in Kootenay National Park. It’s a 55km trail from Paint Pots to the trailhead for Floe Lake that is incredibly scenic. There are a number of campsites along the trail and it can be done in 3-4 nights. Floe Lake is the most popular campsite on the trail, but I also highly recommend staying at the Helmet Falls campsite. Along the way, you can stay at Tumbling Creek, Numa Creek, or both, they’re pretty similar sites. 

The trail is very well maintained and has lots of facilities. Campsites release for the entire season in March at reservation.pc.gc.ca, so make sure you watch for the release date, because the sites will sell out immediately. If you’re lucky enough to score permits, enjoy this beautiful trail through the Rocky Mountains and past the iconic Rockwall. 

Skyline II Backpacking Trip

Continuing on with my mini-series about Manning Park, I’m super thrilled to finally write about the Skyline II Trail! After my amazing hike to 3 Brothers, I was inspired to go back to Manning. My goal was to hike the full Heather Trail, but I needed someone to do it with me. This was back in 2017, so I didn’t have as many hiking and backpacking friends as I have now, so that pretty much left Carolyn and Brandon because Seth isn’t really a fan of backpacking. I think Carolyn must have been on vacation at the time, but Brandon happily agreed to go with me. I wanted to hike from Blackwell Road all the way down to Cayuse Flats, staying overnight at Kicking Horse Campsite and Nicomen Lake. But since this requires two vehicles, we decided to try out the Skyline Trail instead.

The Skyline Trail is located on the other side of the park (basically, the other side of the highway) and continues for 25km to Skagit Valley Provincial Park. Since hiking to Skagit Valley would also require two vehicles, we decided to do a there-and-back-again hike from Strawberry Flats in Manning Park. The Skyline Trail is also well known for its wildflowers, but it doesn’t receive quite as many visitors as the Heather Trail, presumably because of the elevation gain. We wanted to beat the crowds to the campsite, so we decided to take Friday off and head out early.

DSC01154

It was late July and a beautiful blue sky day. We started hiking around noon and our goal was to stay at Mowich Camp, which is located right at the halfway point along the trail: 12.5km. The start of the Skyline II Trail is a bit of a slog. You leave from Strawberry Flats, which is a little way past Lightning Lakes. You can also hike the Skyline I Trail, which leaves directly from Lightning Lakes, but is longer and takes a different route up. On the Skyline II Trail, it’s about 5km to the junction with the Skyline I Trail. There’s not a whole lot to see on the way up – it’s pretty much all uphill in the trees, but they start to thin out near the top and you can catch a glimpse of Snow Camp and Goat Mountain. While it’s not the most interesting section of the trail, I’ve always liked it because it’s not too steep, so it takes about 90 minutes to hike up.

Once you reach the junction though, you are greeted by one of the most beautiful views in the park! From the junction the view completely opens up and you can climb down to this rock viewpoint that looks out over the park, all the way to the distinctive peak of Hozameen Mountain in Washington. The viewpoint isn’t for the faint of heart as there’s a pretty big drop-off, but we loved hanging out there while we ate our lunches.

HOP_5700

After that, it’s back into the trees for one last challenging section. You have to climb back down and up Deception Pass. You head right back into the trees and follow the switchbacks down along the pass before starting to climb back out – I think it’s about another 1-2km, but then you’re home free for the rest of the hike! That’s not to say it’s easy, but it is damn beautiful! Skyline II Trail is what firmly cemented Manning Park as my favourite provincial park and to date, I still consider Skyline II Trail to be my favourite hike in all of BC. Now I still have yet to hike in the Rockies, but until I make it out there, Skyline Trail is definitely holding on to the top spot.

Once you climb out of the pass you quickly realize where the trail takes its name from. The rest of the hike is along the ridgeline looking down over meadows full of wildflowers to the Lightning Lakes Chain Trail, and out towards Hozameen Ridge and Hozameen Mountain. We had picked a dream day to hike the trail. There was absolutely no one on it since it was Friday, it was sunny, and the wildflowers were in peak bloom! I can’t recall exactly how long it took us to get to Mowich Camp, but it wasn’t the fastest. I have a feeling it was somewhere around 6 hours, which is a bit on the slow side for us, but we were constantly stopping to take pictures of the wildflowers and had a long lunch break at the viewpoint. Brandon is pretty silly and I was have a fun time hiking with him – he indulged me by taking lots of Sound of Music inspired photos of me dancing in the wildflowers.

HOP_5815

The big thing to be aware of if you’re camping on the Skyline Trail is the water supply. In hindsight, we were pretty lucky because we weren’t super prepared for it. There’s only one campsite on the entire trail and the water source is pretty small. It’s just one tiny stream that runs through the campsite. We weren’t sure if it was even going to be running, so we kept out eyes open for other water sources along the way. There are a few other streams running by, but it would have been a long walk from the campsite. Fortunately the stream in the campsite hadn’t yet dried up. Our plan had been to bring Brandon’s water filter since it was only a small source, but he forgot it, so we had to make do with the emergency water tabs in my first aid kit. Obviously we could have just boiled the water, which we also did to leave overnight, but the last thing you want after hiking all day is to drink hot water (or worse, no water if the stream was dried up). So plan accordingly if you’re going out there. In future, I would bring extra water with me just in case.

DSC01220

Despite the rest of the trail being breathtakingly gorgeous, Mowich Camp isn’t much to write home about. It’s hidden in the trees, so there’s no viewpoint from the camp. But it still goes down in my memory as one of the more memorable campsites. For the first, and only time, on all of my hikes, we were the only people at the campsite. Manning Park is too far to drive after work and then hike into the camp, so we ended up being the only ones there! It was a weird experience. I’ve camped several times with only a limited number of other people (Juan de Fuca Trail and Ring Lake come to mind), but never as the only people. We took over the whole campsite and picked the best spot to pitch our tent. Brandon set up his hammock across two trees and we set up his bluetooth speaker while we cooked to scare away any animals that might be attracted by the smell. Brandon made chili for supper and had even brought dessert up with him! Overall it was a relaxing evening, except when Brandon left to go get ready for bed and I was left alone in the tent with only the sounds of the forest to keep me company. It’s kind of creepy being the only people around and I was definitely more aware of the potential for animals to wonder into the campsite. We were very careful about keeping all of our smellies away from the tent.

But we weren’t disturbed at all and woke up in the morning to continue our journey. Our plan for day two was to hike along Hozameen Ridge to Monument 74 at the Canada-USA border for a view of Hozameen Mountain. We continued along the Skyline Trail for a little while until we reached the junction for Hozameen. The Skyline II Trail continues down from there all the way to Skagit Valley. I’ve never done that section of the trail, but I have heard there’s more elevation gain to reach the bottom, so it’s not as scenic as the Manning side of the hike. But our destination lay along the ridge. We took the junction onto the Hozameen Ridge Trail, which continues all the way to border, and I suspect onwards past Hozameen Mountain and Ross Lake. I was never able to find a proper map for it, so I’m not really sure. My GPS says the trail ends shortly before the border, but it definitely continues to the monument and beyond.

DSC00958

Hiking along the ridge is pretty easy. It’s mostly flat and you meander back and forth through the trees, catching views on both sides. As you approach the end of the ridge, you start climbing. This is definitely a more challenging section, but as you crest the end of the ridge, you’re rewarded with an unimpeded view straight to Hozameen Mountain. If you’ve ever been to Manning on a clear day, it’s likely you noticed Hozameen Mountain. It’s the biggest mountain in the area, with very distinctive jagged peaks. We decided it was the perfect lunch spot and couldn’t pass up the opportunity to soak in the view while we ate our wraps. While we were eating, we came across our first visitors of the day, three trail runners that were training for Manning’s ultra marathon in August, the Fat Dog 120. They had started running that morning and caught up with us at the half-point of their run (and our 3 day trip). They downed a few gels, snapped some photos of Hozameen, and then took off again while we stared flabbergasted that they’d run the same distance it took us 2 days to traverse in just one morning. I bet we had more fun though.

HOP_5937

Our lunch viewpoint is where it looks like the trail ends on my GPS, from there it’s a steep downhill towards Hozameen. We could see the border monument and trail continuing at the bottom, but I was reluctant to go down there because I didn’t want to have to climb back up again. There was no way Brandon was leaving the last stretch of trail unfinished though and he dragged me down over the side to finish what we started. It is difficult to follow the trail down over the edge and it is pretty steep, so be careful if you’re following this route, but I definitely felt a sense of accomplishment when we reached the monument. It was my first time hiking to a border monument (I’ve since done Monument 78 as well) and we had a lot of fun snapping pictures and dancing around the monument.

I was surprised to learn upon reaching the monument that the entire border is actually clear cut through the park. As we hiked along the ridge, we noticed there was a corridor of clear cut trees, but never considered it was the border. I just assumed there was a transmission line down there. But once you arrive at the monument, it becomes pretty clear that it’s the border. I researched it after the trip and confirmed that it is true. There’s no signage at the monument, but I later learned when I hiked to the PCT monument that the border is also monitored by cameras. There’s a sign at the PCT monument asking you not to moon the border as you are on video! Wish I known this when I was flipping Trump the bird at the monument by Hozameen!

HOP_5979

We continued along the trail a little bit further to get another view of Hozameen Mountain before finally deciding to turn back. The trail definitely continues on, but it’s hard to judge the distance because mountains as large as Hozameen can be very misleading when guessing distance. All in all we hiked about 15km there and back to the campsite. We didn’t see anyone on the trail on our way back, but upon arriving it was obvious that other people had been busy hiking in all day. Our little solitary campsite was now filed with campers who had driven up in the morning to hike in for one night. It made me glad that we had taken Friday off and had the opportunity to hike the trail on our own, but we made some new friends with some of our fellow campers and swapped stories while teaching them to play exploding kittens.

DSC01079

We’d had two beautiful blue sky days, but the weather was forecasted to change on Sunday. When I hike with Carolyn, we’re always the first people up and on the trail, but when I hike with Brandon, we’re usually the last. Carolyn is a major morning person, while Brandon likes to take his time. I tend more towards being a morning person, but I can swing either way and enjoy sleeping in and taking it easy when I hike with Brandon. So despite being the first people to the campsite, we were among the last to leave. The clouds had finally moved in, but fortunately the rain was staying away. We made better time on the hike out, but we still stopped a lot to take more pictures. Even though I prefer round trip hikes, I find there-and-back-again hikes still look different from both directions and I have a tendency to take all my pictures twice – especially when it’s different weather conditions and all the photos look different anyways.

We stopped again at the big viewpoint for lunch and then pounded the last 5km back down to Strawberry Flats. I can’t remember if it ever did rain on us, which itself suggests that likely it didn’t, or at most was just a bit of drizzle. So even though it was 3 years ago that I hiked the trail, it still stands out in my memory as one of my most memorable backpacking trips and my all time favourite trail!

HOP_6069