Rockwall Trail Backpacking Guide

In the spirit of helping more people get hiking on some of western Canada’s most iconic trails, I decided to create a backpacking guide for the Rockwall Trail in Kootenay National Park. I hiked this trail over 3 nights in 2023 and had a fantastic time. I attribute most of the fun to my phenomenal hiking partners, but the beautiful scenery on the trail also made the experience unforgettable. I’ve already published a 2-part trail report, which you can read starting here, as well as a guide to Kootenay National Park. I’ve consolidated all of my Rockwall-specific knowledge here for those planning to hike the trail. Reservations for the 2026 season release at 7am PST on January 26, 2026 (8am MST).

The Trail

The Rockwall Trail is a 54km thru-hike located in Kootenay National Park in BC. You can hike the trail in either direction and there are several exit points that connect to the highway if you want to shorten your hike. The two main trailheads are located off Highway 93 at the Floe Lake and Paint Pots Trailheads. There are 5 campgrounds on the trail, with the most popular campsite at Floe Lake. Most people hike the trail over 3-5 days, depending on fitness level.

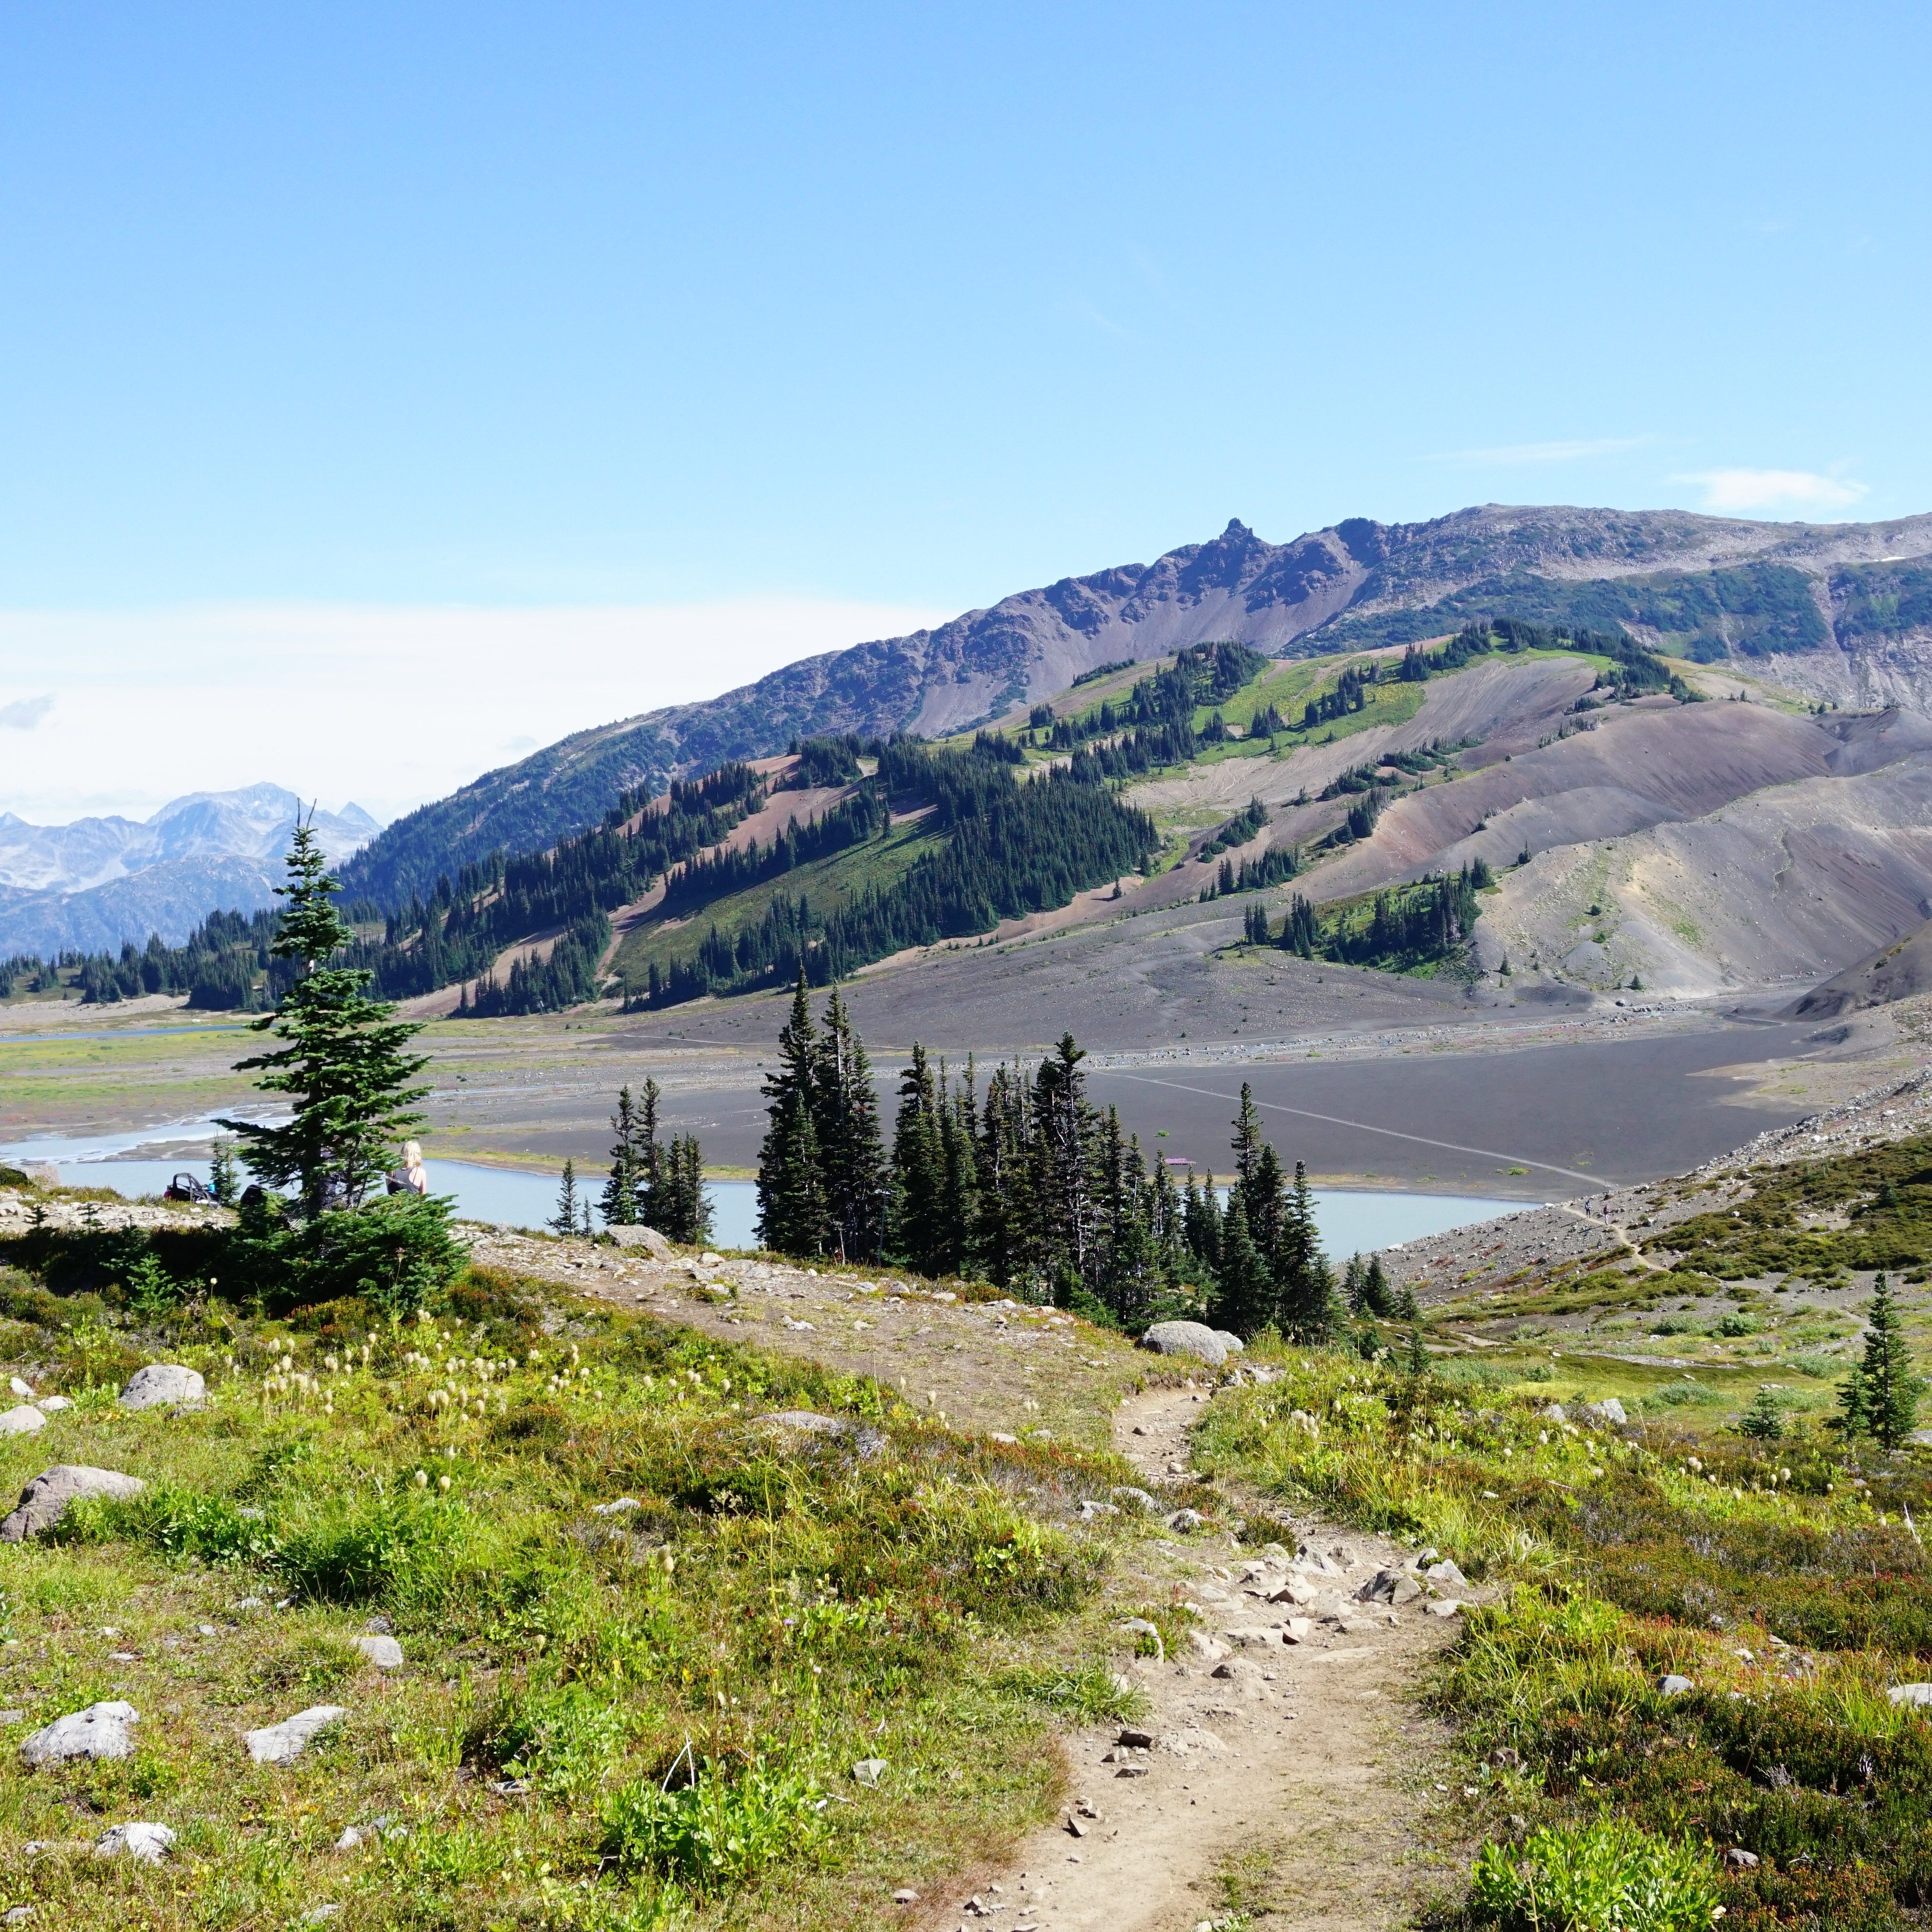
At 54km in length, the Rockwall Trail is not the longest trail in the Rockies, but there is a significant amount of elevation gain, so don’t underestimate it. The hike starts in the forest on both ends of the trail, climbing up towards the alpine, which runs between Helmet Falls and Floe Lake with 3 steep passes along the way. While Floe Lake is very popular, the trail takes its namesake from the large rock wall that runs between Helmet Falls and Tumbling Creek, which in my opinion, is the real highlight!

If you don’t like backpacking, you can visit Floe Lake as a day hike, but it is a 22km round trip hike, with 750m of elevation, so it’s a big day. I don’t recommend day hikes from any of the other trail entrances – unless you’re a trail runner – but the alternative trail entrances from Numa Creek and Tumbling Creek Trails offer the opportunity to shorten your backpacking trip.

PSX_20230903_210217

Time of Year

The best time of year to hike the Rockwall Trail is in the Summer or early Fall. If you go in late-June or early-July, be aware that there may still be snow on some of the trails. If you go later in the summer, it’s more likely that your trip might be impacted by wildfires. While most people prefer to backpack in the summer, late September is also popular due to the colourful larch trees near Floe Lake. However, you should be prepared for snow and cold conditions at this time of year. I hiked the trail at the very end of August and had great conditions.

Getting There

Unfortunately, this park is not accessible by public transit. Similar to other popular Canadian parks, the easiest way to access is by driving. The park is located on Highway 93, which is a 50 minute drive to the Floe Lake Trailhead from either Banff or Radium. The added challenge with the Rockwall Trail is that, because it’s a thru-hike, you will either need 2 cars, 1 at each trailhead, or plan to hitchhike between the two parking lots. I parked a car at each trailhead, which is the easiest option, but hitchhiking is not uncommon along this route and is relatively safe. I recommend making friends along the trail and looking for a ride from another hiker.

There is a large parking lot at the Paint Pots trailhead, but the Floe Lake trailhead is much smaller, so you may have to wait for a parking space to open up. I’ve also heard that break-ins are not uncommon at the Floe Lake trailhead, so make sure not to leave valuables in your vehicle.

20230829_123149

Permits

Like most popular hikes in the Rockies, securing your camping permits will likely be the hardest part of your trip. This is a popular trail and it attracts crowds every year. If you’re doing a day hike, you don’t need a permit for the trail, just the National Park Pass (discussed below). But if you want to try and get camping permits, then it’s important to mark your calendar with the permit release date.

The permit release date for 2026 is January 26, 2026 at 7am PST. Permits are $10 per person, per night (plus a booking fee) and they will disappear fast, so you need to be ready to book right when they release. I will try and update the release dates for permits every year, but they are usually announced by Parks Canada in late November or early December for the following year – so keep an eye on their page of release dates in future years. To make your bookings, visit https://reservation.pc.gc.ca/.

Once booking opens, select “backcountry” in the tabs along the top of the booking page, and then select “backcountry zone”. Next, select “Banff, Kootenay, and Yoho Backcountry” as your park and select your start date and access point. There are 3 options for access points along the Rockwall Trail: Floe Lake, Numa Falls, and Paint Pots. Numa Falls is only used if you’re doing a shorter version of the trail. If you want to hike south, select Paint Pots; if you want to hike north, select Floe Lake. If you have trouble getting your preferred itinerary, you can always try reversing direction or using different start dates.

Once you start your search, you will be forced to build your itinerary day by day. At the top of the page, you’ll see a dropdown menu where you can select your campsite and “add to stay”. Instead of building your itinerary this way, you can scroll down to the map and click on the “calendar” tab in the left sidebar to see a list of all available campsites per night. This is an easier way to see what’s available and build your itinerary. If you don’t see what you want, try refreshing or reversing your itinerary by updating your access point. People are constantly adding and changing dates and campsites in a rush to get their preferred itinerary, so the trick is to frequently refresh. Just because you don’t see a site available right away, doesn’t mean it won’t show up later if you keep refreshing.

My recommendation is to take what you can get and make changes later. If Floe Lake is not available, book Numa Creek and move on to the next day before those dates book up too. Once you have secured a booking for each of the dates in your itinerary, go back and look for cancellations. Keep refreshing until you see one, and then make a change to your booking to add it. This does cost more as you have to pay a small change fee, but it offers more flexibility in ensuring you at least get something. I wasn’t able to book Floe Lake when I made my original booking, but I was able to get a cancellation for it afterwards. You can track cancellations on Schnerp, which will notify you when a site opens up.

Here’s a few tips for getting your camping permits:

  • Get on the booking website 15 minutes early using as many devices as possible (computers, phones, ipads, etc). At release time, everyone on the website is entered into a random generator that assigns you a position in the queue. All of your devices will be assigned a place in line, then proceed to book your permits on whatever device has the shortest queue.
  • Once you get access, be flexible with both your starting date and itinerary. Use the “calendar” option to see available dates at each campsite. Consider shortening your itinerary by exiting on the Numa Creek or Tumbling Falls Trails.
  • If you don’t see any availability, keep refreshing for at least 15 minutes. With so many people trying to book campsites, dates are always disappearing and then becoming available again, so if you don’t see anything, keep refreshing.
  • Be prepared that you might not get what you want. Book alternative sites and sign up for cancellation notifications on Schnerp.
20230829_162446

National Park Pass

In addition to backpacking permits, which are specific to your campsite, you must also have a National Park Pass. These are much easier to obtain – there is no booking period and the number of passes are not restricted. The most common option is to purchase the discovery pass, which is available for $150 for a family, or $75 per person. It’s essentially an annual pass that covers everyone in your car. You leave it hanging in the car while you’re on the trail and it acts as a parking pass. If you have two cars, then you would need two passes. Alternatively, you can buy single adult day passes for everyone, which are $11 per person, per day. However, in 2025 and 2026, Canadians can obtain the Canada Strong Pass for free, which includes a free discovery pass and 25% off bookings! You can purchase passes online, in advance, or in person at the Kootenay and Banff park entrances.

Campsites

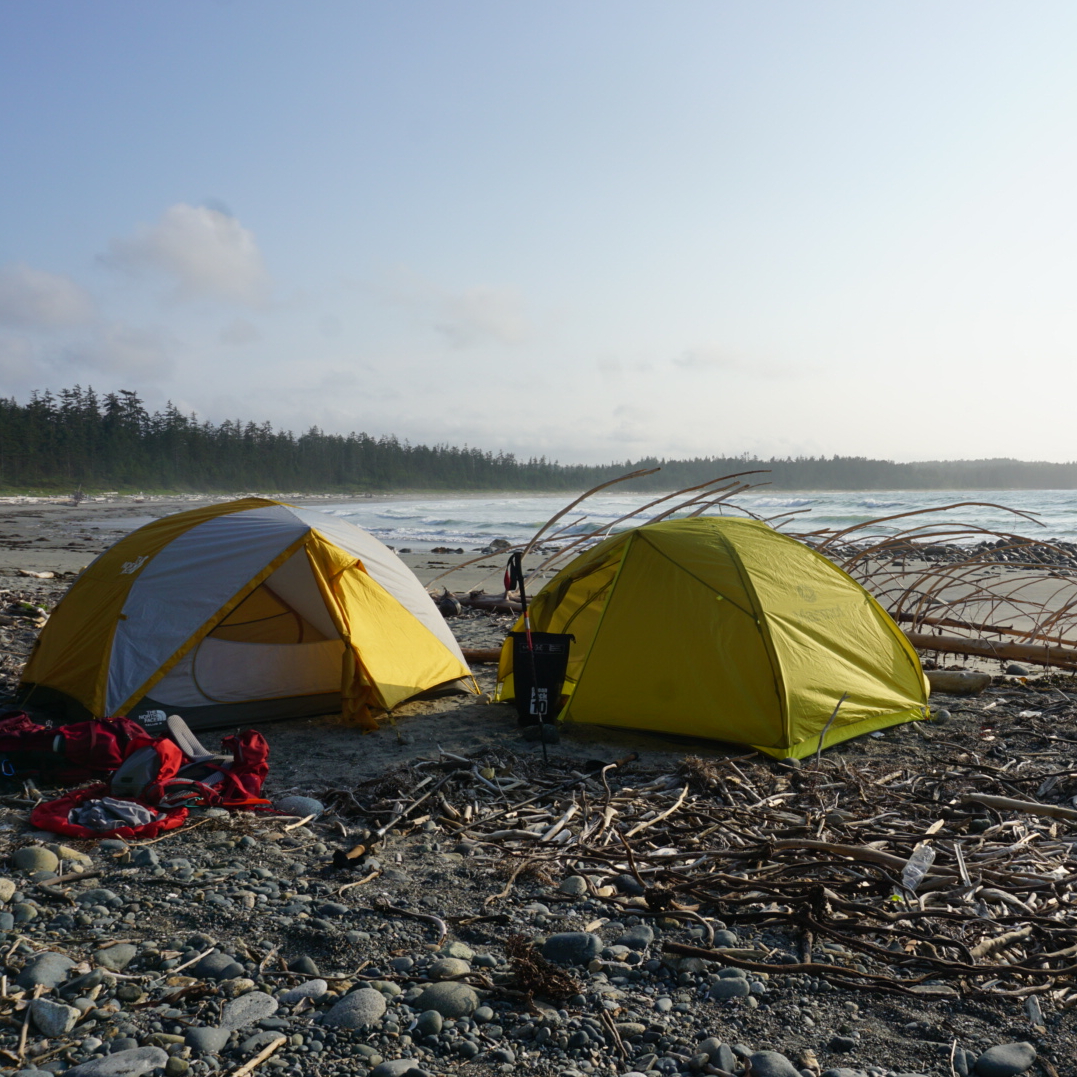
There are 5 backcountry campsites located along the trail, so there are multiple options for where to stay, which provides some flexibility when planning your itinerary and securing bookings. The campsites are pretty equally spaced along the trail, so it is easy to plan for a more relaxed itinerary, or you can plan your sites further apart if your itinerary is more aggressive. I’ll discuss itineraries below, but here’s an overview of the campsites running from north to south. They all include outhouses and bear lockers, and require valid permits for overnight use.

20230830_114825

Helmet-Ochre Junction – This is the most accessible campground on the trail, located 6km from the Paint Pots trailhead. It’s located along the river at a trail junction and has 6 tent sites. It’s a nice enough campground, but it’s often overlooked in favour of the more popular/scenic campsites. If you can’t get permits for Helmet Falls, this is a good alternative. It’s also a great option if you’re starting late in the day and don’t want to hike too far.

Helmet Falls – This is a beautiful campground located at the base of Helmet Falls, which cascades down the valley from Helmet Mountain. There are 18 tent sites and you can enjoy the view from the picnic area at the back of the campground. This is a great option to camp before or after you’ve hiked along the Rockwall.

Tumbling Creek – This campground is located at the bottom of the valley between Rockwall Pass and Tumbling Pass. There’s 18 tent sites and easy access to the river with nice views. This is a great option to camp before or after you’ve hiked along the Rockwall. You can also come direct to the campground along the Tumbling Creek Trail, which starts at the Paint Pots trailhead.

Numa Creek – This is the lowest elevation campground on the trail and is located between Tumbling Pass and Numa Pass. There’s 18 tent sites and easy river access. This is a great place to camp on your way to or from Floe Lake. You can also come direct to the campgound along the Numa Creek Trail, which starts at the Numa Falls trailhead.

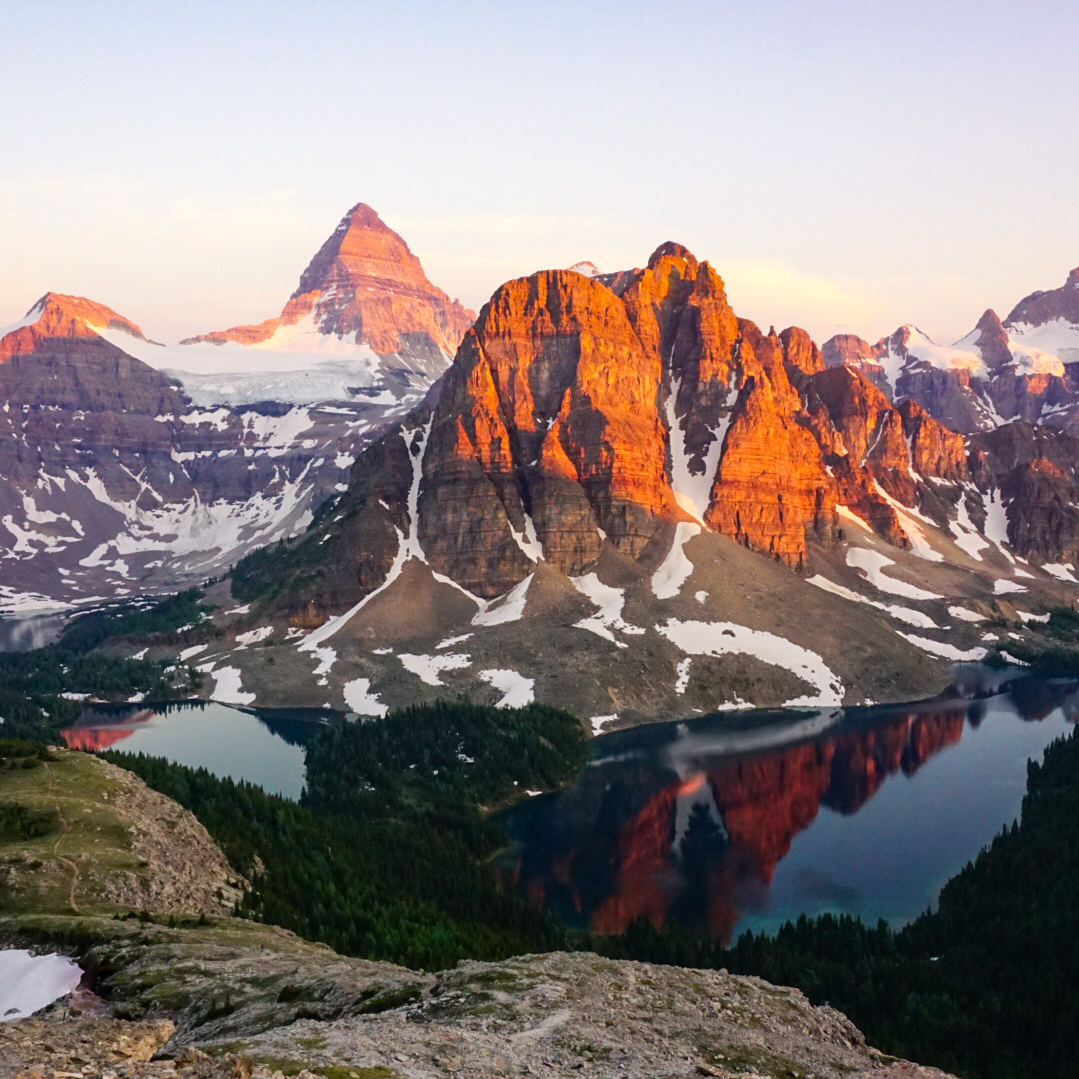
Floe Lake – This is the most popular campground on the trail. If you can score a permit for this campground, do not hesitate to book it. The entire trail is very scenic, but Floe Lake is definitely the most scenic campground. It has 18 tent sites and is located 11km from the Floe Lake trailhead.

Itineraries

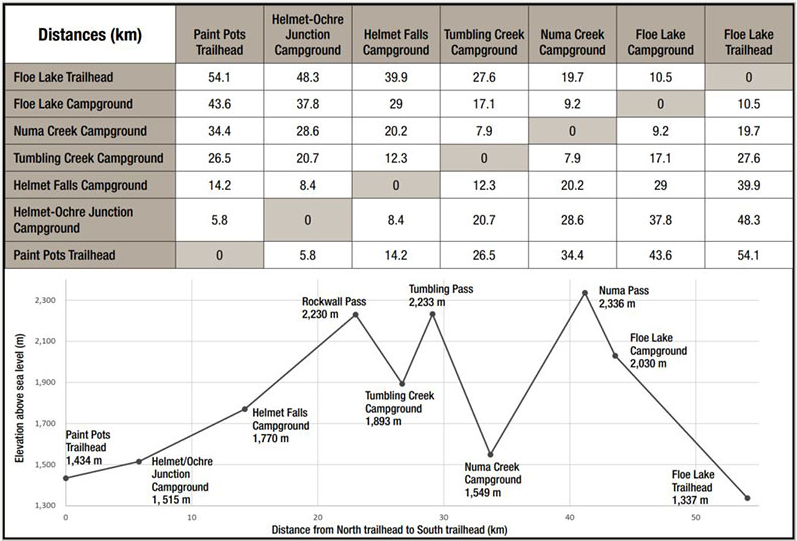
Planning this trail is pretty straight forward because it is a linear thru-hike. Your main decisions will be what direction to hike and over how many days. Here are a few recommendations based on how many nights you plan to spend on the trail. And here’s a useful trail graphic from Parks Canada, noting the distance between each campsite.

1-Night: Your best option if you only have 1 night is to camp at Floe Lake, hiking in and out from that trailhead. Add on 2km each way to hike up to the top of the nearby pass for a fantastic birds-eye view of Floe Lake. Alternatively, if you really want to see the Rockwall, you could spend 1 night at Helmet Falls and hike out via the Rockwall and Tumbling Creek Trail. You just have to be prepared for a big 20km day on day 2.

2-Night: 2 nights is probably the most awkward itinerary, because you can hike most of the trail, but it’s ambitious to do the whole thing. If you want to do the whole trail, I’d recommend camping at Helmet Falls and Numa Creek, which requires you to hike two 20km days back to back. If you don’t want to do the whole trail, hike north, camping at Floe Lake, followed by Tumbling Creek, and exit on the Tumbling Creek Trail. Or hike south, camping at Helmet Falls, followed by Numa Creek, and exit on the Numa Creek Trail. Hiking north allows you to visit Floe Lake, while hiking south allows you to hike the Rockwall. If you want to hit both, you have to do the whole trail.

3-Night: I did the trail in 3-nights, which I thought was a good length. Plan for your first and third nights at either Floe Lake or Helmet Falls (doesn’t matter which direction you go), and then your second night at either Tumbling Creek or Numa Creek. You will have one long day with this itinerary, but you can plan it around whether you’d like to have extra time at Floe Lake or on the Rockwall. I hiked south and camped at Numa Creek, meaning I had lots of time to relax at Floe Lake on my last night.

4-Night: This is the most relaxed itinerary. Do the trail in either direction and camp at Floe Lake, Numa Creek, Tumbling Creek, and Helmet Falls. You’ll have lots of time to enjoy Floe Lake, the Rockwall, and Helmet Falls.

20230829_150852

10 Epic Thru-Hikes in BC

If you’re an avid backpacker already and looking for an epic adventure, there are lots of multi-day trips in British Columbia to whet your appetite. I’ve only done a small sample of what BC has to offer, but these are some of my favourite thru hikes! If you’re a beginner, check out my Guide to Backpacking and Overnight Trips for Beginners posts, as well as my safety resources.

A thru-hike is basically a trip that starts and ends at different locations, allowing you not to repeat any trail. They can be somewhat harder to coordinate and plan because 2 vehicles are often needed and the trailheads may be several hours apart from one another. I don’t recommend any of these trails for true beginners as they are all multi-night trips, several of which are in more challenging or technical terrain. But if you’re an intermediate or experienced backpacker and looking to get outside for extended periods of time, check out some of these trails!

Howe Sound Crest Trail 

The Howe Sound Crest Trail (or HSCT), is the closest trail to Vancouver on this list, as well as one of the shortest. That might lead you to believe that it’s one of the easier trails, but that is not the case. I think a lot of people stumble onto this trail who are not quite prepared for the steep and technical terrain, so definitely proceed with caution. The trail is 30km long and runs from Cypress Mountain to Porteau Cove. It can be done as a 1 or 2 night hike and most people start from Cypress because then it’s a net downhill trail. There are no facilities, so be prepared to do a bear hang and dig cat holes for your waste.

I prefer to do this trail as a 2-nighter and camp at the Enchantments and Brunswick Lake, but there is no water on trail until the halfway point, so if you camp at the Enchantments, you need to do a large water carry. The trail crosses between the Lions and up and down through several small summits. The start and end to the trail are pretty straight forward, but the trail gets very technical in the middle. If you’d like to extend the trip, you can consider summiting Mount Harvey and Mount Brunswick along the way. It’s a gorgeous trail with unparalleled views of Howe Sound. 

Helm Creek Trail

A hiking trail extends through the alpine of Garibaldi Provincial Park towards Helm Lake, with the forest and mountains in the background on a sunny day in British Columbia, Canada

This route doesn’t have a formal name, but extends from Rubble Creek to Cheakamus Lake in Garibaldi Provincial Park, near Whistler. If you’re on my website, most likely you’re familiar with this trail because of the popular trips to Garibaldi Lake, Black Tusk, and the iconic Panorama Ridge. Lots of people explore these trails as a day hike or a 1-nighter from Garibaldi Lake or Taylor Meadows. But I always recommend turning it into a multi-day trip by continuing on to Helm Creek. This trail is more appropriate for newer backpackers because of its substantial facilities. 

This hike can be customized to whatever length you prefer. Start at Rubble Creek and spend a few nights at Taylor Meadows or Garibaldi Lake and explore Black Tusk or Mount Price. When you’re ready to go to Panorama Ridge, pack up your camp and stop at the ridge on the way to the Helm Creek Campsite, which takes you through the gorgeous Helm Lake area. From there, you hike down towards the Cheakamus Lake parking lot. If you want to extend the trip further, make a detour to Cheakamus Lake or Singing Creek campsites. This hike requires camping reservations, which release 4 months in advance of your date from camping.bcparks.ca.

HBC Heritage Trail

A photo of Palmers Pond on a summer day, with the green meadows, forest, and mountains in the background, on the Hudson's Bay Company (HBC Trail) near Hope in British Columbia, Canada.

In my opinion, this is one of the most challenging trails on the list (except for maybe the North Coast Trail). HBC stands for Hudson Bay Company and is a historic trail that was originally used by the First Nations and later by the fur trade. The trail is 74km long and extends through the mountains from Hope to Tulameen. A lot of the trail is through the forest, but it has some gorgeous campsites and views along the way. It’s not an overly popular trail and you likely won’t see many people on it if you like solitude. 

What makes this trail challenging right now is the state of the trail. The trail has been revitalized in recent years and has a dedicated volunteer maintenance group, but the 2021 flood was particularly hard on this area. Volunteers have been working to clear the trail, but there is still quite a lot of blowdown in some sections and the trail does require fording at least 3 rivers. All of the campsites have nice facilities, so if you give yourself enough time to navigate the technical terrain, it is a beautiful trail.

Heather Trail

If you’re new to thru-hiking, the Heather Trail would be my recommendation. This is a relatively easy trail, with gorgeous views and brand new facilities. It’s located in E.C. Manning Park and can be done over 2-3 days. The trail starts at the top of Blackwall Road, which means most of the challenging elevation gain is done in the car. Technically, the Heather Trail is 21km, ending at Nicomen Lake and requiring an out-and-back trip. However, if you connect to the Grainger Creek and Hope Pass Trails from Nicomen Lake, you can turn this into a ~40km thru-hike, ending at Cayuse Flats.

Over 2 nights, I would camp at Kicking Horse and Nicomen Lake, or you could add a night at Buckhorn Campsite at the start of the trip and take your time. The trail is all in the trees after Nicomen Lake, and even though it’s 17km from Nicomen to Cayuse Flats, it’s a very easy trail, though there is another campsite option at Grainger Creek. You do need backcountry reservations to stay at these sites as of 2024, which can be obtained 4 months ahead of your trip at camping.bcparks.ca.

Skyline II Trail

I love Manning Park and the Skyline II Trail is one of my all time favourites. This trail is more difficult than the Heather Trail, but still a relatively easy trip. The trail is approximately 25 kilometres from Strawberry Flats in Manning Park to Whitworth Meadow in Skagit Valley Park. There is one campsite at the halfway mark, Mowich Camp. 

While this hike can be done in one night, I highly recommend doing 2 nights at Mowich Camp and making a detour to hike the 15km round trip trail along Hozomeen Ridge and back. This trail will take you to the border monument and a fantastic view of Hozomeen Mountain in the US. The trail itself is easy to follow and takes you through gorgeous alpine meadows. The campsite is pretty basic and the water source can run dry later in the summer. A backcountry permit is needed and can be obtained 2 weeks prior to your trip at camping.bcparks.ca.

Sunshine Coast Trail

Sunny view of the ocean and beach at Fairview Bay on the Sunshine Coast Trail in British Columbia, Canada

This is the longest trail on my list, but is hands down my favourite thru-hike ever! The Sunshine Coast Trail (or SCT) is 180km and extends through the entire upper Sunshine Coast, from Sarah Point on the Malaspina peninsula, to Powell River, and down to the ferry at Saltery Bay. The SCT is unique because it is a hut-to-hut hiking route, which means you can do the entire trail, staying in free mountain huts along the way. 

The trail can be a challenge to coordinate in terms of transportation and food carries, but it is incredibly well maintained by volunteers, with gorgeous facilities. You can do a section of the trail, or commit to the entire thing. The trail is primarily in the forest and tackles a lot of cumulative elevation gain. There are tons of lakes to enjoy a cool swim and some amazing viewpoints along the way. The trail can get busy, so if you plan to stay in the huts, you should still bring a tent with you as a back-up.

Juan de Fuca

The Juan de Fuca trail is often touted as a great beginner coastal trail. It is good in that it’s a lot easier than its more popular sister trail, the West Coast Trail, but it is still challenging in its own right. It’s a 47km trail on Vancouver Island between Port Renfrew and China Beach. There are several nice campsites located both in the forest and along the beaches, but like all the coastal trails on the island, it can be very technical and muddy.

It’s been several years since I did this trail and I have heard that some parts have received much needed maintenance since I did it, but it will still be quite muddy in early summer and there are several tidal points on the trail that require advance planning to cross. The nice thing about this trail is that there are several bailout points that connect to the highway if the trail is too challenging. Backcountry permits are required and can be obtained 2 weeks in advance from camping.bcparks.ca.

North Coast Trail

Two tents camping on a golden sand beach with drift wood and the forest and waves of the pacific ocean in the background at sunset on Irony Creek Beach in Shuttleworth Bight on the North Coast Trail on Vancouver Island in British Columbia, Canada.

The North Coast Trail (or NCT) is probably the hardest hike on this list. It’s much less popular than the West Coast Trail, but the traffic to this hike has definitely been growing. The NCT is a ~60km hike on the far north coast of Vancouver Island. It has a reputation for being extremely muddy and it doesn’t get very much maintenance. The NCT is only accessible by water taxi, so most people add on another ~25km of hiking to Cape Scott to finish this trail.

The Cape Scott Trail is accessible by dirt road and is better maintained than the NCT. The highlights of both trails are the gorgeous, remote beach campsites. There are several tidal points on the trail and you should be prepared for a very slow hiking pace through extremely technical terrain. But you’ll also likely get to view bears, eagles, and if you’re lucky, maybe even a wolf. Backcountry permits are required for this hike and can be obtained 2 weeks ahead of your trip at camping.bcparks.ca.

Mount Assiniboine

A photo of Mount Assiniboine and Sunburst Mountain and Cerulean Lake at sunset from the Nub in Assiniboine Provincial Park in British Columbia, Canada.

Mount Assiniboine can be accessed as a loop trail, thru hike, or by helicopter. Of course, I did the thru hike option. Mount Assiniboine is one of BC’s premier mountain campsites and there is a lot to explore from the core area of the park. We planned for 3 nights in the Magog Lake Campground, and 1 night on either end of the trip to hike in and out. While Assiniboine Park is located in BC, the hike is accessed through Banff National Park in Alberta.

Take the gondola up to Sunshine Village and hike through the alpine meadows to Porcupine Camp on night one, then continue to Assiniboine for several days in the park. Explore Magog Lake, Cerulean lake, and Sunburst Lake, as well as the iconic hike up to the Nub for sunset. On your way out, hike through beautiful Wonder Pass and camp at Wonder Lake before ending your hike at Mount Shark. You will need to coordinate 2 vehicles and book backcountry reservations for Assiniboine 4 months in advance at camping.bcparks.ca, as well as backcountry reservations for Wonder Lake at reservation.pc.gc.ca, which release sometime in March for the entire season. 

Rockwall Trail

The Rockwall on a sunny day with the mountains in the background and the forest in the foreground with blue sky in Kootenay National Park in British Columbia, Canada.

The Rockwall Trail is another extremely popular trail located in Kootenay National Park. It’s a 55km trail from Paint Pots to the trailhead for Floe Lake that is incredibly scenic. There are a number of campsites along the trail and it can be done in 3-4 nights. Floe Lake is the most popular campsite on the trail, but I also highly recommend staying at the Helmet Falls campsite. Along the way, you can stay at Tumbling Creek, Numa Creek, or both, they’re pretty similar sites. 

The trail is very well maintained and has lots of facilities. Campsites release for the entire season in March at reservation.pc.gc.ca, so make sure you watch for the release date, because the sites will sell out immediately. If you’re lucky enough to score permits, enjoy this beautiful trail through the Rocky Mountains and past the iconic Rockwall. 

Kootenay National Park Guide

Let’s start off with a disclaimer – there’s a lot to do in Kootenay National Park – I’ve still only done a fraction of what there is in the park, but after spending a week there, I feel like I got a good idea of what a lot of the attractions are. There’s still lots for me to return and explore, but here’s some of my learnings after 1 week.

Getting There

Kootenay National Park is characterized by Highway 93. It runs through the entirety of the park and it’s from this highway that you access all the attractions. Put simply, you can either enter through BC or through Alberta. If you’re coming from Calgary (as we were), the obvious option is to drive Highway 1 through Banff and then take the exit for Highway 93. If you’re coming from BC, it’s the same distance from Golden to either park entrance, so it all depends on which direction you’d like to drive. You can access the park through Radium, which in my opinion is the nicer direction because that’s the official park entrance and you can get your park pass there. But there’s nothing wrong with entering through Banff National Park. Leave lots of time for your drive either way because there’s so much to see in the park!

20230902_142932

Where to Stay

Where to stay depends on what kind of sleeping experience you’re looking for. If you’d like to stay in a hotel, I’d recommend Radium. It’s right on the doorstep of the park and has lots of options for cheaper accommodations. You could also stay in Lake Louise or Banff, but be prepared to shell out a lot more money for these options.

If you’d like to camp, then there will be a lot more options available to you and you’ll be able to stay directly in the park. But you have to be prepared to book sites when they release around March because all of the National Parks are popular and they book up fast. See the next sections for more information on your camping options.

20230902_125850

Frontcountry Camping

If you’re new to camping, then frontcountry camping is what you’re looking for. These are drive in sites, so you can store lots of things in your car and they’re a bit easier to get to than backcountry sites. There are 3 frontcountry sites in Kootenay National Park – all can be booked through the Parks Canada reservation site, check early in the year for the date that sites will be released.

Redsteak Campground – This is the largest campground in the park and therefore the easiest to get into. it’s located very close to Radium. It has 242 sites and is usually open from late April to early October.

McLeod Meadows Campground – This site is located in the valley, along the banks of the river in the middle of the park. It has 88 sites and is usually open from early June to early September.

Marble Canyon Campground – Marble Canyon is a large attraction on its own and this site is located in the sub-alpine with nice mountain views. It has 60 sites and is usually open from late June to early September.

Full disclosure, I haven’t actually stayed at any of these sites, but I would like to try for McLeod or Marble one day!

20230902_135748

Backcountry Camping

Backcountry camping is my preferred method of camping, but it is a whole different beast than frontcountry. It revolves around hiking and you have to carry everything you need on your back, so you should only attempt backcountry if you’re aiming to complete a hike.

As far as backcountry camping goes, there are limited options in Kootenay. All of these sites are on the Rockwall Trail (a 54km hiking trail), with the exception of Verdant Creek (which is now closed). Though you don’t have to commit to doing the entire Rockwall Trail if you want to visit some of these sites, many have alternative entrances.

Helmet-Ochre Junction Campground – A small campground along Helmet Creek. It’s a 6km walk to the campsite. It’s a good stopping point along the Rockwall Trail or for a 1-nighter if you just want to visit Paint Pots or Helmet Falls. It’s pretty easy hiking to this site, good for beginners.

Helmet Falls Campground – A larger campground located at the base of Helmet Falls. It’s a 14km hike to the site and is most commonly used along the Rockwall Trail, though you could stop here for 1 night if you just want to visit the Falls. Alternatively, you could camp here for 2 nights and do a day hike up through the pass to the start of the Rockwall and back.

Tumbling Creek Campground – A larger campground located where Tumbling Creek meets the Rockwall. It’s a great place to stop on a thru hike of the Rockwall Trail, or you can do a 10km hike on the Tumbling Creek Trail. It’s a fairly gentle climb up to the campground. I haven’t done the Tumbling Creek Trail, but if I was to enter the Rockwall this way, I would plan to stay for 2 nights and day hike along the Rockwall.

Numa Creek Campground – A larger campground located on Numa Creek. It’s a great place to stop on a thru hike of the Rockwall Trail, or you can do a 6.5km hike on the Numa Creek Trail. It’s an easy trail to the campsite, but Tumbling Creek is closer to the Rockwall if you’re planning on day hiking there. As a thru hike, I recommend staying at Numa, but as a day hike, I’d recommend Tumbling.

Floe Lake Campground – The most popular campsite in the park. This campground is located right on beautiful Floe Lake. It’s a 10.5km hike up to Floe Lake with considerable elevation gain. It’s the most challenging hike on the list, but the most rewarding. A perfect end if you’re doing the entire Rockwall Trail.

Verdant Creek Campground – This site was extensively damaged in the 2017 wildfires and is no longer recommended. It was previously used as an alternative access to Egypt Lake in Banff National Park.

20230830_195556

Hiking

The Rockwall Trail – One of the biggest attractions in the park. This 54km trail is extremely popular and travels along gorgeous alpine terrain. Recommended as a 3-4 night thru hike.

Stanley Glacier – Another popular attraction in the park, this 11km trail can be done as a day hike and covers a lot of elevation gain. You can hike it on your own, or if you’re a fossil enthusiast, pay for a guided hike with Parks Canada!

Cobb Lakes Trail – A shorter trail on the west side of the park, day hike 5km and back to picturesque Cobb Lake for the day.

Dog Lake Trail – A fairly easy 7km trail that leaves from McLeod Meadows campground, with beautiful views of the surrounding valley.

Simpson River Trail – A flat and easy trail along the Simpson river, customized to your preferred length. The trail continues all the way to Mount Assiniboine if you’d like to hike 12km to Sunrise Creek Campground and continue on further.

Ball Pass Trail – I wouldn’t recommend this trail unless you’re backpacking and continuing on to Sunshine Village, in which case, this beautiful trail covers a lot of elevation gain and kilometres. Stay at the Ball Pass Campground or infamous Egypt Lake.

Arnica Lake – A very scenic trail that hikes down to Viewpoint Lake and then back up to Arnica Lake. It’s 10km in total and is very popular in the Fall when the larches turn yellow. (technically this trail is in Banff, but it’s so close to the border)

Boom Lake – Another trail in Banff, but Boom lake is a scenic 10km trail with moderate elevation gain to a gorgeous lake.

IMG-20230902-WA0004
20230902_135404

Roadside Attractions

Since I spent most of my time in Kootenay National Park on the Rockwall Trail, I was more keen to explore all the roadside attractions rather than do more hiking. We spent a full day driving the 100km of road between to the two park entrances and there were tons of attractions to keep us busy all day! Starting from Radium, here are my recommendations:

Sinclair Canyon – Towering canyon walls as you enter the park. Stop for some photos and walk along the pedestrian sidewalk through the canyon.

Radium Hot Springs – Gorgeous commercial hot spring and pool just within the park boundary. Perfect in the winter or on a cloudy day. Walkable from Redstreak Campground.

Olive Lake – Short walk to turquoise waters and a fish conservation area located in Sinclair Pass.

Kootenay Valley Viewpoint – Rest stop with panoramic views of the Kootenay Mountains and Kootenay River across the valley.

Kootenay River Day Use Area – Rest stop with a few picnic tables and an excellent view of the river.

Numa Falls – Short walk to a bridge under which the rushing Numa Falls are channeled to the Vermillion River.

Paint Pots – 1km walk each way to see the red ochre soil that makes up the traditional paint pots.

Marble Canyon – Go back in time along the 1.5km loop trail to see how Tokkum Creek has formed the canyon over thousands of years.

Continental Divide Rest Stop – Photo op where the Rockies collide, separating BC from Alberta, and the flow of water to the Atlantic and Pacific Oceans.

Vista Viewpoint – Technically in Banff National Park, but the last stop along Highway 93 with beautiful views of Arnica Lake.

20230902_143801
20230902_140847

National Park Pass

Before visiting, make sure you get your park pass either at the entrance in Radium, or when you drive through Banff National Park. You will need it to park everywhere inside the park. It’s $10 per person, per day, or you can get the family pass for the whole year for $145, which is applicable to all National Parks in Canada.