I needed a bit of a writing break to start the year. I had a lot of summer and fall adventures to write about, but it’s been pretty low key for me in December and onwards. I was hoping to go on some winter adventures through the holidays, but it’s been a very late start to winter in BC and to be honest, I needed some rest time. So mostly I spent my holidays holed up inside doing jigsaw puzzles and listening to audiobooks.
To start the year, I decided to expand my Newfoundland series for the next few weeks since I don’t have a lot of winter activities to write about at the moment. I’ve been working on completing the East Coast Trail for several years now and I think I might be in a position to finish it this year, so I figured it’s a good time to get caught up on some of my trails!
I first did Biscan Cove Path back in 2016 and at that time, the road to Cape St. Francis was in really rough shape and Biscan Cove Path itself took a lot longer than I anticipated. I returned to the trail in late June 2023 and generally had a much better experience on the trail than in 2016. Biscan Cove Path runs from Pouch Cove to the lighthouse at Cape St. Francis, which is the most northerly point on the East Coast Trail. At one point, I think it might have been the start of the entire ECT, but the trail has since wrapped down the other side of the avalon peninsula towards CBS.
This was a bit of a tricky trail for section hikers because the paved road pretty much ends in Pouch Cove and the gravel road to the lighthouse used to be in really terrible shape. But it was recently graded, so it’s much easier to do this trail with 2 cars now. The first time I did it, I skipped the extra 1km to the lighthouse and hiked from Biscan Cove to Pouch Cove. On my more recent visit, I started in Pouch Cove and generally liked the experience more because you can end at the lighthouse, which is a really nice place to whale watch while eating your lunch.
You can park your car next to the field at Memorial Park in Pouch Cove and then walk up the road to the trailhead at Baldhead Road. It’s just over 8km from Pouch Cove to Cape St. Francis and it took me and Mom a little over 2.5 hours to do last summer. We made a pretty quick pace with just the two of us, but it can be a deceiving trail. When I did it the first time, it took us more like 4 hours to complete, but it was with a much bigger group and we picked a lot of blueberries.
I actually like this trail a lot though. There’s quite a few forest sections, but there’s also a lot of viewpoints. It’s a fairly varied trail and Mom and I pushed all the way to the end before stopping. The trail technically ends at Biscan Cove, where there’s a parking lot. It’s another 600m to hike out the road to the lighthouse at the point, but it’s definitely worth it to walk out there, more so for the whale watching than the lighthouse.
As usual, it was really windy out there, but we sheltered by the side of the lighthouse and ate our lunch while watching the whales play. The first time I did the hike, I brought 2 cars. On this occasion, we didn’t have a second car, so I convinced mom to just walk back the gravel road to Pouch Cove. It does add another 4km to the hike if you walk back the road, so Mom was really cranky about adding another hour to the walk on the way back.
Fortunately there were some other hikers around at the same time, so we only had to walk 0.5km before we were able to hitchhike back to Pouch Cove with a friendly hiker. The East Coast Trail doesn’t see that much foot traffic and the gravel road to Cape St. Francis sees even less, so this is definitely not a reliable option. But it also wasn’t a big deal to me to walk another hour back to the car (though driving was definitely preferable).
So overall, Biscan Trail is a pretty short path, but it’s located close to St. John’s, so it makes for a nice afternoon hike in the summertime! I was happy to return to see the lighthouse.
I finally crossed off a major bucket list item! Seth and I have been dying to visit Desolation Sound Marine Park since we got our kayaks and have had to cancel the trip 3 times in the last 2 years. I feel like this has been a common theme with a lot of my planned trips since the pandemic, but we finally made it happen over the May Long weekend this year!
For those who aren’t familiar, Desolation Sound is a marine park north of Powell River on the Sunshine Coast. It’s located at the tip of the Malaspina Peninsula, which is where the northern trailhead is for the Sunshine Coast Trail. So it was a familiar location for me after making 2 trips to Powell River last summer to complete the SCT.
Originally we were focused on visiting Desolation Sound, but as I did some more research, I discovered it’s really easy to tag a second marine park onto the trip and we added Copeland Islands Marine Park to our itinerary as well. Here’s a map of the area:
Doing both parks in one visit requires a bit more coordination, but it ended up being easier than I anticipated. Getting to Powell River is always a bit of a pain, but we caught the ferry out of Horseshoe Bay on Thursday evening before the long weekend, following by immediately driving up to Earls Cove to catch the second ferry to Saltery Bay. There’s a provincial campground at Saltery Bay and we stopped to sleep there for the night. We didn’t book in advance since it was still Thursday and we were able to just drive in, but I always recommend getting reservations where possible on the weekends.
It’s a nice little campground at Mermaid Cove, but we didn’t stay for long and headed straight for Powell River instead. After a quick restock at Canadian Tire for some items we forgot, we drove north to Lund (~30 min drive). Lund is a tiny little community that is easily accessible in any type of vehicle, though once you go north from Lund, you should really have high clearance 4WD. We unloaded our kayaks in Lund and then I called Powell River Taxi for a transfer from Okeover Arm back to Lund. I was expecting to have to wait a while for a car to come up to Lund, but there happened to be a driver nearby, so I rushed the car over to Okeover Arm to park it for our return.
Okeover Arm is on the other side of the Malaspina Peninsula and less than a 10 minute drive from Lund. It’s also a paved road and easily accessible. There’s a public wharf with parking registration if you’re using the wharf (either with a power boat or self-propelled). If you drive a little further past the public wharf, you’ll arrive at Powell River Kayaks and you can rent kayaks from there.
I didn’t have any trouble finding the parking lot at Okeover, but figuring out how to pay for parking was super confusing. Start by driving down to the dock and at the end of the wharf there is a little shed with parking registration, you take a ticket, leave your money in the envelope, and put it in the drop box. It’s not really that complicated, but I had to tear my car apart looking for a pen to fill out the parking slip, so make sure you bring a pen with you! Parking is only $5 a day, so it’s a very good deal! As for camping permits, they’re also $5 a night, per person, which you can get online, but they don’t start charging until June 1 (in 2023 at least).
But lets get to the fun part, kayaking!
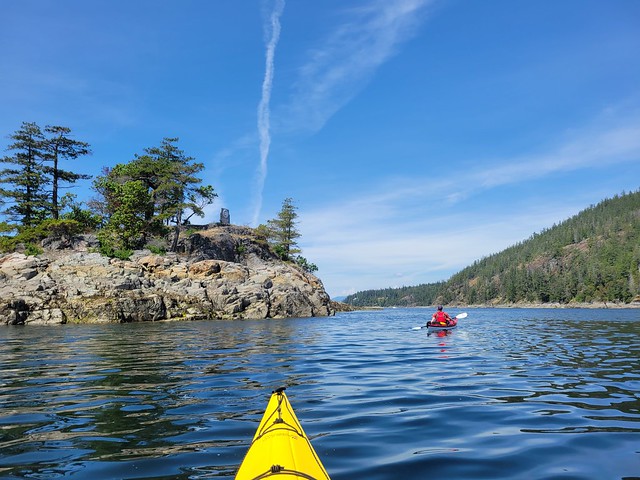
I returned to Lund around noon and Seth had the kayaks mostly packed. It’s a bit confusing where to launch from because kayaks aren’t allowed on the boat ramp, but there’s a small beach behind the grocery store and we launched from there. Tide was very low, so it was a bit tricky, but there was very little wind, which was lovely!
What I liked about this trip was that, once you launched, you were pretty much immediately in the wilderness. We saw a black oystercatcher within 5 minutes of paddling (special to us because Seth did his M.Sc thesis on them) and more exciting, we saw our first sea lion within 30 minutes of paddling!! We’ve never seen a sea lion from our kayaks before, so it was exciting and a little intimidating. They’re a lot bigger than seals, but fortunately this guy kept his distance. We can’t be sure, but Seth thinks it was a Steller Sea Lion. We ended up seeing 3 in total over the course of the weekend, though we heard them from some of our campsites as well.
In general, my understanding is that the Copeland Islands are more susceptible to adverse weather conditions than the route that goes through Okeover Inlet because it’s not sheltered and can get a lot windier. Our experience with wind was that it’s definitely calmer in Okeover Inlet, but that Okeover can get some pretty strong currents depending which way the tide is flowing up the inlet. Timing is really important, so give special consideration to the tides and wind when selecting your route. If windy, I’d stick with Okeover, but leave when the tide is going out.
Fortunately there was very little wind along the Copeland Islands when we visited, so we had a really nice paddle through the marine park. We followed the coast until we hit the islands and then immediately crossed over to paddle along the islands. Our experience with the marine parks was that it’s really important to pay attention to the tides. At high tide, there’s not a lot of beaches to land on and some of the campsites can even be tricky to get to; but at low tide, there are a lot more beaches and potential places to explore. The difference between low and high tide on our trip was 4.5m! So the difference can be quite extreme.
Because the tide was very low when we started paddling, we took a break pretty early after arriving at the islands to eat our lunch on one of the beaches. The beach was absolutely covered in oysters! You are allowed to harvest them with a fishing license, which would have been amazing, but there was a red tide warning in effect, which makes it very dangerous to eat any shellfish, so we just enjoyed with our eyes.
Low tide exposes a lot more islands and we had fun paddling up to the campsites. We were moving pretty slow on Day 1 because of all the provisions we had packed into our kayaks. There wouldn’t be any freshwater sources on our entire 4 day trip, so we had about 35L of water (or 70 pounds) between our two kayaks, plus food and camping equipment! So I definitely felt sluggish on the first day, but it encouraged us to drink a lot of water. It was very hot (high 20’s), so this was probably a good thing!
The first campsite is Middle Copeland Island. This campground is pretty exposed and while it has several tent pads, there’s not a lot of shade. I’d read online that North Copeland Island was nicer, so that was our final destination for Day 1. I don’t think anyone camped at the Middle Island that night, but there were several groups at the North Island. Fortunately there’s a lot of tent pads, so it didn’t feel crowded at all.
We saw some kayaks landing at the south beach on the Island as we approached. There’s two access points, so we decided to go around to the north beach to land our kayaks. Unfortunately we didn’t realize that with the low tide, the cluster of islands around North Copeland all become one big island, so we had to paddle around all of them and weave our way into the beach. There’s 3 main sections to the island, with a cluster of tent pads on the south, a few on the north, and then a bunch more on the west head. I wanted to camp at the head, but after we landed, we couldn’t find any way to get over there and ended up camping on the north side. It was a great choice as we had more shade and an incredible view! Plus all the other kayaks camped on the south side, so we had it all to ourselves. A motorboat landed on the head later in the evening and dropped off a few families, so I think that’s the only real way to access that area unless you land your kayak on the rocks.
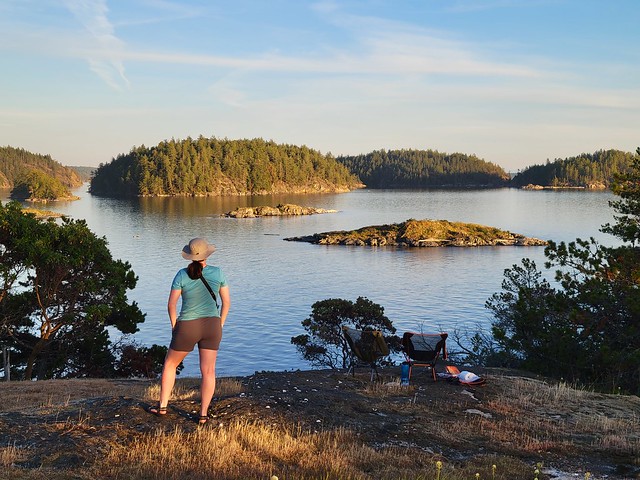
Unloading at low tide was a bit of a pain in the ass though. The beach was huge, so it took us a few trips to move all our gear up to the island and then we found one small grassy landing to store our kayaks. But overall, I loved North Copeland Island! I think it may be my favourite site on the trip. We arrived around 2:30pm after ~10km of paddling, so we had lots of time to enjoy and explore the island. I set up my hammock and watched as the tide started to come in. Once it got high enough, I decided to go for a swim and was shocked by how warm the water was! It was still only May, but after 2 weeks of consistently hot weather, it was incredibly warm and very comfortable for swimming. It honestly felt like it was mid-summer! Since visiting, I did a bit more research and apparently Desolation Sound gets some of the warmest water north of Mexico! Not sure if I believe that or not, but the evidence pointed to yes.
I’m honestly not sure how we passed so much time on this trip. I didn’t really do anything on the island besides swim and lounge around. I didn’t read at all, but I was totally content to just sit in my chair or lie in my hammock and watch nature. It’s weirdly compelling to slowly watch the tide come up and we had a friendly seal hanging around all day. Seth did some exploring on the beach and we generally just took it easy, which was lovely.
The island itself is pretty interesting. It’s a decent size, but a lot of it isn’t really accessible to explore. From our tent pad, we could climb up to the top of the island and we spent most of golden hour up there enjoying the view. Before sunset, we decided we would go for a sunset paddle and since the tide was now so high, we were able to easily launch the kayaks. It was the nicest sunset of the trip and the water was dead calm, so we enjoyed paddling around for a half hour before heading to bed. It stayed warm into the evening and because we were so low in elevation, we slept with the fly off the tent to enjoy the view and the stars. The wind picked up a bit overnight, but it was a great first day of the trip! Check back for Part II.
In my opinion, Mickeleen’s Path is one of the best mid-length day hikes for when you only have one vehicle. This section of the trail goes from Bay Bulls to Witless Bay, so it’s only about a 40 minute drive from St. John’s and it has a convenient ATV trail that you can use to loop back to where you started instead of having to hike back along the entire trail. There’s nothing to see on loop back, so the official ECT section is a lot more scenic, but if you want to cut some time off, you can walk back along the ATV track instead.
When driving there, turn left off the highway and into Bay Balls harbour and follow Southside Road to the very end, where there is a small parking lot. I believe you have to walk a bit further down the road to get to the trailhead, but then follow the left trail branch along the coast. Most of the first part of the trail is in the woods, but around the 2km mark you reach the grassy bluffs and can continue around the headland. The trail does continue to pop in and out of the woods, but it’s very scenic for a solid 3-4km as you go around South Head.
I hiked it solo in early August and made my first pit stop in Island Cove for a small lunch. I saw several whales right at the edge of the harbour as I was eating and I had a good laugh when O’Brien’s whale watching tour blazed right past when the whales were diving without being any the wiser. I’m sure they knew where else to find whales since I later spotted both the boat and the whales on the other side of South Head, but it was still comical to watch them motor right over where the whales were feeding.
For some reason I thought Mickeleen’s Path wasn’t very scenic, so I was thrilled at the views as I continued along the coast. It was extremely windy on the day that I visited, but I also got some blue skies, so it made for really nice photos. I stopped for a second lunch on the bluffs past Upper Red Cove that look out towards Gull Island. One of my favourite parts of hiking around Witless Bay is the ecological reserve and I loved spotting the puffins frantically flapping over the top of the water.
If you’re doing the trail as a one-way, you can end on Bear’s Cove Road in Witless Bay and drive home from there. In that scenario, it’s approximately a 7km hike. However, since I was solo and only had the one vehicle, Sean had given me a tip about the ATV track, so I decided to continue on along that route. To find the track, take a left on the road when you get off the main trail and then very shortly after, take a right to get on the ATV trail. It’s a lot like Shoal Bay Road if you’ve ever hiked the Spout – gravelly with lots of potholes – so if it’s rained recently, you may have a lot of large puddles to navigate around. The road follows a horse shoe shape around the headland and eventually connects back in with the original trail just before you get back to the parking lot in Bay Bulls. This route is just over 11km, so it definitely beats going the whole way back and is pretty flat.
Overall I’m definitely a fan of Mickeleen’s Path and recommend it as a great solo hike or for when you only have one car. The whole route took me just under 3.5 hours, with 2 breaks, so budget 4 hours if you’re doing the loop trail. And keep your eyes open for puffins and whales!