Now that it’s finally starting to feel like Spring, me and Seth were stoked to get our kayaks out again! We bought them last year and did a lot of kayaking in the spring, but less than we would have liked in the summer. The backpacking season is so short, so it’s hard to fit in both backpacking and kayaking, so we decided to make Spring our prime kayaking season (since the alpine is still under snow until the end of June).

We went out once in early April to do our Level 1 Paddling Course (the second course after Sea Kayaking Basics), which was a great opportunity to refresh our rescue skills and work on our paddling strokes. We got wetsuits for Christmas this past year, so I’m feeling more confident about early season kayaking. It made me nervous before because I knew it would potentially be pretty dangerous if either of us accidentally went for a swim. But we tested wet exits in the kayaks in early April and the wetsuits helped a lot!

The training course wasn’t in our own kayaks though, so we were keen to get back to Belcarra, which is one of our favourite places to paddle near where we live in Coquitlam (Rocky Point and Barnet Marine are closer, but Belcarra is our preferred). I like to look at maps a lot and I noticed that there’s a tea house located in Belvedere (neighbourhood in Belcarra) and thought it might be fun to check out. It’s called 8 Corners Organic Tea Room and you can access it by road through Sasamat Lake, but since the road goes through the park, this can be tricky since Metro Vancouver often closes the gate once the parking lot is full during the busy season. So I scoped out the water access, which is available through Farrer Cove, and decided to make an attempt by boat.

We started by getting to Belcarra for 8am. In April you don’t have to go quite this early to get parking (there was lots available), but in the summer, I usually aim for no later than 9am if I want to be assured parking. In this case, we went for 8am anyways because the water is a lot flatter in the morning, which makes for great paddling. In the summer you can rent kayaks from Takaya Paddling Centre in Belcarra, but it’s not open year round, so an alternative in shoulder season is that you can instead rent kayaks from Deep Cove and paddle across Indian Arm. It’s about the same distance from either location (Deep Cove or Belcarra), but it’s a bit of an easier paddle from Belcarra since you don’t have to cross the Arm.

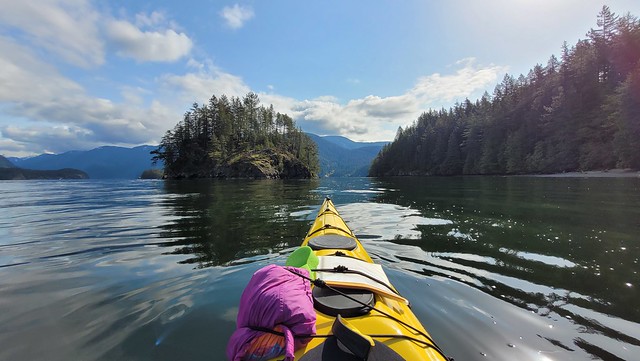
On this particular day, it was super calm on the water and we had a really enjoyable paddle out to Jug Island. I’ve written about Jug Island before, which makes a great paddling trip if you’re new to kayaking. It’s an easy paddle and not as long. I’d budget about 3 hours for Jug Island, whereas we needed a full 6 hours for Ferrar Cove. But Jug Island makes for a good break and we pulled into the beach for a snack and to use the outhouse. There were some hikers on the beach, but it was still pretty early and the tide was really high, so there wasn’t too many people.
From there we continued across Bedwell Bay to Ferrar Cove/Belvedere, which is where the tea room is located. The open water crossing is shorter than Deep Cove, but you want to make sure you check the weather and wind forecast before attempting either crossing. It was a low 6km/h the day we went and we won’t go out in winds higher than 20km/h, which requires a lot more effort. The wind usually comes up in the afternoon in Indian Arm, so earlier paddling will be easier. It was probably only 3-4km/h winds on the way to the tea room, and maybe more like 8km/h winds on the way back. So it was a very easy crossing, which is always nice.

In my advance research, I’d identified a small beach at the end of the cove where we could land, but upon arriving, it didn’t look like the beach connected through to the road. There was however a very large dock that was completely empty. We couldn’t see any signs indicating that it was a private dock, so we tied up our kayaks there and walked up the hill to the tea room, which has a beautiful view looking out over Ferrar Cove. I’m still not 100% sure what the deal is with the dock and whether it’s a proper public dock, but we asked the tea room and they said that it’s the correct place to land when you’re visiting the tea room. While there is a road, they are technically a water access property, so they can’t guarantee that customers will always be able to access the tea room via the road if the park gate is closed, but you should always be able to access the tea room via the dock! So definitely check it out!
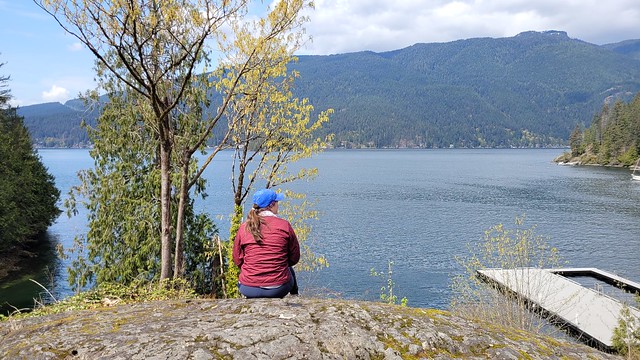
The tea room is only open from 11-5 on Fridays and Saturdays. We got there shortly after 11, so we were the only customers when we arrived and had a great chat with some of the staff! The staff are lovely and they let us sample all of the cold brew teas they were just brewing (cold brew is my favourite) and told us a bit about some of the history of the teas, which they get from an organic tea farm on Jeju Island in Korea. You can make bookings for a proper 90 minute afternoon tea, but since we weren’t sure about our timing, we decided to order a la carte instead. So we each had an open-faced sandwich and a dessert with our cold brew. They have both indoor and outdoor seating, but we opted to sit outside to enjoy the view. It’s a really gorgeous location and we felt so content to relax on the patio. It gave our paddling trip a bit more structure to have such a nice destination and I guarantee we’ll be back again!

Around 1pm we returned to the dock to start the return trip. If you’re visiting by kayak, it is a little bit tricky to dock. It’s definitely tailored to sailboats and yachts, so it’s a bit high to board from a kayak. We were able to use the railings to get in and out of the boats and there is a ladder on the other side if you’re really struggling. The harder part though would be getting the kayaks up onto the dock as it is a bit of a drop. We opted to just leave them in the water and instead locked them to the rail. You could also tie them up using your tow line, just make sure you secure them well.

The wind did pick up in the afternoon, but it was considerably less than some of the other times I’ve paddled Indian Arm and we didn’t find it challenging. We paddled back to Jug Island for a quick pee break before heading back to Belcarra again. It was 9am when we started paddling and shortly after 2pm when we returned. So if you give yourself a full 6 hours of paddling time that should be more than sufficient, though if you do the full afternoon tea, you might want a bit more time.
All in all, it was one of the most fun days I’ve had on the water since we got our kayaks. At 10km round trip, it was the perfect length paddle for a day trip. We absolutely loved the tea room and would definitely recommend whether you’re paddling from Belcarra or Deep Cove. Can’t wait to go back again!