Backpacking can be very intimidating when you first get started. Hiking with an overnight pack is a lot different than day hiking, so you don’t want to start with too challenging of a hike. Figuring out what gear and food to bring is enough work without also having to stress about a difficult trail or having access to facilities at the campsite. So keeping in mind that you want to focus on shorter distance, less elevation, and easy access to facilities, here are some of my hiking recommendations for beginners.
Cheakamus Lake
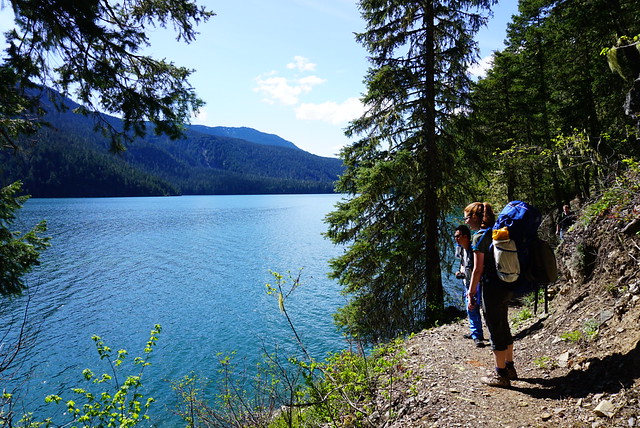
In my opinion, this is the ultimate trail for beginners! It’s located in Garibaldi Park and is a short distance hike with very minimal elevation gain. It has outhouses and bear cache facilities, and you can book your site online in advance so that you don’t have to worry about fighting other hikers for a camping spot.
There are two campsites to choose from – the first one (Cheakamus Lake) is located right at the head of the lake and requires the least amount of hiking, approximately 4km. The campsites are located next to the water and have a decent amount of privacy. The second site (Singing Creek) is another 3.5km and is located at the midpoint of the lake. This site lends itself better to group camping as it’s a series of campsites right next to each other in the woods. That said, there is a really nice beach to hang out and cook from. If you’d like to visit both, you could always camp at the first campsite and then do a day hike out to visit the second! Both sites have an outhouse and bear cache. Reserve here for $10 per person, per night (listed under Garibaldi Park).
Buckhorn Campsite on the Heather Trail
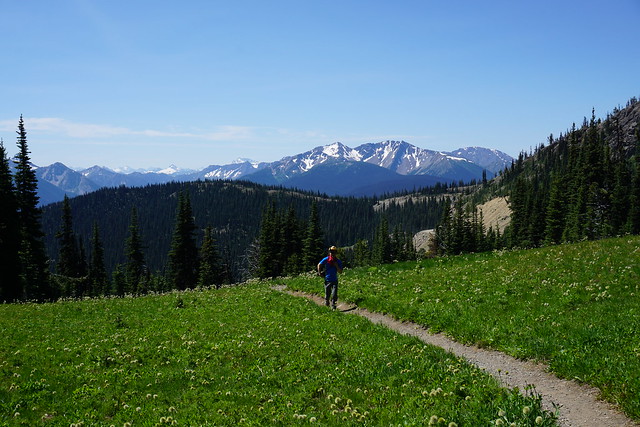
The Heather Trail is a 21km one-way trail in Manning Park. While I definitely don’t recommend doing the whole trail for beginners, the first campsite (Buckhorn) is only 4km in, which makes it the perfect spot for beginners! The Heather Trail is most popular in late July/early August for the colourful wildflowers that pop up all along the trail. What makes it so great for beginners is that you do most of the elevation gain on the drive up. You park at the top of Blackwall Road and from there is a steady incline down to Buckhorn Campsite. The views are beautiful right from the start of the trail.
Buckhorn has an outhouse, bear cache, tent pads, and even picnic tables! You do need a backcountry permit to stay overnight, but sites are first come, first serve, so you don’t need to pre-reserve. You can purchase here for a Manning Park backcountry permit for $5 per person, per night (you will need to create an account to see the system – entry and exit points are Blackwall Peak) . If you have the time, stay for two nights and make a day trip out to 3 Brothers Mountain for unreal views of the alpine meadows and surrounding mountains. Even if you can’t make it all the way to 3 Brothers, explore a little further beyond buckhorn to experience the alpine meadows. Be aware, in the early season this hike will still have snow until end of June.
Viewpoint Beach
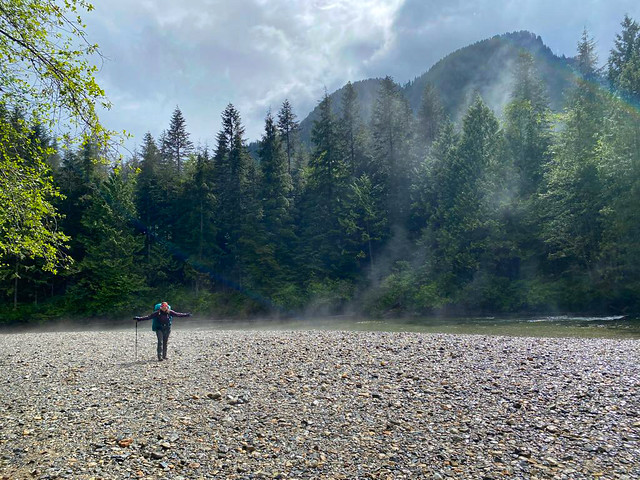
Viewpoint Beach is very similar in difficulty to Cheakamus Lake. It’s a 4.5km hike in Golden Ears Park with minimal elevation gain. Similar to Buckhorn, the campsites are first come, first serve, and you can get a permit online for Golden Ears before you go for $5 per person, per night (entry and exit points are West Canyon). There aren’t any really obvious places to camp, but most people pitch their tents along the tree line on either side of the river since the beach itself is pretty rocky. Plan in advance which side you want to camp on – if you want to camp on the far side, make sure to cross the river at the bridge before you reach the campsite. Both are nice but there tend to be less people on the far side of the trail.
There is an outhouse at this site, but when I visited last year, there wasn’t a bear cache, so we did have to make our own, which you may prefer not to do as a beginner. BC Parks has been spending a lot of time re-vitalizing this trail, so I suspect they will probably install a bear cache soon, but either way, check before you go. If you’re not comfortable hanging your food, you can purchase a bear proof container at most outdoor stores. These don’t need to be hung, but can be a little pricey.
Lindeman Lake
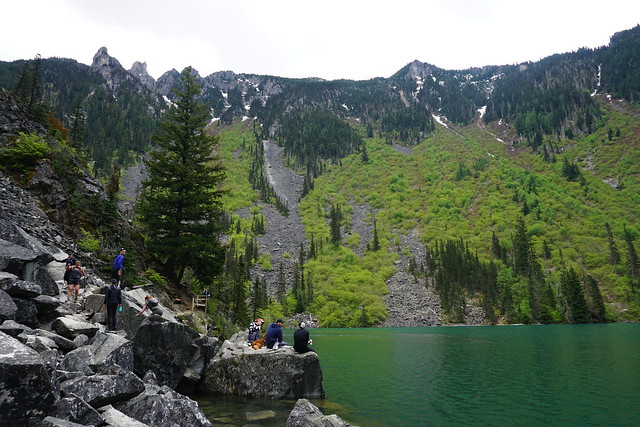
Lindeman Lake is located in Chilliwack Provincial Park. At 3.5km round trip, it’s the shortest hike on the list, but it has 300m in elevation gain in under 200m, so be prepared for a climb. If it’s your very first time carrying a pack, I’d recommend a flatter trail, but if you’re trying to increase your stamina, this is a great practice trail for beginners because it’s steep but short. Same as the previous sites, there’s no reservations for this campsite, but purchase a Chilliwack Lake permit online before you visit for $5 per person, per night.
There are a limited number of tent pads, but there’s lot of ground space to set up your tent. There’s a bear cache right next to the water and a pit toilet up in the woods. As a heads up, the toilet doesn’t have walls, but the trees provide natural privacy and it’s personally never been a problem for me. After setting up camp, I recommend hiking the 1km to the back of the lake for even more amazing views, or if you have time to stay 2 nights, make a day trip up to Greendrop Lake on the second day.
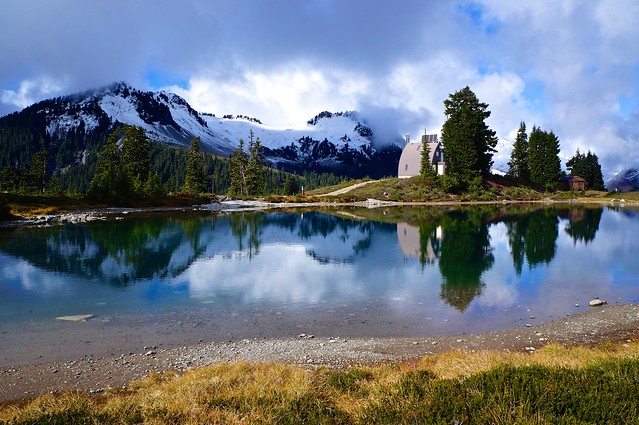
Elfin Lakes
Elfin Lakes is a popular campsite located in Garibaldi Provincial Park. It is the longest trail on the list and definitely the most strenuous. However, I include it because even though it’s a bit longer, 11km one way to the campsite, it is a very forgiving trail and has lots of facilities along the way. The most challenging part of the trail is the first 5km, which is a steady incline up an old forestry road. The road ends at Red Heather hut, which is only meant for emergency overnight use, but has an outhouse and is a great place to stop for lunch.
From there, the trail meanders up and down through some truly beautiful scenery as you wind your way along the ridge to the Elfin Lakes hut. There are two options for camping – both require reservations – but you can either camp on the tent pads, or sleep on one of the bunks in the hut. The hut is the main reason I include it as a beginner trail because if you’re just starting out and want to try with a bit of a lighter pack, you can leave your tent at home and sleep in the hut instead. But if you’re willing to carry your tent up, the panoramic views from the tent pads are truly unreal! Elfin has a big outhouse facility with 3-4 toilets and there is a ranger living in the ranger’s hut. Campsites sell out fast, so book early. Purchase here for Garibaldi Park for $10 per person, per night. Don’t even think about coming up without a permit because the ranger will send you packing. Be aware, this trail usually has snow on it until end of June or even early July.
Elsay Lake is the last trip in my backpacking archive! Once I write about this one I’ll be all caught up on backpacking trips. Don’t fret though, I have lots of trip plans in the works for this upcoming summer and I still have lots of day hikes and frontcountry trips to write about!
Elsay Lake is one of the more random trips I’ve done. I hiked it in July 2019 when my Howe Sound Crest trip was cancelled for the third year in a row (finally did it in 2020). Me, Emily, and Carolyn had planned to go do the trip together, but ended up having to cancel it because the last part of the trail is on private land and had been closed. Parks constructed a new trail entrance before 2020, but in 2019, you weren’t able to do the trail as a through hike.
Carolyn decided to bail on an adventure altogether, but me and Emily still wanted to do something, so Carolyn agreed to drop us off at a local trail. I did a bit of quick research and we decided to try for the Elsay Lake trail, which leaves from the parking lot on Seymour Mountain.
In the summer, you can hike up the ski run to Brockton Point (the top of the chair), where you can continue into the Seymour Wilderness. Our plan was to try and hike up to Mount Seymour and do a loop trail that brings you back down towards Elsay Lake. This was a trip where my GPS app got me into a bit of trouble.
I use GaiaGPS to track my movements every time I go on the trail. I find the app to be a great resource, but you do still need to do research because the trails on the GPS are just based off of user data and are not always up to date. From Brockton Peak, the trail continues to a branch, where you can either go down the Elsay Lake trail, or up towards Pump Peak, Tim Jones Peak, and Mount Seymour. On my app, I noticed a trail shortcut to Pump Peak, so we decided to follow that. After hiking in for awhile, the trail became very steep and we lost it, so we decided to turn back. I later learned that it’s the old Pump Peak trail that has been closed, so you shouldn’t always put all your reliability in your GPS. However, deciding to stop and retrace our steps back was definitely the right decision and what you should do when you find yourself off trail. Don’t continue on because sometimes it’s possible to continue hiking up, but becomes impossible to turn around and hike back down (or vice versa) and you can find yourself stuck.
In any case, because of the lost time, we decided to ditch the Mount Seymour plan altogether and just took the Elsay Lake branch when we got back on the trail. This was definitely the right choice as the Elsay Lake trail ended up being super technically challenging and we needed to whole day to complete it.
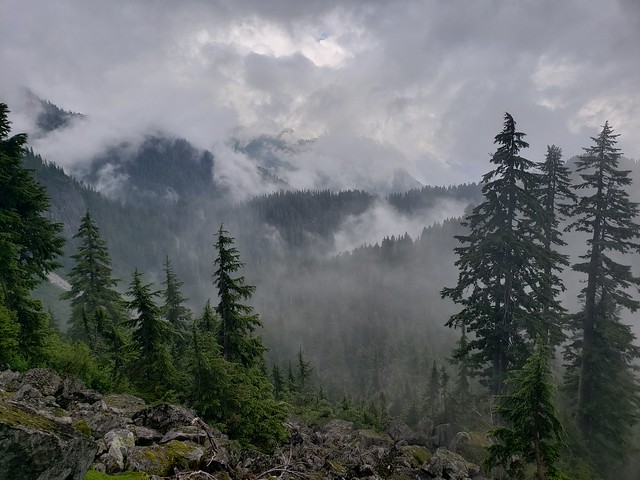
From the Elsay Lake trail branch, you descend down into the valley below Mount Seymour. It wasn’t raining, but it was a very foggy and overcast day when we did it, so at times it was poor visibility, but I also thought the valley looked so cool with the way the fog hung around the peaks. You hike down and down until you eventually come to a large boulder field. As we were hiking down into the valley, I would occasionally do my bear call as there were no other people around (most of the traffic is up on the Mount Seymour trail). After a while, we noticed that someone was starting to respond to our bear calls, and then they started yelling at us. We couldn’t understand what they were saying, but called back that we were on our way down.
When we reached the bottom of the valley, we ran into a slightly distressed couple. They asked us if we knew where we were, to which we responded, yes, and we asked if they were lost. They said they were – they’d been with a group of friends and they’d all hiked to the top of Seymour together. They’d been following their friend and gotten separated on the way down, so they’d hurried on towards the parking lot trying to catch their friend, but now they were confused and didn’t recognize anything.
Because we were familiar with the area and using a GPS, we knew exactly where they’d gone wrong. On their way back from Mount Seymour, they’d taken the wrong branch and headed further into the wilderness towards Elsay Lake instead of back towards Brockton Point. They just kept going further down the valley thinking they were heading back to the parking lot. They were upset because they’d been entirely relying on their friend. We explained to them where they’d gone wrong, showed them the map, and explained they needed to climb back up the valley and take the proper turn to head back to their car. They weren’t happy to hear they would have to climb back up, but at least now they knew where they were and headed back the right direction.
This is a prime example of why it’s so important to always be prepared yourself. One of the common reasons people get into trouble is because of the “expert halo”. They rely on someone else to keep them safe. I’m absolutely a fan of mentoring in the backcountry, but there are definitely some basics you need to take responsibility for. If you get separated from your expert or the expert gets into trouble, do you know how to take care of yourself? It’s easy to get separated and easy to get lost. The Elsay Lake trail doesn’t get a lot of traffic and this couple were unknowingly going further and further into the wilderness. Even close to the city, it’s easy to get into trouble. Check out my post on personal safety in the backcountry and resources from organizations like Adventure Smart to learn more.
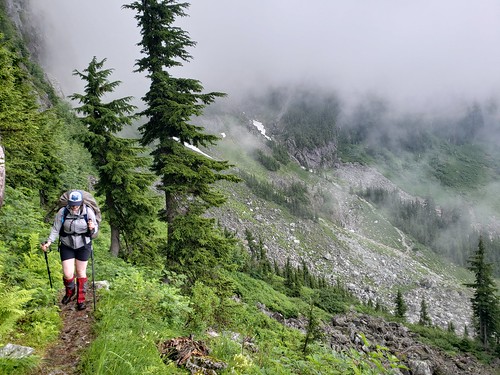
But getting back to the trip, Emily and I stopped for lunch in the valley around the halfway mark, before continuing on along the trail. You continue along the edge of the valley for a while, before eventually heading into the woods. This is where the trail started to get really hard, after you pass the branch that heads up towards Mount Seymour (our initial plan). Elsay Lake is one of those rare trails, where aside from the first part, most of the trail is downhill. ‘Technical’ is definitely the word to describe the trail.
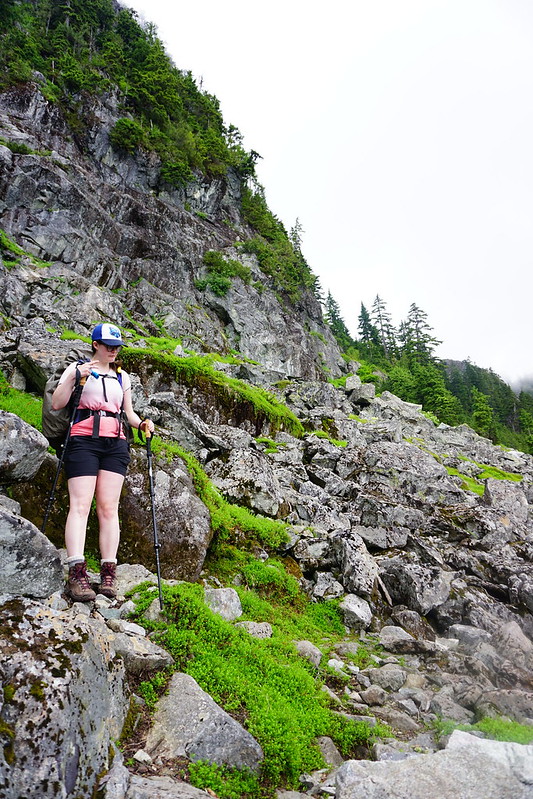
There’s lots of climbing over tree roots as you walk through the forest and several boulder fields scattered throughout. The challenge with the boulder fields is that they’re in the trees and the boulders are very large. So even though the fields are short, it’s difficult to cross them, especially if you’re short. There were several sections where we had to slide down rocks or support each other up over them because they were so large, not an easy feat when you’re both wearing large packs.
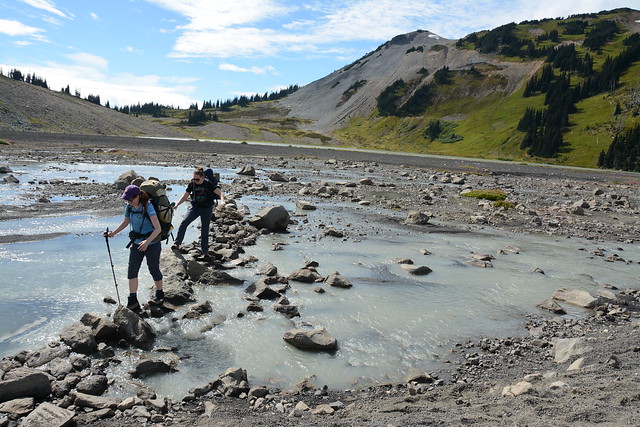
Then the trail continues down several steep sections through the forest that we had to take slowly so as not to trip or fall. Eventually you reach a flat section through the trees at the base that we did relatively quickly, until we came to a challenging river crossing. You have to ford the river, but we were trying really hard to keep our shoes dry, so we spent a long time trying to figure out a way across. We did manage to get across and stay dry, but it chewed up a lot of time. After that, you hike through some mucky areas before finally hitting the lake and hiking around the edge to the campsite.
It was only a 10km hike, but it ended up taking us about 8 hours by the time we reached the campsite. There is an emergency hut, and surprisingly, despite barely seeing anyone on the trail, the campsite was pretty busy. I mean overall there were only a few groups, but it’s not a big campsite and it took us a while to find a space big enough to pitch our tent. It was around 6pm when we arrived, so we went for a quick swim in the lake and then made dinner. There is an outhouse and we were able to store our food in the hut, so fortunately we didn’t have to mess around with a bear cache.
Our concern now was the hike back the next day. We were exhausted and we’d completely underestimated the time the hike would take. We had pre-arranged a pick up time with Carolyn that we didn’t think we’d be able to make (this was before I had an inreach), so we figured we’d just have to do our best and hope she didn’t have to wait too long for us.
We got up early the following morning to get an early start on the day. It was dry when we got up and we were able to pack up our gear pretty quickly, but shortly after we started hiking it started to pour. It was pretty demoralizing considering we were trying to go fast, but at least it was the last day. We didn’t waste time at the river this time and instead just walked right through it, getting our feet soaked. This sucked too, but it was already pouring and we didn’t want to waste time.
The trail is all uphill on the way back, which might be a downside to some, but we much prefer going uphill over going downhill, so things actually went a bit better than the previous day. We were still really slow going through the boulder fields, but persevered. As we were climbing up we came across a second couple that were struggling. The woman had injured her shoulder and her partner was now carrying both his and her packs! I can’t even imagine how difficult this was – in the boulder fields he would basically pass each pack up to her at each section and they would painstakingly carry them across. We stopped to talk to them and see if they needed any first aid. They didn’t, so we asked it they wanted us to contact Search and Rescue for them when we got cell service (since we would be ahead of them). Fortunately they had their own inreach, so they said they were going to continue on since it was still really early in the day, but would contact S&R if needed.
At the time I thought this was a reasonable approach, but after watching the S&R mini-series on the Knowledge Network, I would definitely advise just calling S&R from the beginning. There’s no fee for S&R and they won’t hold it against you for needing their help. This was an example of a couple that was actually well prepared; they had first aid supplies and a satellite device, but one of them had been injured, which is often outside your control. Don’t hesitate to call S&R if you need them. Time is the most important factor in S&R tasks and you want to give them as much time and daylight hours as possible to reach you. This was a rainy, cloudy day, so S&R likely wouldn’t be able to help this couple with a helicopter, which means they would need more time to get in the field. Perhaps this couple was totally fine, but I think S&R would probably just have encouraged them to seek help right away.
Once we got out of the boulder fields, our day improved a lot. It stopped raining and we took a break in the valley again for snacks and to change out of our wet clothes. I still had wet feet, but I was able to finish the hike in dry clothes at least. When we got back to the trail branch, I was able to get service and give Carolyn a call that we would likely be a little late. Surprisingly we’d actually made really good time and by the end of the trail, we were only 30 mins behind our original estimate.
When she heard about how challenging the trail was Carolyn seemed reassured in her decision to skip the trip, but then she went to soccer later that night and broke her ankle with an injury that takes 2.5 years to heal, so I’m not sure how she feels about the decision now! Either way, it was both a memorable and forgettable sister trip for me and Emily. The challenges were memorable, but overall I’d say the trip was forgettable and I definitely won’t be attempting the trail again. I would like to go back some day and hike up to Mount Seymour, but personally I’d give Elsay Lake a pass. I did like the trail down to the valley, but beyond that, the trail is miserable. It was a good lesson in trip preparedness though, given that we encountered two groups experiencing trouble and that we mistakenly took a wrong trail branch ourselves. The North Shore mountains are notorious for S&R tasks, so this was a good reminder to always be prepared!
Special shout out to Emily for taking ZERO pictures of me on this hike. So all you get is a million photos of her selfish butt.
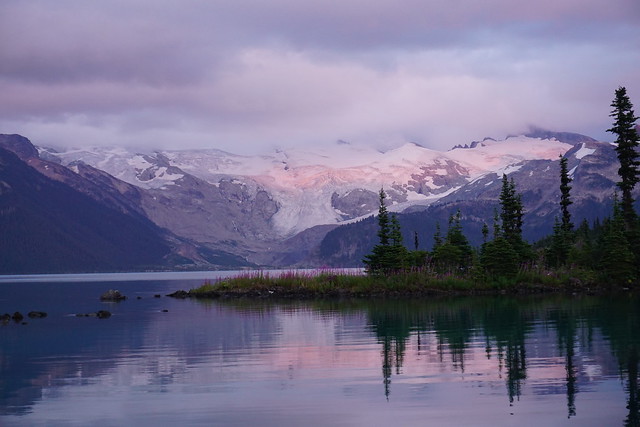
I’ve been to Garibaldi Lake 3 times. The first time was a day hike in 2015 and it was what inspired me to take up backpacking in the first place! So I followed up that hike with a 3 night trip the following year where I camped at the lake and day hiked to Panorama Ridge and Black Tusk. In 2018, Carolyn convinced me to return on another backpacking trip over the Labour Day weekend because she still hadn’t been to the lake at all.
Both trips took place over 3 nights and had identical starts, but the itinerary diverged after that. On both trips, I went to work on Thursday morning and then drove out to the Rubble Creek trailhead in the middle of the afternoon, starting the hike at around 5pm. The trail ascends 800m over 9km and is a bit of a slog, but it’s a very well maintained trail and isn’t that difficult, so it usually takes us about 3 hours to get to the lake, even with large backpacks. My first trip was with Seth and Emily, but on this occasion I went with Carolyn and Brandon.
It was September at this point, so we had less daylight than my previous trip, which had been in early August. We needed our headlamps for the last kilometre or so of the hike in the woods, but arrived at the campsite before it was completely dark. The 3 of us are a pretty well oiled machine at this point, so we quickly set up camp and hit the sack for the night.
On both trips I left on Thursday and took Friday off. I really like this approach because the park is inundated with people on the weekend, so it allows you to beat the crowds on the way in and enjoy at least one day of hiking with less traffic. Fortunately, Garibaldi does have a reservation system, so you are guaranteed a campsite so long as you book far enough in advance to get one. Don’t even think about coming up and trying to camp without a reservation – Garibaldi Lake has a full time ranger and they won’t hesitate to send you packing.
Since it was Carolyn’s first time at the Lake, she wanted to do both the Black Tusk and Panorama hikes. I love Panorama, but I vowed I was done with Black Tusk after the last time (it’s a scenic hike, but I’m not a fan of all the scree). We agreed in advance that we would split up on the first day. Carolyn would day hike up to Black Tusk and I wanted to try day hiking up to Mount Price. Brandon had already done Black Tusk as well, so he decided to join me. Since Black Tusk gets a lot of traffic and Mount Price doesn’t, it worked out pretty well safety wise, plus Carolyn ended up making some friends on her Black Tusk hike, so in the end we all had company!
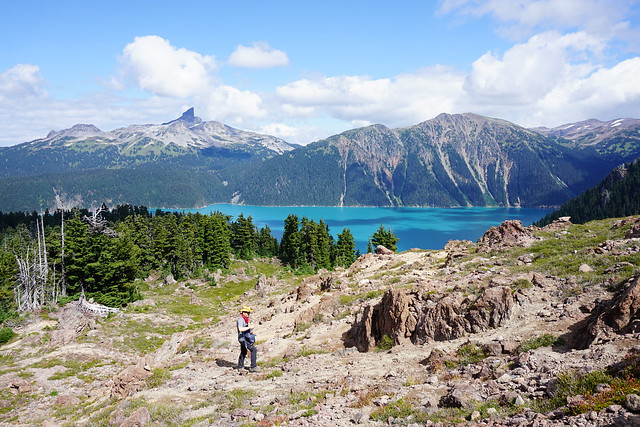
The hike to Mount Price leaves in the opposite direction. Black Tusk and Panorama Ridge head back the way you came and then continue on the north side of the lake, but the Mount Price trail continues south around the lake. It’s not a well maintained trail as the crowds tend to gravitate towards the more popular trails, but wow, is Mount Price ever scenic!
We followed the trail through the trees along the edge of the lake where it heads further back into the woods. The first part of the hike isn’t too challenging and we made good time to the foot of Mount Price. There are nice views looking back at the lake and towards Black Tusk and we didn’t see any people on the way in. The benefit of this was that I got my first real sighting of a pika! I’ve since seen them a few other times, but this was the first time I saw one and we were very close to it, so I got a great view of this cute little furry creature.
We stopped at the base of the mountain for a snack and then continued on. From there, the trail get’s pretty difficult. It’s about 11km round trip from the lake (the same as Black Tusk), but I think this trail is more challenging. Once you start climbing up the mountain, it’s all a big boulder field and it is really easy to lose the trail (to be honest I’m not sure there’s even really a trail in this section). From the map, we could tell where we were headed – there’s Mount Price and Clinker Peak, with a smaller peak between the two. We more or less made our own path across the boulder field as we headed up towards the saddle between the peaks.
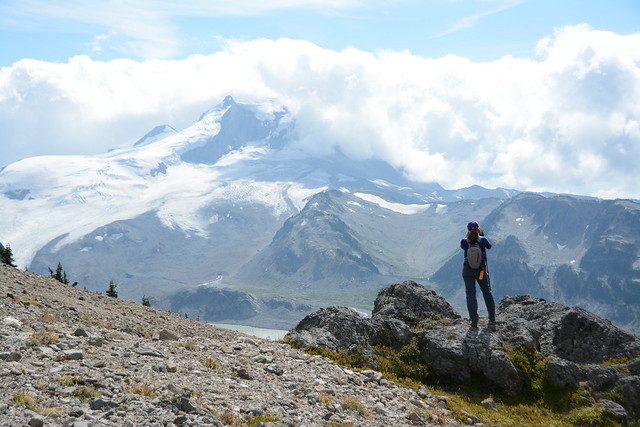
It is very steep and many sections have loose rock, so we took our time. Once you reach the saddle, it’s just one last push up the side of Mount Price. Mount Price is very definitive because it has a huge flat top. Once you reach the top, you can still easily spend an hour walking around the entire top of the peak taking photos, which is exactly what we did! Because the top is so large, you can’t really get a 360 degree view, so we made a wide loop.
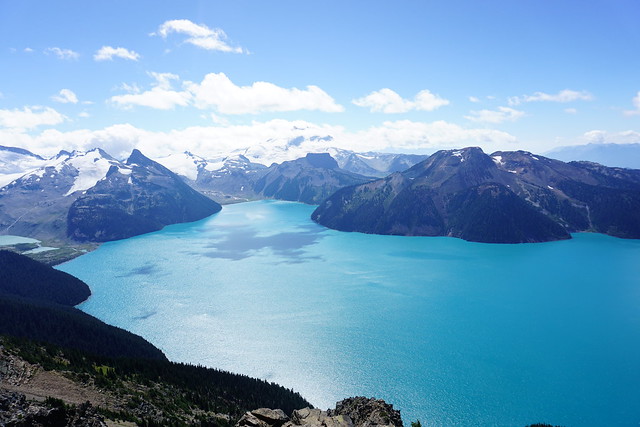
The back of the peak looks out towards the Elfin Lakes/Opal Cone area and there’s an awesome view of Garibaldi Mountain. then as you make your way towards the front, you get a view of the back end of Garibaldi Lake and all the glaciers. Finally, you can see Panorama Ridge and Black Tusk at the front of the mountain. The views from Mount Price are totally out of this world! Panorama Ridge and Black Tusk get all the glory, but honestly, I think Mount Price might be my favourite – the only view that might rival it is the view of Black Tusk from the top of Panorama. As far as lake views go, I think the view from Mount Price is just as good as from Panorama.
We hung out on the top for ages and had our lunch looking down over the lake. It was pretty windy up there, so we found a nice sheltered viewpoint while we ate. We started to see some more people on our way back down the trail (some of which were day hiking 27km from Rubble Creek!), but we didn’t see anyone else while we were on top of the peak.
As usual, the hike down was worse than the hike up. I’d definitely recommend poles and take your time – it’s steep and there’s a lot of loose rocks. There was still a bit of snow up there and it was September, so you definitely want to be prepared for that earlier in the season as well. The best views of Black Tusk are actually from the saddle and we had a little photoshoot on the way down (one of our favourite activities).
Unsurprisingly, Carolyn beat us back to the campsite and was taking a nap in the tent when we returned. Normally we’d be anxious to take a swim in the lake, but it was September and quite chilly by the time we got back, so we opted not to and instead hung out on the dock by the lake while we made dinner. The Ranger was fishing off the dock when we arrived, so we ended up having a big chat with him. Apparently there are tons of fish in the lake since it was stocked in the past and now, because of it’s alpine location, there’s nothing to prey on the fish. So while he has a big canned food cache in the ranger cabin, he likes trying to get fresh fish.
We had a big chat with him about the reservation system as well, which is how I know you will get kicked out if you try and camp there without a permit. I accidentally ratted out a few backpackers we’d seen heading up towards Mount Price (you can get a wilderness permit for sections of the park, which I assumed they had, but apparently Price is not included in this permit). He indicated he’d already kicked 3 groups out of the campsite that day and that he wouldn’t be following the Mount Price campers, but if he saw them having a fire later, he would boot them out. Apparently you can see it all the way from the campsite and because he has a boat, he knows the secret quick trail up Mount Price that can only be accessed from the water. Anyways, trail reservations and camping restrictions exist for a reason people, please follow them.
After that we befriended a few Newfoundlanders that were also staying at the campsite! I was wearing a Newfoundland toque, so they asked me about it and then of course we discovered that Carolyn knew one of them and that we’d all studied engineering at MUN around the same time (classic occurrence TBH). So we had a fun night chatting as the sun went down over the lake while enjoying Brandon’s infamous thai chicken curry.
On Saturday morning we got up early and had breakfast at the lake before taking down camp. Carolyn still wanted to visit Panorama Ridge, but because I wanted to try and do something different than my previous trip, I had no trouble convincing her that we should make it a through-hike and end at Cheakamus Lake. So we lugged our packs with us away from the lake and back up towards the Panorama Ridge trail. The trail between Garibaldi Lake and Panorama is still one of my all time favourite trails. What I love about it is that pretty much the entire trail is incredibly scenic. You pass through the alpine meadows towards Black Tusk and then branch off and continue across the open plains towards the ridge.
The trail in this section is relatively flat, so it makes for a pretty easy hike until you hit the ridge. When we reached the branch that goes up towards Panorama, we ditched our packs in the woods and repacked our food and essentials into our day packs (if you’re caching your pack somewhere, take all your food so that bears won’t be attracted to it, and of course, always have the essentials). So we had lighter packs to climb up towards the ridge.
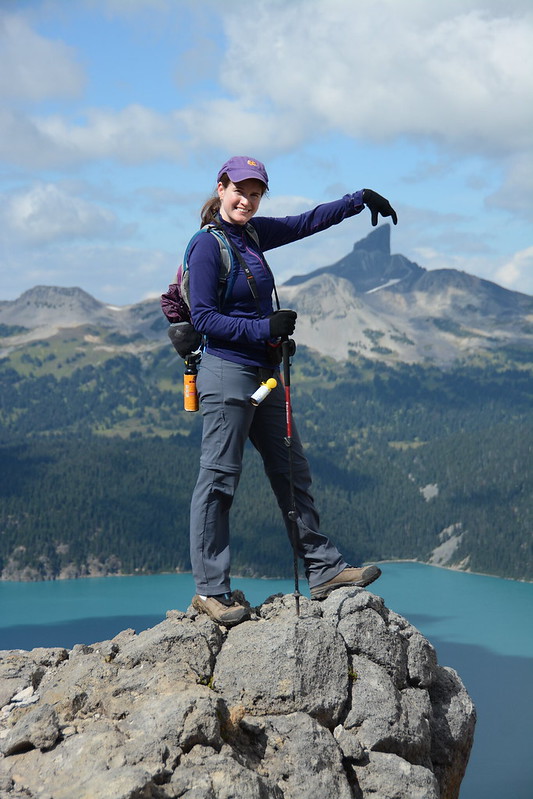
It’s not a long trail to get up to the ridge (1-2km I believe), but it’s definitely steep. This is one of my favourite parts of the trail though because it has the most stellar view looking back at Black Tusk! I love the view looking down at the lake too, but it’s always so windy and crowded up there that I somehow enjoy it less. We had a nice stop at the top though where we layered up and ate our lunches looking out over the lake and surrounding glaciers before heading back down.
On the way back, we had our second photoshoot with Black Tusk. Carolyn decided she wanted to get a picture that looked like her sitting on Black Tusk, so Brandon spent forever trying to manipulate the picture to make it look like Carolyn’s throne with mixed results (it’s a lot harder than it seems!) so we just resorted to taking pictures of us crushing it instead.
Once we retrieved our packs again, we were into new territory and I was very excited about it. At the start of the hike, we met at the Cheakamus Lake trailhead and left Carolyn’s car there, driving Brandon’s back to the Rubble Creek trailhead. So instead of looping back to Garibaldi Lake, we would be continuing on to Helm Creek.
From Panorama Ridge, the trail to Helm Creek looks like a bit of a barren wasteland, but I found it so interesting to explore! It’s pretty open, so I could see it being really hot in the summer, but it was September, so not bad when we visited. The weather forecast had been a little bit mixed before we left and we’d been anticipating rain, but to date we’d fortunately been spared. We continued past Helm Lake and followed the creek down through the wilderness. Traffic reduced significantly as soon as we left the ridge and we were back to having the trail to ourselves. After that all we saw were a few trail runners who were doing the entire pass in a day!
I had a lot of fun walking this section, we crossed the river several times and ended up having another photoshoot with Black Tusk as we continued around the back of it. Between this trip and some others I’ve done in the area, I think I’ve seen Black Tusk from every possible angle! Eventually though my feet started aching and the last few kilometres to the campsite were a bit rough. The vegetation increases as you head towards the Helm Creek campsite and the barren rocky outcrops turned back to meadows.
The campsites at the lake are all nestled along the trees and have decent privacy, but the Helm Creek Campsite is pretty much just a big open field with some tent pads. Unlike the lake, these don’t always sell out and there were a lot of empty tent pads, so if you really want to visit the park and can’t get a site, you could consider hiking in from Cheakamus Lake and staying at Helm Creek. I don’t like tent pads and prefer to set up on the ground, but tent pads are often constructed to protect the native vegetation, so we made sure to use it and always stick to the trails instead of stomping through the meadows.
Helm Creek isn’t as scenic as the lake campsite, but you can see right up to the back of Black Tusk from the meadow, so it’s still a gorgeous site. Being out in the open though, it was definitely the coldest night in the tent. We had dinner and then decided to go to bed pretty early as we were exhausted from all the hiking. Tent pads create a bit of a draught under the pad so it took us a while to warm up and fall asleep – I’m not sure if poor Carolyn warmed up at all. It rained a little bit overnight, but that ended up being the only rain on the trip, so we consider ourselves pretty lucky.
Sunday was our last day and the only order of business was to hike back towards the car. The trail goes back into the trees pretty much right after the campsite, so there’s not much to look at and we made good time on the trail. The trail length and elevation are pretty similar to the way in, but this trail has a long flat section along the Cheakamus River at the end, so overall it’s steeper. Once you get down the mountain, most of the elevation is done and you can either hike in towards Cheakamus Lake, or back towards the parking lot. Like most trips, we intended to go see the lake, but it was our 4th day and we were all pretty tired, so in the end we opted to skip it. We went back the following year and spent 3 days at Cheakamus Lake though, so no regrets!
And that concludes the trip! I haven’t been back to Garibaldi Lake since, but I have very fond memories from both of the trips I made there! I’ve explored most of the trails in this section of the park now, but it’s just so scenic I wouldn’t hesitate to go back again. I’m hoping my next trip there will be a snow camping trip as I’ve never seen the lake in the winter! I took an insane amount of photos on this trip, so here’s a few more to end the post.