It’s been over 12 years since I moved to BC. There’s so much to explore in this province and every year has been filled with new adventures, which I’ve loved sharing on this blog. I like encouraging others to explore the many attractions BC has to offer, so for this post I’m partnering with intrip to share my list of 100 unique experiences in BC.
Intrip is a discovery app for all BC wanderers. It’s a map-based social media platform where every post is linked to a real place. It helps you to discover real local tips and experiences, easily explore what’s around you, and connect with your community to love where you live. Join me on the intrip app to rediscover beautiful British Columbia! Download the app on Google Play or Apple Store.
This list skews towards those living in the lower mainland, as that’s where I’ve spent the majority of my time, but I like to think there’s a little something in here for everyone. Happy adventures!
Unforgettable Adventures
Ride the Sea to Sky gondola for unforgettable views of Howe Sound
Cross the Fraser Canyon at it’s narrowest point at Hell’s Gate
Bike from Sidney to Sooke along the Lochside and Galloping Goose trails
Explore underground at the Upana Caves near Gold River
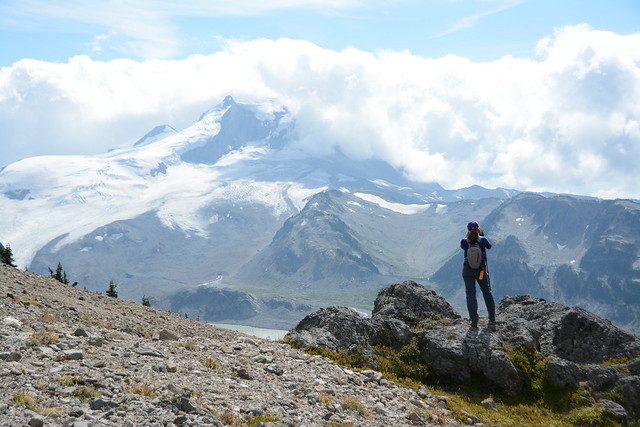
Hike Frosty Mountain in the Fall to see the larch trees turn yellow (pictured)
Embrace “Ski to Sea” and end your ski day with a trip to the beach
Reminisce about the Beachcombers TV show at Molly’s Reach in Gibsons
Classic City Experiences
Climb the Grouse Grind and visit the resident grizzly bears
Walk across the suspension bridge at Lynn Canyon or Capilano
Bike along the seawall and stop to see the totem poles in Stanley Park
Take the ferry to Bowen Island for a classic day trip
Play beach volleyball or let it all hang out at Wreck Beach
Last winter I set myself a goal of visiting more huts, planning 3 separate trips across the season. As is often the case in winter, the avalanche conditions didn’t align with my trips and I ended up bailing on two of three huts. Fortunately, I had a fantastic time at the Elfin Hut, but was left feeling a bit disappointed about the other trips.
This winter I planned 4 hut trips! The first trip was a bust again, due to weather, and one trip has yet to happen, but I was successful in visiting two of the ACC huts in mid February! The ACC is the Alpine Club of Canada, which is a great organization if you’re looking to grow your mountaineering skills. It has an annual membership, but one of the unique features of being a member is access to a large network of huts throughout BC and Alberta, as well as the ability to participate in trainings, trips, and events. You can still stay in the huts if you are not a member, but you get priority booking as a member (and a small discount on the cost), so it can be hard to book some of the huts without having the advance booking privileges.
I’m no stranger to snow camping and have spent many trips sleeping in the snow in a tent. But since I’ve taken up ski touring, I have to admit, there’s a certain advantage to staying in huts and being able to travel with a smaller pack. It’s much harder to ski with a full pack that includes a -30 degree sleeping bag and a winter tent, so we’ve largely switched to hut camping in the winter.
Since most of the ACC huts are located in the Rocky Mountains, this year I decided to plan a whole trip around skiing in the Rockies. I took one week off work and planned to do a few days resort skiing at Revelstoke with friends, before doing some ski touring with Brandon to the A.O. Wheeler Hut in Glacier National Park and the Elizabeth Parker Hut in Yoho National Park. We planned to finish with a day of resort skiing at Kicking Horse, but I ended up bailing on that day to rest and watch some of the Olympic finals.
After 3 days in Revelstoke, Brandon and I overpacked his 4runner to drive an hour to the Wheeler trailhead in Glacier National Park. I am, of course, talking about the Glacier Park located in BC, and not the one located in Montana. I feel like this park is hugely underrated and I’ve been wanting to explore more of it, so we booked one night at the Wheeler Hut to check it out.
The Wheeler Hut is one of the ACC’s most accessible huts and it’s a great option in the winter especially. In the summer, it’s basically located at the parking lot next to Illecillewaet Campground, but in the winter, you have to use the winter lot, so it’s a flat 1.5km hike to the hut instead. There’s a small picnic shelter and outhouse located at the trailhead. It’s a short walk up through the trees, and then it’s dead flat for 1.5km on a wide winter road. There’s no avalanche risk along the road, so you can feel pretty confident in visiting it at any time of year, regardless of your skill level.
When we visited, literally everyone in the cabin was on touring skis, most of which were planning to ski some bigger terrain nearby, but this would still be a good hut to visit on snowshoes or cross country skis. It was the middle of the week, so I think the hut likely attracts more families on weekends. I didn’t have any trouble booking the hut for a weeknight, and it wasn’t full, but I believe it’s very popular on the weekends. Booking through the ACC, you get access to bookings 6 months ahead of your travel date if you are a member, or 3 months ahead of your travel date if you are not a member.
In addition to the hut booking, there are several permits that are required from Parks Canada. You will need the standard Parks Canada Pass to leave in your vehicle, which is currently free in the summer, but still comes for a fee in the winter. You can buy it as an annual pass for your party, which we already had, or you can buy a day pass for each person on the trip. If you’re going to spend more than a week with 2 people in National Parks, I recommend the annual pass.
In addition to the Parks Pass, you are also required to obtain a free Winter Permit from Parks Canada if you are recreating in Glacier National Park. It’s a really interesting park because the Trans Canada Highway runs through the middle, which is extremely mountainous and potentially dangerous in the winter. The road passes through Rogers Pass, which has a bit of a reputation locally. Because the highway runs straight through the mountains, there is considerable avalanche risk, which is managed using explosives. In fact, Glacier National Park is home to the world’s largest mobile avalanche control program.
As a result, sections of the park are regularly shut down for avalanche control and it is completely illegal and extremely dangerous to be in those sections of the park when they are closed (as they will be setting off explosives and triggering avalanches). In order to manage the risk and ensure that people know how to check where they should and shouldn’t be, Parks Canada requires every single visitor recreating in the park to obtain a free Winter Permit every winter. In order to get the permit, you have to learn about the avalanche control program and complete a 30 minute quiz. It’s not difficult, but at the end you will receive a winter permit and parking pass.
If you’re staying at the Wheeler Hut, you’ll require a hut booking, the standard National Park Pass, the Winter Permit, the Winter Pemit Parking Pass, and an Overnight Parking Pass, which you can obtain from emailing Parks Canada (instructions are included as part of the Winter Permit process). It does sound quite complicated, but once you complete the Winter Permit quiz, the requirements will become much more obvious.
Once you’ve obtained all the appropriate permits, you’re ready for a fun trip to the hut. I was on touring skis and Brandon was on a splitboard, so it didn’t take us too long to get to the hut. The trail looks flat, but I think it might be ever so slightly uphill on the way there, because we were a lot faster on the way out. We arrived at the hut around 12:30pm and it was completely empty because all the current residents were out ski touring for the day. We had lunch and set up our beds before getting ready to go out and do a little exploring of our own.
I’m not super knowledgeable on the terrain around the Wheeler Hut, so I’ll just give a quick overview. If you don’t have Avalanche Safety Training, you’ll want to stick pretty close to the hut when exploring, but there are a few relatively safe options to check out. There are two trails from the hut, which includes the Perley Rock/Sir Donald Trail and the Asulkan Valley Trail. I didn’t do the Perley Rock Trail, which is closest to the hut, but you can follow it along the river in simple terrain for 1-2km. Stick to flat terrain – once the trail starts to get steeper or exposed to open mountain slopes, it’s time to turn around.
We opted to take the Asulkan Valley Trail, which starts in a meadow as opposed to the trees. We followed the trail until we hit a branch, where we took the left fork onto the Great Glacier Trail. We followed that trail for ~1km, until we hit the Illecelliwaet River, where there is a great view of some really big mountain terrain. That’s where we opted to turn around because we didn’t want to expose ourselves to any risk and the avalanche forecast was considerable.
Another option is to continue further up the Asulkan Valley Trail, from what I understand, you can go another half a kilometre up that trail until you hit a bridge, after which point it’s time to turn around. So overall, there are 3 potential routes, which are all ~3km round trip from the hut. When we visited the hut, we were the only people visiting for just 1 night. Everyone else was staying for multiple nights to go ski touring, with the most popular route being to tour the whole way up the Asulkan Valley Trail, where there is a second ACC hut, the Asulkan Cabin. I hadn’t done enough research to be comfortable with this route at the time, so we played it safe. I talked to a few skiers that did the trail and I think with a bit more background, this would be a good option for me in the future.
In spite of the higher avalanche conditions, the weather was quite nice. It was overcast all day, but it also snowed all day, leaving a nice layer of fresh powder to ski. We seemed to be the only people to take the Great Glacier Trail on that day, so there was several cms of fresh snow, which was nice. We returned to the hut for supper and the atmosphere was much livelier as people rolled in from their day of exploring. There was a large group staying at the hut, which is often annoying, but I will credit this group with being really respectful of hut norms. They took care of most of the hut chores, chopping a ton of firewood, keeping the woodstoves going, and making sure there was always a steady rotation of drinking water available in the large pots. So Brandon and I had it quite easy!
There is a creek near the hut where you can get drinking water. I’m not sure if the creek is normally open year round, but it was when we visited, which made water supply a lot easier. It’s so much faster than having to melt snow and a much nicer quality for drinking as well. Overall, the Wheeler hut is pretty swanky and exceeded all my expectations. It’s a large hut and it did feel busy, but it was under capacity on the night we stayed there, with lots of empty beds.
You enter from the back of the hut and there’s a small room to take off your boots, followed by the first of 3 main rooms. The first room has a woodstove and a table, but I would consider it to primarily be the gear drying room. There’s a bunch of racks for boots and lots of places to hang gear. The middle room is a large kitchen and cooking area. You don’t need to bring a stove or fuel, as there are several propane burners. You also don’t need to bring any dishes or utensils. We opted to bring our own small pot because we were just cooking dehydrated food and the provided pots tend to be quite large, but we didn’t need any other kitchen equipment, aside from some camp suds and a hand towel.
The last room is the main eating and hang out room and has a large fireplace. This is where we spent the rest of the evening. The large group was at one table, and most of the other smaller groups were at the other table. We had a nice chat with 2 brothers who were visiting from Ontario in order to go touring, and a group of 3 from Calgary. They saw me teaching Brandon how to play crib and recognized a fellow card lover, so I ended up joining them for several rounds of cards. I’ve already forgotten the name of the game. I only planned to play a few rounds before going to bed, but got sucked in when I couldn’t win a single hand. I ended up losing spectacularly, but I had a great time!
In addition to the three rooms on the main floor, there are 3 rooms of bunks upstairs, so it’s a very large capacity hut. Sleeping mats are provided, but I opted to bring my thermarest anyways because my quilt and thermarest together weigh less than my full size sleeping bag (and I didn’t want to lay directly on the mats in my quilt). Brandon brought his thermarest too because he was concerned about being cold on the mats, but it’s plenty warm in the hut with 2 woodstoves, so that wasn’t a concern.
It’s a nice set-up for sleeping, but I didn’t get much sleep because as soon as everyone went to bed, the symphony of snores started. This is to be expected at a hut and I did have earplugs, but it was so loud even that couldn’t drown them out. In future I would probably bring earbuds so that I could put on some music, I think that would have been more effective.
We were up early because we had to ski out, drive to Field, and then ski 12km up to Lake O’Hara on the same day. We were the first people to get up and the fire had gone out completely, so we got it re-started and then had a quick breakfast before heading out again. It was a beautiful day and we saw lots of blue sky on our early morning hike out. One night at the hut did seem a bit short, but it was a good length for what we planned to do, especially since we arrived early on the first day. In any case, Elizabeth Parker Hut was the real highlight of our trip, so tune back in next week to learn about that hut!
Mount Assiniboine is located in Mount Assiniboine Provincial Park in BC and is one of the more iconic peaks in the Canadian Rockies. It’s been a few years since I hiked this trail, but there are a lot of options for how to do this trip, and I wanted to share my knowledge in the form of a backpacking guide to the trail. At the time that I hiked the trail in 2021, I wrote a 4-part trail report, which you can read starting here. Reservations for the 2026 season release at 7am PST, 3 months in advance of your planned start date.
The Park
Mount Assiniboine is located in the middle of Mount Assiniboine Provincial Park, but is surrounded by Banff and Kootenay National Parks, as well as Spray Lakes Provincial Park in Alberta. If you plan to hike there, you’ll have to go through one of the National Parks, with Banff being the more popular access point. There are two routes through Banff and one route through Kootenay, but they are all at least 25km long, so it is a big hike just to get into the park.
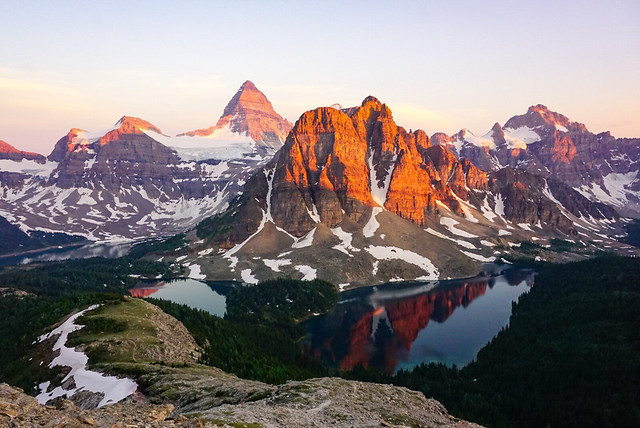
If you’re looking for a more direct approach to the park, it is possible to fly in from the Mount Shark trailhead via helicopter. This is a popular option if you want to maximize your time in the core area of the park. The core area of the park encompasses Magog Lake, Sunburst Lake, and Cerulean Lake, as well as the popular day hiking trail up to the Nub (or the Nublet/Niblet if you prefer a shorter option). The Nub is well known for its phenomenal sunset views of Mount Assiniboine, when the adjacent Sunburst Peak lights up orange as the sun goes down (see photo below).
There are limited options for where to stay in the park, which will likely be the restricting factor of your trip. The cheapest option is to stay at the Magog Lake Campground, if you can score permits. Otherwise you’ll have to pay more to stay in either the Naiset Huts or Assiniboine Lodge, both of which are privately owned and not cheap. The lodge is catered, but I’m not sure about the huts. There is another campground at Og Lake, but it’s approximately 5km away from the core area of the park, so it’s not ideal.
If you have limited time, I recommend flying into the park, but if you can spare a few extra days, you can do either a there-and-back trip or a thru hike. I opted to do a thru hike along the two access points in Banff National Park and it’s a very scenic hike. It’s best if you have 2 days each way (with a night spent halfway between), and then another 2 days to explore the core area of the park (6 days in total). Another option could be to fly in and then backpack out through Wonder or Assiniboine Pass, to experience the best of both options.
Sunburst Mountain and Mount Assiniboine at sunset from the Nublet
Time of Year
The best time of year to hike Assiniboine is in the Summer or early Fall. There may still be some snow on the trails if you go in late-June, but the later you go in the summer, the more likely that your trip might be impacted by wildfires. While most people prefer to backpack in the summer, late September is also popular due to the colourful larch trees through Wonder Pass. However, you should be prepared for snow and cold conditions at this time of year. I hiked the trail in late June and there was no snow, but it was during the early season heat wave of 2021, which melted remaining snow very quickly.
Getting There
There are 3 primary ways to access the park: the Mount Shark Trailhead, Sunshine Village, or the Simpson River Trailhead. Unfortunately, the park is not accessible by public transit. Similar to other popular Canadian parks, the easiest way to access is by driving. If you’re flying in, Calgary is the closest major airport.
Mount Shark: If you plan to fly into the park or hike in via Wonder or Assiniboine Pass, you will need to take Spray Lakes Road out of Canmore and drive to the trailhead at Mount Shark. There are two parking lots here, one for hikers accessing the trailhead, and another for those taking the helicopter. A National Parks Pass is not required to park here since the trailhead is technically in Spray Valley Provincial Park. However, you will need to pay for a Kananaskis Conservation Pass from Alberta Parks in order to park your car.
Sunshine Village: In my opinion, the Sunshine Village access is the easiest way to hike into the park. You can hike along the Citadel Pass Trail at the top of the Sunshine Village gondola. You park at the base of the ski resort, at the end of Sunshine Road off of Highway 1, and have the option of paying to the gondola to the top of the mountain. I highly recommend this as it will save you 5km of hiking and over 500m of elevation gain. A National Park Pass is required to park at the base as it is located in Banff National Park.
Simpson River: This is the least popular access point to the park as it’s the least maintained trail and the longest route to Magog Lake, as well as one of the lesser scenic routes. However, it is a great option if you’d like to avoid crowds or are unable to get permits to one of the halfway camps on the other routes. The trailhead is located off Highway 93 in Kootenay National Park, so a National Park Pass is required to park.
Using my thermarest to float on Sunburst Lake
Permits
Like most popular hikes in the Rockies, securing your camping permits will likely be the hardest part of your trip. This is a popular destination and while more people prefer to fly in rather than hike, it is challenging to get camping permits in the core area of the park. I’m not sure how difficult it is to book the lodge or the huts, but if you want to get camping permits, then it’s important to mark your calendar with the appropriate permit release dates. Unfortunately, because there are many different access points to the park, depending on your itinerary, you may have to obtain permits from both BC Parks and Parks Canada.
The permit release date for Mount Assiniboine Provincial Park is 7am PST, 3 months in advance of the start of your trip. They are released through BC Parks (camping.bcparks.ca) in a rolling window. These permits are considered “backcountry reservations” and they will likely sell out as soon as they release. So if you want a permit for July 1, you will need to be online at 7am on April 1 to make your reservation. Reservations are available for Magog Lake, Og Lake, and Porcupine Campsite. Bookings are $25 per person, per night (plus a booking fee).
If you are planning to hike in or out via Wonder or Assiniboine Pass, you may also want to make a reservation for one of the Parks Canada Sites (https://reservation.pc.gc.ca/), either Marvel Lake or McBride Camp. These campsites are all located in Banff National Park and the release date for 2026 was January 26, 2026 at 8am MST. Bookings are $15 per person, per night (plus a booking fee). Once booking opens, select “backcountry” in the tabs along the top of the booking page, and then select “backcountry zone”, followed by “Banff, Kootenay, and Yoho Backcountry”. The appropriate access point is “Bryant Creek Trailhead”. If you can’t get one of these sites, there are two more alternative sites, Big Springs or Allenby Junction Camp, though they are not located at the midpoint of the trail.
There are no reservations required if you are hiking via the Simpson River Trail in Kootenay National Park, but there are 3 potential campgrounds: Surprise Creek, Rock Lake, or Mitchell Meadows.
Here’s a few tips for getting your camping permits:
For permits from Parks Canada, get on the booking website 15 minutes early using as many devices as possible (computers, phones, ipads, etc). At release time, everyone on the website is entered into a random generator that assigns you a position in the queue. All of your devices will be assigned a place in line, then proceed to book your permits on whatever device has the shortest queue.
For permits from BC Parks, there is no queue, so there’s no benefit to using multiple devices. To save time, create and login to your account before 7am and check the system time at the top right corner of the page so that you click reserve right at 7am.
If you don’t see availability for your preferred date, keep refreshing for at least 15 minutes. With so many people trying to book campsites, dates are always disappearing and then becoming available again. Be flexible with dates.
If you can’t get the dates you want, you can track cancellations on Schnerp, which will notify you when a site opens up.
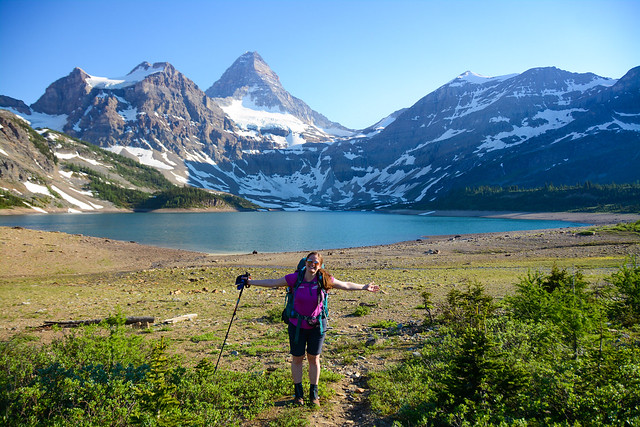
Mount Assiniboine and Magog Lake on the way down from Wonder Pass
Campsites
There are 3 backcountry campsites in Mount Assiniboine Provincial Park and 4 backcountry campsites along the Wonder/Assiniboine route in Banff National Park. There are 3 backcountry campsites in Kootenay National Park, but they do not require reservations. There is only 1 campsite in the core area of the park, Magog Lake, so this should be your priority booking. I’ll discuss itineraries below, but here’s an overview of the available campsites.
Magog Lake – This is the most centrally located campsite for your visit to the core area of Assiniboine Park. This should be your first priority for bookings and I recommend at least two nights at the campsite. It has 40 tent sites and a large open-air shelter, which you must use for all cooking. The campsite also has several outhouses and grey-water disposal, a water tap, and bear lockers next to the cooking shelter. Book this campsite through BC Parks, $25 per person, per night.
Og Lake – This campground is technically located in the core area of the park as well, but it is 5kms from Magog Lake and the Nub hike, so it’s not as ideal as the Magog Lake Campsite. It’s an alternative option if you can’t get into Magog Lake or a good stop on the way to Magog Lake via the Citadel Pass Trail from Sunshine Village. It has 10 tent sites, an outhouse, bear lockers, and grey-water disposal. There are picnic tables for cooking and water is available from the lake. Book this campsite through BC Parks, $25 per person, per night.
Porcupine – This campground is located near the midpoint of the Citadel Pass route between Magog Lake and Sunshine Village. This is the best option for camping if you are backpacking in or out of the park along this trail. It has 10 tent sites, an outhouse, bear lockers, and a cooking area. Book this campsite through BC Parks, $25 per person, per night.
Marvel Lake – This is one of 2 campgrounds located at the midpoint of the route into Mount Assiniboine from the Mount Shark trailhead, also sometimes called the Bryant Creek trailhead. This is the best campsite if you’re hiking in or out via Marvel Lake or Wonder Pass. Book this campsite through Parks Canada, $15 per person, per night.
McBride – This is one of 2 campgrounds located at the midpoint of the route into Mount Assiniboine from the Mount Shark trailhead, also sometimes called the Bryant Creek trailhead. This is the best campsite if you’re hiking in or out via Assiniboine Pass. Book this campsite through Parks Canada, $15 per person, per night.
Big Springs – If you can’t get a reservation at Marvel Lake or McBride, there are two alternative campgrounds. Big Springs is located at km 7 of the Bryant Creek Trail from the Mount Shark trailhead, also sometimes called the Bryant Creek trailhead. This is a good alternative camping option regardless of which route you’re taking (Wonder Pass or Assiniboine Pass), since it’s located before the trail junction. Book this campsite through Parks Canada, $15 per person, per night.
Allenby Junction – This campsite is located at km 17 of the Bryant Creek Trail from the Mount Shark trailhead, also sometimes called the Bryant Creek trailhead. It would be my last choice if I couldn’t get reservations at Marvel Lake or McBride. The campsite is located along the Assiniboine Pass route, so it can’t be used if you plan to hike via Wonder Pass. Book this campsite through Parks Canada, $15 per person, per night.
Surprise Creek, Rock Lake, and Mitchell Meadows – All 3 of these campsites are located along the Simpson River Trail in Kootenay National Park. I haven’t visited any of these campsites, but I’ve heard that Mitchell Meadows is the most popular. If you can’t get bookings at any of the other campgrounds, consider taking this route instead as there are no reservations required. However, the trail is not as well maintained as other options and I highly recommend doing further research to ensure it is an appropriate route for your party.
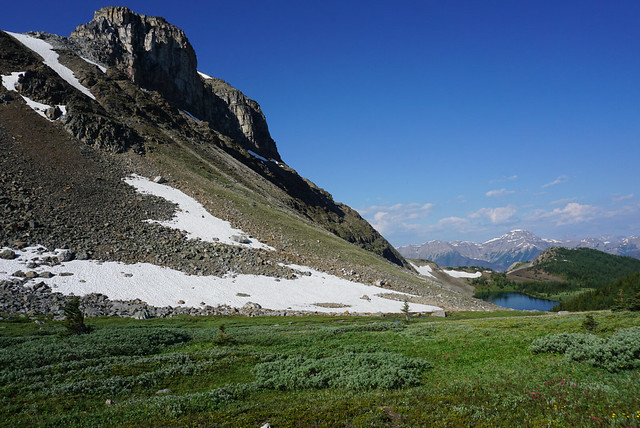
The view along the Citadel Pass Trail from Sunshine Village
Itineraries
With so many access points, there are many different ways to plan a trip to Mount Assiniboine. So I’ll try and keep this as simple as possible with a few different hiking strategies.
Helicopter Access: Helicopter into the core area of the park and spend as many days as desired camping at Magog Lake and exploring the core area of the park. Plan for a day hike up the Nub, as well as some time exploring around to the many lakes. If you have enough time, day hiking up to Wonder Pass is also incredibly scenic! (recommend 2-3 nights)
Half Thru Hike: If you want to experience backpacking, but don’t have enough time to commit to a full thru hike, plan to take the helicopter one way and backpack the other. This way you can experience the beauty of the backcountry, along with the core area of Assiniboine Park. My recommendation is to fly into the park from Mount Shark and then hike back via Wonder Pass. This works well because it’s a net elevation loss on the way out, your pack will be lighter after eating your food, and your car will already be parked at the Mount Shark Trailhead from taking the helicopter. (recommend 3-4 nights)
Full Thru Hike: If you have the time and access to two vehicles, it’s well worth it to commit to doing an entire thru-hike, enjoying a few days in the core area of the park in the middle of your trip. As discussed, there are 3 access points into the park, but my recommendation is to hike in via Sunshine Village along the Citadel Pass Trail and out via Mount Shark along the Wonder Pass/Bryant Creek Trail. Stay at Porcupine Camp on the way in and Marvel Lake Camp on the way out. This is the most ideal route because you can bypass a lot of elevation gain on the way up by taking the Sunshine Gondola, and it’s a net downhill hike through Wonder Pass. Hiking in through the Simpson River Trailhead is also an option, but it’s a lot of elevation gain and not as scenic as Citadel Pass. (recommend 5 nights)
Loop Trail: Another great option if you can’t afford the helicopter or don’t have access to two vehicles is to do a loop hike from the Mount Shark Trailhead. There are two ways to access Assiniboine along this route: Wonder Pass or Assiniboine Pass. Both trails share the Bryant Creek Trail for ~10kms and then branch into two different trails. The Wonder Pass trail goes along the edge of Marvel Lake and up over Wonder Pass, whereas the Assiniboine Pass Trail follows an easier route up through the valley. I haven’t done the Assiniboine Pass route, but would recommend hiking in along that trail since it has less elevation gain, and then hiking out through Wonder Pass. Just make sure to check for any trail closures as sometimes part of the Assiniboine Trail is closed for breeding and conservation. (recommend 5 nights)
Fast Packing: I have no experience with fast packing, but for those who travel ultralight or are experienced trail-runners, some people do visit the park by completing the entire backpacking access trail in a single day rather than over 2 days. In some instances, hikers have paid to have their backpack carried in by helicopter, enabling them to move faster and complete the hike with only a day pack. I don’t recommend this option unless you are experienced, but it is something you can consider. (recommend 3-4 nights)
Wonder Pass in early summer (2021)
Day Hikes
There are several great options for day hiking in Mount Assiniboine Provincial Park. At the very least, I think everyone should hike up to the Nub or the Nublet and explore around the lakes, but there are several other options if you have the time. Here’s the trails I would recommend:
The Nub – If you want to get a birds-eye view of the park, this is one of the best day hikes. There is quite a bit of elevation gain from Magog Lake, but it’s well worth it for the incredible views. From the campsite, it’s a ~9km roundtrip trail with 600m of elevation gain.
The Niblet/Nublet – I highly recommend this trail for sunset. If you’re hiking up to the Nub, you’ll have to hike over both the Niblet and the Nublet, but if the Nub is too ambitious for you, these are great alternatives. The view from all of these locations is phenomenal at sunset as Sunburst Mountain turns orange when the sun goes down, but it is a long way down in the dark from the Nub, which is why the Nublet or the Niblet are great alternatives. From the campsite, it’s a ~7km roundtrip trail with 375m of elevation gain.
Wonder Pass – If you fly into the park or hike via one of the other access points, I highly recommend taking the time to hike up to Wonder Pass as a day trip. It’s much easier coming from Magog Lake than from Mount Shark. It’s a ~9km roundtrip trail with only 275m of elevation gain, so technically one of the easier hikes on this list. At the right time in the summer, the trail will be filled with wildflowers, and if you visit in the Fall, the larches will be turning yellow on the way up to the pass. From the top of the Pass, there’s an add-on hike up to Wonder Peak, but it’s fairly steep and not recommended for beginners. Please do additional research if you decide to attempt it.
The Lakes – There are 5 lakes in the core area of the park, not including Og Lake. If you have time to visit them all, I’d definitely recommend it, but at the very least, you must visit Magog Lake, Sunburst Lake and Cerulean Lake. Gog Lake and Elizabeth Lake are nice add-ons if you have the time. I made it my goal to swim in every single lake and I was successful! In my opinion, Sunburst Lake is the most scenic.
Og Lake – If I flew into the park, I would prioritize the other day hikes on this list over Og Lake, but if you have the time and are not hiking past it already, it is a fairly easy hike to go out and back to Og Lake from Magog Camp. It’s a 12km roundtrip trail, making it one of the longer hikes on this list, but there’s almost no elevation gain and it’s all through open meadows, so it’s not challenging. In the middle of the summer, there should be lots of wildflowers along this route, but keep in mind that on a hot day, the trail is completely exposed. There’s also the option to branch off and visit O’Brien Meadows if preferred.
Mitchell Meadows – I haven’t done this hike, but it’s an ~11km roundtrip trail to Mitchell Meadows, with minimal elevation gain, so it could be a nice hike if you have the time.
Mountaineering Routes – There are several mountaineering objectives in the area, which I will not discuss because I don’t have mountaineering experience and they shouldn’t be attempted by those without proper equipment. But other options for further research include Sunburst Peak, Mount Cautley, Naiset Peak, Cave Mountain, or Og Mountain.
Hiking around Marvel Lake on the way through Wonder Pass