Favourite Hikes in Southwestern BC: Part V

It’s been over 10 years since I moved to British Columbia, so every 2 years I compile a list of my favourite hikes from the past 2 years. You can view my other favourite hikes in Part 1, Part 2, Part 3, and Part 4. This collection is my favourite trails that I hiked in 2023 and 2024. It’s always a mix of day hikes and backpacking trips!

Two hikers lay on Starvation Lake on floating pads with the mountains and forest in the background on a warm, sunny day in Summer, near Squamish, BC.

#10 Starvation Lake

This hike is super easy and accessible, but chances are, you’ve never heard of it. The alpine snow was pretty slow to melt in the summer of 2024, so one day in July we decided to check out some of the lesser known trails in Squamish. We wanted to stay at a low elevation and take advantage of lake swimming season. We had Brunch at Fergie’s and then continued to the end of Paradise Valley Road to start this hike. The trail follows the Cheakamus River before a gentle hike uphill on the Sea to Sky Trail. We hiked as far as the Starvation Lake Rec Site and spent several hours lounging around and swimming in the warm water. You can continue hiking further to connect with the Sea to Sky highway (if you have two cars), but we enjoyed a round trip from the lake. (6km roundtrip, 130m elevation gain)

A group of snowshoers head downhill in winter on a snowy mountain with snow covered trees and a view of Vancouver city in the background from Brockton Point in Seymour Mountain Provincial Park in British Columbia, Canada.

#9 Brockton Point

Brockton Point is well known among the skiing and snowshoeing crowd. It’s a hike I’ve done several times, but I only started to appreciate it in the past few years. I recommend doing it in the winter, just make sure to book a free parking pass for Mount Seymour Backcountry or you’ll be denied access. Recently I’ve been ski touring up to Brockton Point and then skiing back down through the resort trails, but it’s also a really nice snowshoeing trail. The trail starts at the back of the parking lot and hikes parallel to the ski run. Most users continue past Brockton Point to Pump Peak, but this takes you into avalanche terrain, so don’t go further without the proper gear and training. I always stop at Brockton because the view is great there anyways! (6km roundtrip, 270m elevation gain)

A photo of a tent in a meadow just before sunrise, as the sun turns the surrounding mountains orange on a clear sky day overlooking the alpine and forest around Jade Lake in Mount Revelstoke National Park in BC.

#8 Jade Lake

In line with my other posts, I’m not afraid to stretch the boundaries of what is considered “southwestern BC”. Jade Lake is located 6 hours away from Vancouver in Mount Revelstoke National Park, so it’s definitely a bit of a stretch to include it in this list, but it’s a great hike! Eva and Jade Lake can be done as either a backpacking trip, or a long day trip. It’s a little over 20km round trip if you want to do both lakes in a day, so I opted to visit overnight. The hike starts from the top of Mount Revelstoke and meanders through beautiful alpine meadows. After Eva Lake, the hike climbs up the pass for a beautiful view of Jade Lake. Most people stop at the Pass, but it’s definitely worth it to add the extra 2km down to Jade Lake, which is a gorgeous alpine lake that receives limited visitors compared to the rest of the park. (20km roundtrip, 525m elevation gain)

A hiker stands on the edge of a rock next to Widgeon Creek with the forest and mountains in the background on a sunny day

#7 Widgeon Falls

Widgeon Falls is a really unique hike because it’s only accessible by boat! In the summer, you can rent canoes from Pitt Lake and paddle across the Pitt River and up Widgeon Creek to the Widgeon Campsite (~1.5 hour paddle). It’s a pretty safe paddle, but you definitely want to be prepared if you’ve never canoed before. The Pitt River is tidally influenced and can become pretty fast moving, so research the current conditions before visiting. I think the best time to go is early spring or early summer. Avoid freshet, which causes high flows in the river, but also avoid late summer because then the flows in the creek can get too low. From the campsite, you can hike through the forest and along the river to Widgeon Falls. It’s an easy hike, but makes for a great adventure! (9km roundtrip paddle, 6km roundtrip hike)

A photo of Palmers Pond on a summer day, with the green meadows, forest, and mountains in the background, on the Hudson's Bay Company (HBC Trail) near Hope in British Columbia, Canada.

#6 HBC Heritage Trail

If you know me well, you might be surprised to see this hike on the list. I did not have a great time on this hike. It’s 80km long and me and Carolyn completed the entire trail in 3 days, resulting in a foot injury. I was quite miserable along a lot of the trail, but it was definitely a type 2 kind of fun because I still think about this trail all the time. Like the name suggests, it’s a heritage trail that connects Hope to Tulameen and was used during the fur trade and by First Nations. The trail has a lot of forest walking and is not for the faint of heart after the 2021 flood caused a lot of blowdowns and washouts. Most of the trail has now been repaired by amazing volunteers, but the real reason you do this hike is for the solitude. We encountered a lot of people when we passed through Lodestone Lake Rec Site, but otherwise, we didn’t see a single person on the trail in the entire 3 day weekend we were hiking. Despite the challenges, I think this is a really special trail and you will be rewarded with views at Conglomerate Flats and Palmer’s Pond. It’s a great option if you like a challenge! (80km, 3300m elevation gain, 4-6 days)

A female hiker stands next to a fence, looking out at the fast moving water of Sechelt Inlet near Skookumchuck Narrows, with the mountains in the background on a sunny, summer day, on the Sunshine Coast, BC.

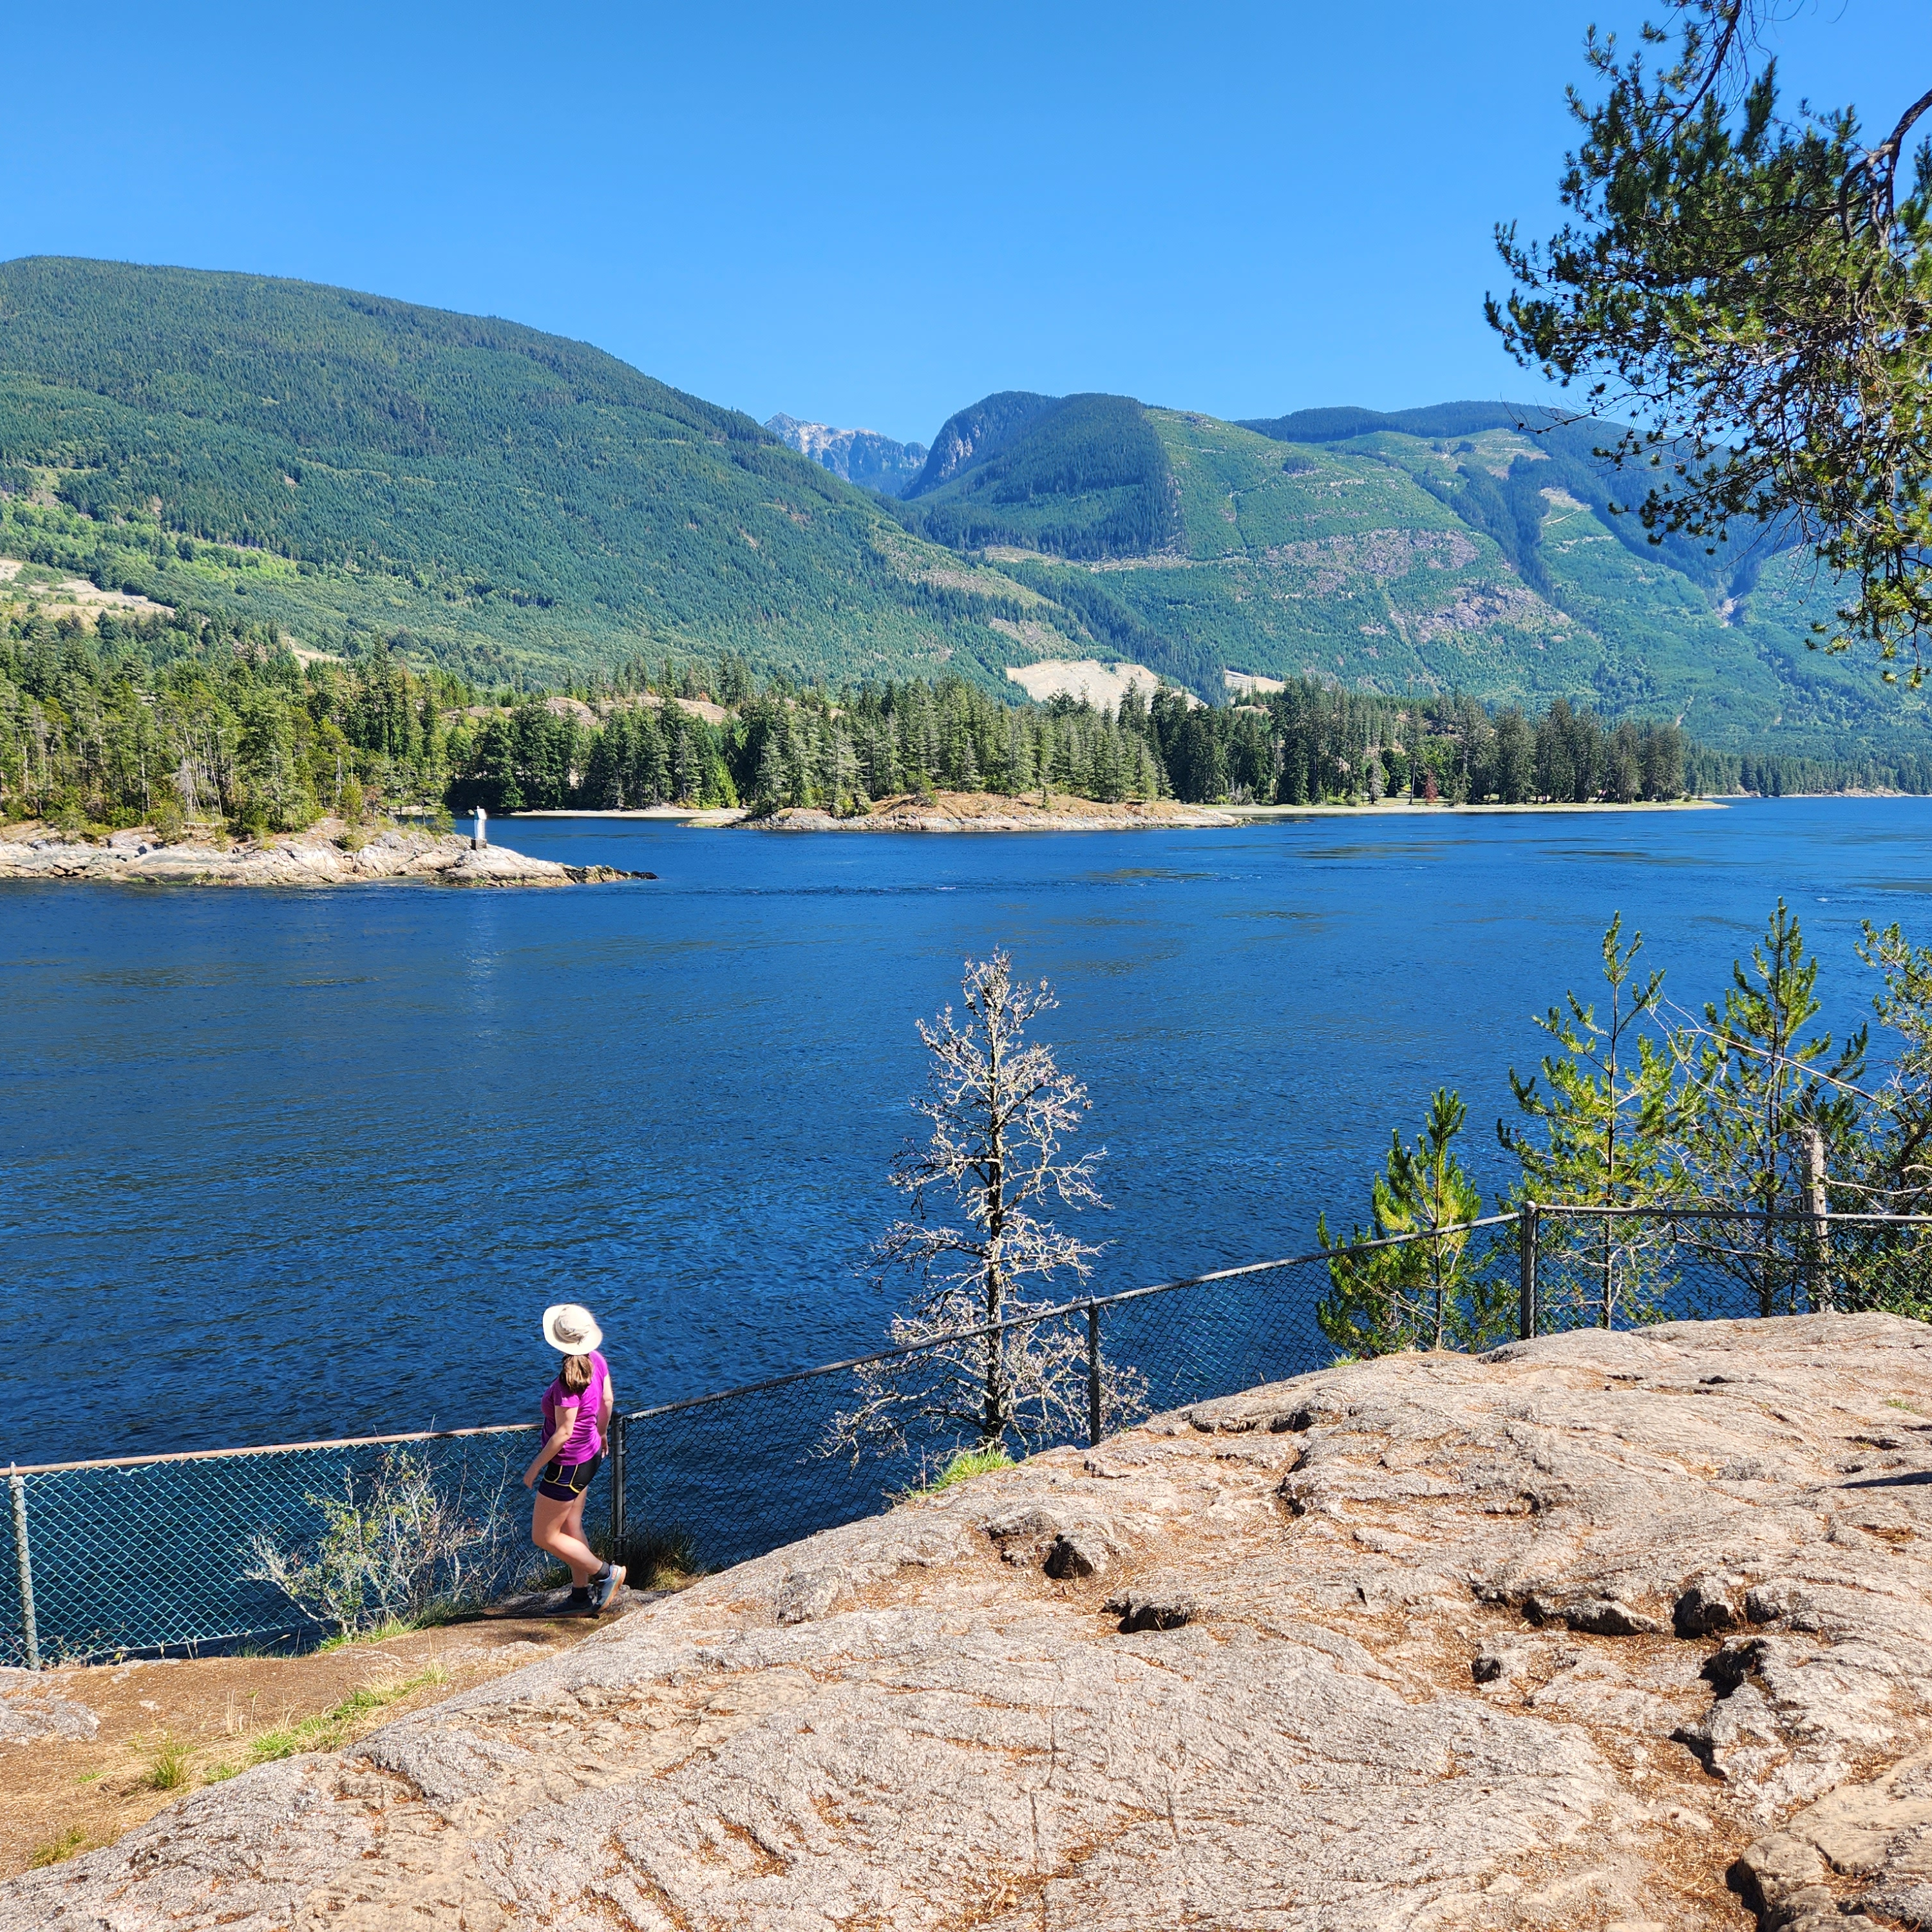
#5 Skookumchuck Narrows

This is a small and easy trail on the Sunshine Coast, but I really enjoyed visiting it. After you take the ferry to Langdale, drive all the way north to Earls Cove and take the turn off to Egmont. It’s a relatively easy hike, so make a day of it and visit the small village of Egmont and go for a swim in Waugh Lake on the way back. There’s a tiny cafe along the trail, so you can reward yourself with a little treat. The trail hikes through the woods to a series of viewpoints at the Sechelt Rapids. The main reason to visit is to see the series of rapids that develop during tide change, which are popular among kayakers and whitewater enthusiasts. The views of Sechelt Inlet are gorgeous, and it’s really fun to watch the thrill seekers playing in the rapids! (9km roundtrip, 150m elevation gain)
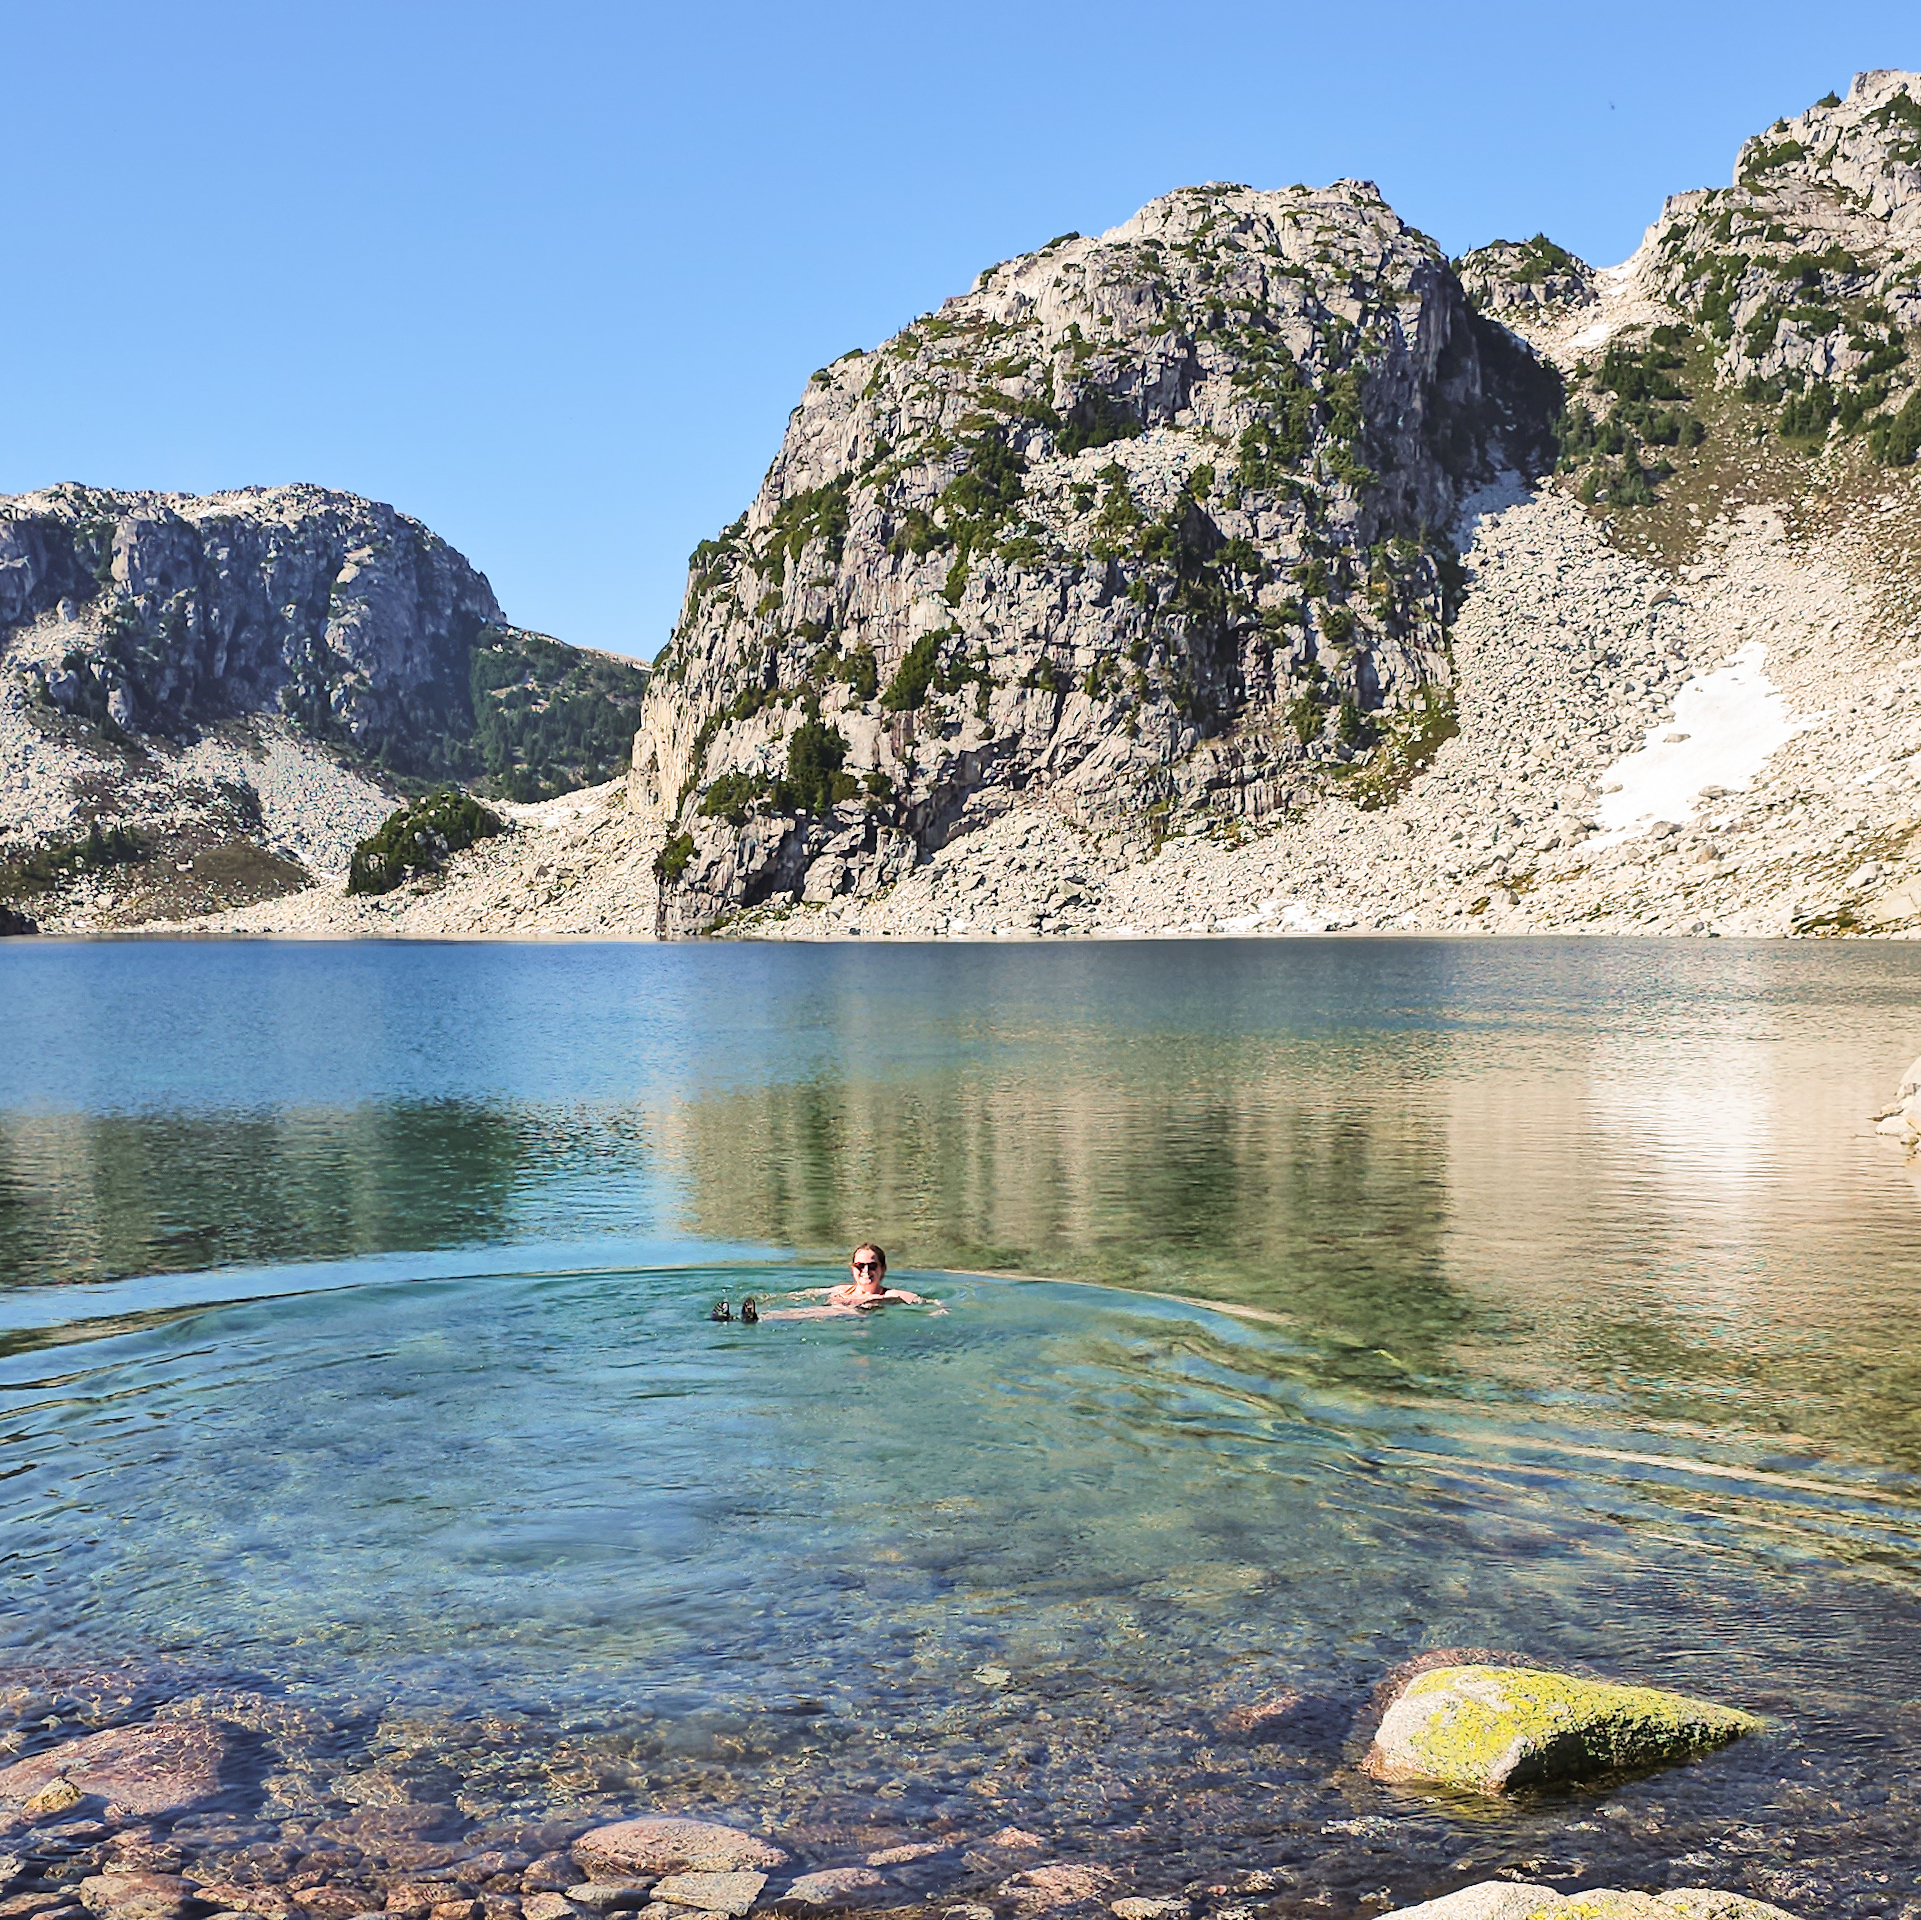
A female hiker floats in an alpine lake while swimming at Blanca Lake, with the mountains in the background on a blue sky, sunny day, north of Squamish, BC

#4 Blanca Lake

Blanca Lake is still a relatively little known hike, but it is quickly becoming popular. It’s located really far down the Squamish River FSR, off the Elaho Mainline on E300 line. 4WD is required to get to the trailhead. You could try taking a car partway up the E300, but it’s 10km long and completely exposed. We picked up a few hitchhikers who were getting ready to quit from the heat. If you make it to the trailhead, it’s a short but steep hike up to the alpine. There’s a steep climb in the first 1.5km, but then the incline is more gentle for the remaining 3km up to the lake. You can visit as a day hike or an overnight. We stayed one night and there is a lot of space for tents. If you have the time, stay 2 nights to explore the surrounding alpine area. There’s no trails, but there’s lots of terrain to explore! (9km roundtrip, 500m elevation gain)

A landscape photo of the trees, mountains, and ponds, from the top of Mount Steele in Tetrahedron Provincial Park on the Sunshine Coast of British Columbia, Canada.

#3 Tetrahedron Park

Tetrahedron Park is located on the lower Sunshine Coast and has an amazing hut system that can be utilized all year round. Drive to Sechelt and take Sechelt Inlet Road out to the Gray Creek FSR. A normal car will get you to the lower parking lot, or with 4WD, you can save 1km extra and drive to the upper lot. You can visit Tetrahedron as a day trip, but I really recommend overnight to take advantage of the huts (great for beginners). There’s ~30km of hiking and 4 huts. Batchelor Cabin is best for families, Edwards Cabin is a good base camp for day hikes, and the cabins at Mount Steele and McNair Lake are great for more adventurous hikers. I highly recommend summiting Mount Steele, but exercise caution in the winter and watch for avalanche terrain.

A photo of the hiking trail in South Chilcotin Provincial Park that runs to Lorna Pass. The trail is covered in yellow wildflowers in the middle of the forest, with the mountains peaking out in the background on a cloudy day in British Columbia.

#2 South Chilcotin Provincial Park

South Chilcotin is a huge park with so many options for hiking. It’s definitely not a trip you can do for a day, unless you’re a mountain biker, but it’s great for multi day backpacking trips. I visited the park in mid-summer and did a 90km loop around the core area of the park, from Tyaughton Creek, over Deer Pass, to Spruce Lake. Other trip options include exploring the park via the Castle Creek trail or through adjacent Big Creek Park. For a price, you can take a float plane into the core area of the park and stay at fancy mountain lodges with full catering. What’s really nice about this park is the limited number of people and we had the backcountry sites to ourselves most nights.

A photo of Russet Lake with the grassy meadows and the mountains in the background on a smoky summer day in Garibaldi Provincial Park near Whistler, British Columbia, Canada.

#1 Russet Lake

I decided on Russet Lake as my favourite hike of the last two years. It’s a popular hike in the Garibaldi backcountry, but due to trail length and campsite maximums, it’s hard to do as a day hike and not as busy as other trails in the park. You can access the lake via the Singing Pass Trail (free from Whistler base), or take the gondola and peak chair up to the top of the mountain and hike via the Musical Bumps trail (this is what I did). There’s a lot of up and down along this trail, but you’re in the alpine the entire time and it’s absolutely breathtaking! Once you reach the lake, you can pay more to stay in the very beautiful Kees and Claire Hut, or you can stay in the BC Parks campsite at the lake. Stay an extra day if you want to explore the surrounding area. (24km roundtrip, 550m elevation gain)

Brockton Point Ski Touring

I’ve been downhill skiing since I was 10 years old. Since moving to BC, it felt inevitable that I would eventually want to get into ski touring. It’s intrigued me for the past few years, but it’s such a high buy-in for new gear that I was reluctant to commit. My downhill skis are 16 years old and very narrow for west coast skis (68mm underfoot). Me and Carolyn both decided to get new downhill skis at the same time, and as soon as she said she was getting skis for touring, I was obligated to get them too!

For those of you unfamiliar with ski touring, to oversimplify it, it’s downhill skiing without a chair lift. Meaning you stick skins to the bottom of your skis that allow you to walk uphill. The bindings are also different and use a pin in the front that allows your heel to lift out of the binding while walking. They look a bit like what most people know as telemark skis. This allows you to explore a lot of different terrain that wouldn’t be accessible to ski otherwise. Once you get to the top of the hill, you take off the skins, switch your bindings from ‘walk’ to ‘ski’ mode, and clip in your heels for a more traditional downhill ski experience.

20230325_105319
Screenshot_20240207_133042_Instagram

Choosing skis, bindings, and boots was a learning experience and took me most of last winter. A great tip when deciding is to take advantage of Whistler’s ski demo program. When you have your own equipment, you can demo skis for $20 a day, you just can’t keep any one pair of skis for more than 2 hours, but you can try different skis all day. I did this once at the demo shop on Blackcomb (at Rendez-Vous) and once on Whistler (at Roundhouse). You use your own boots and poles and it’s a good way to see what you like. My favourites were the Head Kore 97 skis, which I was able to get for a really good price online. It’s been an experience getting used to my new skis though since they are 30mm wider and 10cm longer than my previous pair.

Bindings were the most expensive part of my new gear, but the most straightforward. I wanted hybrid bindings that could be used both in the resort and in the backcountry (instead of the lightweight backcountry bindings). There’s really only one hybrid set on the market (called the lab shift) and they’re made by both Salomon and Atomic. For boots, I went to a professional boot fitter and tried on boots until I was happy. This was the most challenging part as I found a lot of them really uncomfortable. I opted for Salomon boots, but I’m not 100% sold on them yet.

IMG-20231216-WA0003

Anyways, back to the point. After getting all my gear last year, the season as almost over, so I only got to ski tour once last year and opted to start with Brockton Point on Mount Seymour. It’s a popular trail for touring because there’s a dedicated trail up the mountain and you can ski down the resort runs. I was hoping to do lots of touring in 2023, but it’s been a terrible year for snow, so I kicked off my season with a second run up and down Brockton Peak as well. I’ve done it twice on skis now, both with my friend, Eddie.

Eddie has been ski touring for several years, so he’s been very tolerant and supportive while I get comfortable. I wasn’t quite sure what to expect, but overall I think it’s been easier than I anticipated. The downhill part is definitely scarier than the uphill part, but the uphill part has been surprisingly comfortable. It’s very easy to walk uphill with the skins on and to be honest, it’s a lot more comfortable than snowshoeing. Your weight is distributed more and because you’re sliding your feet versus lifting them, it’s a lot easier. There are some tricky parts when the trail is steep, but overall the uphill part has been pretty enjoyable. I think a lot of people imagine that it would be exhausting, but mentally you’re prepared to go uphill for an extended period of time, so it’s really more like hiking with a fun ski out. At this point, it’s not really about the downhill ski part for me. More experienced skiers are out there chasing fresh mountain powder, but since I’m learning, it’s less about that for me right now.

20230325_111359
Screenshot_20240207_162120_Gallery

Anyways, Brockton Point is a great place to learn, because like I said, the downhill part is scarier than the uphill, but since you’re just skiing in the resort, it’s no different than a normal ski run, it’s just free. You just have to plan to get a day pass and park in the snowshoe lot since you’re not purchasing a resort pass. We followed the snowshoe trail up the side of the road and then up the side of the slope to Brockton. From Brockton, you can drop back onto the resort runs. It took us about 90 minutes each time to get to the top, but I think Eddie could have down it faster without me. Eventually I’d like to try going further to Pump Peak, but I’m not quite there yet.

Touring seemed intimidating to me for a long time, but I’m thrilled to have finally taken the step to try it out. You just need to be cognizant that touring is generally a lot more dangerous than snowshoeing because skiers tend to prefer to be in steep terrain. Taking an Avalanche Safety Course is an absolute must if you’re getting into ski touring and I never go out without my beacon, shovel, probe, and helmet. Check out my winter safety post for more tips. I’m disappointed I didn’t get to go very much touring this year with the snow conditions, but looking forward to expanding this hobby in the years to come!

20231216_105224

Snowshoeing Brockton Point

Vancouver got a lot of snow through the Christmas holidays in 2021 and when I returned from my trip to Newfoundland I was excited to get up in the mountains and enjoy it! So the first weekend back in January we woke up super early to be at Mount Seymour when the gate opened at 7am. We’re not quite on the ball enough to get there right on time, but we were able to get parking and hit the hill around sunrise.

PSX_20220118_191016

Our desired destination was Pump Peak, which is located past the top of the ski lift, about mid-way to Mount Seymour. I hiked up the ski lift towards Pump Peak once in the summer on my way to Elsay Lake and I snowshoed to Brockton Point the previous winter during my avalanche training course. But it was pouring rain and foggy on that occasion, so I didn’t remember too much about the trek. It’s about 7km out and back to Pump Peak and we were planning to have breakfast at the top.

PSX_20220111_201923

It’s a big of a slog to snowshoe up to Brockton Point, which is at the top of the ski lift. The snowshoe trail runs parallel to the ski run, but never connects. It’s a wide trail and it’s a pretty stead uphill trek, but boy is it beautiful! The weather blessed us on our visit and it was a gorgeous blue sky day with several inches of fresh powder from the day before. Once you get up to Brockton Point, there are beautiful views in all directions and you can see both out to the backcountry and down to Vancouver.

PSX_20220117_221628

If you’re looking for an easier day, I recommend just stopping at Brockton Point, which is about 4-4.5km round trip from the parking lot and has awesome views. We continued on towards Pump Peak, which is easily visible from Brockton Point. The trail descends from Brockton to do a bit of a round about of Pump Peak to climb up from the the back. We started down towards it, but as we snowshoed, we checked the time and realized we might not have quite as much time as we needed. We weren’t really that slow, but we weren’t super fast either. We only had a day pass for the morning and Carolyn’s puppy Jasper was home alone, so we wanted to be back down to the car for noon.

20220109_093505

We could have pushed on to Pump Peak, but we would have had to turn around immediately upon getting there, so we decided to stop at another random viewpoint along the trail instead. We’d all brought our stoves to make breakfast and the views were gorgeous all along the ridge, so we didn’t mind missing out on the peak. Me and Seth made oatmeal, Carolyn and Steve made breakfast sandwiches, and Brandon outshined us all with mountaintop dim sum! It was a warm enough day with the sun shining down on us and we liked having a long relaxing break in the snow instead of rushing back.

DSC00141_1

A few words of advice if you’re visiting Seymour – there is now a year round permit system to access the mountain. People have a lot of mixed feelings about this and I think the system has definite pros and cons, but it seems like it’s here to stay, so make sure to get your pass before visiting the mountain. Seymour Resort staff are checking for permits at the base of the mountain, so you won’t get past the gate without a permit and you won’t get past the snowshoe parking lot without a ski pass. So be prepared for a bit of a walk up from the parking lot. I recommend going early because even with the new system, parking is still a bit of a gong show.

IMG-20220109-WA0011

A lot of people visit Seymour to hike Dog Mountain, which is an easier trail, but there are a lot of people recreating out to Pump Peak as well. The pass system has thinned out the trails, which is nice, but be prepared to encounter lots of snowshoers, skiers, and dogs. A lot of the trail is multi-use, but there are a few places where it branches and skiers will often take slightly different routes, so my advice as a snowshoer is to follow the trail markers.

20220109_091301

In addition, you are entering avalanche terrain if you choose to go all the way to Pump Peak. The trail along the ski resort is in simple terrain, so you’re probably mostly okay without avalanche equipment, but eventually you will reach a sign with the avalanche danger rating. I can’t remember exactly where it is, you do get to the ridge before you hit it, but I think it may be a little bit before Brockton Point. After this point, you are leaving simple terrain and entering challenging terrain, so make sure you are familiar with avalanche hazards and take the proper equipment with you. See my post on avalanche safety for more details.

DSC00146

But if you’re prepared, Brockton Point/Pump Peak make for a great snowshoe adventure! I still haven’t made it to Pump Peak, which is why I titled this point Brockton Point instead, but whenever I don’t finish a trail, I just say it was because I had to leave something to come back for! So one day I’ll be back to finish this trail for real!

PSX_20220118_204616