Cape Scott and North Coast Trail: Part I

Prior to the pandemic, my friends and I had already decided we were going to take a week off to do a road trip to the Rockies to hike Mount Assiniboine. I booked the sites back in early March and we were all set to go. Then Covid-19 happened and we weren’t sure what would become of the trip. BC Parks re-opened in June and we were thrilled that the trip would still be going ahead, until about 2 weeks before when BC Parks cancelled our reservation with no explanation. I suspect it was cancelled because they weren’t operating the park at full capacity, but we could never track down anyone to get an explanation and we were frustrated that they waited until mid June to cancel the reservation, meaning that we missed out on any opportunity to try and book something different because everything was booked up. So overall, really not impressed with BC Parks, but that seems to be the general consensus with their new booking system this year.

Anyways, we were determined to do something else instead and we landed on the North Coast Trail. Brandon had already done it once and was trying to convince me to do it again with him at the end of the summer, so we decided to move it up to replace our Assiniboine Trip. We managed to work out all the details and spent the first week of July hiking through Cape Scott Provincial Park.

HOP_3754

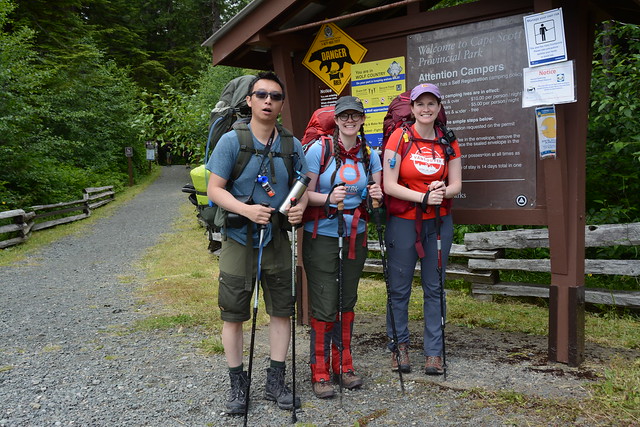
Cape Scott is a super well known and popular park, but the North Coast Trail is a relatively new addition that was added to the park in 2008. It was extended as an extension to the Cape Scott Trail and continues up along the entire North Coast of Vancouver Island. The two trail entrances are at San Josef Bay, which is the main entrance for Cape Scott and lies at the end of a 65km gravel road, and at Shushartie Bay, which is only accessible by water taxi from Port Hardy. Most people hiking the NCT start with the water taxi from Shushartie Bay and hike west, but in our case, the water taxi wasn’t re-opening until July 1 and we wanted to start hiking earlier then that, so we decided to do the trail backwards. There were some benefits to this in that the North Coast Trail is much harder than the Cape Scott Trail and so your pack is lighter by the time you reach the NCT, but overall I would definitely recommend you do it the traditional way. It gives you more time to enjoy the less crowded and more technical NCT. We didn’t realize just how slow we would be on the NCT and slightly underestimated how much time we would need to complete the trail, resulting in a pretty rushed final two days.

But let’s start from the beginning. My hiking companions on this trip would be Brandon, Emily, and Lien. Me and Brandon have done lots of backpacking together and he has done lots of multi-day trails, including the North Coast Trail. Likewise me and Emily have done lots of backpacking together, including the Juan de Fuca Trail, which was our reference trail for what to expect on the NCT. Lien was our rookie wildcard. We’ve done lots of day hiking together, but the North Coast Trail was a big jump for him and he was super stoked about it!

DSC05941

We spent a lot of time working on our kit list for the trail and me and Emily were determined to keep our pack weight down. I’ve never done a trail longer than 3 nights and this one was going to be 6 nights, so food was a major consideration. We planned to share dinners, but plan our own breakfasts and lunches. Oatmeal and instant mash potato are my go-to’s for breakfast because they’re already dried, so we spent a lot of time dehydrating food for our dinners, lunches, and snacks – I’ll include our meal plan below for anyone interested in what we brought on our 6 day trip. Food is really one of the most important considerations because it will be the heaviest thing in your pack. My food bag weighed in at about 11-12 lbs, resulting in a total pack weight of ~43lbs with water. This was a lot heavier then I wanted (was hoping to ring in around 36-38lbs), but we really only brought the bare minimum and after having completed the trip, there’s not a whole lot I would have changed. The only way I can figure to reduce my pack weight would be with a lighter tent and that costs a lot of money.

We had a packing party at my house before the trip and then took off bright and early on a saturday morning to catch the ferry to Nanaimo. It was the first weekend after the Phase 3 re-opening, so it was pretty bumping at the ferry terminal. We spent the boat ride napping in the cars and then hit the road for the 4 hour drive to Port Hardy. It went by relatively quickly and we met up with some of Brandon’s friends in Port Hardy for an early dinner. By the time we hit the road again, it was around 4:30pm, which left 90 mins for the drive to the trailhead and enough time to hike an hour in to San Josef Bay to camp for the first night.

It was an admirable plan, but unfortunately it was quickly derailed. The road to San Jo is all dirt and gravel. As far as gravel roads go, I didn’t think it was that bad and have definitely driven on a lot worse. But it seems that the road had recently been graded and the grader had not been back out to remove all the larger rocks from the road. About 30km in Brandon’s tire pressure dropped all of sudden and we got out to discover we had a very flat tire. We didn’t feel any bumps and didn’t seem to have hit a pothole, so all we can figure is a very sharp rock must have punctured the tire. It was a bad flat, but no problem for Brandon who lives for off-roading and has a full spare tire in his 4runner.

DSC05918

Over the past few years I’ve had quite a lot of bad luck with flat tires. Me and Carolyn went out to Sloquet hot spring one year and the guy we were driving with got a flat on the way back and didn’t have the lug nut key for his tires – so we ended up having to abandon the truck on the service road for a tow. I joked when we got out that Brandon better have the right lug nut key for his tires and he reassured me he wasn’t so fool-hardy. But wouldn’t you know, while Brandon’s a pro, his mechanic is not. He had the car serviced just before the trip and the mechanic had put a very slightly different version of Brandon’s lug nuts on the tires. They were the same shape, but Brandon’s key had a curved edge, while the lug nuts had a pointed edge. The key didn’t work and for the second time I found myself stranded on a forestry road with a flat tire that should have been an easy fix.

Brandon really beat himself up about it, though none of the rest of us found any fault with him since it should have been an easy fix. Fortunately another car drove by just as we were having this realization and we asked them to call a mechanic or a tow for us (there was no cell service on the road). They took some notes before offering to take one of us back to Port Hardy with them, which was very kind, especially during Covid, so I jumped in the back with them. They dropped me at Lien’s car, which we had left at the end point, and I got on the phone to BCAA immediately to try and find a solution. Ideally we just needed someone with the master set of lug nut keys, but it was 6pm on a saturday night in a tiny town, so our options were pretty limited. Almost everything was closed and it was an hour and a half before BCAA finally found a tow truck that was willing to come get the car the next morning. The only problem of course was that it was going to cost an arm and a leg to get a tow truck up the service road. Either way, the car wasn’t going anywhere that night, so I headed back up the road in Lien’s car to pick everyone up.

DSC05929

Just before this trip I invested in an InReach so that I could get emergency assistance on the trail if needed, and I have to say that as expensive as it was, it was worth every penny. I left the inreach with Emily when I went back to Port Hardy, so I was at least able to communicate with them while I was away. They ended up sitting on the service road for 4 hours before I finally returned, so I can only imagine how bored they all were. Apparently they tried flagging down every car that passed in an attempt to find a matching lug key! The ride back to them was the most intense part for me though because it was dusk and if I broke down, I really had no way to communicate with anyone. So I took my time and fortunately made it back to them without incident. There happened to be a rec site about 2 kms down the road, so we ended up just crashing there for the night since there wasn’t anything else we could do for Brandon’s car.

The next morning we got up early and went straight back to Port Hardy. Everything was still listed as closed until Monday, but we decided to try our chances. The tow truck said it could go out later that morning, but in the meantime we called around to any mechanic we could find. Eventually one mechanic told us to drive over to the OK Tire, which has an emergency number listed on the door. We had gathered OK Tire was our best bet at getting the tire off, but they weren’t open until Tuesday, so our original plan had been to get it towed to the OK Tire and leave it there and drive Lien’s car out. Fortunately, the emergency line came through and the nicest mechanic came and met us to save our asses. He found a bunch of similar keys and then drove back out to the car with Brandon where they finally got the nuts off and replaced the tire. In the meantime, the rest of us chilled in Port Hardy and spent some time soaking in the sun along the waterfront. It wasn’t quite what we pictured for our first day, but the weather was gorgeous, so we made the best of it.

IMG_0330

Brandon made it back in no time and by noon, he had a full spare tire replaced and we were back on the road to San Jo. This time we made it the full hour and a half without incident. The trailhead was absolutely hopping when we finally rolled in. There were a ton of people day tripping to San Josef Bay, as well as a bunch of people backpacking to Cape Scott. There were a few people doing the whole NCT like us, but they were few and far between and we didn’t meet any of them until later in the trip. The way the trail is, there’s a 2km off-shoot to San Jo Bay. We were sad to have to skip it, but we planned to stay there at the end when we returned for Brandon’s car. We had a quick lunch in the parking lot and then started the trail around 2pm, skiping San Jo and heading up towards Cape Scott.

Had we starting hiking in the morning, we probably would have been aiming to make it to Nel’s Bight, a super popular beach about 17km in. Brandon was still super optimistic we could make it to Nel’s Bight, but me and Emily were a little more realistic. The mud started almost as soon as we started hiking (as expected), but otherwise the trail wasn’t too bad. It was a little technical, but there was limited elevation gain and we made a pretty good pace along the trail. The first campsite is Eric Lake at 3km. We had lots of jokes about Eric Lake because Lien had tried to hike to Cape Scott about 10 years ago and had never made it past Eric Lake because his party was so unprepared. So we kept joking that we were going to leave him there and that he was the reason we’d never made it to San Jo Bay, because he was cursed.

DSC05962

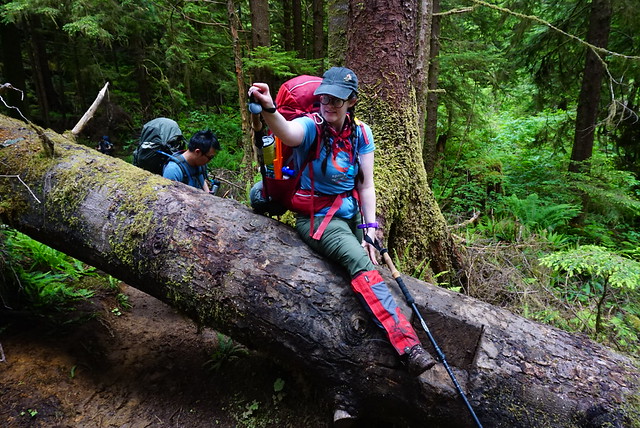
Eric Lake sounds like a nice place, but there was really no lake access and the whole campsite was in the trees and very buggy. I was glad we weren’t staying there and we continued on. Eventually we rolled into Fisherman River around 6pm. The whole first part of the trail is straight north and inland towards the coast. So we didn’t see any coastline on our first day. I’m not sure if Fisherman River is an official campsite, it has an outhouse and bear cache, but only has 2 tent pads. We were about 9km in (of the desired 17km) and we all knew it was unrealistic to try and go any further, so we were thrilled to find both tent pads empty. There’s really not much room to camp outside of the tent pads and we were concerned about there being room for us. 2 other groups did show up afterwards and managed to squeeze in along the river and on the side of the bushes. It wasn’t a beautiful beach, but we had an enjoyable evening cooking along the river. Brandon made his infamous thai chicken curry and we had a lazy evening recovering from the first day.

I think that’s enough for one blog post, more to come in Part II!


Maria’s Meal Plan

.             Breakfast                            Lunch                                      Supper
Day 1     Potato and bacon bits       Egg salad wrap                       Brandon’s thai chicken curry
Day 2     Oatmeal and trail mix        Egg salad wrap                       Lien’s dehydrated chili
Day 3     Potato and bacon bits       Salami and cheese wrap         Emily’s dehydrated veggie pasta
Day 4     Oatmeal and trail mix        Salami and cheese wrap         Maria’s dehydrated chickpea curry
Day 5     Potato and bacon bits       Salami and cheese wrap         Emily’s thai PB pasta and Brandon’s Paella
Day 6     Oatmeal and trail mix        PB and jam wrap

Snacks: Fig bars, kind bars, apple chips, banana chips, energy bites, fruit leather, granola, trail mix, chocolate

IMG_0347

Advertisement

Semaphore Lakes Backpacking Trip

I already wrote about my one night backpacking trip to Tenquille Lake, but I also did one night at Semaphore Lakes in the same trip. I decided to split up the trip into 2 blogs though because the two trails are not actually related and writing about them together would make for one really long post. We visited Tenquille Lake and Semaphore Lakes on the Canada Day long weekend in 2016. In hindsight, we easily could have spent 2 days exploring around Tenquille Lake, but instead we hiked out from Tenquille on the second day and did Semaphore for the second night.

The reason we picked Semaphore Lakes for the second night is that it’s super close to the Tenquille Lake trailhead. Instead of having to drive on the 4WD Branch 12 road though, it’s located just off the Hurley Forest Service Road, shortly past where the Branch 12 side road is (see my Tenquille Lake blog for more detailed directions). So you can get to this trailhead with 2WD.

Semaphore Lakes is a much shorter trail, it’s about 5km round trip to the lakes and back, but don’t be deceived because there is still 300 metres in elevation gain in the short 2.5km, so it does make for a pretty steep hike up to the top. With our packs, it probably took us about an hour and a half to reach. We had a bit of a late start hiking in to Semaphore because we had a personal issue come up that required us to drive back to Pemberton between the two trails. Then when we finally got back to the Semaphore Lakes trailhead in the late afternoon (and had all our packs on ready to go), Brandon realized he left his REALLY NICE Nikon DSLR camera on the side of the road at the Tenquille Lake trailhead when we were packing up the car. So we had to drive back up and down the 4WD access road, but fortunately his camera was still sitting there patiently waiting for us!

So I think it was after 5pm by the time we finally started hiking in to Semaphore and it started to rain on us in the last half hour. In my early backpacking days I had a bit of a “rain” phobia because I was terrified of my clothes and sleeping bag getting wet and being stuck freezing cold in the mountains. Actually, this is totally a valid fear and one I go to great lengths to protect myself from. I actually carried an umbrella with me on the entire 50km Juan de Fuca trail because I was afraid of the rain getting my clothes wet on the first day of our 4 day hike. I’ve since chilled out because I’ve acquired some better gear to protect me against these scenarios, but I remember when it started raining on the way to Semaphore I pretty much ran the last 20 mins to the lakes because I was terrified that our tent would get wet because Seth had failed to purchase himself a backpack cover. He thought a garbage bag on top of his pack would work fine – spoiler alert: it didn’t.

Anyways, in retrospect, the rain was a bit of a joke. It was really just sun showers and not a proper downpour, but when we got to the lakes we pretty much threw the tent up as fast as possible and chucked all our gear inside. Me and Seth were still using my parents ancient tent at this point, which is a tee-pee style tent and not very spacious, and I have this really funny memory of the two of us just sitting in the tent staring at each other waiting for the rain to stop because there wasn’t enough room to do anything else.

Brandon travels in style ALL the time, so he and Carolyn were next door happily setting up their mansion while we just stared at each other in angst – me because I was annoyed about the rain and Seth because he never really wanted any part of the trip to begin with. Eventually Carolyn and Brandon got their house all set up and invited us over for dinner, as if we had anything better to do LOL, and we climbed into their nice space and cooked supper poking out through the vestibule. This is like textbook ‘what-not-to-do’ because you don’t want your tent to smell like your dinner and attract bears. I want to say, “but we were rookies and didn’t know any better”, but we did know better, so I really have no excuse. I’ve since purchased a lightweight tarp for future trips, so problem solved next time.

Anyways, the rain did let loose after that. Fortunately we were all set up by that point, so none of our gear got wet, but it did result in a pretty early night. We failed to bring cards, so I ended up reading a bedtime story to everyone instead. I basically yelled at Carolyn and Brandon for 30 mins between the tents so that they could hear me over the sound of the rain, and those kweens just fell asleep on me in like the first 5 minutes, rude.

So our evening at Semaphore left a little to be desired after our awesome night and campfire at Tenquille, but I have no regrets because the rain moved on overnight and the clouds cleared out in the morning. So I woke to the sun shining on me and the most beautiful view of the lake through my tent door. I was afraid of the clouds rolling back in again, so I got up pretty early and me, Carolyn, and Brandon went for a little exploratory morning walk around the area. You could absolutely spend 2 nights at Semaphore Lakes as well because there’s so many other mountains nearby to explore during the day. Since it was only the first weekend in July and we were at a pretty high elevation, there was still a lot of snow around, so we just explored the immediate area, but it had some truly lovely views of the lakes and surrounding mountains.

One of the benefits to Semaphore Lakes was that it has a lot less people. Don’t get me wrong, there were still other campers, but there was a lot less than Tenquille and they were a lot more spread out, so it didn’t feel crowded at all. It also had significantly less mosquitoes than Tenquille Lake, so that was a blessed relief. The clouds did roll in again pretty quickly though, so we didn’t stay too long and packed up our gear after a quick breakfast.

Overall, it was a great foray into backcountry camping and though we had some challenges, they were not enough to deter me from wanting to try it again and I ended up doing 2 other backcountry trips that summer! I would definitely love to go back to both of these trails as a more experienced hiker and check out some of the other surrounding trails in the area.

5 Ways to Visit Lindeman Lake

Lindeman Lake is a short hike in Chilliwack Provincial Park, which has somehow ended up being one of the hikes I’ve done most often. It’s only a 3.5km trail round trip, but has 350 metres of elevation gain in under 2 km, making it a challenging hike, but not a long one. I’ve visited it twice as day hikes and twice as overnight hikes, where I explored several other trails in the area. I really think there’s something fun for everyone in this park, so without further ado, here are some of the different ways to visit Lindeman Lake and the surrounding trails!

Day hike to Lindeman Lake

Lindeman Lake is a great hike for beginners because like I said, it’s challenging, but it’s short. It’s a great early season hike because it’s at a low elevation, so the snow melts pretty fast, and you’ll get a great work-out on the hike to the top. It can get pretty busy (like most hikes), so I’d suggest getting to the parking lot early. The first time I visited, I was actually car camping in the provincial park, so this was a perfect easy day hike for us. One tip, the campsite area where the trail ends gets very little sun and while it provides a nice view, there are better lake views. If the water level is low enough, you can cross the logs at the river outlet to scramble over the rocks on the other side of the lake. But my recommendation would be to follow the trail at the lake edge back into the trees for another kilometre until you arrive at the far end of the lake. There’s a rock slide at the far end with lots of big rocks to eat your lunch on while admiring the view. In my opinion, this is the best view of the lake and it’s a great place to go swimming (which I’ve done twice… in May. It was really cold!)

Day Hike or Camp to Greendrop Lake

There is a great trail network in the Lindeman Lake area, so if you want to make it a longer day trip or turn it into a camping weekend, that is totally doable. If you continue past Lindeman Lake towards the back of the lake, the trail continues up a rock slide and through the trees until you reach Greendrop Lake. In total, Greendrop Lake is about a 11.5km round trip from the parking lot, or an 8km round trip from the Lindeman Lake campsite. There is wilderness camping at both Lindeman Lake and Greendrop Lake and both campsites have a pit toilet and a bear cache. Greendrop Lake can definitely be done in a single day, or if you’re looking to take your time and enjoy Lindeman Lake (like I was), it’s also great as an overnight trip. We camped two nights at Lindeman Lake and day hiked to Greendrop Lake on our second day.

Both campsites are first come, first serve. I’ve only ever camped there on the May long weekend and it’s always been busy, but we’ve always managed to get a spot. I expect it’s probably a little busier later in the summer though. I love the Lindeman Lake campsite because it’s such a short hike, so we brought up a ton of extra fun gear like hammocks and frisbees and those fancy inflatable couch things. Greendrop Lake is less busy than Lindeman, but I personally didn’t like that campsite. There’s not really a great view of Greendrop Lake and because it’s higher elevation than Lindeman Lake, it was a lot colder. Granted, I visited in May, which is really early, but there was still snow on the ground walking up to Greendrop at this time and the trail was a little more challenging to follow. Overall, I’d recommend camping at Lindeman or visiting as a day hike.

Day Hike or Camp to Flora Peak

The second time I camped at Lindeman Lake, we wanted to try a different trail, so we camped at Lindeman Lake and then day-hiked to Flora Peak. Logistically it doesn’t make the most sense because in order to go from the Lake up to Flora Peak, you actually have to backtrack back to the parking lot and take the right branching trail at the start of the trailhead. But we really wanted to camp at the lake, so we did it anyways, so ideally this probably works better as a day hike. Like I said, the trail goes in the opposite direction of the Lindeman Lake trail and is substantially more challenging than the Lindeman and Greendrop trails because of the significant elevation gain.

The Flora Peak trail is about 12km round trip from the parking lot, but has an elevation gain of ~1300 metres, which is significant! You will pretty much be climbing the entire time. There’s not much to see for the first half of the trail up until you reach a small viewpoint poking out through the trees. Continue for a little while after that and the trail will eventually spit you out on the ridge looking down over Chilliwack Lake. This was by far the highlight of the trail for me. The rest of the trail remains pretty open and you eventually start ascending Flora Peak in a loop before coming back to the ridge. Sadly for us, our trip ended on the ridge. Because it was May, there was still a fair bit of snow at the higher elevations. We used microspikes to get up to the ridge, but we decided not to ascend the peak because there were a lot of snow bridges and it would have been easy to fall through the melting snow. But it was worth it just getting to the ridge and we ate lunch with an amazing view of the lake.

Like I said, I did it as an overnight, but I do think it probably works better as a day hike. You can also snowshoe up to Flora Peak in the middle of winter. I would recommend spikes and snowshoes for this, but I haven’t tried it yet because the trail is unmarked in winter and there is avalanche risk, so I’m waiting until I complete the avalanche safety course. A great trail for summer though, just be prepared for a big climb!

Snowshoe to Lindeman Lake

So here’s the thing about snowshoeing to Lindeman Lake. Only do it if there’s been a lot of snow at lower elevations. It’s not very high and it doesn’t get a lot of snow, but it does get ice. If Vancouver has snow, I’d say its safe to grab your snowshoes and head up to the lake. In my case, there wasn’t much snow, but microspikes were definitely required. Me and my friends learned a big lesson on this trail. We showed up with snowshoes, but the trail didn’t have enough snow for it, so I was the only person with spikes, but we decided to go up anyways. We had a great time on the trail and made hot chocolate and had a picnic lunch at the top. But it’s definitely dangerous without spikes. My friend ended up falling about halfway down and broke her wrist. Fortunately she is a champ and we did have a first aid kit (ALWAYS take a first aid kit and your 10 essentials when going into the wilderness), so we were able to patch her up and help her down the mountain. We still had a lot of fun and have good memories of the trail, but definitely be prepared with the proper equipment.

As I mentioned in the trail above, you can also snowshoe up to Flora Peak in the winter, but again, be prepared. It’s unmarked, so bring a GPS and make sure you have avalanche appropriate training and gear and have checked the forecast.

Complete the Flora Lake Loop

This is the only one on the list I haven’t actually done, but if you’d like to knock out all the trails in one visit, this is the way to go. I’ve talked about two trails leaving from the parking lot, one which goes straight up to Lindeman and Greendrop Lakes and the second which branches off and goes up to Flora Peak. But the trails actually do form a 20km loop between all 3 points of interest, plus Flora Lake. 20km is doable in a day (I have a feeling it would make a great trail run), but it does have over 1000 metres in elevation gain, so I’d probably personally prefer to do it as an overnight trip. There are campsites at all 3 lakes, Greendrop is located at ~7km and Flora Lake at ~11km, so either would be an option if you were doing it as an overnight! Again, just keep in mind the season. I would wait until July to go if you want to make sure most of the snow is gone from the trail.