6 Simple Backcountry Lunches

As discussed in my last post, I’m a big fan of dehydrating! If I cook something that I think can be dehydrated, odds are I’ll try it in the dehydrator. But I didn’t always have a dehydrator and I recognize that it is a lot of time and money to get into dehydrating when there are lots of other options available. Fresh foods are inevitably a little bit heavier than cold soaking, but make alternatives for quick, easy lunches. Here’s some of my no-cook, no-dehydrate lunches that are ready-to-eat:

HOP_5937

1. Meat and cheese wrap

This is a classic. There are lots of meats that keep well in the backcountry and can be eaten un-refrigerated for a few days. I’ll usually buy a roll of salami and eat it over the course of 2-3 days. Likewise, there are several cheeses that can handle a few days without refrigeration. The best are babybel and laughing cow, but aged cheeses will often do okay for a few days, so sometimes I’ll bring an aged cheddar wrapped in wax to eat early in the trip. If I don’t mind eating it dry, I’ll bring some crackers in my mug, but most often I bring a tortilla wrap and a little hummus container (from costco or superstore). If it’s the first day, I might bring an avocado and a bit of bell pepper, in the photo above I even had cucumber!

2. Egg salad wrap

This one isn’t as long lasting as the meat and cheese wrap, but I still love it. I like to live on the edge, so I’ll hard-boil my eggs before a trip and eat them for the first two days. If you’re lazy, eggs on their own are filling and have lots of protein, but I’ll smash mine on a tortilla with some hard cheese for a wrap. I used to bring a little container of mayo, but more often than not these days I just eat it dry. A few sundried tomatoes can really add some flavour though, and don’t forget salt and pepper!

3. Chickpea wrap

This was one of my go-to recipes when I was first figuring out how to be vegetarian. It’s so simple, you mash up a can of chickpeas at home and throw in some mayo, lemon juice, and dill. You don’t want to whip or mix it because then it will just become hummus; I like to keep mine nice and chunky and will usually throw in some diced pepper and green onion for more substance. I recommend eating this one on the first day though. It keeps okay if it’s cool, but it does deteriorate pretty quickly on a hot day. Eat with tortilla and hard cheese.

4. Tuna wrap

I can’t lie, I’ve never actually made this one because I’m not a tuna lover, but it’s such a classic backcountry lunch that I wanted to include it anyways. Similar to all my other options, bring a small can or packet of tuna and slap in on a tortilla with some hard cheese.

5. Ramen Bomb

Another lunch I’ve never eaten myself, but is popular among the backpacking community is the Ramen Bomb. It basically consists of cold soaking a pack of ramen noodles with instant mash potatoes and your protein of choice (spam or tuna work well). All of these things are cheap to buy at the grocery store and can rehydrate with cold water (though I’d imagine it’s quicker and tastier with hot water). I can’t stomach spam or cold potatoes, so this one is a no from me, but lots of people love it!

6. Cheese and jerky

This is the real low budget option – just grab a handful of your favourite jerky or pepperoni sticks (Brandon favours the Korean BBQ pork from Costco) and your favourite cheese (moon cheese, whisps, babybel, or laughing cow) and make a meal out of it. As you can see, I rely heavily on tortilla wraps for my no-cook lunches, but there’s nothing wrong with loading up on snacks for lunch instead. Lots of people just eat protein bars and trail mix, but I like having a proper lunch, so these are the things I rely on.

DSC04703

6 Cold Soak Backcountry Lunches

Continuing my backcountry meal series, I want to talk about lunch. For the most part, I don’t need to bother with the dehydrator for breakfast, but I find it lightens my pack so much to use it on my lunches and suppers. I’ve developed a two-part post for both of these meals. This week I’m talking exclusively about lunches that require a dehydrator, but next week I’ll cover lunch ideas that don’t need one! If you’re new to dehydrating, see my introduction post.

Cold soaking is a bit of a new trend in backpacking, so for those who have never heard of it, it’s basically choosing meals that can be re-hydrated over the span of a few hours with just cold water, no cooking involved. While cold soaking requires the same amount of work as hot meals when it comes to the prep, the practice of cold soaking is something that has completely changed my backpacking experience.

PSX_20220628_140452

I’ve never done hot meals for lunch. I don’t like the extra time and fuel required to cook a meal in the middle of the day and hate being stuck with dirty dishes, so before I discovered cold soaking, I always brought ready to eat items for lunch. While this makes for an easy lunch, it’s a lot heavier to carry a salami stick for multiple days and food safety can get dicey when it’s hot.

Any dehydrated food can be made edible again by soaking it for a few hours in cold water, though many are not as tasty to eat cold as they are hot. By focusing on foods that are still yummy cold, you can add water to your sealable lunch container at breakfast and by lunchtime, all you have to do is take out your fork and start eating. All my cold soak lunches involve dehydrating, but are built around things I don’t mind eating cold. Here’s some of my favourites:

IMG-20200217-WA0012

1. Pasta and Soybean Salad

Lots of salads are meant to be eaten cold, so that’s a great place to start. I originally found this recipe in a Betty Crocker cookbook and made it regularly for BBQ’s. Turns out, if you leave the dressing off, it works great for cold soaking! I don’t have a specific recipe, but google any pasta salad that sounds good to you and leave off the dressing. In mine, I use macaroni and then add diced bell pepper, grated carrot, and diced tomato, but you could add any vegetable you like (avoid lettuce). Then I add chickpeas and edamame for protein. Once done, I pop the entire thing in the dehydrator for 8 hours and once I’ve re-hydrate it in the field, I add freeze dried cheese (such as whisps) and a little bit of salad dressing (zesty italian is my preference). It’s a bit annoying to carry the salad dressing, but the rest of the meal is so light.

2. Taco Salad

Taco Salad is a newer recipe for me, but I think it’s my favourite cold soak lunch to date. Most of my hiking companions are vegetarian or have dairy sensitivities, so all of my meals are vegetarian (and often vegan) except for this one (though you can easily sub soymeat!). Similar to the pasta salad, I don’t have a specific recipe, I just cook some ground beef (lean) in taco seasoning and add whatever I want to it. Usually that includes diced onion, tomato, and pepper, as well as salsa, corn, grated carrot and sometimes spinach. My only tips are to skip avocado (too fatty to dehydrate) and use grated carrot instead of diced as it re-hydrates much easier! Once satisfied, I pop the whole thing in my dehydrator for 8 hours and then after I re-hydrate it, I add crunched up tortilla chips. Carolyn actually brings full taco shells with her, but I like the chips because it doesn’t matter if they get smashed in your bag.

3. Peanut Butter Pasta Salad or Coleslaw

Since most of my recipes are vegetarian, finding a good source of protein is always important, as well as something that dehydrates well (if you’re new to dehydrating, avoid chicken). I started following HealthyGirlKitchen on instagram and she shares a lot of recipes for healthy salads and pastas. She shared a few that are made with a soy peanut butter dressing that translate great to the backcountry! A lot of dressings involve oil, which doesn’t dehydrate, so I decided to try out the PB dressing, and it dehydrates really well. I ended up making one PB pasta using macaroni, with soybean and chickpeas for protein, and then a coleslaw using a pre-shredded cabbage mix (make sure no lettuce). Both are a variation on this rainbow pasta recipe, where I add the veggies I like. The coleslaw isn’t as filling as the pasta, so you could also add some rice to it. Once you’re happy with the taste, throw the whole thing in the dehydrator for 8 hours! My only recommendation is that the peanut butter flavour isn’t as strong once dehydrated, so I also add some PB2 powder to the dried mix for extra flavour.

4. Mexican Rice

To be honest, this is pretty similar to my taco salad recipe, with rice instead of tortilla chips, but the end result seems different somehow. The key change is that I use black beans instead of ground beef, otherwise I use all the same veggies and a salsa or tomato sauce for the base. If you want to save some time dehydrating, you can just fry all the veggies to make the sauce and leave the rice out. Instant rice will re-hydrate with cold water, so it’s not necessary to cook it and then dehydrate it again, though this is my preference because then the rice imbibes the flavour better. Note that only instant rice can be rehydrated with cold water – normal rice will need to be cooked with hot water and can’t be used for cold soaking. Either way, dehydrate with or without cooked rice for 8 hours. I usually add whisps cheese to this one in the field. It’s also great heated for supper, but I don’t mind eating it cold for lunch.

5. Quinoa Salad

There are lots of quinoa and couscous salad recipes that also translate well to dehydrating. One that I’ve adapted is a Mediterranean salad – I use chickpeas for my protein and then add a bunch of veggies (bell pepper, tomato, red onion, tomato, carrot, olives, cucumber, etc). Here’s a recipe you can use as a base – again, most of these recipes call for olive oil, but this one has a lemon oregano base, so I add both of those ingredients to the salad and leave out the olive oil. It’s a bit drier than I’d like at home, but it hits the spot well enough in the backcountry, though it’s not a big deal to bring a small thing of oil if you really want it! Sometimes I’ll add a bit of maple syrup to give it some extra flavour, and take craisins and nuts/seeds with me to add to the final product (don’t dehydrate or soak the craisins and nuts, just add right before you eat).

6. Pasta Bolognese

This recipe is basically your classic tomato based spaghetti, but with a smaller pasta like macaroni or penne, which is easier to dehydrate. I like to use soymeat as the protein for this meal, but you could also use ground beef or beans. I fry up the soymeat with tomato sauce and add onion, pepper, and grated carrot. If you want to cold soak it, you have to also cook and dehydrate the pasta, but if you plan to eat it hot, you could just dehydrate the sauce and cook the pasta at camp. I like to add cheese whisps to this one for more flavour!

DSC07692

The Waterfalls of Strathcona Park

This has turned into quite the series about Strathcona Park, with my backpacking trips to Landslide Lake and Bedwell Bay being some of the highlights. But I want to spend a bit of time talking about waterfalls because there are so many to explore in the park and most of them are extremely easy to get to!

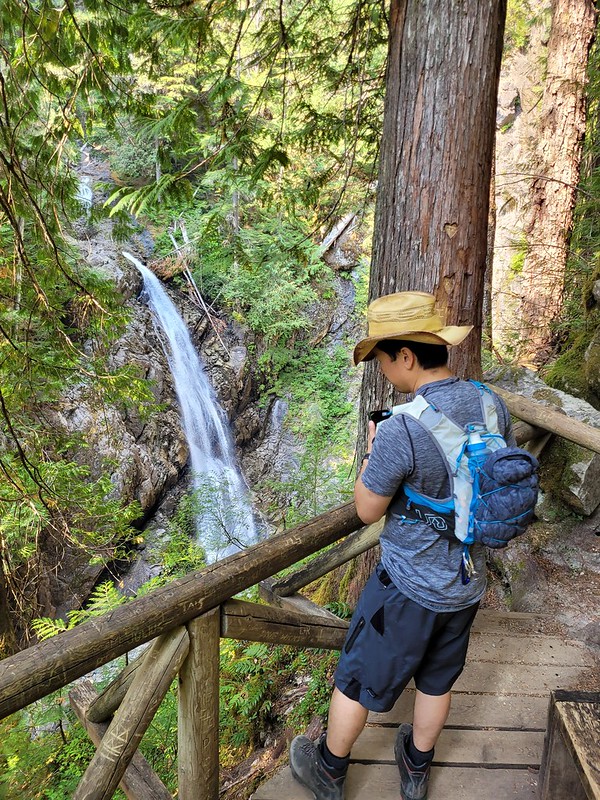
First up is Lady Falls. It’s located in the North end of the park along Highway 28 (as opposed to the road along Buttle Lake). If you’re going to Landslide Lake or Gold River, it’s a good stop along the way. There’s a small parking lot and it’s 500 metres each way (and 50m elevation gain) to get to the waterfall. There’s a platform from which to watch the falls thundering down into the ravine and you even catch some of the spray. Of the short waterfall hikes, Lady Falls is the easiest to get to and more impressive than Lupin Falls.

20220913_181407

If you’re heading down Western Mines Road to the south end of the park, make sure to stop at Lupin Falls on the way there. It wasn’t as impressive as Lady Falls when we visited, but that’s because it was early September and extremely dry – I suspect it has a much higher flow in the Spring. It’s flat and less than 1km as a round trip hike through the woods. The waterfall was more of a trickle when we visited, but there are some beautiful tall trees to enjoy along the way.

20220913_185252

Continuing on Western Mines Road, you’ll hit the parking lot for Lower Myra Falls at the south end of the lake, after the road for Bedwell Lakes. It’s a further drive than Lady Falls and Lupin Falls, but in my opinion, Lower Myra Falls is the best waterfall in the park (except for Della Falls). It starts with a steep hike down towards the lake, about 500 metres, but with 100m in elevation loss. There are two options for viewing – you can take the first left and see the upper falls and pool at the viewpoint – and then you can continue down to the middle falls where there’s another pool and you can explore around the rocks. You can walk along the edge of the falls as it cascades down towards the lake.

20220914_145612

Our first trip was in the early morning, so it was too cold to swim and we decided to come back later in the afternoon. On the second visit, we went for a dip in the middle pool before climbing down over the rocks to the lake – “climbing” being the key word. There are various paths cutting through the woods, but none of them are official, so we just found the least dangerous route down to the lake where there was a large sandbar. I’m not sure if the sandbar is there year round though (lake level was very low when we visited), so exercise caution around the rocks as it would be easy to slip and fall.

20220914_102344

We loved swimming in the lake. The waterfall pool was freezing cold, but the lake was a very balmy temperature and we enjoyed a proper swim before climbing back up to the parking lot. There’s a dam on the lake, so there are still all kinds of large tree stumps in the water from when they impounded the reservoir. It’s fun to swim out and stand on them, but be careful because they are slippery and have lots of sharp edges.

20220914_151637

Our last waterfall was Upper Myra Falls. At 8km round trip, this is the longest waterfall hike in the park (that we did). If I we’re to rank them all, I would put Upper Myra Falls below Lower Myra Falls and Lady Falls, but above Lupin Falls. It’s a very high, narrow waterfall that comes out through the trees and cascades down to the forest floor. There’s no accessible pool, but there is a platform from which you can view it. It took us about an hour to hike the 4km to the platform and we hung around for a half hour and had lunch before heading back again. There’s only about 80m of elevation gain along the whole trail, so it’s not very difficult.

20220914_125921

While it wasn’t my favourite waterfall, it still made for a nice little adventure. You have to drive through the active Westin Mine to get to the trailhead, which is an experience in itself, and the forest on the way to the falls is amazing! This trail is through old-growth forest, which is pretty rare in BC these days, so I enjoyed the tall, wide trees, and the chaos that makes up the undergrowth of an old growth forest.

And those are the waterfalls of Strathcona Park! There are more waterfalls that are accessible through other park entrances, the most notable of which is Della Falls and is only accessible by boat, but we only had time for the core area of the park on this trip. Overall I had a blast and would highly recommend this park, which is so large it feels more like a National Park!

20220914_104306