ECT Series: Piccos Ridge

Piccos Ridge is the most recent section I’ve done on the East Coast Trail. It runs from Portugal Cove to Bauline on the west side of the northern Avalon Peninsula. The trail has been around for many years, but it is one of the newer trails and the ECT association has been doing trail expansion on the northern side of Bauline Line recently as well.

At 14.5km, Piccos Ridge is one of the longer trail sections and it has a bit of a reputation of being one of the more challenging trails due to the steep uphill at both ends of the trail (and throughout). Emily hates this section and when I was out for dinner in July with my family, my cousin started bragging about how he had done Piccos Ridge and therefore could pretty much do any other trail. I was skeptical that Piccos Ridge was the pinnacle of Newfoundland’s challenging hikes, so I figured I’d bump it up my bucket list. I ended up having to make a surprise trip home again in September and decided to give the trail a try to see if it lived up to my cousin’s assessment.

DSC00702

I will admit, Piccos Ridge is harder than some of the other trails of similar length, such as Stiles Cove. I didn’t find it as challenging as some of the other sections I’ve done (the Spout kicked my ass), and I’ve definitely done more strenuous mountain climbs in BC, but I can definitely see where it gets its reputation. It is very steep climbing up the trail out of Bauline and there is a fair bit of undulation across the rest of the trail, so it feels like a lot of climbing throughout. I read a few reviews on AllTrails before going and they all strongly recommended starting the trail in Portugal Cove and going north because the last stretch into Bauline “was very difficult to even climb down it”. Friends, can I let you in on a secret? It is so much safer to go up steep sections than down. Also, I have bad knees and I prefer going up over going down, so I decided to buck the trend and start my hike in Bauline.

DSC00718

It took me about an hour to get from Bauline to the first lookout. That is the most strenuous part of the hike, so I was glad to get it over with early and it got much easier after that. I went on this hike solo and it was interesting because I hiked shortly after Hurricane Larry had passed through Newfoundland, so there was a lot of blowdown along the trail. I debated a few times if I was maybe getting myself into trouble climbing over the trees and would potentially get stuck somewhere further along the trail, but the first section was the worst and I didn’t encounter too much more downfall after that.

DSC00722

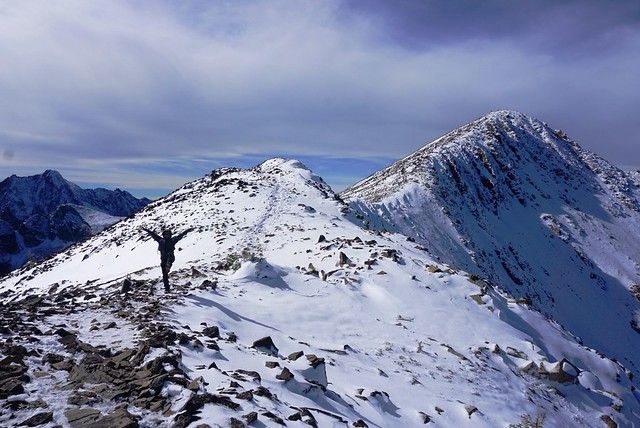
From the first lookout, you hike back down a little bit before ascending up to Piccos Ridge, which is the highest point along the trail. Even though it was getting later in September, I encountered quite a few berries in this section, particularly partridgeberries! You continue along the ridge for awhile before making a big decent through the trees towards several ponds. There is an unofficial campsite located at Brock’s Head Pond at about the 8.5km mark. I could only see room for 1 or 2 tents in the trees, but there is a bit more open space just past the pond at the river, which is the water source. There are no facilities.

DSC00738

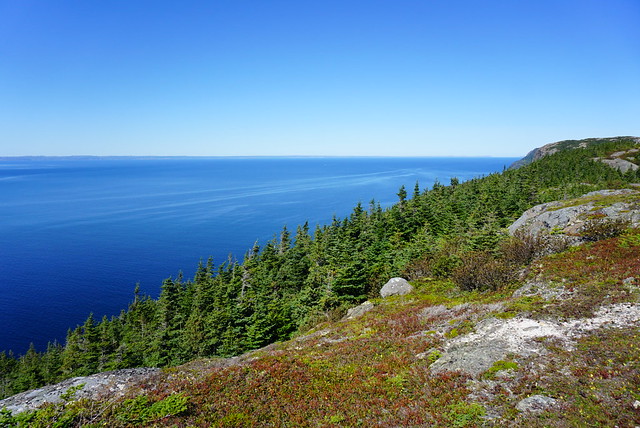
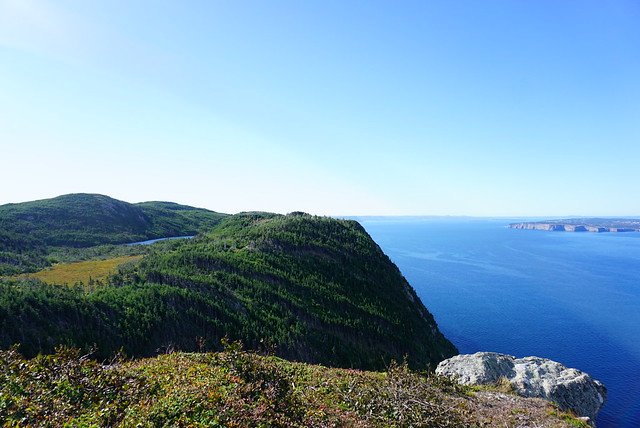
There’s one last uphill climb after the campsite, but then it’s smooth sailing after that! I think this was my favourite section of the hike because it’s all wide open and barren at the top. Piccos Ridge has a lot of different viewpoints, but large parts of the trail are in the trees, so I love hiking along the barren rock with the Atlantic stretched out alongside you. The view from this trail is into Conception Bay, so on a clear day you can see over to the other side of the peninsula and there are great views of Bell Island.

DSC00748

The rest of the trail is a steady downhill, so I can see how it’s a strenuous trail from either end, though the uphill is more gradual on the Portugal Cove side, which is why most people prefer that direction. Unfortunately I didn’t end up making it quite to the end of the trail. A few things came up and I decided to get off the trail a little early to try and make another appointment. Shortly after the 12km mark (so 2km before the trailhead in Portugal Cove), there’s a branch that exits off to Blast Hole Pond Road. The very top section of the road is gated, but then it’s gravel road which turns to asphalt. My knees were really bothering me, so I figured this would be an easier and quicker exit along the road, which was definitely the case. Mom was going to pick me up at the top, but I ended up powering it down the entire road before she got there. So overall I did the same distance, but skipped the last 2km to the official trailhead.

DSC00709

I would definitely go back sometime and hike up from the Portugal Cove side just to get the views. The highest view on that end is at 4km, but there’s views along most of the trail here, so you could hike as far as you want and then turn around for a shorter hike. In total it took me 5 hours, but I didn’t stop very much and I would recommend more time if you’re in a group or want to pick some berries. I did really like this section of the trail though considering Emily has been bad-mouthing it to me for years. There’s some ECT sections I wouldn’t want to do twice, but this definitely isn’t one of them!

DSC00754
Advertisement

Hiking Yellow Aster Butte

Last week I wrote about my trip to the Skyline Divide Trail in 2018, so I figured I’d continue on writing about some more of my adventures across the border in the Mount Baker Wilderness Area. The second hike I decided to explore in the North Cascades was Yellow Aster Butte. I have Stephen Hui’s book “105 Hikes in and Around Southwestern BC”, which features 3 hikes down in the cascades, so me and Lien decided to try and do them all. We were already down one with Skyline Divide and we thought that ‘Yellow Aster’ sounded promising for fall colours and decided to attempt it a year later in early October 2019.

DSC00607

It was just me and Lien on the hike, so we got up early to cross the border through Sumas and then followed the forestry road up off the main road to the trailhead. I don’t think they plow this road in the winter, so access to the hike would be limited by the road conditions. The trail profile is really similar to Skyline Divide in that both hikes are 13km long, but with 750m of elevation gain, Yellow Aster Butte is a little bit steeper.

DSC00643

The trail starts with lots of bright colours as you weave your way through some low shrubs and trees looking out towards Mount Baker. Honestly, the trailhead is probably the most colourful part of the entire trail because from there you head into the woods for a few kilometers to climb up to the alpine. On the East Coast, most of the fall colours come from the trees, but my experience on the west coast has been that most of the colours come from the shrubs. The low lying plants turn beautiful hues of orange, yellow, and red. The bottom of the trail was mostly oranges and yellows, but once we popped out into the alpine, there were a lot more reds along the trail.

DSC00663

Once you exit the woods, you continue climbing up around a big bowl to the butte. For those who aren’t familiar, a butte is an isolated hill with steep sides and a flat top. Personally I think yellow aster butte is a bit of a misnomer because it looks a lot more like a mountain to me than anything else, but I’m no expert. As you keep climbing, the views start to open up more and more. There were a few overripe blueberries hanging on along the trail and it looked like the area had recently received its first smattering of snow. It’s a bit of a barren area, but still very scenic.

IMG_4355

The trail is a little flatter as you circle around the edge of the bowl, but then it starts climbing again to the end of the trail, with a steep section up to the top of the butte. This part of the trail had snow on it when we visited, but it was the kind of snow that makes you really unsure about what kind of footwear to use. I think studs would have been ideal, but we only had microspikes, so we used those. They were clumping up a bit from the dirt underneath the snow, so we probably could have just struggled up without them, but why risk it when we carried the spikes all the way up there anyways!

DSC00698

From the top there are some pretty awesome views of the trail and we stopped to have lunch. Despite it being weeks earlier than when we’d hiked Skyline Divide the previous year, it was much colder and I bundled up in my winter parka, contrasting the shorts I’d been wearing the year before. It just goes to show you really have to be prepared for any weather, especially when hiking in shoulder season. While we felt like we were on top of the world, the trail actually continues another kilometer down the ridge and back up to another peak on the other side. Some people were crawling down the bank to finish the hike, but we decided it wasn’t worth the risk along slippery ground. The view from the first peak is absolutely incredible so we were already satisfied.

DSC00693

We took our time coming back down, stopping to snack on some berries and taking lots of pictures of the surrounding vista. We were in a bit of a goofy mood, which is one of my favourite ways to feel on a hike, so we took lots of funny pictures of us in our surroundings and generally had a good laugh on the way down. Despite the cold weather, it was still a really nice day and we resolved to come back the following week to do the Chain Lakes Trail!

DSC00715
IMG_4384
IMG_4381

Hiking Frosty Mountain

Disclaimer: I wrote this blog a year ago and hiked the trail on September 27, 2020. I delayed posting out of respect for hiker Jordan Naterer, who went missing on this trail on October 10, 2020 and whose remains were not found until July 2021. Manning Park can get snow early in the Fall, which can make the trail difficult to follow and be exacerbated by freezing temperatures and limited daylight hours. It can be a beautiful trail, but it is also a strenuous hike and an unforgiving environment, so please don’t underestimate it in your zeal to photograph the larches. Don’t go unprepared; take the essentials and leave a trip plan. Check out my blog post on Personal Safety for more info.


The Heather Trail is the most trafficked trail in Manning Park in the summer, but by fall, everyone flocks to Frosty Mountain. It’s hard to see Mount Frosty in most of the park as it’s hidden behind other mountains and can’t be seen from the highway. But if you drive up Blackwell Road and stop at the first viewpoint, you can get a great view of it. I’d heard some talk about Frosty Mountain when I first started hiking and though I was intrigued by it, decided Frosty was probably a little too challenging for me.

In 2018, I decided I was finally ready to give it a try and I hiked the longer route up past Windy Joe Mountain, day hiking up to Frosty Peak from the PCT campsite. Even in summer, this is a challenging and strenuous trail, but boy is it rewarding. So earlier this Fall, Brandon and I decided to hike up the other (more trafficked) half of the trail from Lightning Lakes to try and catch a glimpse of the larches turning yellow.

DSC08005

There’s so many different ways to explore Frosty Mountain. It’s located near the midpoint of a loop trail with campsites located on either side. One side of the loop trail is shorter than the other, so you can either hike 21.5km up and back from Lightning Lakes (what we did this year), or hike 27km as a loop (exiting on the Windy Joe trail). Alternatively, you can camp at one or both of the campsites, either day hiking up to the top (what I did on my first visit) or if you’re determined, hiking your big pack up over the top.

Like I said, our key interest in hiking Frosty on this occasion was to explore the larch meadow below the peak and snap some pictures of the needles turning from green to yellow. We were a little too early in the season to get the really gold hues, but we still got some truly beautiful views of the trees changing colour and had great weather for it. Plus with the fresh dusting of snow the yellow larches really popped! There were a lot of people around, but we were still a bit early in the season, so it never felt that crowded. If you’re a novice but want to see the larches, consider just hiking to the meadow and skipping the peak.

DSC08022

It rained the day before and was still foggy when we set out early on Sunday morning to drive the 2 hours out to Manning Park. With the shorter daylight hours, it’s essential to give yourself lots of time for this hike in the Fall. Me and Brandon left my house around 6:45am and were on the trail by 9am. We had the privilege of watching the sun rise from the highway and watched as it started to burn off the fog. There were still lots of low clouds hanging around when we got to Manning, but the sun was shining through and we were optimistic they would lift off by the time we reached the top.

DSC08133

Our plan had been to do the entire loop trail starting from Lightning Lakes. It’s a big climb, 1150m from the bottom to the top, but it’s spread over 11km, so I didn’t find it too bad. It’s steeper for the first 6km, but it levels off before you reach Frosty Creek Campsite. When I visited before, I camped at the PCT campsite on the other side. Both are located in the trees and have really small creeks as water sources, so I’d recommend bringing a water filter with you for both, but overall I’d give the edge to the Frosty Creek Campsite. It’s a bit more spacious. There’s two viewpoints before you hit the campsite; the first looks down towards lightning lakes and out to Hozameen Mountain, while the other is the first glimpse of Frosty through the trees. At the time we passed it, it was super cloudy at the top and there was a fresh layer of snow sitting on the peak. It looked super foreboding, as if it was the middle of a storm, but fortunately it cleared up in no time.

We continued along the trail until we finally hit the larch trees! Like I said, they weren’t quite at their peak, some were full yellow, others lighter green changing to yellow, but still very gorgeous. The trail exits the woods into the meadow and has the most beautiful view of snowy Mount Frosty peaking out behind the yellow needles of the larch trees. I’d been getting targeted adds on facebook for a few weeks before with this gorgeous picture of the larch meadows, with the mountain covered in snow behind them. It’s a beautiful picture and a rare time when what I saw before me looked exactly like what had been advertised in the photo! Except of course more unreal because I was there to experience it with my own eyes.

DSC08127

The trail winds through the meadows and then you pop out on the ridge, with a steep climb ahead to the trail junction for the loop trail, and then a final ascent along the ridge to the summit of Frosty Mountain. It’s very steep, but not that long to the junction. The problem in this instance was the snow. There was only a couple of centimetres of snow on the trail, but it had become very packed down and icy. It was perfect conditions for microspikes and I was kicking myself for not having them. I carry my microspikes all winter and spring and rarely get the opportunity to use them, but of course, the one time I really would have benefitted from them, I didn’t have them with me. It was still September and I hadn’t really thought there would be snow yet. So we slowly trudged our way up the slope, taking care with each step, arriving without incident.

DSC08086

The first milestone is reaching the junction sign. It’s really not obvious with the snow, but there is a trail going down the other side. There seemed to be a few people using it that were coming from the camp on the other side, but overall, most people seemed to be going up and back from Lightning Lakes. The second and final milestone is reached only by continuing across the ridge and climbing up to the final peak. It’s only about a kilometre (maybe a bit less), but both times I’ve found it annoying being so close to the top and still having to push to the end. The final ascent isn’t as steep as the climb up to the junction though, so it was easier in the snow.

DSC08039

The parking lot was packed when we arrived, but given the length of the trail it felt pretty empty as we were hiking. We passed one or two groups right at the beginning and got passed by a group of trail runners about halfway up. So by the time we got to the top, the peak was looking a little crowded. Fortunately, the trail runners didn’t stay too long and after a few minutes it was just us and 2 other guys at the top. It was REALLY cold and windy up there, so I don’t think people were sticking around for too long. The cold is definitely another thing to be prepared for; Manning is always chilly – it was about 3 degrees when we started hiking and was only supposed to go up to 11 degrees (at the bottom).

DSC08048

We layered up and had only intended to stay at the very top for a short while, planning to eat our lunch a little further down where it was more sheltered, but the view is just so damn spectacular I couldn’t bring myself to leave! It was pretty overcast when we arrived, but the sun came out and cleared away a lot of the clouds while we were up there, resulting in me having to take all my pictures twice with the changing weather conditions. I ended up eating my lunch standing up and walking around because I didn’t want to climb down yet and it was too cold to sit still. We stayed up there for about a half an hour or more and when we’d had our fill, started to trek back down. It’s definitely worse going down without spikes, but it was manageable along the ridge.

PSFix_20200927_203732

I had to rethink our plan to do the whole loop trail though. I thought the whole thing was 22km, but we’d already done 11km and looking at the map in retrospect, it was clearly going to be longer going the other way down, 6km longer to be precise. I have bad knees and at 22km, this hike was already much longer than any other day hikes I’d done all year, so we decided to just head back the way we’d come. Fortunately I’d already done the other side, so I didn’t really feel like I was missing much.

Going down the steep section was definitely a lot harder than going up. I had brought gloves with me for the cold and they were invaluable climbing back down. I did a lot of the trail in a kind of crouching position so that I could reach down and grab the rocks to steady myself. But no question, microspikes would have made it a whole lot easier. Looking back now, I’m a little embarrassed to admit I did it without spikes; it’s really important to know your limits and turn back if you’re unprepared. It was probably a bad judgement call for me to keep going without spikes and I’m working on getting better at making these tough choices. In the past year I have passed on summiting several scrambles (Needle Peak and all the summits on the HSCT) out of abundance of caution, so I am getting better at it.

PSFix_20200928_221704

There were still a good number of people coming up when we were going down and the summit was starting to look pretty crowded again. The meadows were more or less empty as we made our way back through them and I had to take all my photos again, this time with blue sky in the background! Otherwise it was a pretty uneventful hike back. My knee was bothering me, so I wrapped it up about halfway down and we stopped at the campsite for a snack break. When we sat down at the campsite, 6 hours into our hike, I realized that was the first time I’d sat down all day. We hadn’t taken any breaks on the way up, other than to snap a few photos, and while we’d taken a hiking break at the top, it’d been too cold to sit down. So it felt good to take a little rest before knocking out the last 6km of the hike.

Overall the whole thing took us 8 hours, which I think is pretty impressive for a 22km hike with 1150m of elevation gain! It was cold, but I loved all the varying weather conditions we experienced on the trail and really think we couldn’t have picked a better day!

DSC08106