It’s been over 12 years since I moved to BC. There’s so much to explore in this province and every year has been filled with new adventures, which I’ve loved sharing on this blog. I like encouraging others to explore the many attractions BC has to offer, so for this post I’m partnering with intrip to share my list of 100 unique experiences in BC.
Intrip is a discovery app for all BC wanderers. It’s a map-based social media platform where every post is linked to a real place. It helps you to discover real local tips and experiences, easily explore what’s around you, and connect with your community to love where you live. Join me on the intrip app to rediscover beautiful British Columbia! Download the app on Google Play or Apple Store.
This list skews towards those living in the lower mainland, as that’s where I’ve spent the majority of my time, but I like to think there’s a little something in here for everyone. Happy adventures!
Unforgettable Adventures
- Ride the Sea to Sky gondola for unforgettable views of Howe Sound
- Cross the Fraser Canyon at it’s narrowest point at Hell’s Gate
- Bike from Sidney to Sooke along the Lochside and Galloping Goose trails
- Explore underground at the Upana Caves near Gold River
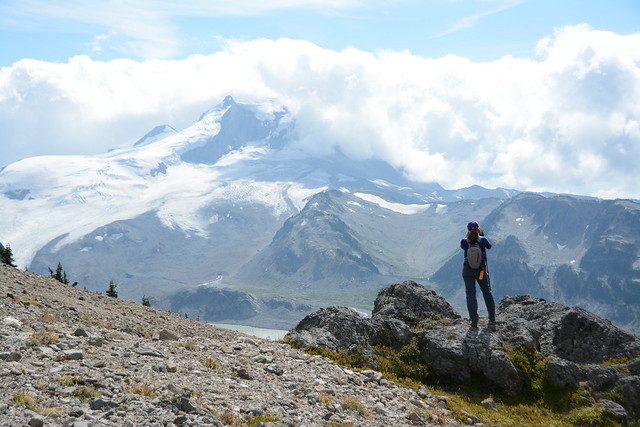
- Hike Frosty Mountain in the Fall to see the larch trees turn yellow (pictured)
- Embrace “Ski to Sea” and end your ski day with a trip to the beach
- Reminisce about the Beachcombers TV show at Molly’s Reach in Gibsons

Classic City Experiences
- Climb the Grouse Grind and visit the resident grizzly bears
- Walk across the suspension bridge at Lynn Canyon or Capilano
- Bike along the seawall and stop to see the totem poles in Stanley Park
- Take the ferry to Bowen Island for a classic day trip
- Play beach volleyball or let it all hang out at Wreck Beach
- Ride the mountain coaster on Cypress Mountain
Natural Phenomenons
- Soak in a natural hot spring in the Kootenays
- Photograph the stars in E.C. Manning Park
- Dive for microbialities at Pavilion Lake in Marble Canyon Park
- Stay up late to look for bioluminescence in Sechelt Inlet
- Travel millions of years into the past with a guided fossil walk in the Burgess Shale (pictured)
- Watch thrill seekers paddling the waves at the Skookumchuck Narrows
- Drive north and look for the Northern Lights

Delicious Eats
- Indulge in all you can eat sushi, Hot Pot or Korean BBQ
- Join the throngs of people enjoying Sunday brunch at Jam or Fable
- Grab a sandwich and coffee from Blue Moose Café in Hope before heading off on a day hike
- Split tapas with friends at Nuba or Nightingale restaurants
- Sample local venison and bannock at Kekuli Café in Merritt
- Try delicious vegetarian food at Meet
- Enjoy brunch by the river at Fergies Café in Squamish
Camping Adventures
- Take your family frontcountry camping at Golden Ears, Porteau Cove, or Alice Lake
- Plan a coastal hike along one of Vancouver Islands iconic routes, like the West Coast Trail or Juan de Fuca Trail
- Experience hut-to-hut hiking on the Sunshine Coast Trail (pictured)
- Camp at one of thousands of free Rec Sites around the province
- Go back in time hiking a Heritage Trail like Tikwalus or the HBC Trail
- Wild camp in grizzly country in South Chilcotin Park

Entertainment
- See a broadway musical at the Queen Elizabeth II Theatre
- Line dance with friends at The Yale Saloon in Yaletown
- Try roller skating at the Roller Skate Club at the PNE
- Enjoy live music at The Vogue, The Orpheum, or the Commodore Ballroom
- Take a guided Ghost Tour in New Westminster
- Support community theatre on Granville Island
Wildlife Encounters
- Look for owls at Boundary Bay or Eagles at Brackendale
- Celebrate the annual salmon run with First Nations at Adams River
- Search for moose on the Bowron Canoe Circuit (pictured)
- Feed the birds at Reifel Bird Sanctuary in Delta
- Make friends with the Goats on the Roof in Coombs
- Spend a day horseback riding in Pemberton

Stay Hydrated
- Stop for a cold beer after your hike at Backcountry Brewing or A-Frame in Squamish
- Sip tea at BC’s oldest tea merchant, Murchies, in downtown Victoria
- Visit Brewers Row in Port Moody along a beer crawl
- Go on a winery tour around the Okanagan
- Drink beer from all over the province at Craft Beer Market and Brewhall
Summer Exploring
- Explore a classic hiking trail in Garibaldi Provincial Park (pictured)
- Photograph the sea stacks at San Josef Bay, the most beautiful beach in the world
- Swim with bergy bits at Berg Lake in Whistler
- Enjoy Honey’s Donuts after hiking to Quarry Rock in Deep Cove
- Count how many waterfalls you can see in Wells Gray Park
- Cool down on a hot day at the Sooke Potholes
Opportunities to Learn
- Go on a historic walking tour around Chinatown and the Inner Harbour in Victoria
- Relive the gold rush era in Historic Barkerville town
- Watch a documentary at Science World’s IMAX theatre
- Learn about BC’s history at the Royal BC Museum in Victoria
- Appreciate indigenous art at the Bill Reid Gallery in Vancouver
Water Based Activities
- Snorkel the warmest water in BC in Copeland Islands or Desolation Sound (pictured)
- Spend a week house boating on Shuswap Lake
- Relax along the lazy river in Penticton
- Attempt the inflatable obstacle course on Harrison Lake
- Surf the waves with Surf Sisters Surf School in Tofino
- Look for the mythical Ogopogo at Okanagan Lake
- Embrace your wild side at the Cultus Lake Water Park

Sweet Treats
- Cool down with homemade ice cream at Earnest in North Vancouver
- Satisfy your sweet tooth with a gourmet doughnut from Doughnut Love in Coquitlam
- Find your favourite bubble tea shop with options all over the lower mainland
- Celebrate with High Tea at 8 Corners Tea Room or Neverland Tea Salon
- Walk along the inlet in Port Moody with an ice cream cone from Rocky Point
- Get a frozen yogurt made with fresh fruit from Alice + Brohm in Squamish
The Rocky Mountains
- Ride the Rocky Mountain Express train along the historical cross-province route
- Hike the Berg Lake Trail to the base of Mount Robson, the tallest mountain in the rockies
- Ski iconic resorts at Fernie, Kicking Horse, Red Mountain, and Revelstoke
- Try and score permits to visit Iconic Lake O’Hara and hike the Alpine Circuit in Yoho National Park
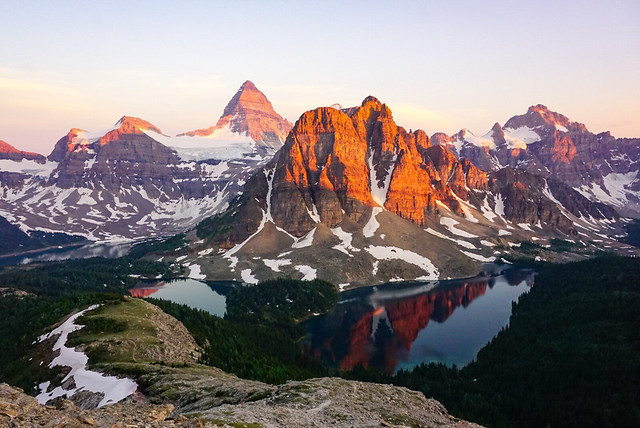
- Watch the sunset from The Nub in Mount Assiniboine Park (pictured)
- Do a classic thru-hike like the Rockwall Trail in Kootenay National Park
Shopping Extravaganza
- Browse for books at one of the many bookshops in Sidney or Victoria
- Pretend you’re in Europe at one of Metro Vancouver’s many Christmas Markets
- Check out the local Farmer’s Market on weekends
- Window shop along the streets of Fort Langley
Winter Fun
- Watch the sunset from the Sky Chair while Night skiing at Cypress Mountain
- Skate through the forest on a 1km skating loop at Apex Ski Resort
- Try ski touring or cross country skiing in the Callaghan Valley
- Snowshoe to a backcountry hut for the night at Elfin Lakes
- Test your mettle camping in the snow at Manning Park or Coquihalla Summit Rec Area (pictured)
- Ski or snowboard at Whistler–Blackcomb‘s world class ski resort
- Realize the benefits of the sauna and ice bath at Tality or Scandinave Spas

Sporting Events
- Cheer for the Vancouver Canucks NHL hockey team at Rogers Stadium
- Support the Vancouver Rise Women’s Soccer Team in Central Park
- Share a 3ft hot dog at Nat Bailey Stadium while cheering for the Vancouver Candians baseball team
Paddling
- Whitewater raft along the rushing Elaho River in Squamish
- Camp overnight at one of several marine access campground in selilwet (Indian Arm)
- Paddle Widgeon Creek and hike to Widgeon Falls
- Soak in the sunset from a SUP in Deep Cove
- Explore the coastline on a multi-day paddling trip to the Gulf Islands (pictured)
- Rent a canoe for the day at Alouette Lake in Golden Ears Park


